DIY Tutorials

Bridesmaid Proposal Wine Labels

This post contains affiliate links, meaning that if you click on a link I will recieve a small comission. This costs you nothing extra and I only promote products I use and love! You can read our full disclosure here

Bridesmaid Wine Label Pin.jpg

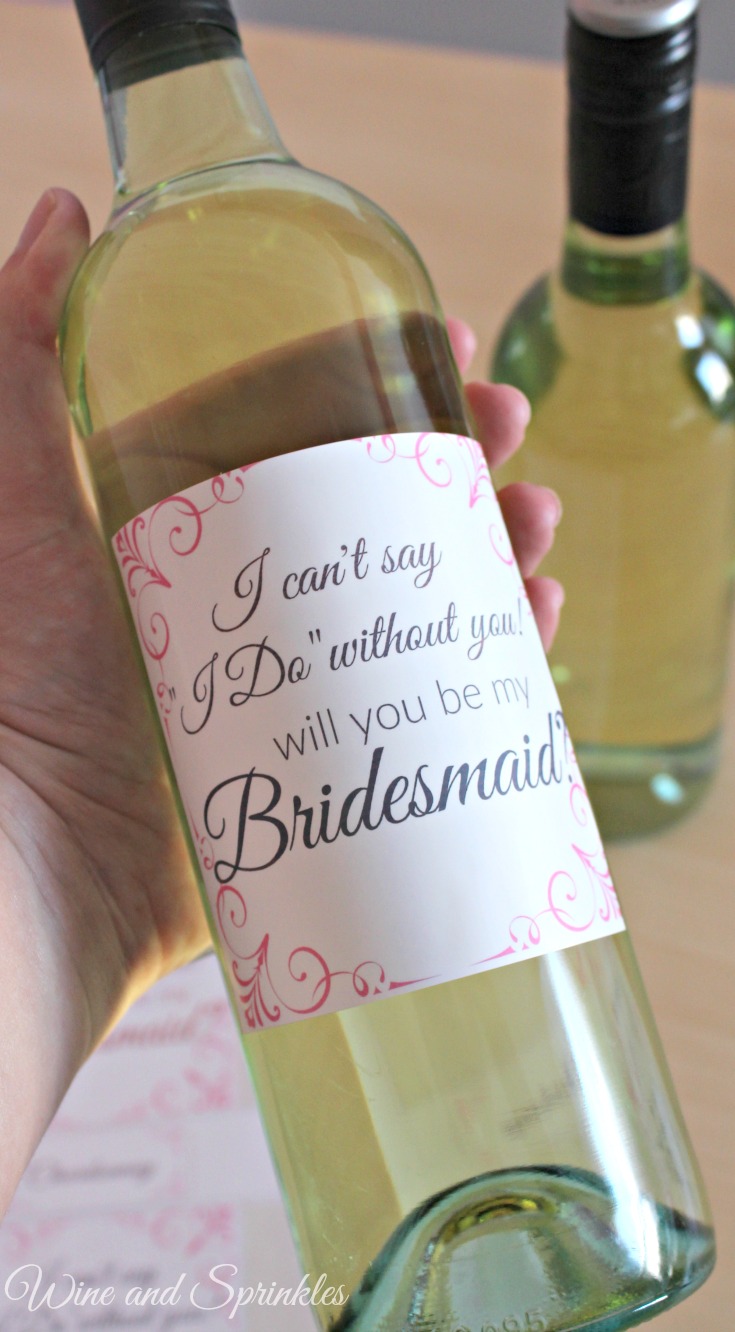
What Bridesmaids wouldn’t appreciate a bottle of wine to toast to the new wedding journey? I love the idea of giving a bottle of wine; it’s always appreciated and is not that expensive compared to the other bridesmaids invitation options out there. I must say I bought a bunch of swag for my maids to invite them, and while I don’t regret it in the least (they did A LOT of DIY) most people don’t want or need to drop a bunch of cash on their bridal party invitations.

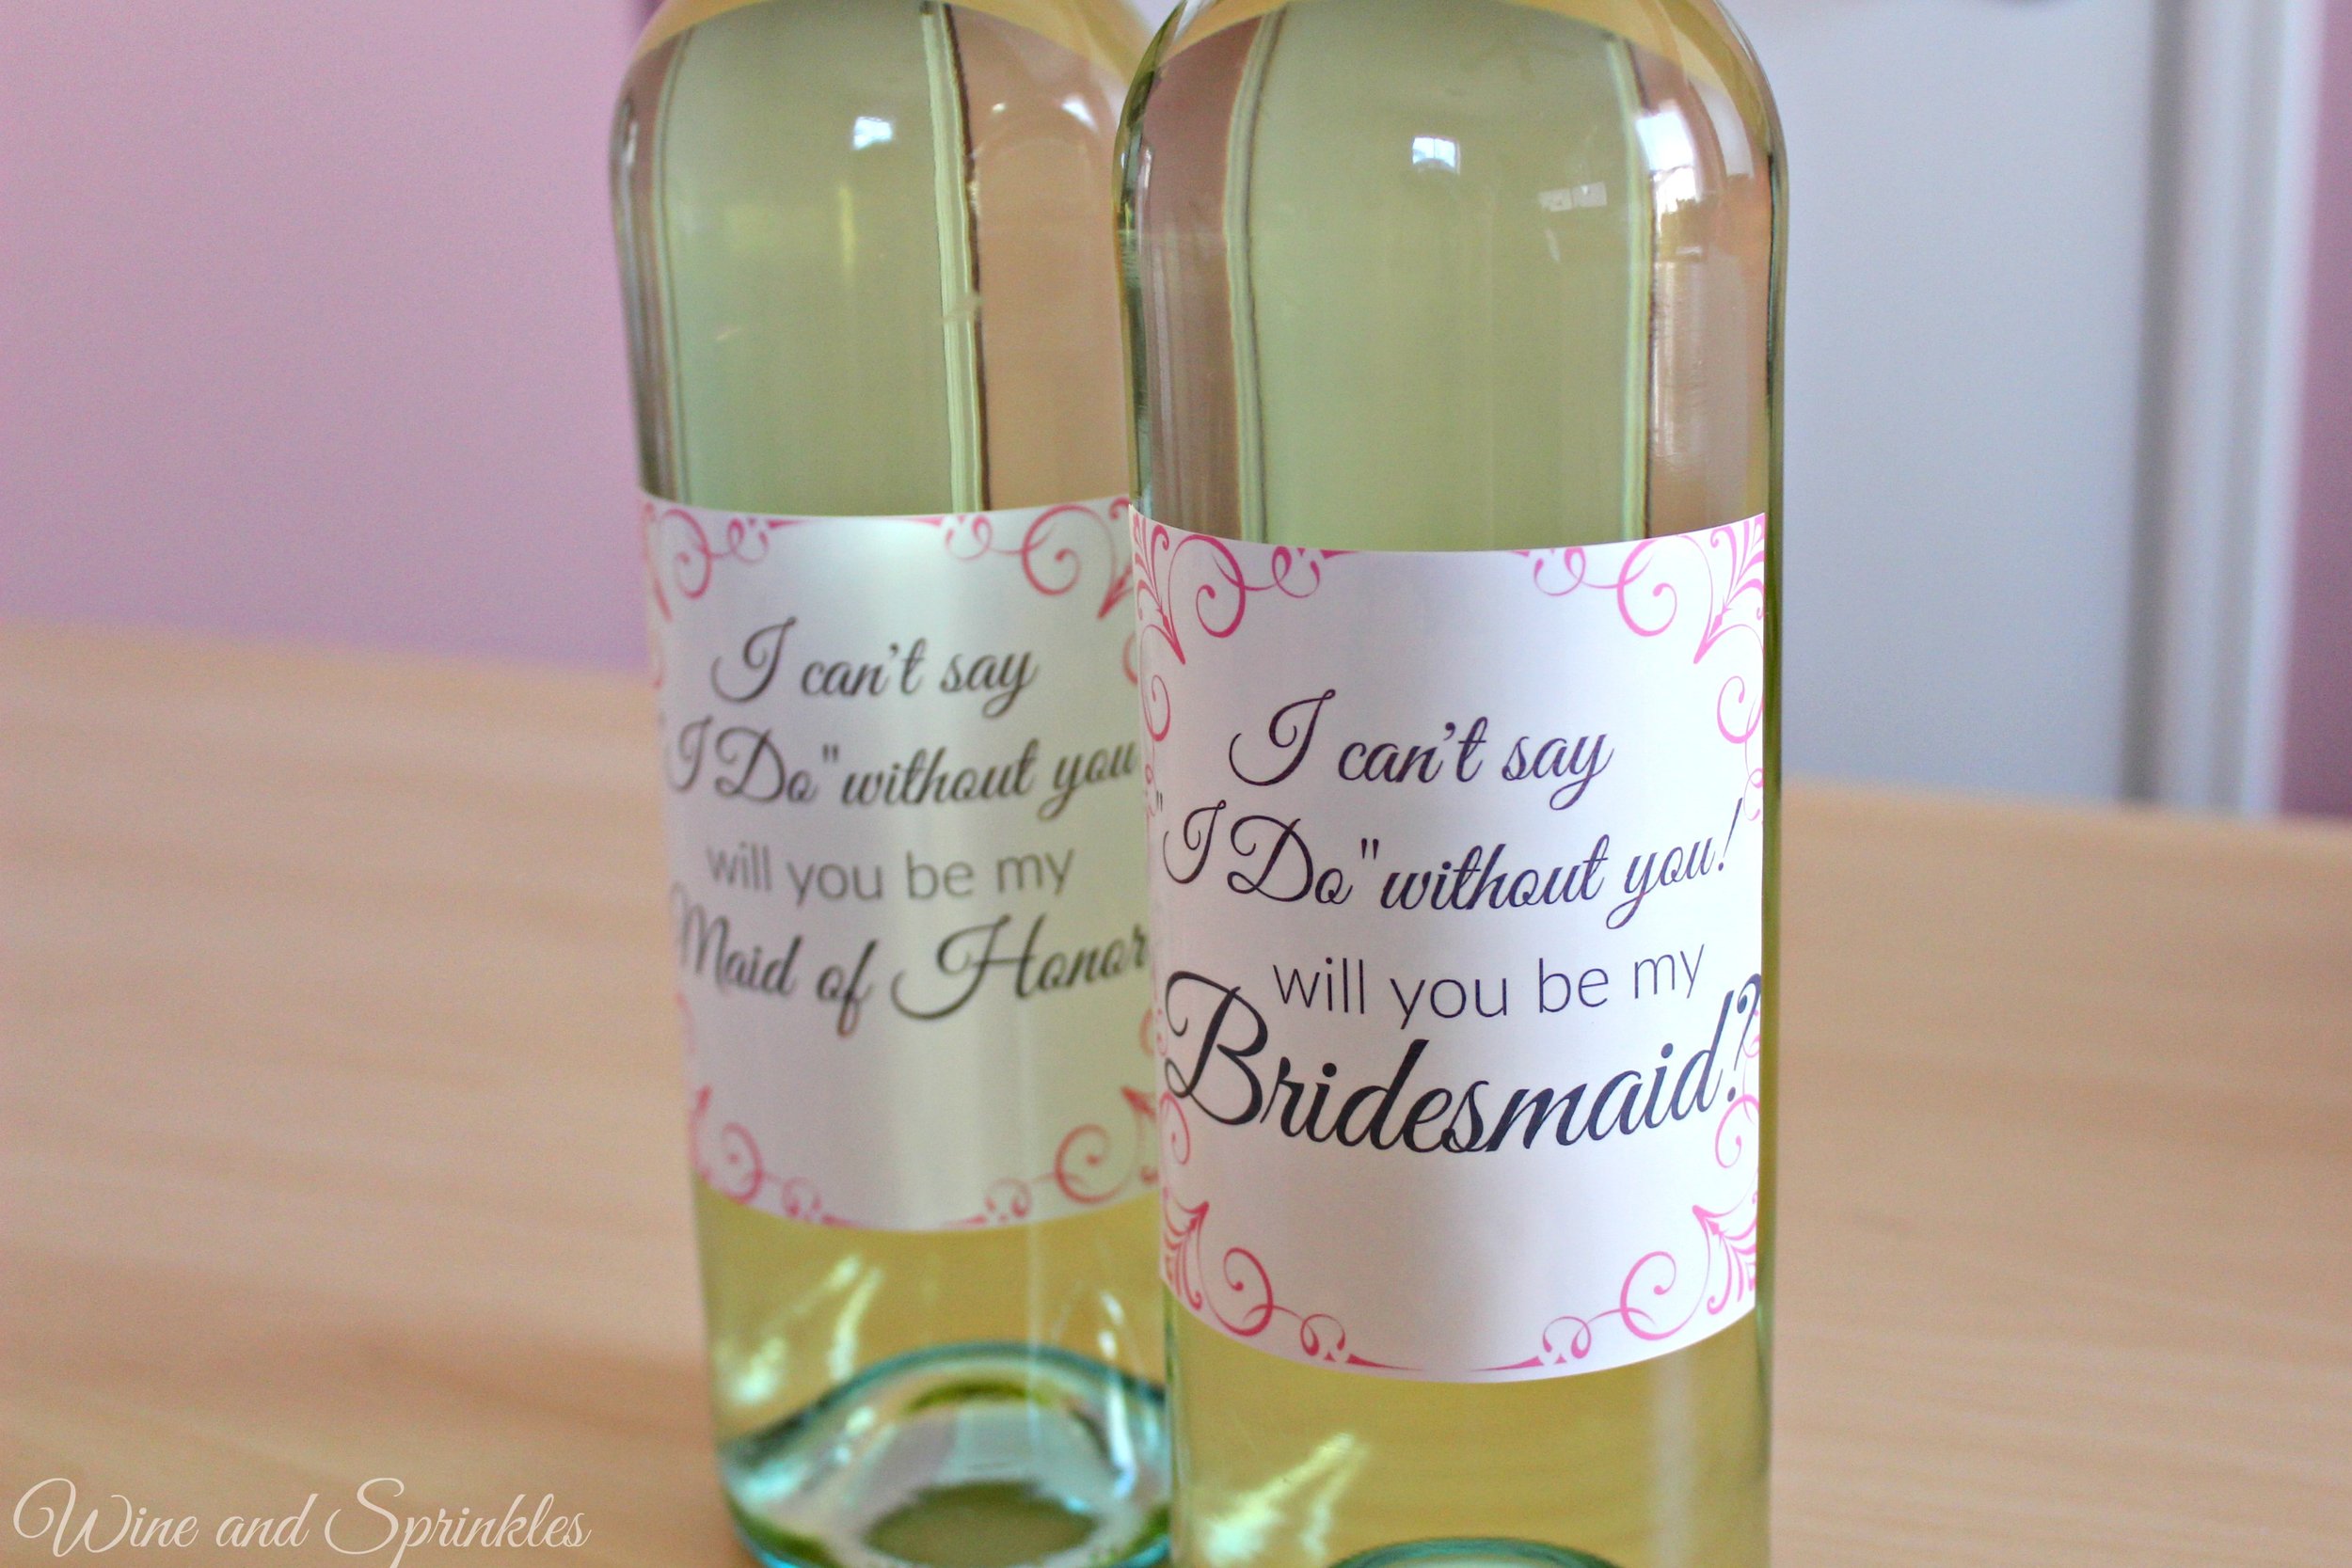
Making these Bridal Party Invitations is very straightforward and turned out so cute! I would recommend wines in clear bottles for the labels to show to their best advantage, but you can use them on most any wine bottle you like!

Finished Label Pin 2 with text.jpg

Supplies:
Wine Bottle Labels
Wine Label Printable
Wine of Choice

1.     Download the Printable and Print your labels. I have made them specifically for Chardonnay wine bottles but you can always use something else and not use the top strips. :)

Supplies with text.jpg

2.     Soak off the Label from your wine bottles with hot soapy water. Scrub any remaining residue off with a sponge and dry the outside of the bottles.

3.     Peel off the label and affix it to your cleaned bottle. I found the edge of the bottle and used the vertical line to line up my label so it would be level.

Labelling Collage.png
finished labels no gems.jpg

4. If using the Chardonnay labels, wrap them around the top where the foil meets the bottle.

Chardonnay Collage.png

5.     Optional: Glue on a few clear and pink gems to give your bottles some extra sparkle! I just used regualr tacky glue and some extra gems I had lying around from previous bachelorette parties. :)

This is a wonderful way to invite your maids and it really only costs as much as the wine and a set of labels. Want to design your own labels? The company that created these label sheets has an online design studio so you can always come up with a design all your own!

Vinyl Wall Quote Decorations

This post contains affiliate links, meaning that if you click on a link I will recieve a small comission. This costs you nothing extra and I only promote products I use and love! You can read our full disclosure here

One of my favorite things about planning DIY Parties and my Cricut is that it makes it so easy to make custom decorations for your theme that guests are always impressed by! Here we are starting with something simple, designing your own quote cutouts using your Cricut!

For the Beauty and the Beast Theme, I went with movie quotes that worked well with what I was designing, mainly the Tea Bar, Teacup and Tea Favors, Food, and Guestbook.

For this project I would highly recommend getting a larger 12” x 24” mat, it makes it so much easier to design and cut your quotes!

Supplies:
Black Adhesive Vinyl Roll
Craft Cutter and Tool Set
Adhesive Mat
 

1.     To start, you need to make your text into a picture. I have done some text cuts in the Cricut software but it doesn’t work as well for the cursive style texts as well. When I need to make such pictures, I use PicMonkey. You can use the free version for this font with no issues! Go to picmonkey.com and select the Design Tab on the Top. Don’t pick any of the suboptions and it should take you to a blank square to start.

2.     For Canvas Color, select the “Transparent Canvas” Box and Apply.

3.     Now, resize the background to 2000 x 1000 pixels. Go to the Resize tab, uncheck the “Keep Proportions” Option, then enter your number and click Apply.

4.     Now you can insert the text of your choice! Select the Button the text button (Tt), Select the Font you want (I used Great Vibes for my text), then click add text

5.     A small text box will appear on your canvas. Type in whatever text you want, then using the text options or by manually dragging the box, change the size of the text to fit your background. You can also change colors and other text properties here but there is no need for this project.

6.     Save the design as a picture by selecting “Export” on the upper options bar, naming the file, then export to computer.

7.     Now, Import the Picture into the Cricut Software. Follow the tutorial for the Bride Tribe Tumblers if you need help importing the photo to the software.

8.     Size the Picture to be 11.5” tall. Confirm that the width is no longer that 23.5”. Cut out the image on removable vinyl with the large cutting mat.

9.     Remove all the excess vinyl from the image and cover with contact paper. Smooth the contact paper to adhere the design and remove any air bubbles.

10.    Stick to the wall! Clean the wall beforehand; then arrange where you want your design and smooth the contact paper onto the wall.

11.     Smooth out any air bubbles again and slowly remove the contact paper. My contact paper did a really good job of sticking to the design and not as good of a job unsticking it, so smooth the letters as you remove the contact paper to fully stick them to your wall.

As you can see, you can easily make any words you like in a myriad of fonts once you get the basics down! What quotes would you put on your wall? :)

D.I.Y. Loose Tea Favors

This post contains affiliate links, meaning that if you click on a link I will recieve a small comission. This costs you nothing extra and I only promote products I use and love! You can read our full disclosure here

DIY Loose Tea Tin Favors #diywedding #printables

As much as I love teacups and teacup candles as favors, in reality that is just too expensive for everyday shower favors. That’s where these lovely tea tins come in! For a Beauty and the Beast feel, I modified a free piece of rose clipart that reminded me of the stained glass window in the original movie.

DIY Loose Tea Tin Favors #diywedding #printables

1.     Fill the tea tins with the tea of your choice. It took around 3 Tbsp of tea per tin to fill it about 2/3 full.

2.     Print your labels. I always print a test page of the labels to make sure they line up with your label paper. My printer was a little bit testy about printing them perfectly on the lines but since the rose pattern overlaps the label anyway it didn’t really cause any issues for my labels. :)

3.     Lastly, place the label on the lid of the tin and you are done!

DIY Loose Tea Tin Favors #diywedding #printables

Yes this is literally the easiest tutorial ever, making it a great last minute favor your guests will love! I’m already thinking of other fun foods for these tins; mixed nuts, coffee, sprinkles? :) What food would you give away in these cute little tins?


SEE OUR RELATED POSTS HERE:

 
DIY Loose Tea Tin Favors #diywedding #printables

D.I.Y. Wood Wick Teacup Candles

This post contains affiliate links, meaning that if you click on a link I will recieve a small comission. This costs you nothing extra and I only promote products I use and love! You can read our full disclosure here

There is nothing that adds a fun vintage flair to a shower quite like these teacup candles. And they are so versatile! I will be using them for a Beauty and the Beast themed bridal shower, but they could just as easily be used for a tea party, Jane Austen Shower, or Mother’s Day Brunch!

Teacups Favor with text.jpg

For me, the wood wicks were a requirement on this batch, they just remind me so much of a fire in the hearth, and for a Beauty and the Beast Shower, it is the perfect touch since most of the story takes place in the winter where crackling fires are most welcome! In addition, the teacups are the perfect ode to my favorite characters, Mrs. Potts and Chip!

I have wanted to make these candles for a while but was always discouraged for one reason, finding the teacups! While you can find teacups at yard sales and estate sales, I could rarely find them and when I could, they were $10+ per cup! Luckily, I had the thought to check Etsy for teacups and I was not disappointed! :)

I was very impressed with the Etsy shop, The Acerage, which I purchased my teacups from. First, they were half the price I see at estate sales for the same cups due to what they term “minor damage.” So when I received them I was expecting some stains, chips, or even small cracks. Imagine my surprise when all the cups that came not only were in great condition (I could hardly find any chips), but they were in fact much better than the aforementioned teacups I paid double for at the estate sale! I have linked in the supplies the set I used, which are great to make a whole set of candles for shower favors. When someone orders them, the listing will disappear but as soon as they gather the next set they list it again.

If giving the teacups as a favor is not quite in your budget, use them as bridal shower prizes and only make a couple! I have been using them for the last couple showers I have gone to as prizes for games and they have been beloved by all!


Supplies:  

Mismatched Teacups and Saucers
Wooden Candle Wicks
Candle Wax*
Candle Pouring Pot
Powdered Candle Dye
Essential Oils for Scent

*I used leftover candle stubs, but the wax linked here will make about 20 -8oz teacup candles

1.  Melt wax on low heat in your pot. If, like me, you are using candle stubs, remove the wicks from the old candles once the wax is completely melted using either tongs or a fork.

2. For these candles, the full wax wick is far too long. Insert the wood wick into its metal stand and place in the cup. Cut the wicks at the top of the teacup with a pair of scissors, then remove the candle wax from heat and soak them in the wax for 10 minutes. Soaking these wicks is VERY IMPORTANT, they are not like the standard wicks that are already coated in wax and not soaking them will lead to the candles not staying lit.

3. Once wicks have been soaked, remove them with tongs or a fork. Once they are cool enough to handle (I was able to touch them immediately) insert them into the metal holder stands included and let dry.

4. Now, attach the wicks to the bottom of your teacups by dipping the metal holder into the melted wax, then position at the bottom of the jar. 

5. Let the wax cool for a couple more minutes, then add color and fragrance of your choice. The ones I have recommended are great for candles, bath bombs, soaps, and bath salts, so you can get a lot of use out of them! I made pastel pink, purple, and yellow candles that were scented as peppermint-lemon, lavender-lemon, and rosemary-lemon (I know you can't tell that I like lemon).

pouring candles.png

6. Pour cooled (but still liquid) wax into the teacups. Reserve about 25% of your wax to remelt and top off your candles if a divot is created in the middle due to the wax cooling. The cooler the wax is, the less of a divot will form. Some of mine with the cool wax needed no additional wax to fill in, while the ones where I started with hot wax needed a lot of extra to make them look nice!

7. Once candles are cooled and solidified, remelt the excess wax and fill in any divots that were caused during the first pour. Now you have a lovely set of candles for your home or favors for your next party!

These have been by far one of my favorite DIY projects I have done lately and a project I have wanted to do for a long time! Now I just need to find homes for all the teacups I can’t keep, time for a tea party! :)

Painted Wine & Martini Glass Candles

This post contains affiliate links, meaning that if you click on a link I will recieve a small comission. This costs you nothing extra and I only promote products I use and love! You can read our full disclosure here

I always love receiving those special painted wine glasses as gifts, but then I never end up using them! Either I want them all to match or I don’t want to deal with hand washing it every time I use it. Since I’ve been on a candle kick lately, I decided to turn them into candles! I made both Wine Glass Candles and Martini Glasses; both came out beautiful!

I used regular wicks on these candles but you could just as easily use the wood wicks as I previously did for my jar candles. Regardless of your choice of wick, this is a great way to use the extra unique glasses in your collection that or to turn into prizes for your next bridal shower or baby shower!

Supplies:

Wine or Martini Glasses
Candle Wax
Wicks
Candle Melting Pot
Essential Oils and Coloring (Optional)


1.     Melt down candle wax in pot over low heat. If, like me, you are using old candle stubs, remove the wicks from the wax when melted with a fork or tongs.

2.     Remove wax from heat. Let cool for 5-10 minutes; then stir in coloring and fragrance if desired. I used pink and purple for my glasses and a peppermint –lemon fragrance.

3.     Dip the end of your wick (the metal stand bit) into the wax then press it into the bottom of your glass. Wait for the wax to harden before pouring the candle. Note: I had no issues with the glasses and hot wax, but if you are worried about the wax being too hot, soak your glasses in hot water and dry them just prior to placing your wicks.

4.     Pour melted wax into the glasses. Reserve 25% of your wax to top off the candles as they cool. The cooler your wax prior to pouring, the less you will need to fix divots that form while cooling. Your wicks may not want to stand up straight when you pour the wax; I used a wooden stick placed on the top of the glass to balance the wick in the right position.

5.     Once the wax in the glass has hardened and cooled, re-melt the excess wax if needed and top off the candle to create a smooth top.

And there you have it, super easy prizes or as fun accessories to your house! What glasses or containers would you make candles out of?

Bride Tribe Tumblers

This post contains affiliate links, meaning that if you click on a link I will recieve a small comission. This costs you nothing extra and I only promote products I use and love! You can read our full disclosure here

If there is one thing I love making for Bridal Parties, it is Tumblers! They are so cute and so useful for getting ready gifts, bachelorette party favors, or even to ask your maids in the first place.

For these tumblers, I was looking for a free dream catcher file for a more unique “Bride Tribe” tumbler, but none of them were suiting my fancy. Then I found this amazing one on Etsy! For a couple bucks it was well worth the price! Better yet, its an SVG file which are super easy to import into the Cricut Craft Cutter software.

For these tumblers and many of the wedding and bridal projects you will see on this blog, having a Cricut is required. I can’t say enough good things about mine, I wish I had had it when I was crafting for my own wedding! It would have saved me hours of work and many of the projects I did would have turned out even better! If you are a crafter, a bride, or even part of the bridal party I would highly recommend one, the one-time purchase will serve you well. :) Not only can you make tumblers like these, but you can also use it for custom cut invitations, iron on clothing, paper crafts, and removable vinyl wall decorations. I could go on and on but needless to say they are awesome!

Supplies:

Gold Adhesive Vinyl
Metallic Teal Adhesive Vinyl
Transfer Paper
Purple Tumblers
Craft Cutter and Tool Set
Adhesive Mat
Dream Catcher File
Bride File
Bride Tribe File


1.     Download the Dream catcher File and import into the Cricut software. You can do this by going to the software; and, after making a new project, click the upload button. Import the file, the click Continue.

Cricut 1-2

2.    Press save for the file to be uploaded to the software, then click the image under the Upload Tab. Select Insert Images" to insert it into the current project.

Cricut 3-4

3.     Size the dream catcher to 3.25” wide, then remove the unneeded cuts. For this image, ungroup the cuts using the button on the upper right.

Cricut 5

4.     Now, select each of the first 5 cuts and press the red "x" on the image to remove it.

Cricut 6-8

5.     Once the excess cuts are removed, copy and paste the number of dream catchers you need then click the "Make it" Button in the upper right. You can get up to six dream catchers per 12” x 12” sheet of vinyl. Press Continue to got to the cut Screen. On the Cricut itself, set the dial to "Vinyl", load the mat with Gold Vinyl, and press the Cricut button to cut.

Cricut 9-10

6.     Similarly, import the “Bride” and “Bride Tribe” pictures into the software, sizing them to be 2.5” tall. Cut these out in the Metallic Teal Vinyl.

7.     Remove the excess vinyl (known as weeding) until just the images and words you want to transfer are remaining.

8.     Cut away the excess backing around your vinyl designs. Fix them to the vinyl mat based on how you would like them to transfer onto the tumbler. As you can see from mine, I nested the “Bride Tribe” words into the bottom right of the Dream Catcher.

vinyl arrangement

9.     Cover the design with transfer paper. Push out all the air bubbles and press it into the design, such that when you lift the transfer paper the design comes up with it without its backing. I prefer the lined transfer paper as it makes it easier to orient the designs on their final resting places.

transfer paper

10.     Starting at the top of the tumbler, line up and press the transfer paper onto the tumbler, working top left to bottom right. Because it is curved, it will not stay exactly parallel with the top, this is ok! Pres the transfer paper as flat as you can against the tumbler, rubbing the design especially to get out any air bubbles. Lift the transfer paper, leaving the design on the tumbler.

Bride Tribe Tumbler

11.     For the Bride Tumbler, I wanted the letters to overlap the Dream Catcher. So the same steps as above are followed, but you first transfer the dream catcher, then the test as two separate transfers.

Bride Tumbler

Using these basic instructions, you can also design whatever tumbler you like to make your own custom tumblers for you, your bride, or your wedding party (if you are the bride!).

Pomander Flower Frames

This post contains affiliate links, meaning that if you click on a link I will recieve a small comission. This costs you nothing extra and I only promote products I use and love! You can read our full disclosure here

July is upon us and what does that mean? We are in the middle of Wedding Season! Better yet to me, we are in Bridal Shower Season, and I’ve been crafting for one of my best friend’s showers! I ended up being able to use a couple of the flowers leftover from the bouquets and decorations from a different wedding to make these cute little frame accents!

The best part of these is how easy they are to make; the floral foam makes it super simple as it already has the adhesive on the back and is the perfect size for making little pomander style accents to frames, signs, or table numbers. I made two types, one that was mixed hydrangeas, for my friend’s shower, and one that was spray roses for a more English feel.

Supplies:
Oasis Deco Mini Foam
Silk Flowers of your Choice (I used Purple Hydrangeas, Lilac Hydrangeas, and Spray Roses on mine)
8 x 10 Frame
Tacky Glue (Optional)

1.     Start by removing the heads of your silk flowers. Mine popped off no problem but you may need wire cutters based on the flowers you choose.

2.     Remove Floral Foam from its attached grid. Starting at the top of the round, push the head of the flowers into the foam. If they are having trouble staying put, use a little tacky glue to keep them in.

roses collage

3.     Once you have arranged the flowers as you wish, remove the adhesive backing on the back of the foam. Stick directly to the picture frame you have chosen and you’re done!

Yep it’s really that simple and they look adorable! An added plus with this foam is that if you want to use real flowers, you can simply soak it in water beforehand and then press the flower heads directly into the foam like the silk ones, just make sure to keep a little bit of their stems on. Fresh flowers will last a couple days this way. These Flower frames are super easy to make and are a cute addition to any shower, as an extra accent to wedding signs or table numbers!

D.I.Y. Wooden Wick Candles

This post contains affiliate links, meaning that if you click on a link I will recieve a small comission. This costs you nothing extra and I only promote products I use and love! You can read our full disclosure here

DIY Wooden Wick Candles #candles #diy

These lovely crackling candles first came to be based on my own bridal shower. One of my friends won one as a prize and absolutely loved it! When it finally burned out a couple weeks ago, I went looking for a way to replace it as her birthday present. Luckily, I had the thought to check for the wooden wicks first!

DIY Wooden Wick Candles #candles #diy

I love these wooden wicks compared to the regular ones, where you can achieve the comfort of a crackling fire with a little candle. I didn’t realize it would be so easy to make them myself, or that amazon would have had such an assortment to choose from (last time I doubt that Amazon doesn't have everything under the sun).

DIY Wooden Wick Candles #candles #diy

Now, I have a wonderful assortment of these candles which were cheap to make and so nice to have! I would highly recommend making them if you have candle stubs at home; I used the ends of my wedding candles for them and was able to make a bunch of them in both leftover favor jars and teacups as prizes for upcoming showers and gifts for my friends! These also work wonderfully for Bridal Shower favors, Wedding Favors, or Baby Shower Favors!

DIY Wooden Wick Candles #candles #diy

Some things to note on this project: for your candle making supplies, you need a pouring pot or an old pot you don’t care about to melt the wax. I made the unfortunate choice of using one of my cooking pots with an old measuring cup and it took me a good couple hours to get all the wax remnants out. Seeing as I could’ve bought an actual candle pouring pot for a little over $10, it would’ve been a far better choice and I wouldn’t have been spilling wax all over the place!

Supplies:  
Wooden Candle Wicks
6 oz Jars with Lids
Candle Wax*
Candle Pouring Pot
Powdered Candle Dye
Essential Oils for Scent

*I used leftover candle stubs, but the wax linked here will make about 26 -6oz candles

1.  Melt wax on low heat in your pot. If, like me, you are using candle stubs, remove the wicks from the old candles once the wax is completely melted using either tongs or a fork.

2. For these candles, the full wax wick is far too long. Cut the wicks in half with a pair of scissors, then remove the candle wax from heat and soak them in the wax for 10 minutes. Soaking these wicks is VERY IMPORTANT, they are not like the standard wicks that are already coated in wax and not soaking them will lead to the candles not staying lit.

DIY Wooden Wick Candles #candles #diy

3. Once wicks have been soaked, remove them with tongs or a fork. Once they are cool enough to handle (I was able to touch them immediately) insert them into the metal holder stands included and let dry.

4. Now, attach the wicks to the bottom of your jars by dipping the metal holder into the melted wax, then position at the bottom of the jar. 

5. Let the wax cool for a couple more minutes, then add color and fragrance of your choice. The ones I have recommended are great for candles, bath bombs, soaps, and bath salts, so you can get a lot of use out of them! I made pastel pink, purple, and yellow candles that were scented as peppermint-lemon, lavender-lemon, and rosemary-lemon (I know you can't tell that I like lemon).

DIY Wooden Wick Candles #candles #diy

6. Pour cooled (but still liquid) was into the jars. Reserve about 25% of your wax to remelt and top off your candles if a divot is created in the middle due to the wax cooling. The cooler the wax is, the less of a divot will form. Some of mine with the cool wax needed no additional wax to fill in, while the ones where I started with hot wax needed a lot of extra to make them look nice!

7. Once candles are cooled and solidified, remelt the excess wax and fill in any divots that were caused during the first pour. Now you have a lovely set of candles for your home or favors for your next party!

The crackling of these candles makes me want to make a slew of them for a fall or winter wedding, just with different colors and scents. :) What would you make these cute little candles for?

DIY Wooden Wick Candles #candles #diy

Chocolate Dipped Cookie Spoons

This post contains affiliate links, meaning that if you click on a link I will recieve a small comission. This costs you nothing extra and I only promote products I use and love! You can read our full disclosure here

Chocolate Covered Cooker Spoons #cookie #favors

These adorable cookie spoons are something that I was planning on doing for my wedding out of town guest bags; but I never got around to making them! They go perfect with a cup of cocoa and are a wonderful addition to a coffee bar. :) The best part is that they are quite cheap to make, 120 spoons for about $50 if you have to buy all the ingredients.

Supplies:
Spoon Shaped Cookie Cutter
2 – 10 oz White Candy Melts
2 – 10 oz Chocolate Candy Melts
Sugar Cookie Dough (Here is my recipe)

1.     Prepare the Sugar Cookie dough according to the recipe you plan to use. For the recipe I used, it will make around 120 spoons if you use all the dough. In general you want the dough to hold its shape and not flatten out, so try not to use the store bought stuff (If you do, add a little flour into the dough before rolling it out).

Chocolate Covered Cooker Spoons #cookie #favors

2.     Sprinkle flour on your work surface and roll the dough out to a little over ¼” and cut out spoons with the cookie cutter. Transfer to a cookie sheet and bake for 10-12 minutes. Try to have your cookies come out on the crispier side; that will help them keep their strength for being dipped into coffee.

Chocolate Covered Cooker Spoons #cookie #favors

3.     Once your cookies are cooled, melt the chocolate melts according to the package. Dip the end of each spoon into the chocolate then lay on parchment paper to cool. I put my candy melts in glasses so that it made dipping the cookies easier and made half of my cookies white and half dark chocolate.

4.     Once the chocolate has hardened, use a spoon to drizzle the extra chocolate over the spoons, and you’re done!

Chocolate Covered Cooker Spoons #cookie #favors

These cookies are easy to make into cheap favors by simply putting them in cellophane bags and are the perfect addition to a welcome bag for a winter wedding! Leave any questions you have in the comments!

Chocolate Covered Cooker Spoons #cookie #favors

Disney Pin Monogram

This post contains affiliate links, meaning that if you click on a link I will recieve a small comission. This costs you nothing extra and I only promote products I use and love! You can read our full disclosure here

I have a couple friends getting married in 2017 so I have been having oodles of fun thinking of bridal shower and bachelorette themes for them. One I can't seem to get out of my head is a Disney bridal shower, so regardless of if either of them choose it in the end I have started crafting!

First up is an art piece I made for my craft room, but would look great hanging over the food or gift table at and bridal or baby shower, a monogrammed canvas. :) For this version I used Disney Pins to make the first letter of my last name, but you can make it just about any letter you want, depending on the number of pins you have. :)

Note: This page may contain affiliate links, meaning that if you click on the link and buy the product, I will receive a small commission. This will not change your cost at all and I only recommend products I use and love!

Supplies:
Disney Pins (if you don't have a collection already)
20" x 30" Canvas
1/2-1 yard Disney Fabric
Fabric Glue
 

1. First, Iron out your piece of fabric and arrange it over you canvas. I tried to make mine so that my favorite princess wasn't in the center of the fabric so she wouldn't get completely covered up by the pins. :) 

2. Once you have you fabric arranged, flip both your fabric and canvas over to the opposite side. trim the edges of the fabric so that they meet up with the edge of the canvas. Using fabric glue, stretch and adhere the short sides of fabric to the canvas. Wait until one side is dry before stretching and gluing the other so that you don't accidentally move you fabric!

3. Finish covering the canvas with the long sides in a similar fashion. I folded the corners in like a Christmas present to give it a nice clean look, as shown below:

Monogram Pic 2.jpg

4. Now that you canvas is ready, its time to pick what you want to put on it! I did an uppercase C for my last name but you could do the first letter of the bride's/baby's name, the age a child is turning on their birthday; there are lots of choices! Using Microsoft Publisher or Word, make you letter as big as you can to take up an 11" x 17" page and print.

5. If your printer is like mine, it doesn't accept that big of pages. Using the tiled printing, your letter should print onto three separate pages. Once it is printed, cut out the inside of the letter and tape the sheets together.

6. Now comes the fun part, putting on all your pins! I will admit that this is rather time consuming, but still a lot of fun. :) Arrange your letter in the center of the canvas, then start by pushing pins in along the edges of your design. I chose not to put on the pin backs until the end, which saved time in this stage.

Monogram Pic 3.jpg

7. Once the outline pins are done, fill in the middle. I ended up making one base layer and filled in the holes I had as a top layer. As I collect more pins I will fill it in to define the letter more and more.

8. After you have placed all the pins, remove your paper stencil. Turning the canvas over, put the backs into all the pins, pushing the backs in as much as possible. Once this is done, just reposition any pins that rotated while you were securing them.

Monogram Pic 4.jpg

I love this project for either a baby or bridal shower, and if the bride or mama-to-be loves Disney, it also makes a great gift to hang on their wall. :) Tune in later for more projects for a Disney themed Bridal Shower!

IMG_20160731_113503927.jpg

DIY Personalized Wedding Matches

This post contains affiliate links, meaning that if you click on a link I will recieve a small comission. This costs you nothing extra and I only promote products I use and love! You can read our full disclosure here

One of my favorite ideas that came into play with our wedding was the Cigar Bar I designed for my husband and his fraternity brothers. It gave the guys a fun "manly" thing to do during the wedding and everyone told us how much they liked it! Now for me, no cigar bar is complete without personalized matches, and no better time to personalize everything than for your wedding! As I searched, I couldn't seem to find anything quite right so I decided to design my own! It was surprisingly easy and I love the way they turned out!

Note: This post contains affiliate links, which means that if you click on one of the product links and choose to purchase, I will receive a small commission. This does not affect your price in any way and I only promote products I use and love! :)

Supplies:


Full Sheet Adhesive labels (I used Avery 5156)

Matches Template

1. Using the matchbook template, start by putting your own information into the text boxes. The font I used for our names and location is called Baroque Script, so if you want it to look exactly like these matches make sure to have the font downloaded beforehand!

2. Print out the matches and cut them out with scissors. Next, line up the top of the matchbook and the sticker. Make sure that the sandpaper strip is on the side that won't be covered by the sticker.

3. As shown above, adhere the sticker starting at the top, then smoothing around the entire matchbook. Below you see a finished matchbook.

flower explosion

This project really added a special touch to our big day and as you can see its quite easy to do! After the initial measuring and designing of the template it only took about two hours to cut and make 100 matchbooks! Stay tuned for more fun wedding crafts!

DIY Wine Charm Favors

This post contains affiliate links, meaning that if you click on a link I will recieve a small comission. This costs you nothing extra and I only promote products I use and love! You can read our full disclosure here

To celebrate the hubs and I first year of marriage, I took a look back at all the DIY I did through the course of my wedding and selected some of the projects to feature here on Wine and Sprinkles! The first is our wedding favors, homemade wine charms. They are surprisingly easy to make and make a cute memorable, and transportable wedding favor!

Note: This post contains affiliate links, which means that if you click one of the links and choose to purchase, I will receive a small commission. This does not affect your price in any way and I only promote products I use and love!

Supplies:
Assorted beads (I chose blue and silver)
Assorted Charms
Earring Wire Hoops
Jump Rings
Needle nose pliers
 

1.  First, attach the small jump rings to all of the charms you intend to use. In the pack I mentioned there are some that just don't look wine charm material, so order an extra pack. 

2. Using the needle nose pliers, flatten the wire on the hoop so that the beads and charms can easily slide on. Then slide on your beads and charms however you like. As you can see below I did silver, blue, charm, blue the silver for a nice symmetrical look.

flower explosion

3. Finally, re-bend the wire hoop's tip to its original position to look all the beads and charms in place.

And then you're done! We ended up pairing two to a favor box, but these could easily be made into sets of 4-8 to give away as Christmas presents or wine tasting favors as well. :) Now go get yourself a glass of wine to try out your new charms on!

DIY Valentine's Day Tea Cups

This post contains affiliate links, meaning that if you click on a link I will recieve a small comission. This costs you nothing extra and I only promote products I use and love! You can read our full disclosure here

As we get closer to Valentine's Day and its impending tea party, I keep finding bits and pieces that I forgot about. A few days ago I realized in a panic that I didn't have enough matching tea cups for the whole party. Yes I am a little crazy when it comes to things matching at parties, but on the bright side it gave me the idea for these little beauties, personalized Valentine's Day Tea Cups! Not only will they function as place cards when people get their tea but they become great favors for each guest to take home. The best part, in my opinion, was the price. I found plain white tea cups at Walmart for a dollar a piece and I already had all the vinyl I needed for the project so I ended up only spending $10 on the whole set!

Supplies:
Plain white teacups (i found mine at Walmart)
Permanent Adhesive Vinyl in pinks, white and red (I use Expressions Vinyl)
Craft Cutter and Tool Set
Adhesive Mat
Scissors

1. First, cut out the valentine heart using your craft cutter. You can download the one I used here. I made my hearts about 3" wide. Once cut, weed away the extra vinyl.

2. Next cut out the the names in a white matte vinyl. I used the Brush Script for my names and made sure that the longest was 2" wide maximum. Additionally, cut out 1" hearts in varying colors of pink and red, about 5 per cup.

3. Once the names are weeded, use transfer paper to adhere it to the hearts while they are still on the mat. I did mine on a slant for fun, but it is by no means required! Decide how you like them best. :)

Cameo 3 Bundles by Expressions Vinyl

4. Now, peel off the main heart just like a stick and cut a small slit in the bottom near the point. This will help you overlap the bottom that is closer to the curve.  Place squarely on the teacup, with the teacup handle on whatever side you plan to drink from (mine are right because I assumed everyone was right handed). Starting in the middle on the heart, smooth it out to the edges, starting at the top and ending at the bottom, so any excess can be easily hidden in the point.

5. Finish each teacup by sticking on the smaller assorted hearts you cut. I found that about 5 filled up the cup nicely but didn't overlap.

I absolutely adore these cups! Next year I may do something similar with champagne flutes because this tea party may become a yearly tradition. And since they are made with permanent vinyl, they are a hand washable addition to your friends mug collection! :)

Valentine's Day Tea Party Invitations

This post contains affiliate links, meaning that if you click on a link I will recieve a small comission. This costs you nothing extra and I only promote products I use and love! You can read our full disclosure here

I'm going to be honest here: the Hubs and I aren't huge Valentine's Day fans. Other than one Greek event we did together before actually dating we've never done anything for Valentine's Day, and with our anniversary now being the end of February, it seems even more pointless (especially when we can take advantage of all the half-priced flowers and candy ). 

Yes, I'm kind of a Grinch when it comes to Valentine's Day; ever since I could no longer make a box that got filled with candy it's gone down hill. Well this is the year that is going to change! I've always wanted to throw a high tea party so I decided this was the perfect way to get excited about Valentine's day again! And once I got this tea bag invitation in my head I was committed! 

If you have Publisher you will be able to download the file and fill it in with your own information. The bright side of these invites is that they are actually super easy to make and require almost not skills except for cutting along the lines and lining up tape along the edges. I will warn you though, they are time consuming. :)

Note: This post contains affiliate links, which means that if you click one of the links and choose to purchase, I will receive a small commission. This does not affect your price in any way and I only promote products I use and love!

Supplies:
(For 10 invitations)

10 sheets Pastel Pink Vellum
5 sheets Razzleberry Card stock
1 sheet each of light blue, green and yellow card stock for hearts
Craft Cutter and Tool Set (for cutting out hearts)
1 sheet pastel green card stock for tag
Pink Ribbon
Double Sided Tape
10 Envelopes

Note: If you do not have an electronic craft cutter, I would highly suggest buying heart shaped confetti as opposed to cutting out hundreds of tiny hearts, I have a lot of crafting patience and that would drive me crazy!

1. First, Download the design file here. the first page you will print on the card stock for bases and the second sheet you will print on the vellum for your words. I always outline my cut lines in light gray so that if you are a less than perfect cutter you get less contrast than with straight black.

2. Cut out all the card stock bases and vellum prints. Using a craft cutter, cut out the candy hearts for inside the invite (mine were aprx. 1 inch square).
 

3. Now lay the base on top of the vellum (vellum wrong side up). Once you have i aligned with the tabs equally spaced, fold up each vellum "tab" to score the paper for when you tape. Remove the card stock, and fill the vellum with hearts (I did 5 of each color).

4. Line each tab of the vellum with double sided tape. The tab should be completely covered, with the tape coming into the card body. My tape happened to take about half its width on the tab and half in the card. now replace the card stock into the vellum, pressing down on each tape to seal in the hearts. Flip over the card and do the same on the front, don't catch any hearts in your tape!

5. Finally, glue on an 8" piece of pink ribbon and seal the loose side with a tag; I used a folded up rectangle of pastel green card stock.

Now the invitation is officially complete! See what I said about time consuming? Since I just made 10 for a smaller gathering it was totally worth the effort, they came out just like I wanted! Make sure to buy bigger envelopes, these cards are on the heftier size so you need around the A9 Size.

Thanks for stopping by and stay tuned for more Valentine's Fun!


Check out the link parties we join here.

Northern Lights Shadow Box

This post contains affiliate links, meaning that if you click on a link I will recieve a small comission. This costs you nothing extra and I only promote products I use and love! You can read our full disclosure here

Northern Lights Shadow Box.jpg

This Shadow Box was one of my favorite crafts of the holiday Season! After making oodles of prints and canvases I needed just one more piece to complete my Christmas "Art Wall" and this little reindeer fit the bill. Making it was much more straightforward than I would've thought and it came out perfect.

*This post contain affiliate links. I only link products I use and love!

Supplies:

White and Silver Glitter Permanent Adhesive Vinyl (I use Expressions Vinyl)
Craft Cutter and Tool Set
Adhesive Mat
White Textured Scrapbook Paper
12 x 12 Shadow Box
Christmas Lights-Next time I will make mine with LED lights, in this case I used regular twinkle lights :)

1. First, cut out the silver vinyl into an animal/tree of your choice using either a craft cutter or exacto knife. Next cut the white vinyl in a "wave" pattern for a nice looking snowdrift. Start by adhering the white vinyl to the bottom of the shadow box then layer on your deer using transfer paper as shown below:

2. Now cut you piece of scrapbook paper to size so that it lays flat in the bottom of the shadow box. Cut of one of the bottom corners of the shadow box depending on what side you want the lights to exit. Then, arrange the lights in the shadow box (as many as you can fit) with the end of you light string going out of the shadow box on the same corner you cut from the back of the shadow box.

Cameo 3 Bundles by Expressions Vinyl

3. Replace the back of the shadow box, turn over and ta-da! The Shadow Box is complete!


My favorite part of this shadow box is that is is a nice winter print by day a a multicolored light by night, perfectly adding a little something extra to my regular Christmas Decorations. Happy Holidays to all!