Inedible Favors

DIY Wax Seal Magnet Favors

DIY Wax Seal Magnet Favors

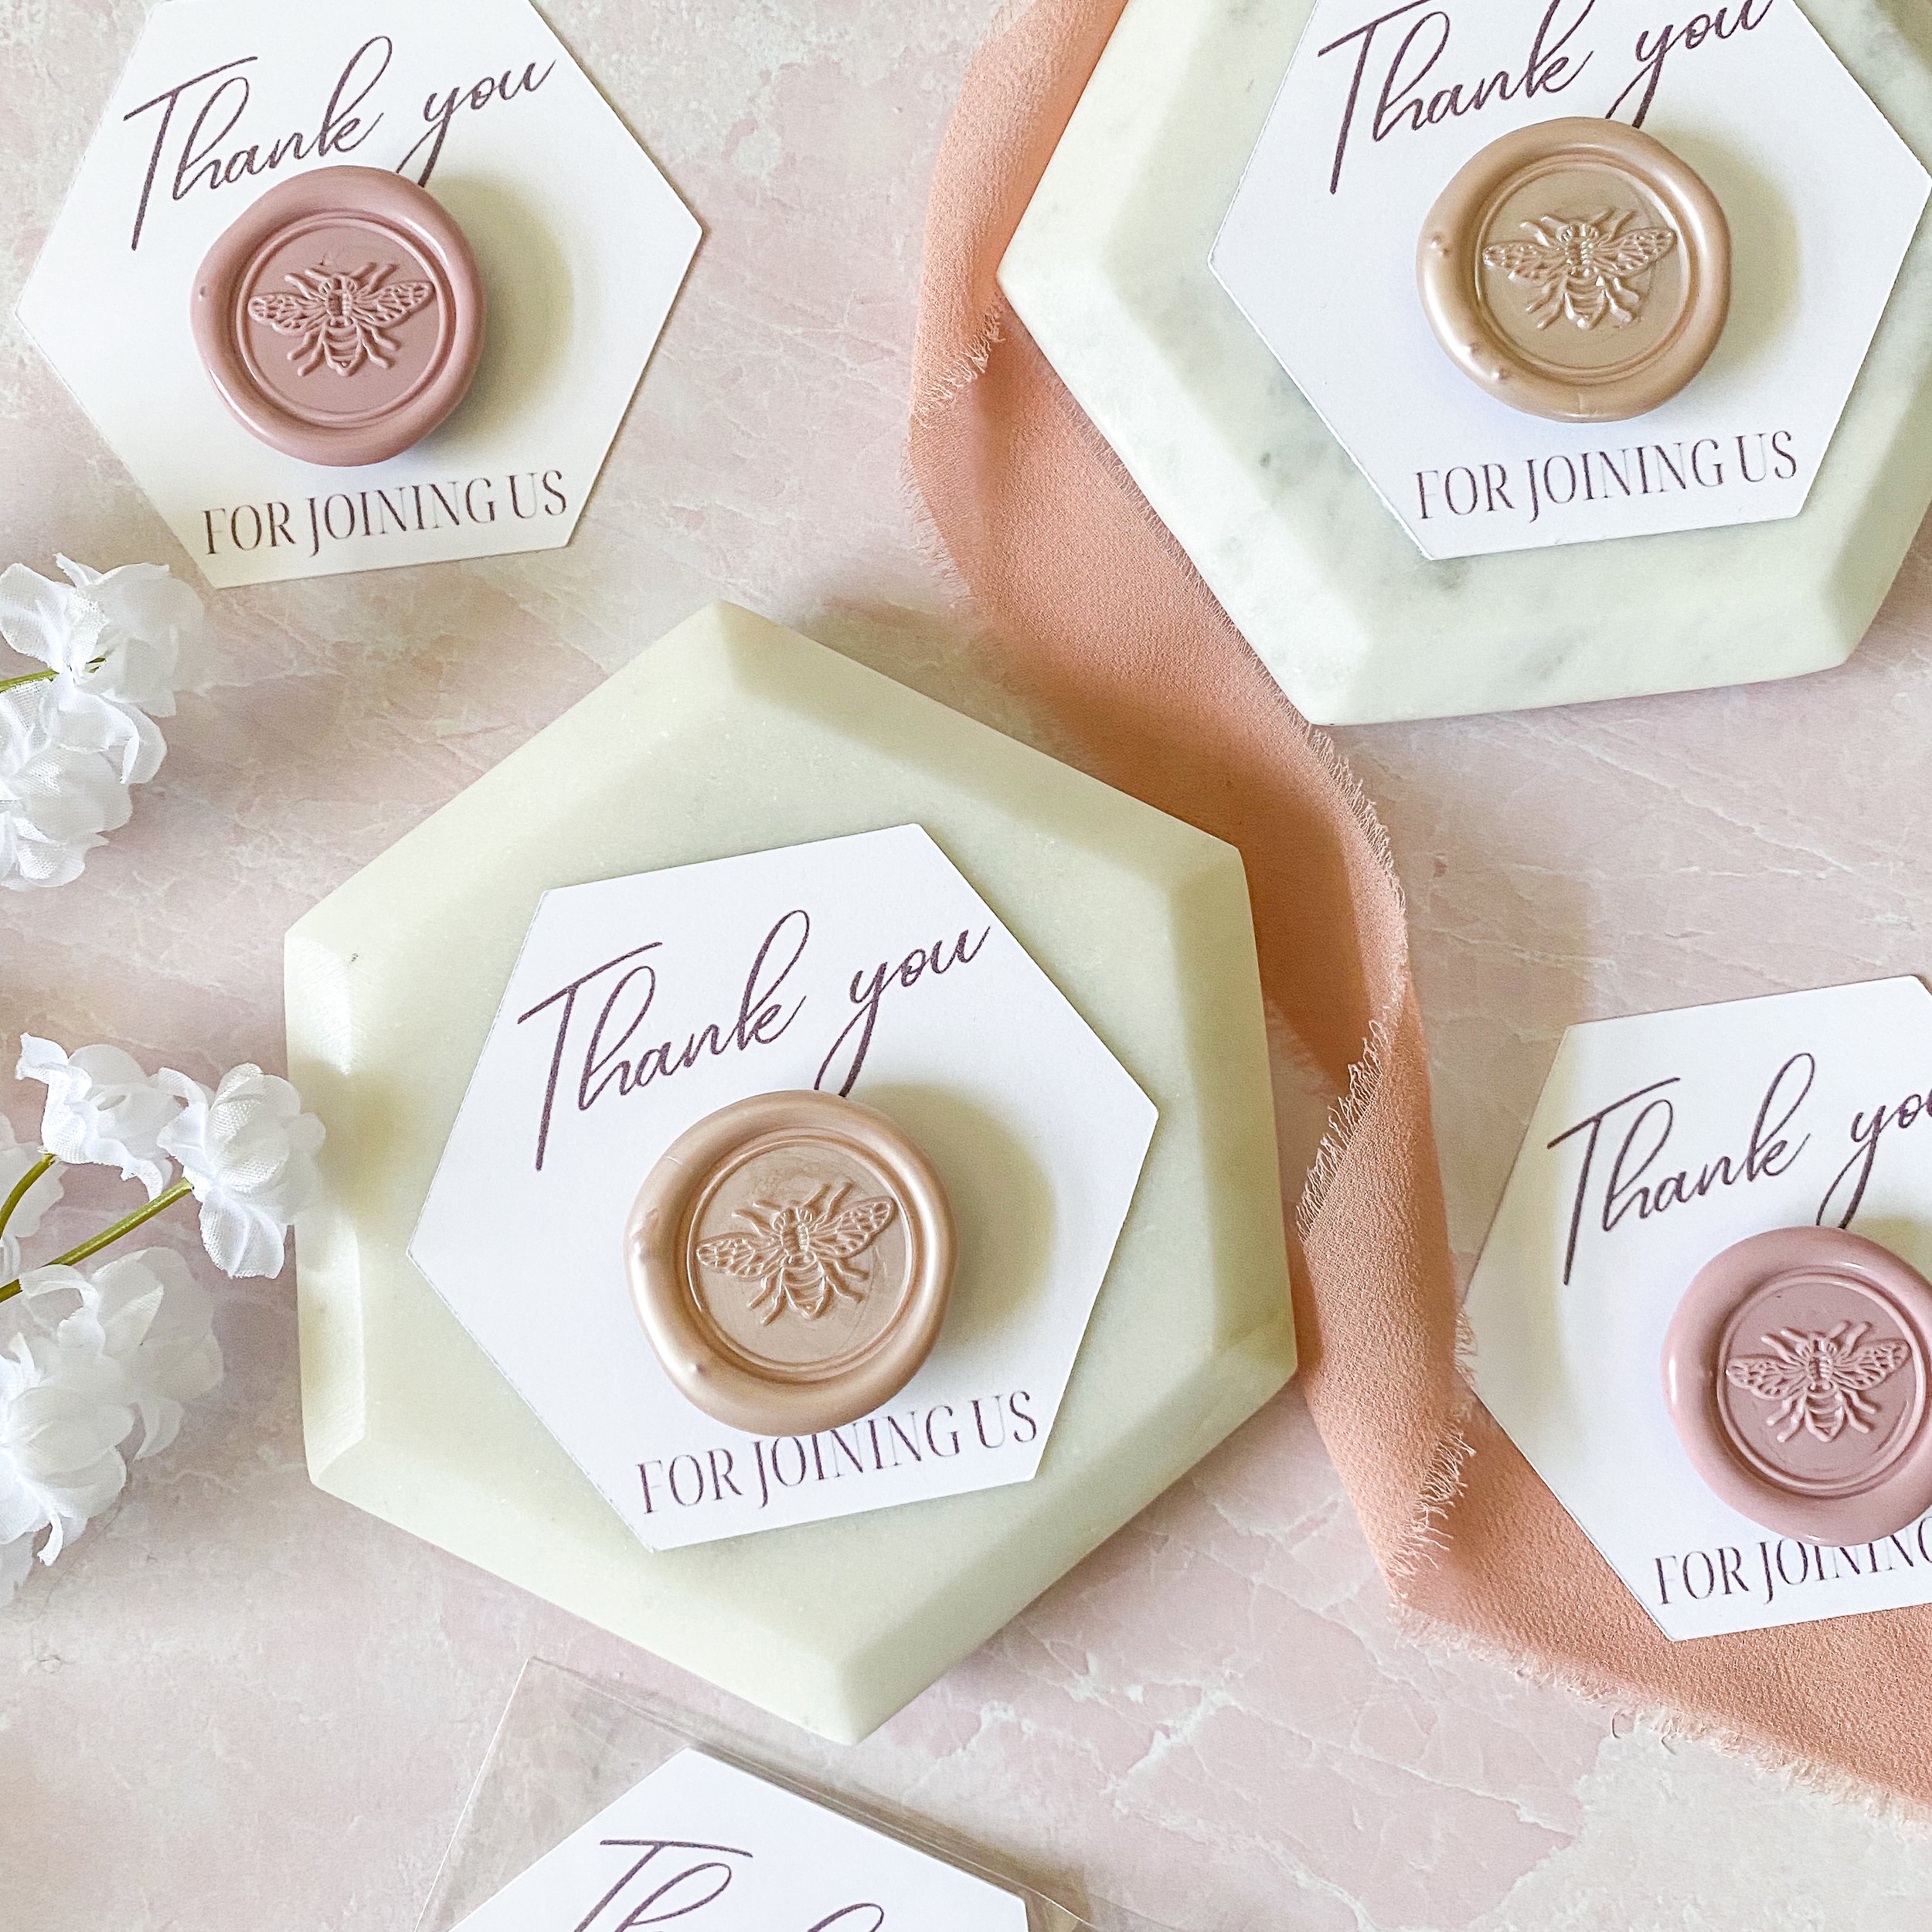
I love magnets as an inexpensive and useful party favor, but even more for how many creative options I’ve found in the past. From wooden magnets to photos to wine corks or bottle caps, there’s so many creative ways to design them and make them unique to your own event! When I was experimenting with ways to use sealing wax in my party projects for my Vintage Victorian Cocktail Party, as soon as I thought of making these Wax Seal Magnet Favors, I knew that they were going to be my favorite form of magnet yet!

Read More

DIY Wax Stamp Floral Patterned Playing Cards

DIY Wax Stamp Floral Patterned Playing Cards

While I was creating all sorts of mismatched floral stationery and details for my latest party, I just had to share one of my favorites before the festivities started, featuring some of my own favorite things; florals and beautiful wax stamps! With my next party full of fun and games, my first project featuring all the wax seals I’ve made so far are kicking off with these Personalized Wax Stamp Floral Patterned Playing Cards.

Read More

DIY Ombre Heart Shaped Mini Soap Favors

DIY Ombre Heart Shaped Mini Soap Favors

If there's a favor I love to give for baby or bridal showers, it has to be shower and spa themed goodies! So when I was done making bath bombs and bath salts, the next favor in my lineup had to be another of my favorite spa themed favors to give with a fun mini sized twist, these Ombre Pink Heart Shaped mini soaps!

Read More

DIY Essential Oils Fizzy Floral Bath Salt Favors

DIY Essential Oils Fizzy Floral Bath Salt Favors

There is nothing like a hot bath to soak away the troubles of the day, and giving fun spa themed goodies for them as favors is surely one of my favorite things! When I was done making a new set of Mini Bath Bomb Trios for my friendcation in Florida, I still had plenty of bath bomb supplies left, so I chose to vary the charm and help one of my at home besties with some favors for her teen’s spa party, these Floral Fizzy Bath Salts!

Read More

Easy Essential Oils Mini Bath Bomb Favor Trios

Easy Essential Oils Mini Bath Bomb Favor Trios

I love giving away bath supplies as Bridal Shower and Baby Shower Favors, but they are great gifts for any variety of events, so I returned to this tutorial to create a new trio of bath bombs for my latest trip to the beach to visit and catch up with some college friends! This pretty trio was the perfect finishing touch to the Spa Sleepover Gift Boxes I made for each of my friends, being easy to DIY and color customize!

Read More

DIY Love is Brewing HTV Iron On Koozies

This post contains affiliate links, meaning that if you click on a link I will recieve a small comission. This costs you nothing extra and I only promote products I use and love! You can read our full disclosure here

Love is Brewing DIY Wedding Koozies #koozies #diywedding #weddingfavor

Koozies are always fun for wedding favors, and these “Love is Brewing” Koozies are a great choice for the craft brew loving Bride and Groom!

These designs aren’t hard to weed but I would recommend only using Easyweed Heat Transfer Vinyl as opposed to the Glitter HTV since some of holes in the text are small. If you have to make a bunch its nice to have a group to help you weed them since that’s the most time intensive part of this project.


Love is Brewing DIY Wedding Koozies #koozies #diywedding #weddingfavor

1. After downloading the cut files, import them into the Cricut Software. After creating a new project, select Upload Image. Select the file you wish to upload and it will automatically take you to the final upload screen, where you can name the file the select Save. The SVG Files are sized so that they will automatically cut to the size you see in the photos, but if you want to change the size you can do so to fit the koozies the way you like.

2. After selecting “Make It” Make sure to select the Mirror Mode on the cutting screen. Cut the design(s) in your choice of heat transfer vinyl with the Iron On (for Easyweed Vinyl) or Iron On+ (for Glitter Vinyl) Setting on your Cricut, with the shiny side of the material down.

3. Weed the additional material off of the backing material so that, looking down with the shiny side up, you can see your design with the correct orientation.

Love is Brewing DIY Wedding Koozies #koozies #diywedding #weddingfavor

4. Center the design in the middle of the koozie. Arrange the design shiny side up, then cover with parchment paper. Make sure to keep the parchment paper between the design and the iron.

5. Set your Iron to the second Highest setting and press the the iron down firmly on the design, not ironing but rather using it as a small heat press. The koozie design should be completely covered by the iron. Pressing the iron on the design for 15 - 30 seconds, mine took only 20 seconds. :) I’m always a little nervous ironing koozies, so I check them every 5 second or so until the design has transferred. :)

Love is Brewing DIY Wedding Koozies #koozies #diywedding #weddingfavor

6. Remove the backing from the design, leaving the design on the koozie. Repeat with all the remaining koozies.

I always love koozies for using up extra bits of HTV and they are the perfect favors for a wedding! Check out more of our Koozie Projects here! :)

Love is Brewing DIY Wedding Koozies #koozies #diywedding #weddingfavor

DIY Two Less Fish in the Sea HTV Iron On Koozies

This post contains affiliate links, meaning that if you click on a link I will recieve a small comission. This costs you nothing extra and I only promote products I use and love! You can read our full disclosure here

DIY Two Less Fish in the Sea HTV Iron On Koozies #twolessfish #beachwedding #weddingfavors

Koozies are wonderful wedding favors, especially for Beach or Destination Weddings! To Start off our Destination Wedding Koozie Designs, I went with my personal favorite beachy wedding saying, Two Less Fish in the Sea!

DIY Two Less Fish in the Sea HTV Iron On Koozies #twolessfish #beachwedding #weddingfavors

I made them in Mermaid Blue Glitter HTV and Jade Easeyweed HTV on white koozies; the Mermaid Blue Glitter ones are definetely my favorite! These designs are easy to weed and an easy project to make over a weekend; however, if you have to make a bunch its nice to have a group to help you weed them since that’s the most time intensive part of this project.


1. After downloading the cut files, import them into the Cricut Software. After creating a new project, select Upload Image. Select the file you wish to upload and it will automatically take you to the final upload screen, where you can name the file the select Save. The SVG Files are sized so that they will automatically cut to the size you see in the photos, but if you want to change the size you can do so to fit the koozies the way you like.

2. After selecting “Make It” Make sure to select the Mirror Mode on the cutting screen. Cut the design(s) in your choice of heat transfer vinyl with the Iron On (for Easyweed Vinyl) or Iron On+ (for Glitter Vinyl) Setting on your Cricut, with the shiny side of the material down.

3. Weed the additional material off of the backing material so that, looking down with the shiny side up, you can see your design with the correct orientation.

DIY Two Less Fish in the Sea HTV Iron On Koozies #twolessfish #beachwedding #weddingfavors

4. Center the design in the middle of the koozie. Arrange the design shiny side up, then cover with parchment paper. Make sure to keep the parchment paper between the design and the iron.

DIY Two Less Fish in the Sea HTV Iron On Koozies #twolessfish #beachwedding #weddingfavors

5. Set your Iron to the second Highest setting and press the the iron down firmly on the design, not ironing but rather using it as a small heat press. The koozie design should be completely covered by the iron. Pressing the iron on the design for 15 - 30 seconds, mine took only 20 seconds. :) I’m always a little nervous ironing koozies, so I check them every 5 second or so until the design has transferred. :)

DIY Two Less Fish in the Sea HTV Iron On Koozies #twolessfish #beachwedding #weddingfavors

6. Remove the backing from the design, leaving the design on the koozie. Repeat with all the remaining koozies.

DIY Two Less Fish in the Sea HTV Iron On Koozies #twolessfish #beachwedding #weddingfavors

I always love koozies for using up extra bits of HTV and they are the perfect favors for a beachy destination wedding! Check out more of our Koozie Projects here! :)

DIY Two Less Fish in the Sea HTV Iron On Koozies #twolessfish #beachwedding #weddingfavor
DIY Two Less Fish in the Sea HTV Iron On Koozies #twolessfish #beachwedding #weddingfavors

D.I.Y. Wood Wick Teacup Candles

This post contains affiliate links, meaning that if you click on a link I will recieve a small comission. This costs you nothing extra and I only promote products I use and love! You can read our full disclosure here

There is nothing that adds a fun vintage flair to a shower quite like these teacup candles. And they are so versatile! I will be using them for a Beauty and the Beast themed bridal shower, but they could just as easily be used for a tea party, Jane Austen Shower, or Mother’s Day Brunch!

Teacups Favor with text.jpg

For me, the wood wicks were a requirement on this batch, they just remind me so much of a fire in the hearth, and for a Beauty and the Beast Shower, it is the perfect touch since most of the story takes place in the winter where crackling fires are most welcome! In addition, the teacups are the perfect ode to my favorite characters, Mrs. Potts and Chip!

I have wanted to make these candles for a while but was always discouraged for one reason, finding the teacups! While you can find teacups at yard sales and estate sales, I could rarely find them and when I could, they were $10+ per cup! Luckily, I had the thought to check Etsy for teacups and I was not disappointed! :)

I was very impressed with the Etsy shop, The Acerage, which I purchased my teacups from. First, they were half the price I see at estate sales for the same cups due to what they term “minor damage.” So when I received them I was expecting some stains, chips, or even small cracks. Imagine my surprise when all the cups that came not only were in great condition (I could hardly find any chips), but they were in fact much better than the aforementioned teacups I paid double for at the estate sale! I have linked in the supplies the set I used, which are great to make a whole set of candles for shower favors. When someone orders them, the listing will disappear but as soon as they gather the next set they list it again.

If giving the teacups as a favor is not quite in your budget, use them as bridal shower prizes and only make a couple! I have been using them for the last couple showers I have gone to as prizes for games and they have been beloved by all!


Supplies:  

Mismatched Teacups and Saucers
Wooden Candle Wicks
Candle Wax*
Candle Pouring Pot
Powdered Candle Dye
Essential Oils for Scent

*I used leftover candle stubs, but the wax linked here will make about 20 -8oz teacup candles

1.  Melt wax on low heat in your pot. If, like me, you are using candle stubs, remove the wicks from the old candles once the wax is completely melted using either tongs or a fork.

2. For these candles, the full wax wick is far too long. Insert the wood wick into its metal stand and place in the cup. Cut the wicks at the top of the teacup with a pair of scissors, then remove the candle wax from heat and soak them in the wax for 10 minutes. Soaking these wicks is VERY IMPORTANT, they are not like the standard wicks that are already coated in wax and not soaking them will lead to the candles not staying lit.

3. Once wicks have been soaked, remove them with tongs or a fork. Once they are cool enough to handle (I was able to touch them immediately) insert them into the metal holder stands included and let dry.

4. Now, attach the wicks to the bottom of your teacups by dipping the metal holder into the melted wax, then position at the bottom of the jar. 

5. Let the wax cool for a couple more minutes, then add color and fragrance of your choice. The ones I have recommended are great for candles, bath bombs, soaps, and bath salts, so you can get a lot of use out of them! I made pastel pink, purple, and yellow candles that were scented as peppermint-lemon, lavender-lemon, and rosemary-lemon (I know you can't tell that I like lemon).

pouring candles.png

6. Pour cooled (but still liquid) wax into the teacups. Reserve about 25% of your wax to remelt and top off your candles if a divot is created in the middle due to the wax cooling. The cooler the wax is, the less of a divot will form. Some of mine with the cool wax needed no additional wax to fill in, while the ones where I started with hot wax needed a lot of extra to make them look nice!

7. Once candles are cooled and solidified, remelt the excess wax and fill in any divots that were caused during the first pour. Now you have a lovely set of candles for your home or favors for your next party!

These have been by far one of my favorite DIY projects I have done lately and a project I have wanted to do for a long time! Now I just need to find homes for all the teacups I can’t keep, time for a tea party! :)

D.I.Y. Wooden Wick Candles

This post contains affiliate links, meaning that if you click on a link I will recieve a small comission. This costs you nothing extra and I only promote products I use and love! You can read our full disclosure here

DIY Wooden Wick Candles #candles #diy

These lovely crackling candles first came to be based on my own bridal shower. One of my friends won one as a prize and absolutely loved it! When it finally burned out a couple weeks ago, I went looking for a way to replace it as her birthday present. Luckily, I had the thought to check for the wooden wicks first!

DIY Wooden Wick Candles #candles #diy

I love these wooden wicks compared to the regular ones, where you can achieve the comfort of a crackling fire with a little candle. I didn’t realize it would be so easy to make them myself, or that amazon would have had such an assortment to choose from (last time I doubt that Amazon doesn't have everything under the sun).

DIY Wooden Wick Candles #candles #diy

Now, I have a wonderful assortment of these candles which were cheap to make and so nice to have! I would highly recommend making them if you have candle stubs at home; I used the ends of my wedding candles for them and was able to make a bunch of them in both leftover favor jars and teacups as prizes for upcoming showers and gifts for my friends! These also work wonderfully for Bridal Shower favors, Wedding Favors, or Baby Shower Favors!

DIY Wooden Wick Candles #candles #diy

Some things to note on this project: for your candle making supplies, you need a pouring pot or an old pot you don’t care about to melt the wax. I made the unfortunate choice of using one of my cooking pots with an old measuring cup and it took me a good couple hours to get all the wax remnants out. Seeing as I could’ve bought an actual candle pouring pot for a little over $10, it would’ve been a far better choice and I wouldn’t have been spilling wax all over the place!

Supplies:  
Wooden Candle Wicks
6 oz Jars with Lids
Candle Wax*
Candle Pouring Pot
Powdered Candle Dye
Essential Oils for Scent

*I used leftover candle stubs, but the wax linked here will make about 26 -6oz candles

1.  Melt wax on low heat in your pot. If, like me, you are using candle stubs, remove the wicks from the old candles once the wax is completely melted using either tongs or a fork.

2. For these candles, the full wax wick is far too long. Cut the wicks in half with a pair of scissors, then remove the candle wax from heat and soak them in the wax for 10 minutes. Soaking these wicks is VERY IMPORTANT, they are not like the standard wicks that are already coated in wax and not soaking them will lead to the candles not staying lit.

DIY Wooden Wick Candles #candles #diy

3. Once wicks have been soaked, remove them with tongs or a fork. Once they are cool enough to handle (I was able to touch them immediately) insert them into the metal holder stands included and let dry.

4. Now, attach the wicks to the bottom of your jars by dipping the metal holder into the melted wax, then position at the bottom of the jar. 

5. Let the wax cool for a couple more minutes, then add color and fragrance of your choice. The ones I have recommended are great for candles, bath bombs, soaps, and bath salts, so you can get a lot of use out of them! I made pastel pink, purple, and yellow candles that were scented as peppermint-lemon, lavender-lemon, and rosemary-lemon (I know you can't tell that I like lemon).

DIY Wooden Wick Candles #candles #diy

6. Pour cooled (but still liquid) was into the jars. Reserve about 25% of your wax to remelt and top off your candles if a divot is created in the middle due to the wax cooling. The cooler the wax is, the less of a divot will form. Some of mine with the cool wax needed no additional wax to fill in, while the ones where I started with hot wax needed a lot of extra to make them look nice!

7. Once candles are cooled and solidified, remelt the excess wax and fill in any divots that were caused during the first pour. Now you have a lovely set of candles for your home or favors for your next party!

The crackling of these candles makes me want to make a slew of them for a fall or winter wedding, just with different colors and scents. :) What would you make these cute little candles for?

DIY Wooden Wick Candles #candles #diy

DIY Personalized Wedding Matches

This post contains affiliate links, meaning that if you click on a link I will recieve a small comission. This costs you nothing extra and I only promote products I use and love! You can read our full disclosure here

One of my favorite ideas that came into play with our wedding was the Cigar Bar I designed for my husband and his fraternity brothers. It gave the guys a fun "manly" thing to do during the wedding and everyone told us how much they liked it! Now for me, no cigar bar is complete without personalized matches, and no better time to personalize everything than for your wedding! As I searched, I couldn't seem to find anything quite right so I decided to design my own! It was surprisingly easy and I love the way they turned out!

Note: This post contains affiliate links, which means that if you click on one of the product links and choose to purchase, I will receive a small commission. This does not affect your price in any way and I only promote products I use and love! :)

Supplies:


Full Sheet Adhesive labels (I used Avery 5156)

Matches Template

1. Using the matchbook template, start by putting your own information into the text boxes. The font I used for our names and location is called Baroque Script, so if you want it to look exactly like these matches make sure to have the font downloaded beforehand!

2. Print out the matches and cut them out with scissors. Next, line up the top of the matchbook and the sticker. Make sure that the sandpaper strip is on the side that won't be covered by the sticker.

3. As shown above, adhere the sticker starting at the top, then smoothing around the entire matchbook. Below you see a finished matchbook.

flower explosion

This project really added a special touch to our big day and as you can see its quite easy to do! After the initial measuring and designing of the template it only took about two hours to cut and make 100 matchbooks! Stay tuned for more fun wedding crafts!

DIY Wine Charm Favors

This post contains affiliate links, meaning that if you click on a link I will recieve a small comission. This costs you nothing extra and I only promote products I use and love! You can read our full disclosure here

To celebrate the hubs and I first year of marriage, I took a look back at all the DIY I did through the course of my wedding and selected some of the projects to feature here on Wine and Sprinkles! The first is our wedding favors, homemade wine charms. They are surprisingly easy to make and make a cute memorable, and transportable wedding favor!

Note: This post contains affiliate links, which means that if you click one of the links and choose to purchase, I will receive a small commission. This does not affect your price in any way and I only promote products I use and love!

Supplies:
Assorted beads (I chose blue and silver)
Assorted Charms
Earring Wire Hoops
Jump Rings
Needle nose pliers
 

1.  First, attach the small jump rings to all of the charms you intend to use. In the pack I mentioned there are some that just don't look wine charm material, so order an extra pack. 

2. Using the needle nose pliers, flatten the wire on the hoop so that the beads and charms can easily slide on. Then slide on your beads and charms however you like. As you can see below I did silver, blue, charm, blue the silver for a nice symmetrical look.

flower explosion

3. Finally, re-bend the wire hoop's tip to its original position to look all the beads and charms in place.

And then you're done! We ended up pairing two to a favor box, but these could easily be made into sets of 4-8 to give away as Christmas presents or wine tasting favors as well. :) Now go get yourself a glass of wine to try out your new charms on!