Tumblers

Bride and Tribe DIY Skinny Tumblers

Bride and Tribe DIY Skinny Tumblers

Whether it's for a Bachelorette Party or for getting ready drinks the day of your Wedding, bridal party tumblers and a classic and useful drinkware choice for all the ladies in your Bride Tribe. Help them celebrate in style with these simple and gorgeous Bride and Tribe DIY Vinyl decal Skinny Tumblers!

Read More

Romantic Font DIY Bridal Party Skinny Tumblers

Romantic Font DIY Bridal Party Skinny Tumblers

Getting ready with your bridesmaids and family is one of the best memories to start off your wedding day, and no wedding pregaming, whether mimosas or water, is complete without some fun drinkware for your ladies to use and take home! For a classic and romantic getting ready tumbler, look no further than these beauties you can make yourself!

Read More

DIY I Do Crew Skinny Tumblers

This post contains affiliate links, meaning that if you click on a link I will recieve a small comission. This costs you nothing extra and I only promote products I use and love! You can read our full disclosure here

DIY I Do Crew Bridal Party Skinny Tumblers #idocrew #diywedding #svgfiles

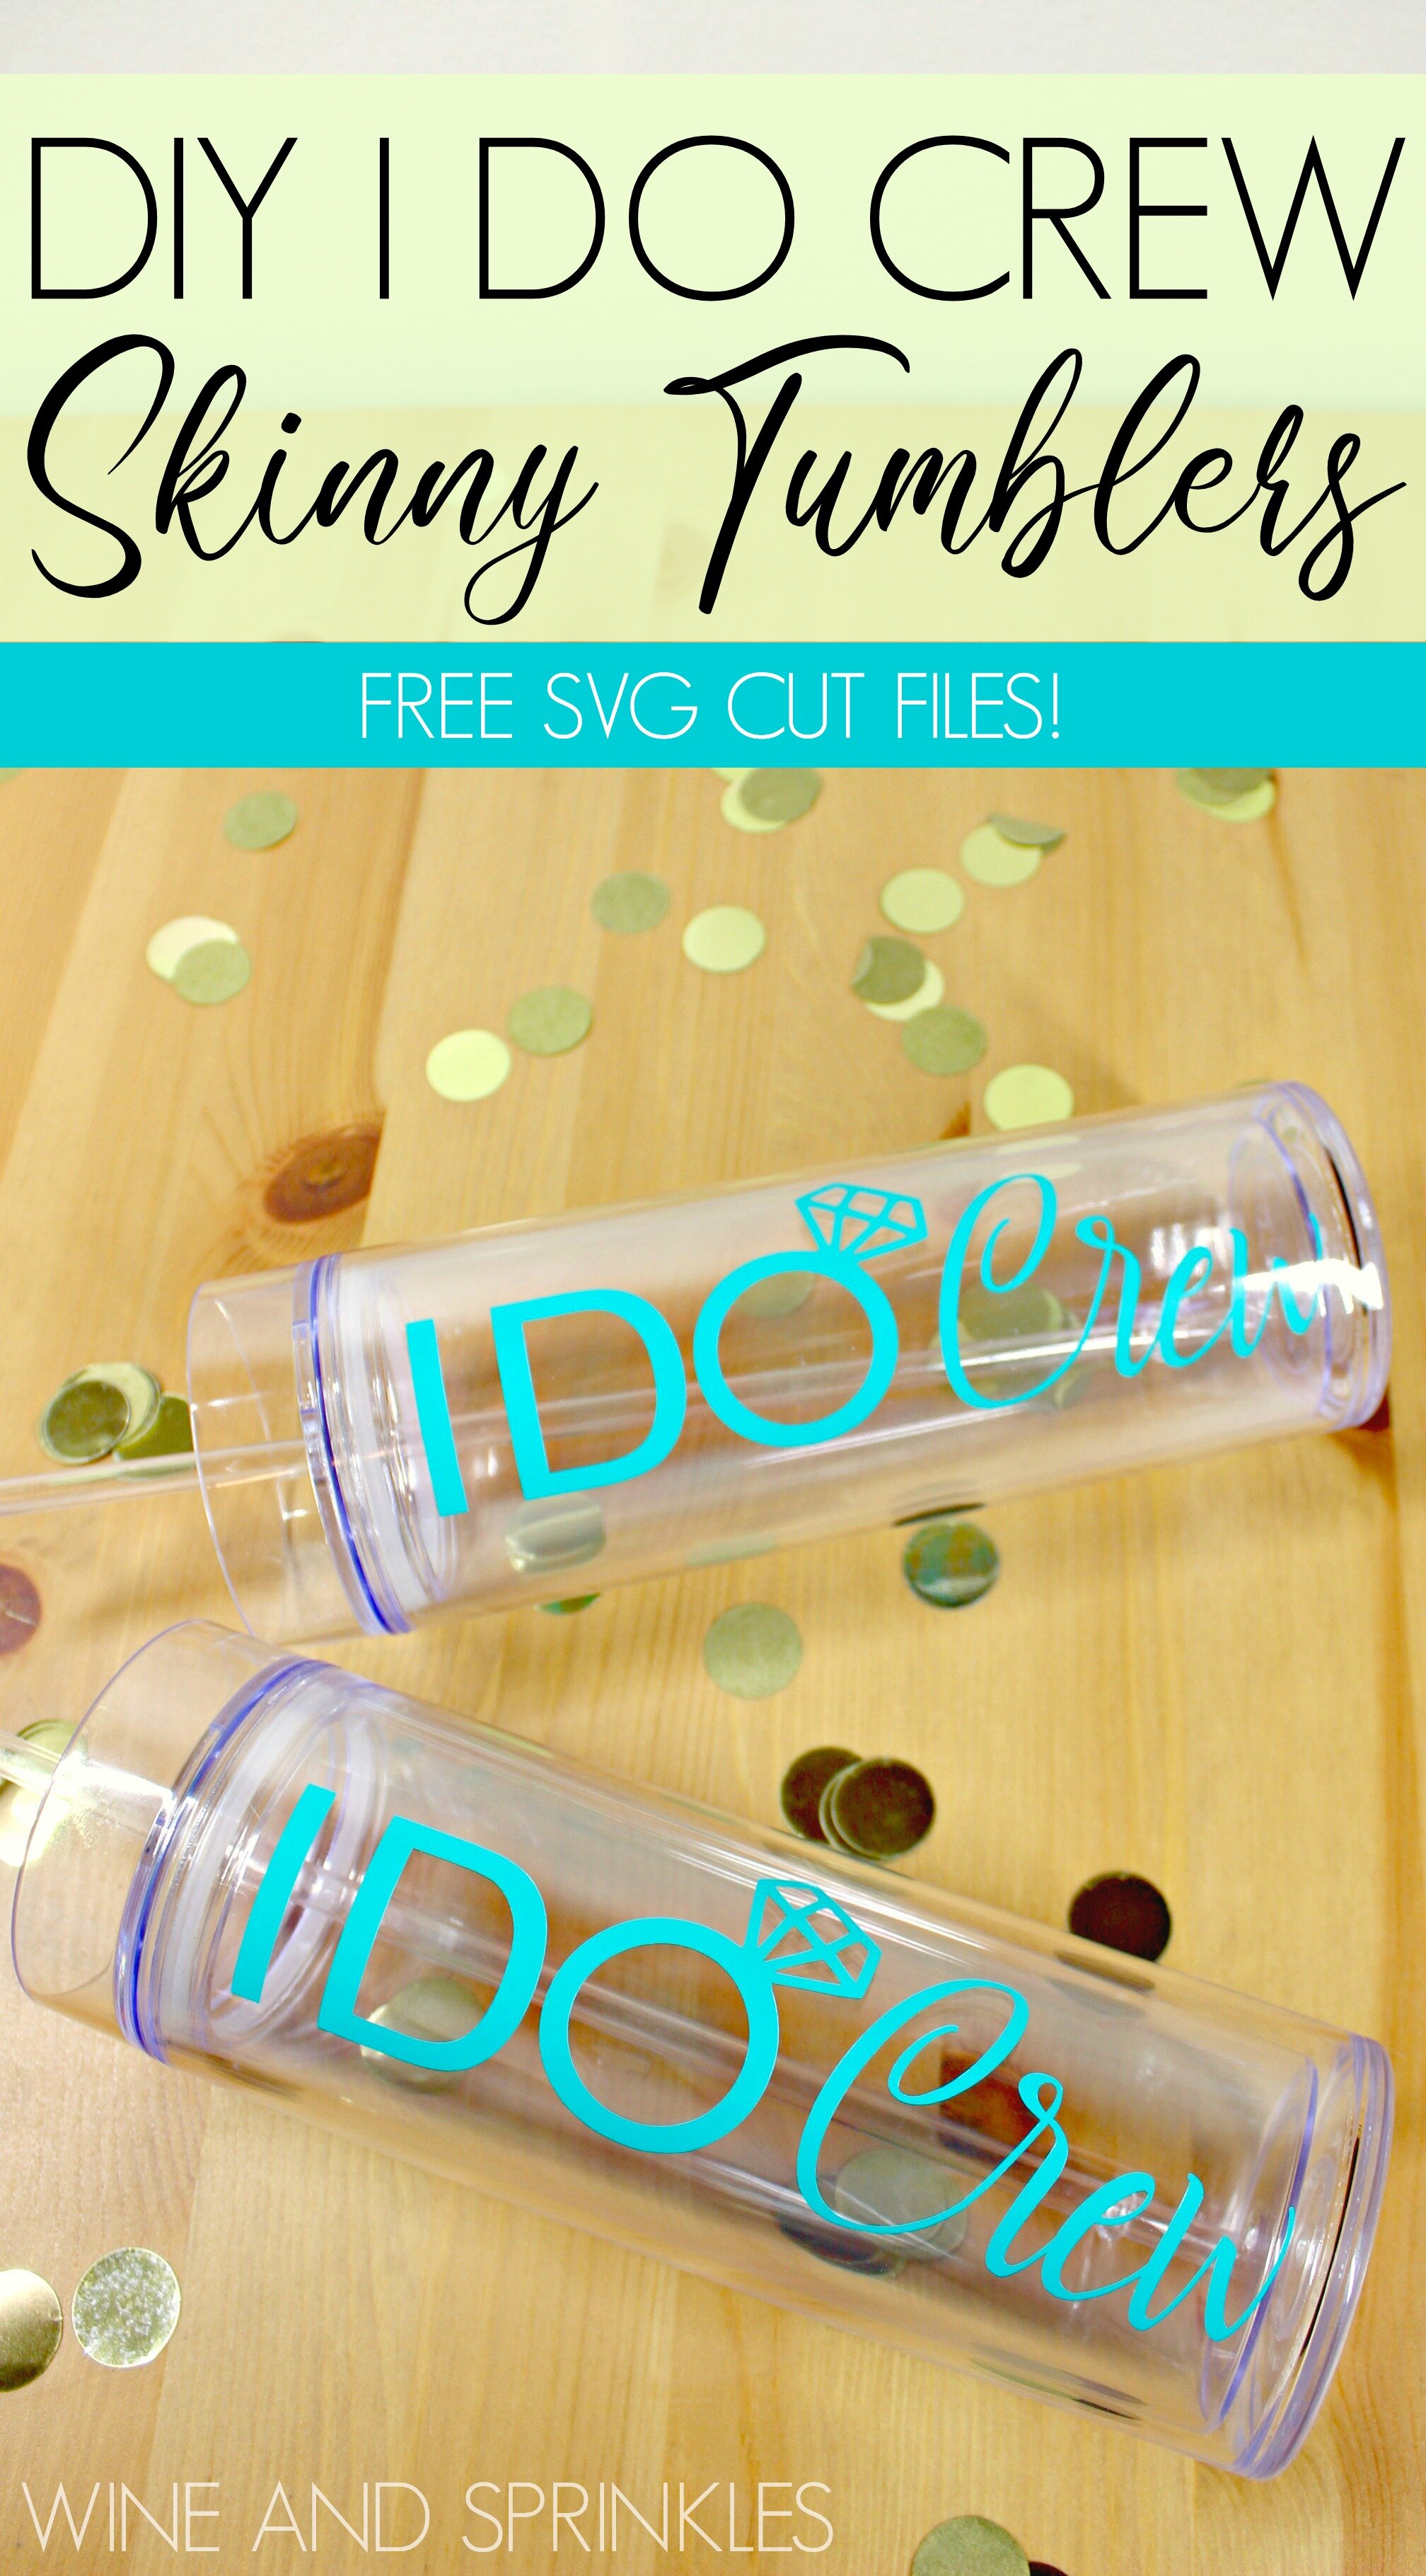
When I was designing Bridesmaids Tumblers, I had to include my new favorite bridal party group saying, the I Do Crew! I love this saying and it's perfect not only for Bridesmaids Proposals and Gifts, but also for your whole bridal party group to use for getting ready or dress shopping! 

 I made the decals with Oracal 651 Turquoise Vinyl and they were beautiful on the Clear Acrylic Tumblers, but I would love to see what the Gold Metalized Vinyl would look like on a Black, White or Marbled Tumbler for a bachelorette party! I used the fonts Bebas Kai for “I Do” and Rachella for “Crew” if you would like to use these phones to further personalize tumblers they are available for free at dafont.com


DIY I Do Crew Bridal Party Skinny Tumblers #idocrew #diywedding #svgfiles

You can see more of our Tumbler Decal Designs Here for other choices to perfectly fit your taste and that you can DIY for your girls!


DIY I Do Crew Bridal Party Skinny Tumblers #idocrew #diywedding #svgfiles
  1. After downloading the cut files, import them into the Cricut Software. After creating a new project, select Upload Image. Select the file you wish to upload and it will automatically take you to the final upload screen, where you can name the file, then select Save.

  2. Cut the design(s) in your choice of permanent adhesive vinyl with the Vinyl Setting on your Cricut. The SVG Files are sized so that they will automatically cut to the size you see in the photos, but if you want to change the size you can.

DIY I Do Crew Bridal Party Skinny Tumblers #idocrew #diywedding #svgfiles

4. Now, transfer the design to your tumbler. Remove the tape and decal from the backing, making sure that the entire decal transfers to the transfer tape.

3. Once the designs are cut, weed away the extra vinyl and cut a piece of transfer tape to 2.5" x 7.5". Cut away any excess backing from the vinyl design and smooth transfer tape over the design, aligning it with the text and arranging it such that one set of the 1/2” blocks are along the left of the decal, as shown in the photos. Using the smoother tool, smooth the tape over the vinyl, removing any air bubbles.

DIY I Do Crew Bridal Party Skinny Tumblers #idocrew #diywedding #svgfiles

5. Arrange the design such that the short side of the transfer tape is along the top edge of the lip of the tumbler, as shown in the photos. Starting from the top and working down, trace the letters to smooth them onto the tumbler. Smooth the design to remove any air bubbles. Remove the transfer tape from the tumbler, leaving the design on the tumbler.

6. Use the smoother tool or your finger to retrace the letters after removing the transfer tape to smooth out any additional air bubbles. Repeat with the remaining tumblers.

DIY I Do Crew Bridal Party Skinny Tumblers #idocrew #diywedding #svgfiles

Bride Squad DIY Skinny Tumblers

This post contains affiliate links, meaning that if you click on a link I will recieve a small comission. This costs you nothing extra and I only promote products I use and love! You can read our full disclosure here

Bride Squad DIY Bridal Party Skinny Tumblers for Bridesmaid Proposals, Bridesmaid Gifts, or Getting Ready Drinks #wineandsprinklesdiy #diywedding #bridesmaidgifts

For those of you that may want to create more personalized designs,  I used the font Passengers Script for the Bride and Bride Squad Decals, which you can download for free at dafont.com.

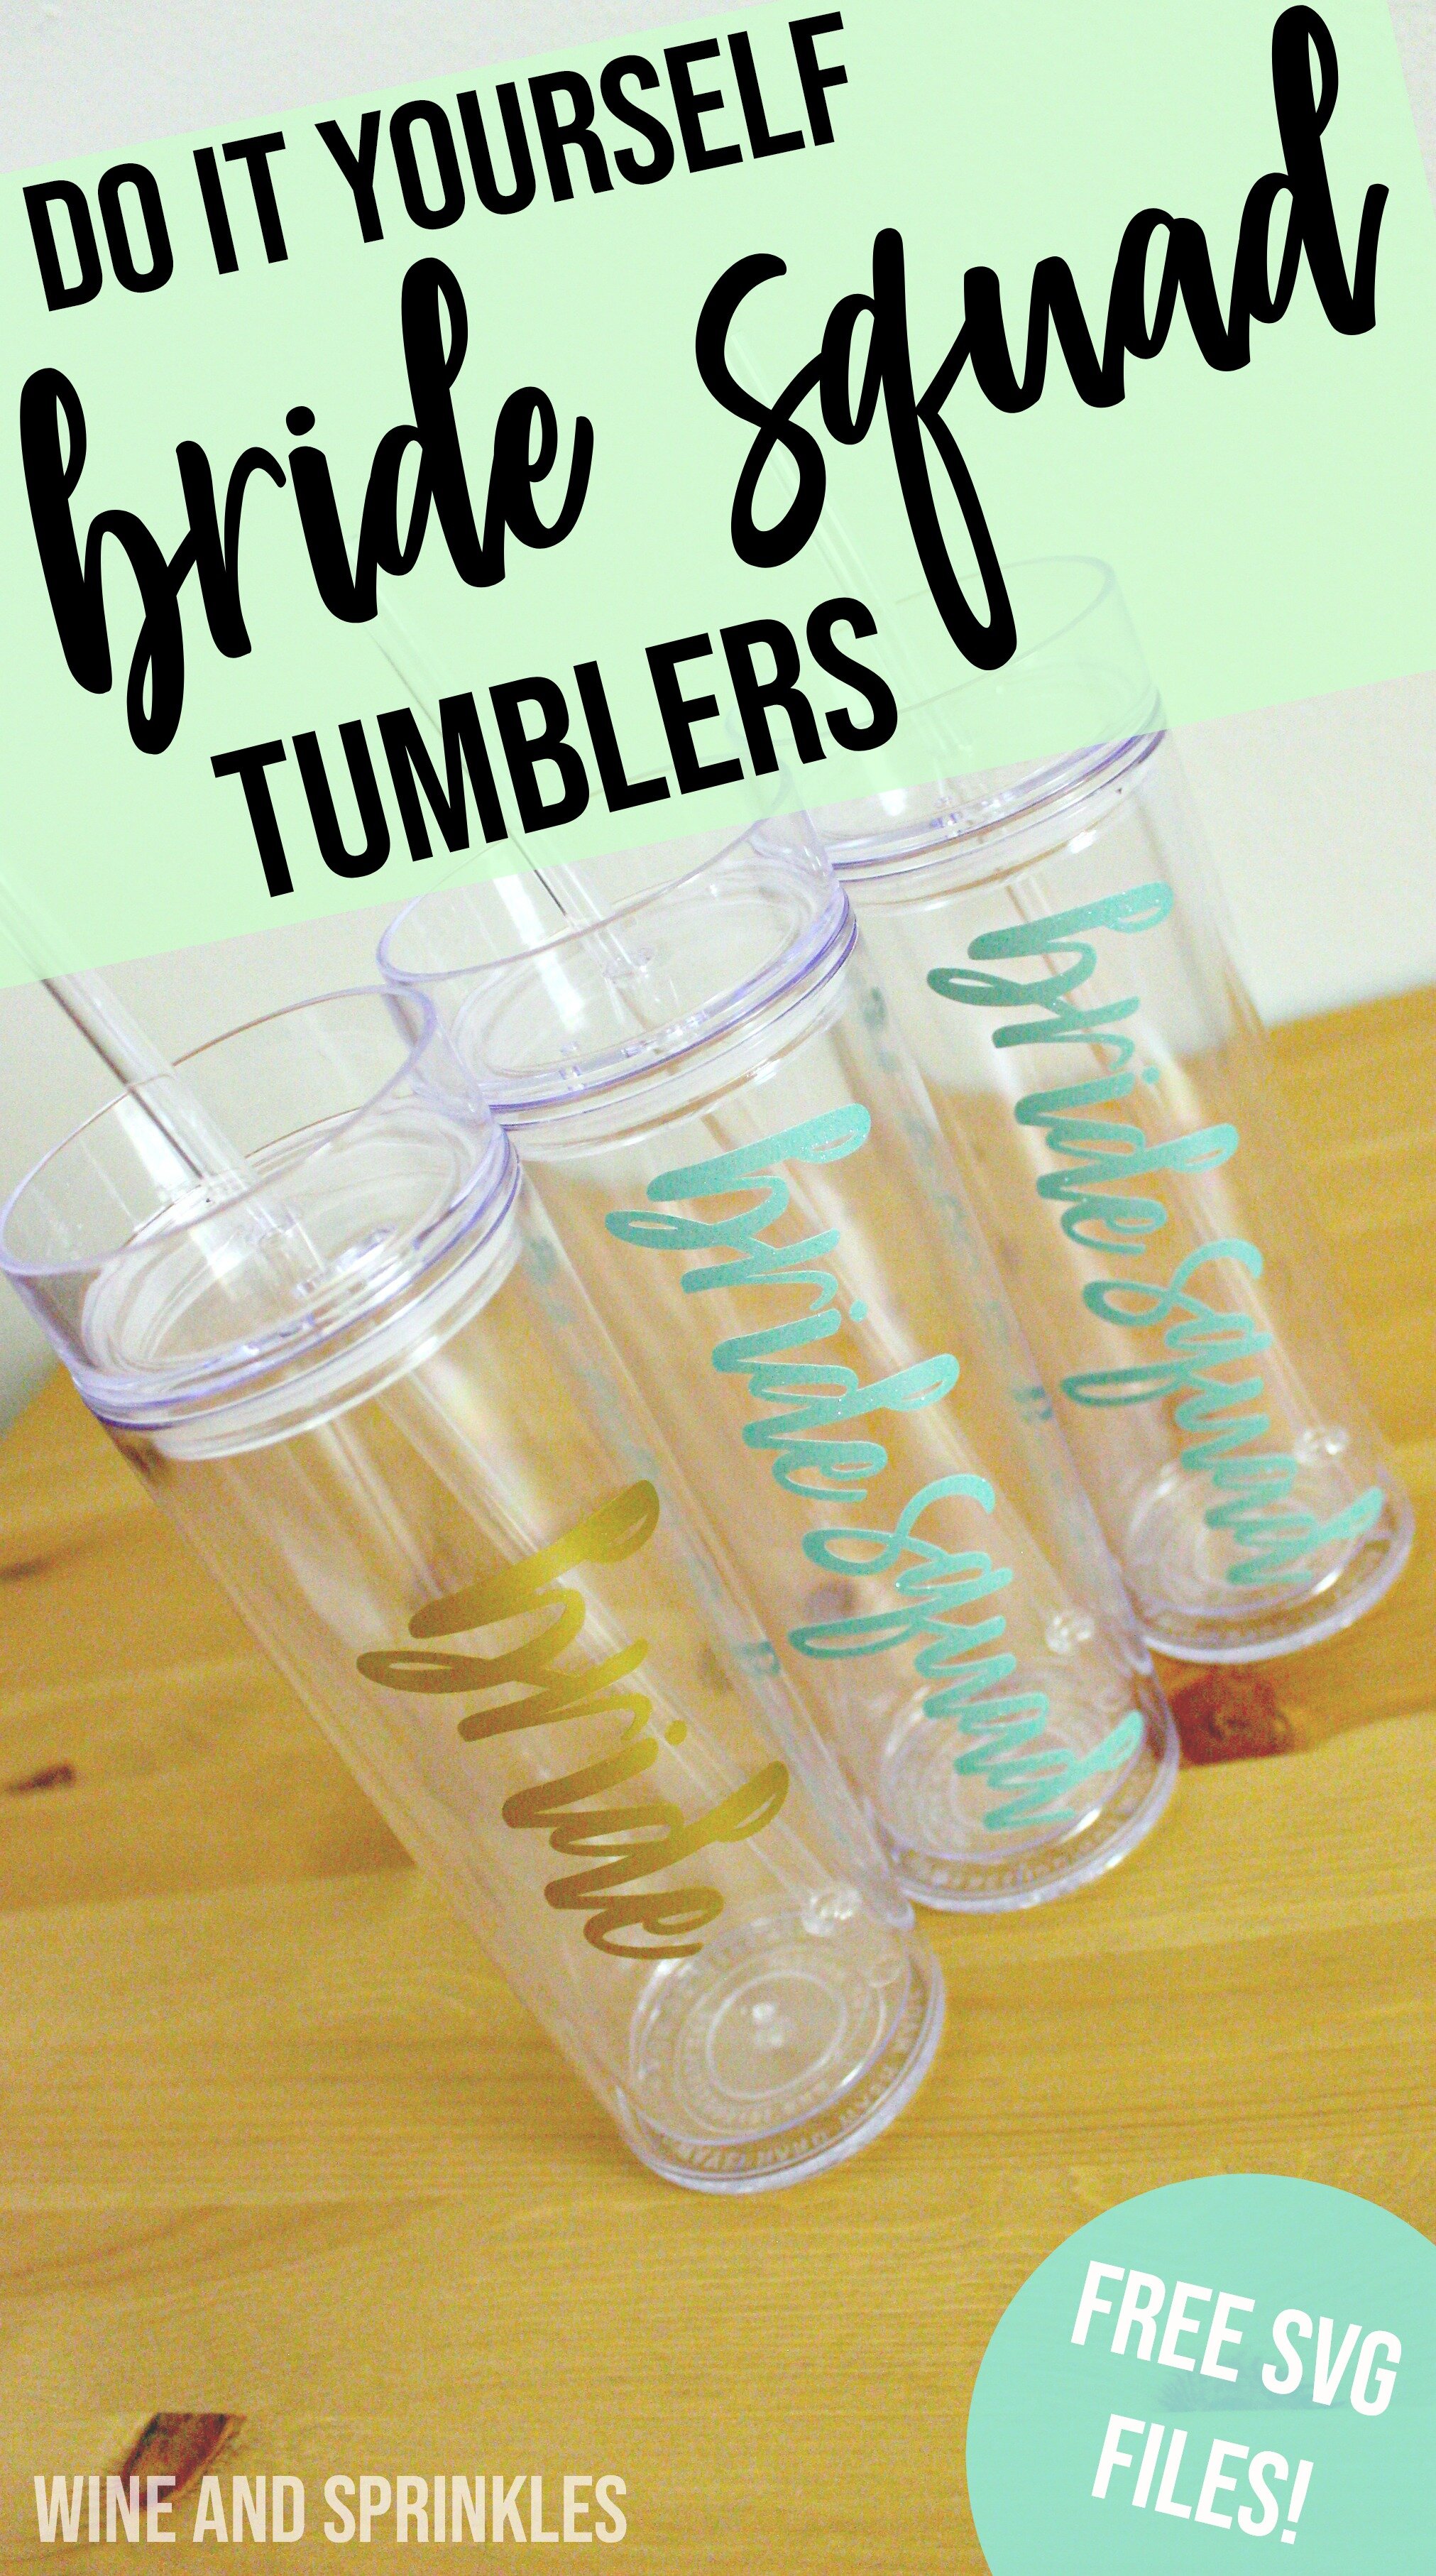
Skinny Tumblers are a great choice for  Bridesmaid Proposals, Bridesmaid Gifts, Bachelorette Party Favors, or getting ready drinks the morning of your wedding. Since they are also a great choice for crafty brides to DIY, we’ve made multiple Tumbler Designs for you to choose from! Up today are some bride squad skinny tumblers, Perfect for including in a bridesmaid box or for sipping bachelorette cocktails at the pool.

These decals are easy to weed and good project for beginners working on curved surfaces. While the tumblers are a curved surface, the cylindrical shape makes the transfer pretty easy. The bride decal was cut is Oracal 651 Gold Permanent Adhesive Vinyl with the bride squad cut in Glitter SeaFoam Green, which may be one of my new favorite color combinations!


Bride Squad DIY Bridal Party Skinny Tumblers for Bridesmaid Proposals, Bridesmaid Gifts, or Getting Ready Drinks #wineandsprinklesdiy #diywedding #bridesmaidgifts


  1. After downloading the cut files, import them into the Cricut Software. After creating a new project, select Upload Image. Select the file you wish to upload and it will automatically take you to the final upload screen, where you can name the file, then select Save.

  2. Cut the design(s) in your choice of permanent adhesive vinyl with the Vinyl Setting on your Cricut. The SVG Files are sized so that they will automatically cut to the size you see in the photos, but if you want to change the size you can.

Bride Squad DIY Bridal Party Skinny Tumblers for Bridesmaid Proposals, Bridesmaid Gifts, or Getting Ready Drinks #wineandsprinklesdiy #diywedding #bridesmaidgifts
 
Bride Squad DIY Bridal Party Skinny Tumblers for Bridesmaid Proposals, Bridesmaid Gifts, or Getting Ready Drinks #wineandsprinklesdiy #diywedding #bridesmaidgifts

3. Once the designs are cut, weed away the extra vinyl and cut a piece of transfer tape to 3" x 7.5". Cut away any excess backing from the vinyl design and smooth transfer tape over the design, aligning it with the text and arranging it such that one set of the 1/2” blocks are along the left of the decal, as shown in the photos. Using the smoother tool, smooth the tape over the vinyl, removing any air bubbles.

Bride Squad DIY Bridal Party Skinny Tumblers for Bridesmaid Proposals, Bridesmaid Gifts, or Getting Ready Drinks #wineandsprinklesdiy #diywedding #bridesmaidgifts

4. Now, transfer the design to your tumbler. Remove the tape and decal from the backing, making sure that the entire decal transfers to the transfer tape.

 
Bride Squad DIY Bridal Party Skinny Tumblers for Bridesmaid Proposals, Bridesmaid Gifts, or Getting Ready Drinks #wineandsprinklesdiy #diywedding #bridesmaidgifts

5. Arrange the design such that the short side of the transfer tape is along to top edge of the lip of the tumbler, as shown in the photos. Starting from the top and working down, trace the letters to smooth them onto the tumbler. Smooth the design to remove any air bubbles,. Remove the transfer tape from the tumbler, leaving the design on the tumbler.

6. Use the smoother tool or your finger to retrace the letters after removing the transfer tape to smooth out any additional air bubbles. Repeat with the remaining tumblers.

Bride Squad DIY Bridal Party Skinny Tumblers for Bridesmaid Proposals, Bridesmaid Gifts, or Getting Ready Drinks #wineandsprinklesdiy #diywedding #bridesmaidgifts

Arrow Decal DIY Bridal Party Skinny Tumblers

This post contains affiliate links, meaning that if you click on a link I will recieve a small comission. This costs you nothing extra and I only promote products I use and love! You can read our full disclosure here

Arrow Decal DIY Bridal Party Skinny Tumblers for bridesmaid proposals, bridesmaid gifts, bachelorette party favors, or getting ready drinks #wineandsprinklesdiy #diywedding #bridesmaidgifts

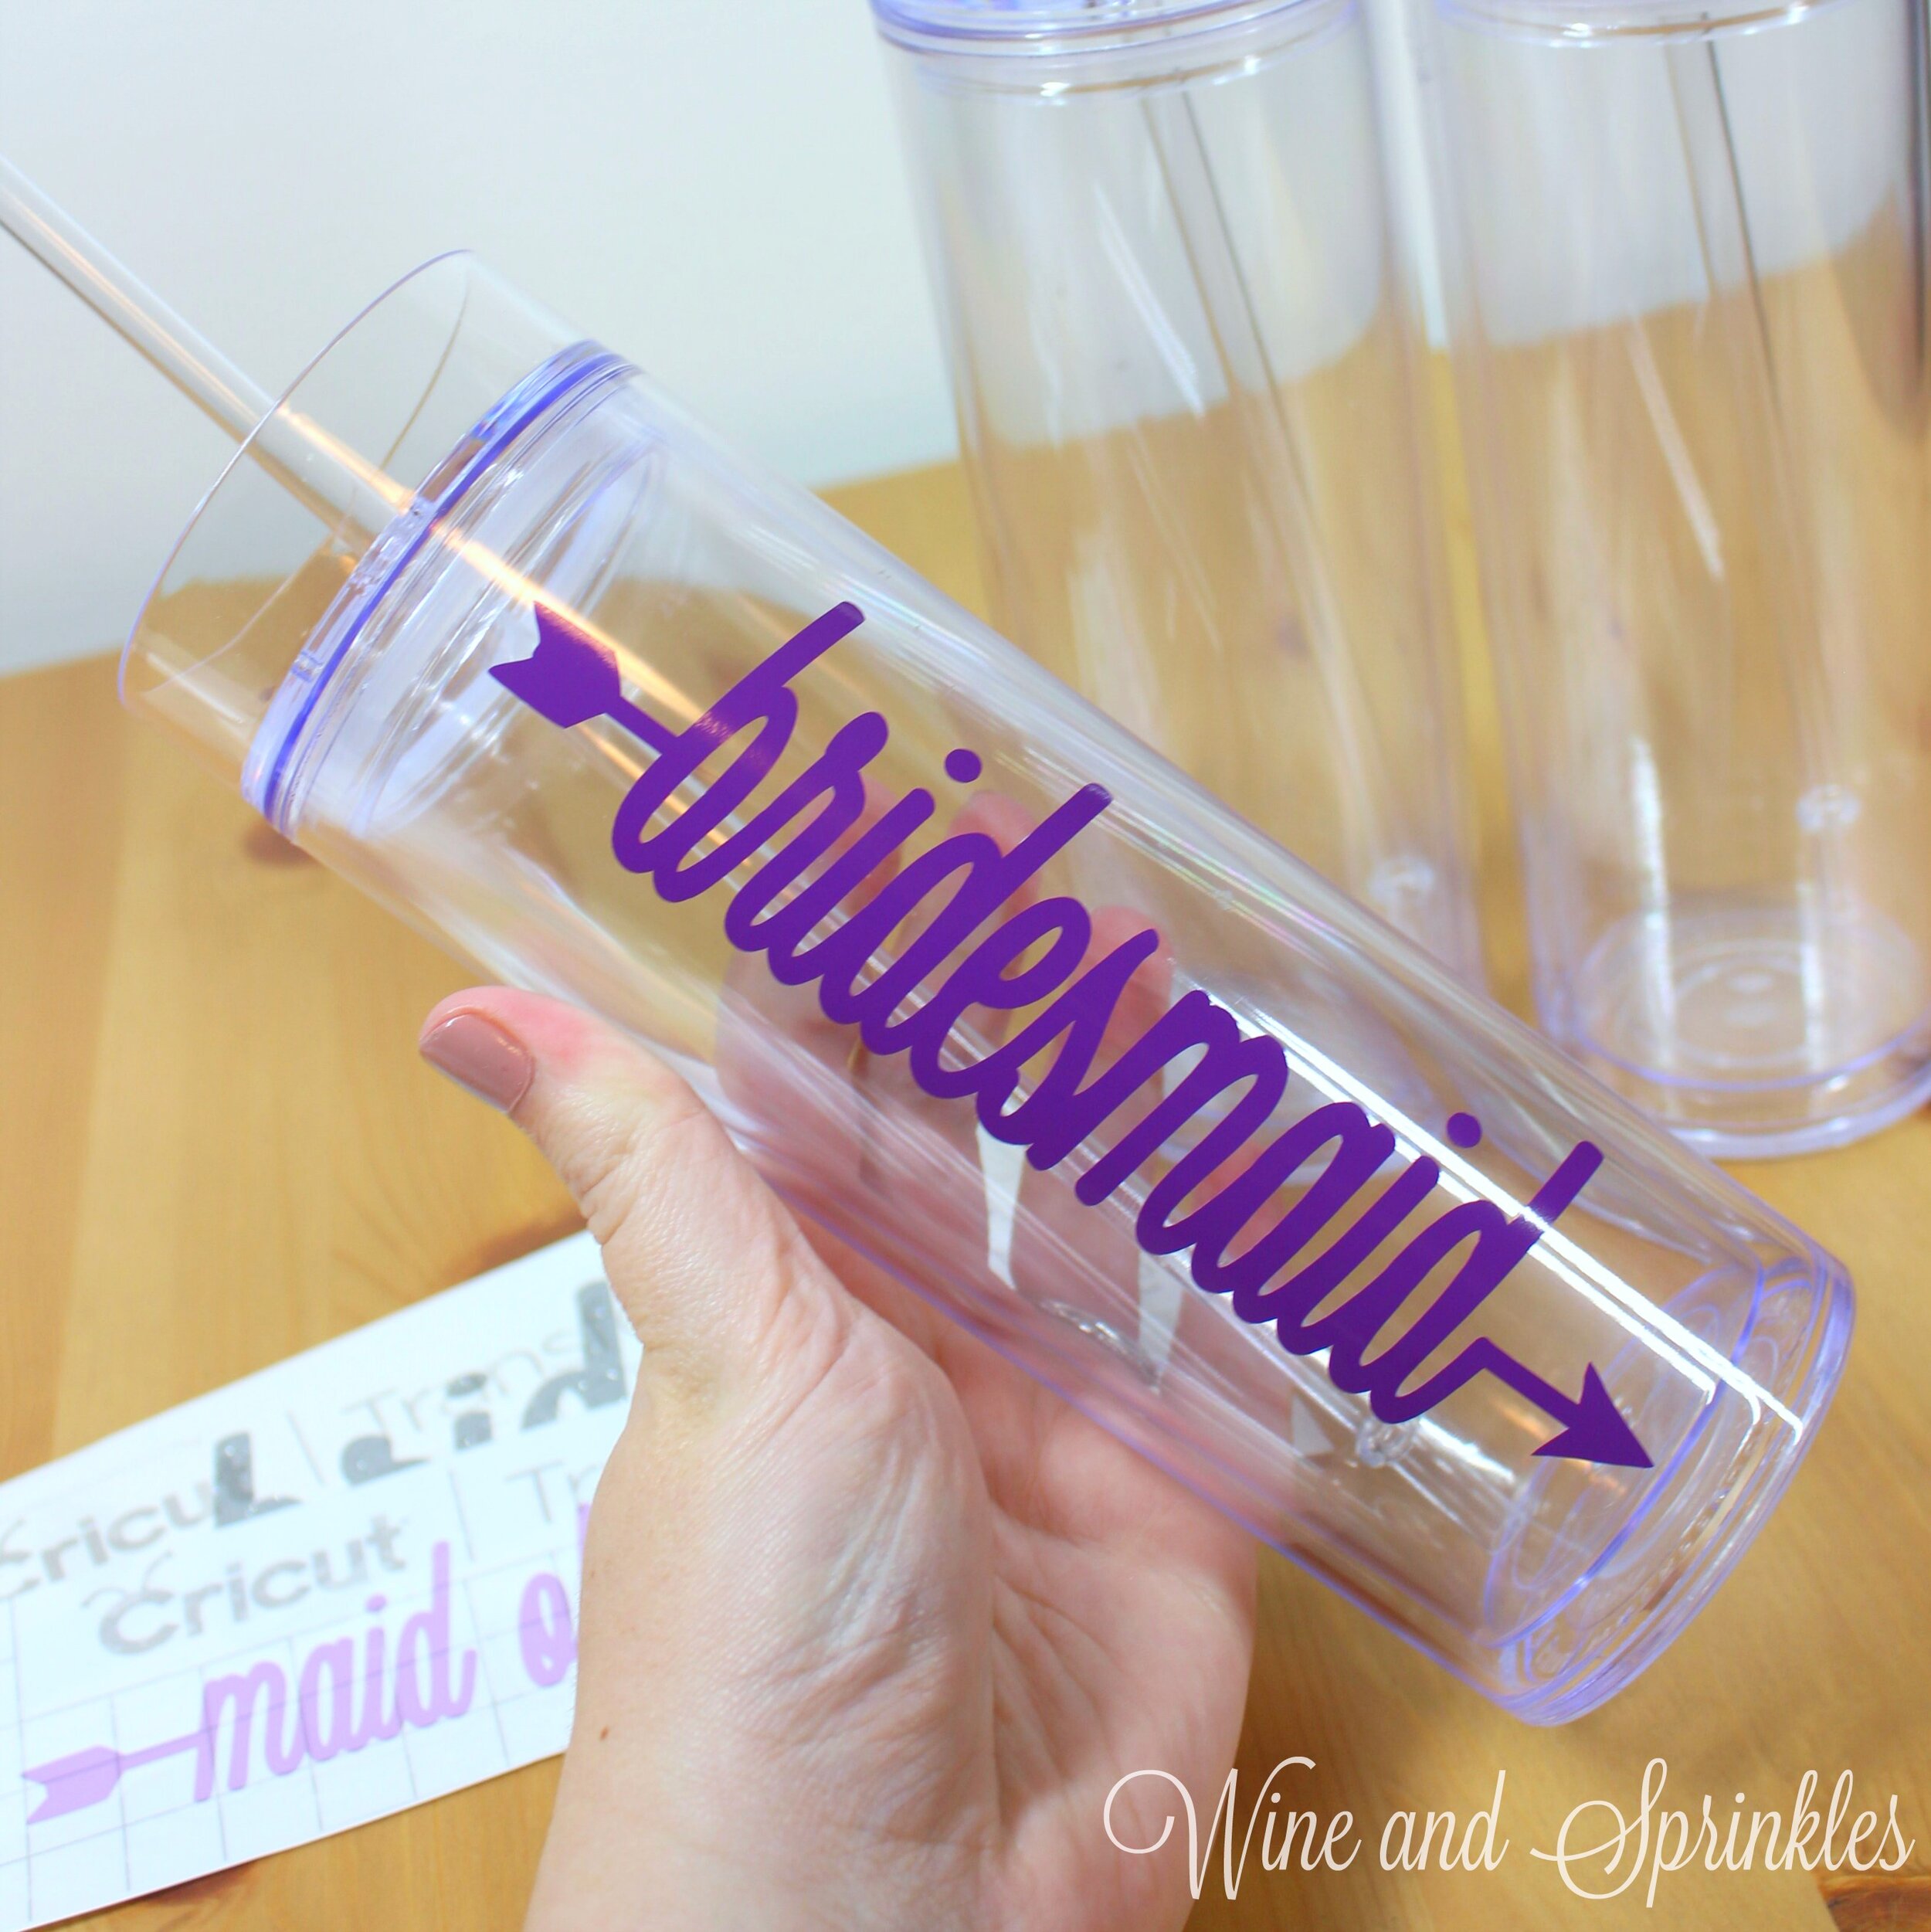
Bridal Party tumblers are always a great choice for Bridesmaid Proposals, Gifts, or as Bachelorette Party Favors, so we had to add to our collection of decals! Since we are starting the year with some fun projects to invite your bridal party to the wedding fun, our first tumbler project of the year are these Bridal Party Arrow Decal Tumblers.

The whimsical arrow decals are easy to weed and a great project for beginners. While the tumblers are a curved surface, the cylindrical shape makes the transfer far easier than wine glasses. The bride decal was cut is Silver Glitter Permanent Adhesive Vinyl, complemented by the maid of honor and bridesmaids tumblers in Lilac and Purple Permanent Adhesive Vinyl.


Arrow Decal DIY Bridal Party Skinny Tumblers for bridesmaid proposals, bridesmaid gifts, bachelorette party favors, or getting ready drinks #wineandsprinklesdiy #diywedding #bridesmaidgifts

For those of you that may want to create more personalized designs,  I used the font Bio Monster for the lettering in the arrow decals, which you can download for free at dafont.com.


Download Cut Files Here!
Arrow Decal DIY Bridal Party Skinny Tumblers for bridesmaid proposals, bridesmaid gifts, bachelorette party favors, or getting ready drinks #wineandsprinklesdiy #diywedding #bridesmaidgifts
  1. After downloading the cut files, import them into the Cricut Software. After creating a new project, select Upload Image. Select the file you wish to upload and it will automatically take you to the final upload screen, where you can name the file, then select Save.

  2. Cut the design(s) in your choice of permanent adhesive vinyl with the Vinyl Setting on your Cricut. The SVG Files are sized so that they will automatically cut to the size you see in the photos, but if you want to change the size you can.

Arrow Decal DIY Bridal Party Skinny Tumblers for bridesmaid proposals, bridesmaid gifts, bachelorette party favors, or getting ready drinks #wineandsprinklesdiy #diywedding #bridesmaidgifts

3. Once the designs are cut, weed away the extra vinyl and cut a piece of transfer tape to 2.5" x 7.5". Cut away any excess backing from the vinyl design and smooth transfer tape over the design, aligning it with the text and arranging it such that one set of the 1/2” blocks are to the left of the end of the arrow, with the decal horizontally aligned along the bottom of the text. Using the smoother tool, smooth the tape over the vinyl, removing any air bubbles.

4. Now, transfer the design to your tumbler. Remove the tape and decal from the backing, making sure that the entire decal transfers to the transfer tape.

Arrow Decal DIY Bridal Party Skinny Tumblers for bridesmaid proposals, bridesmaid gifts, bachelorette party favors, or getting ready drinks #wineandsprinklesdiy #diywedding #bridesmaidgifts

5. Arrange the design such that the short side of the transfer tape is along to top edge of the lip of the tumbler, as shown. Starting from the top and working down, trace the letters to smooth them onto the tumbler. Smooth the design to remove any air bubbles,. Remove the transfer tape from the tumbler, leaving the design on the tumbler.

6. Use the smoother tool or your finger to retrace the letters after removing the transfer tape to smooth out any additional air bubbles. Repeat with all remaining tumblers.

Arrow Decal DIY Bridal Party Skinny Tumblers for bridesmaid proposals, bridesmaid gifts, bachelorette party favors, or getting ready drinks #wineandsprinklesdiy #diywedding #bridesmaidgifts

DIY NOLA and Bourbon St Lamp Post Bachelorette Skinny Tumblers

This post contains affiliate links, meaning that if you click on a link I will recieve a small comission. This costs you nothing extra and I only promote products I use and love! You can read our full disclosure here

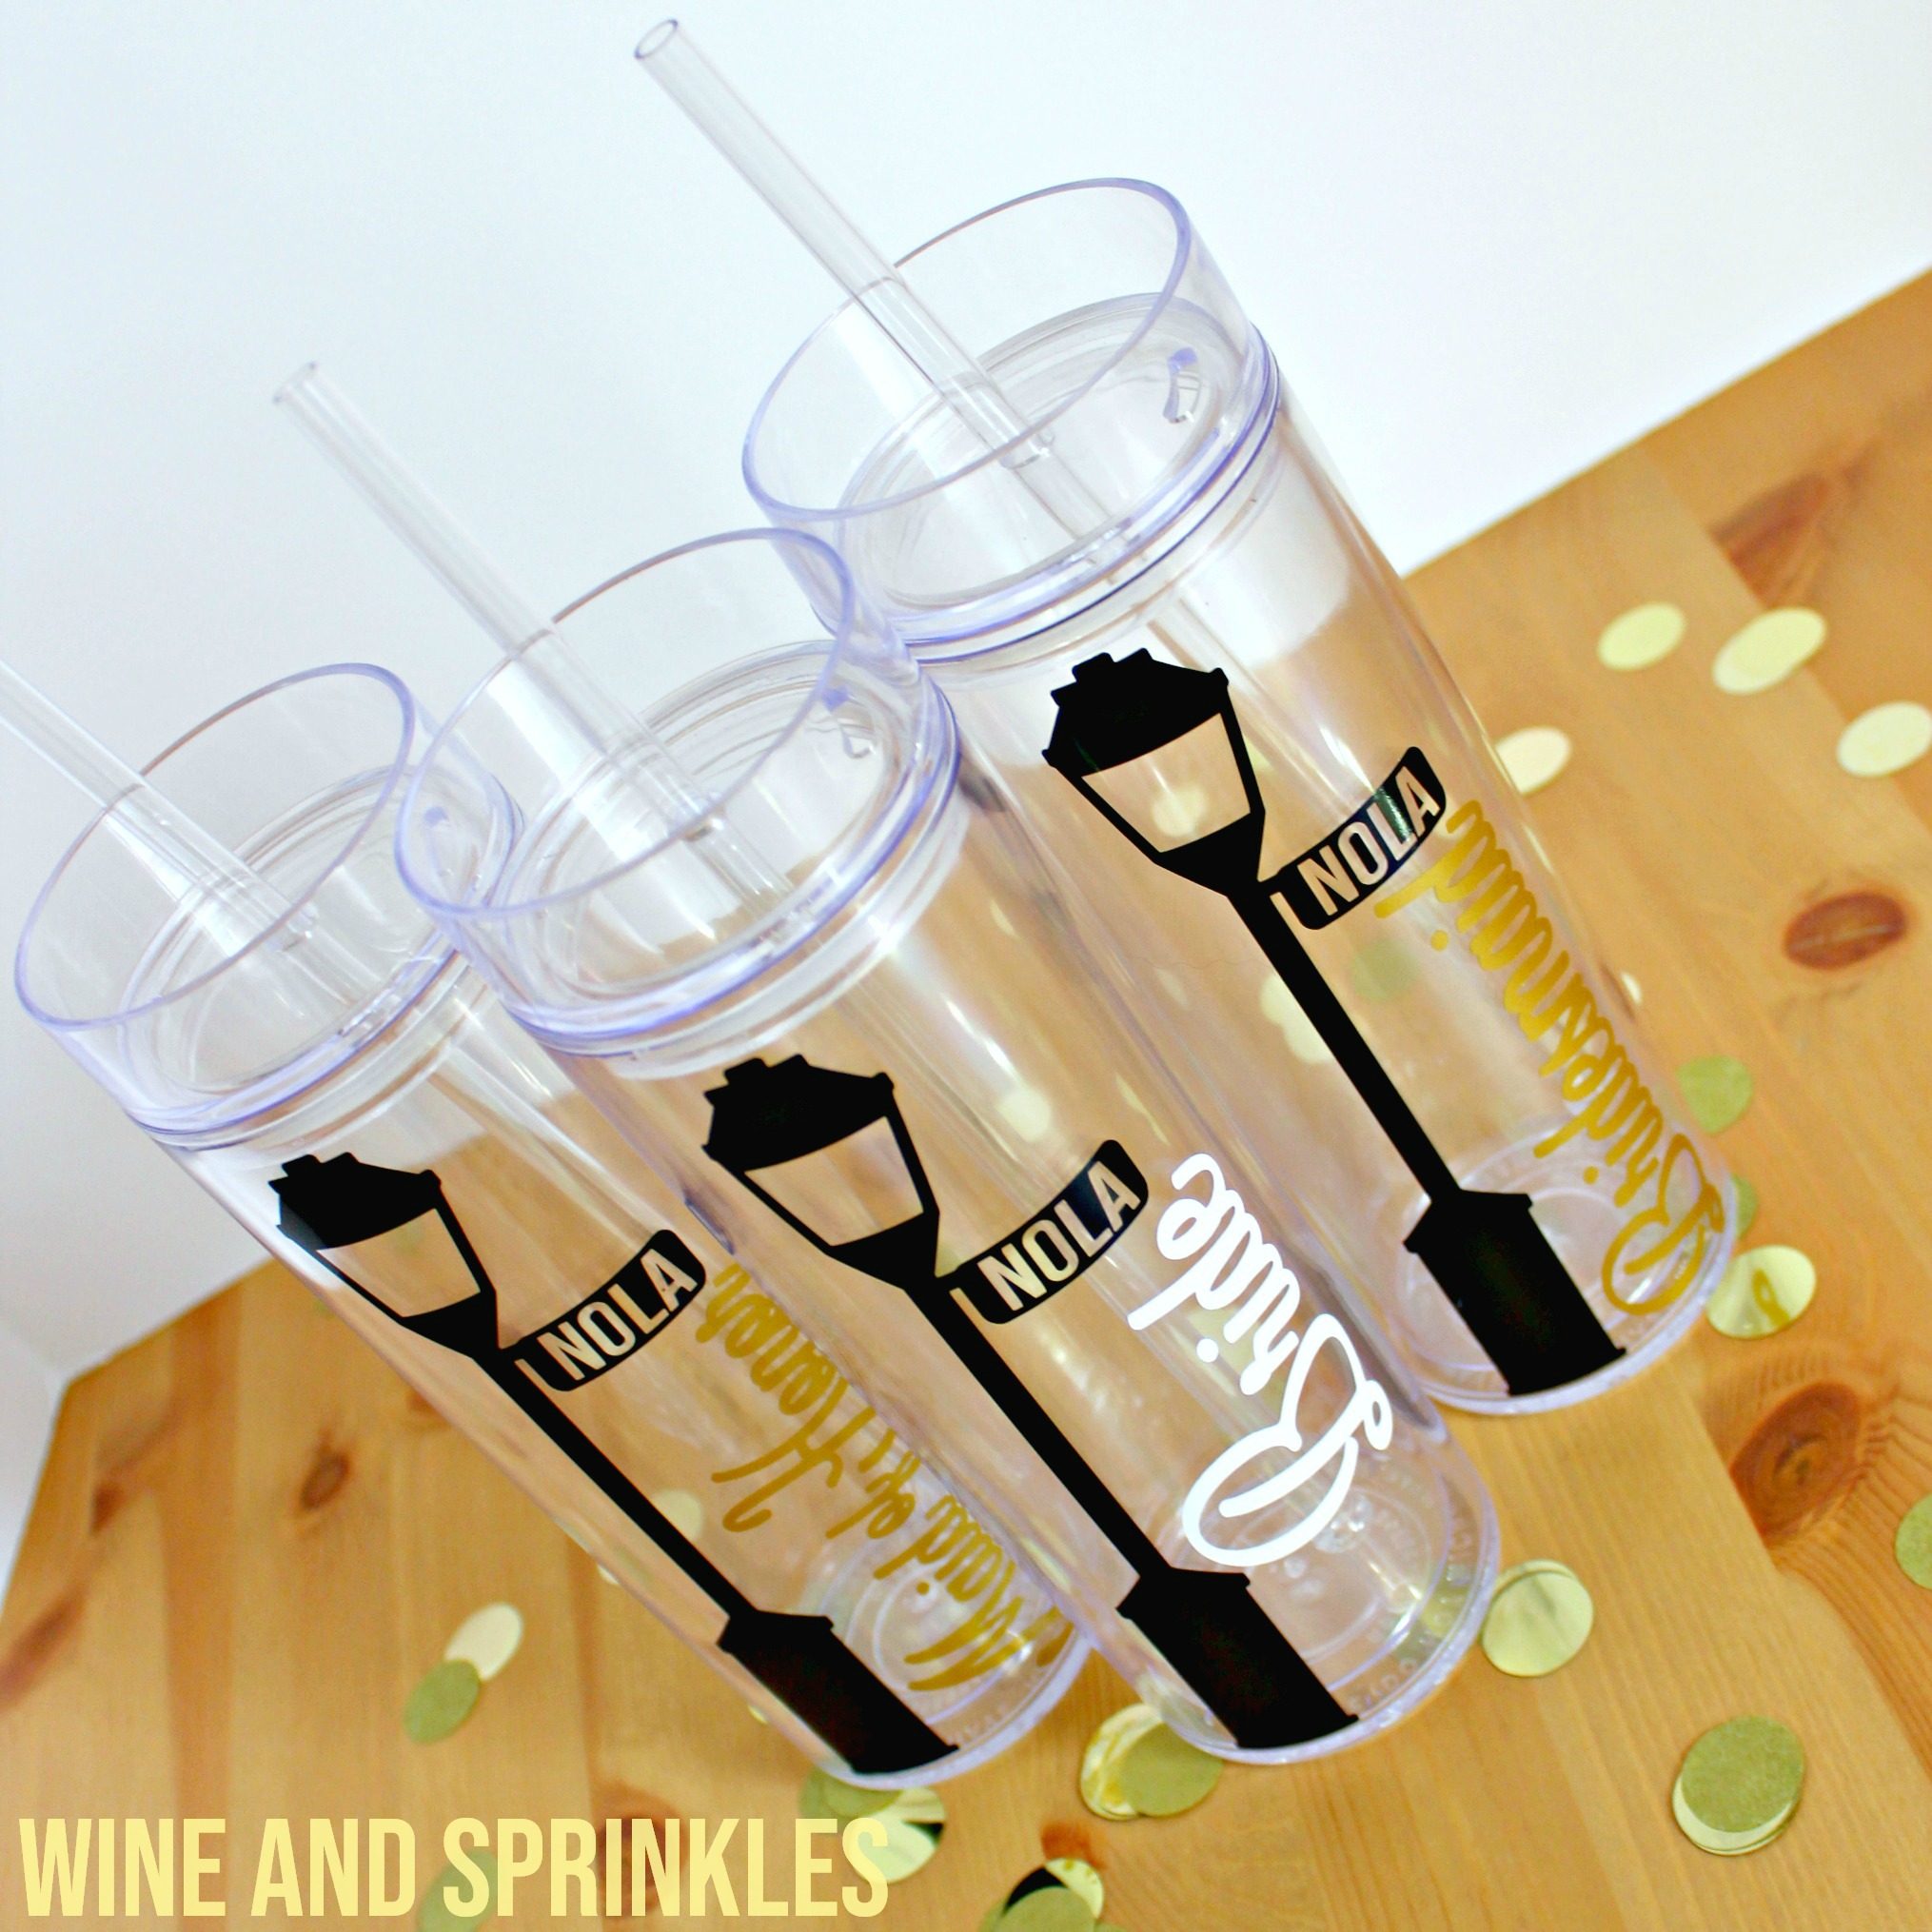
DIY Bourbon Street and NOLA Lamp Post Skinny Tumbler #bachelorette #nola #svgfiles

I’ve been wanting to start designing a set of Destination Bachelorette Skinny Tumblers, so when I found out my sister in law is having her bachelorette in New Orleans, these tumblers were born!

The files are designed in the colors you see these tumblers and will automatically sort the decals onto separate sheets based on their colors.

 
DIY Bourbon Street and NOLA Lamp Post Skinny Tumbler #bachelorette #nola #svgfiles

For my tumblers, I used Oracal 651 Gold Metallic Vinyl for the Bridesmaid and Maid of Honor Decals, Oracal 651 White Vinyl for the Bride Decals and Oracal 651 Black Vinyl for the lamp posts and I absolutely adore them! While they are pretty easy to weed, it does take some practice to get them perfectly vertical, so grid lined transfer tape is a must!

 
DIY Bourbon Street and NOLA Lamp Post Skinny Tumbler #bachelorette #nola #svgfiles
 
DIY Bourbon Street and NOLA Lamp Post Skinny Tumbler #bachelorette #nola #svgfiles

1. After downloading the cut files, import them into the Cricut Software. After creating a new project, select Upload Image. Select the file you wish to upload and it will automatically take you to the final upload screen, where you can name the file the select Save. 

2. Cut the design(s) in your choice of permanent adhesive vinyl with the Vinyl Setting on your Cricut. The SVG Files are sized so that they will automatically cut to the size you see in the photos, but if you want to change the size you can. :)

3. Once the designs are cut, weed away the extra vinyl and cut a piece of transfer tape to 2.5" x 7.5". Cut away any excess backing from the vinyl design and smooth transfer tape over the design, aligning it along the left side of the pole of the lamp post and along the top of the bottom lip of the lamp post, as shown below. Using the smoother tool, smooth the tape to the vinyl, removing any air bubbles. The transfer tape should overlap the backing of the design, so that you can stick the tape to an object with the backing still on the design.

DIY Bourbon Street and NOLA Lamp Post Skinny Tumbler #bachelorette #nola #svgfiles

4. Now, transfer the design to your tumbler. If you are comfortable transferring longer designs, you can remove the decal from the backing directly and place on the tumbler, aligning the top of the transfer tape along the lip of the tumbler, as shown below. I found it easiest to first place the transfer tape with both the decal and backing on the tumbler. Once they were placed satisfactorily, I lifted the transfer tape and decal while making sure the transfer tape wasn’t fully removed from the tumbler. Then remove the backing and replace the decal and transfer tape as before to transfer the design to the tumbler Arrange the design in the middle of the tumbler with the top of the transfer tape along the top lip of the tumbler.

DIY Bourbon Street and NOLA Lamp Post Skinny Tumbler #bachelorette #nola #svgfiles

5. Working from the the top and working to the bottom of the lamp post, smooth the design onto the tumbler. Because the surface is curved, focus on the vinyl smoothly transferring than your transfer tape looking nice and neat; however, the backing should flatten out with little trouble, at least it did for me! :) Once the design is set, remove the transfer tape from the tumbler, leaving the first part of the design on the tumbler.

DIY Bourbon Street and NOLA Lamp Post Skinny Tumbler #bachelorette #nola #svgfiles

6. Now, cut a piece of transfer tape to 2.5" x 5.5" for the Bridesmaid and Maid of Honor text decals and 2.5” x 3.5” for the Bride text decal. Cut away any excess backing from the vinyl design and smooth transfer tape over the design, aligning it along the left and bottom sides of the of the text with one set of the 1/2” blocks to the left and below the decal, as shown above. Using the smoother tool, smooth the tape to the vinyl, removing any air bubbles. The transfer tape should overlap the backing of the design, so that you can stick the tape to an object with the backing still on the design.

DIY Bourbon Street and NOLA Lamp Post Skinny Tumbler #bachelorette #nola #svgfiles

7. Place the transfer tape with both the decal and backing on the tumbler, aligning it with the right edge of the pole of the lamp post as well as along the bottom of the lamp post for the Bridesmaid and Maid of Honor Tumblers. Since the “Bride” text is shorter, it is aligned along the top of the barrel and the left edge of the pole of the lamp post, as shown above.

DIY Bourbon Street and NOLA Lamp Post Skinny Tumbler #bachelorette #nola #svgfiles

8. Once they were placed satisfactorily, I lifted the transfer tape and decal while making sure the transfer tape wasn’t fully removed from the tumbler. Then remove the backing and replace the decal and transfer tape as before to transfer the design to the tumbler, as shown above and below.

DIY Bourbon Street and NOLA Lamp Post Skinny Tumbler #bachelorette #nola #svgfiles

9. Remove the transfer tape, leaving the text on the tumbler under the sign of the lamp post. Repeat with all remaining tumblers.

DIY Bourbon Street and NOLA Lamp Post Skinny Tumbler #bachelorette #nola #svgfiles


DIY Getting Ready Bridesmaid Dress Tumblers

This post contains affiliate links, meaning that if you click on a link I will recieve a small comission. This costs you nothing extra and I only promote products I use and love! You can read our full disclosure here

Do It Yourself Bridesmaid Dress Getting Ready Wedding Tumblers #bridesmaidgift #diywedding #svgfiles

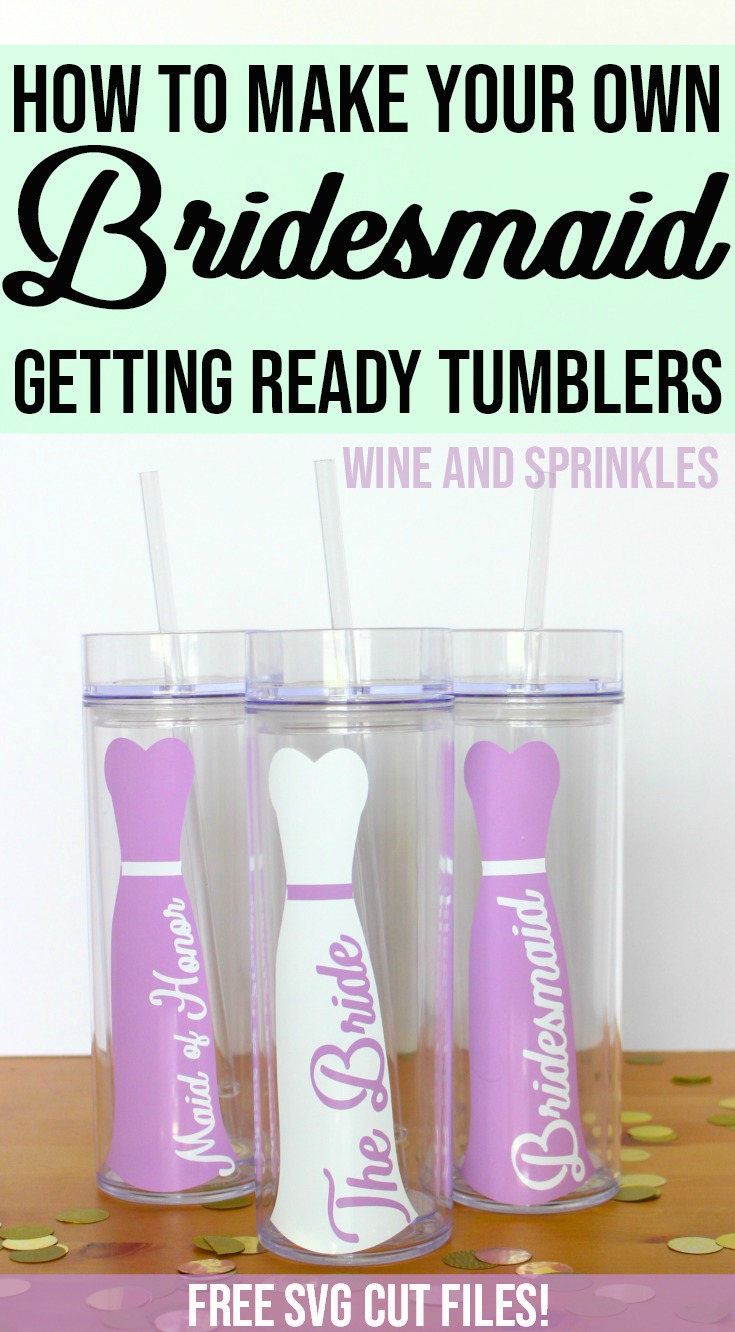
I always see Bridesmaid Dress getting ready tumblers on Etsy and decided to try my hand at making my own! I’ve been designing skinny tumblers lately, so it was a perfect choice to attempt a long and lean evening gown option!

I made both a light colored and a dark colored dress set and both came out beautifully! The combinations I used were: Oracal 651 Lavender Vinyl Dress with White Vinyl Lettering and Amethyst Glitter Vinyl Dress with White Vinyl Lettering. The Bride’s tumblers have lettering in the color of the bridesmaid dresses with a Oracal 651 White Vinyl Dress.

Do It Yourself Bridesmaid Dress Getting Ready Wedding Tumblers #bridesmaidgift #diywedding #svgfiles

Transferring these designs is easiest in layers, similarly to the Princess Inspired Tumblers. It was far easier and cleaner to transfer the designs to the tumblers in layers as well as limiting the air bubbles from transferring and keeping the whole design smooth as its transferred to a curved surface.


1. After downloading the cut files, import them into the Cricut Software. After creating a new project, select Upload Image. Select the file you wish to upload and it will automatically take you to the final upload screen, where you can name the file the select Save. 

1. Supplies with text.jpgDo It Yourself Bridesmaid Dress Getting Ready Wedding Tumblers #bridesmaidgift #diywedding #svgfiles

2. Cut the design(s) in your choice of permanent adhesive vinyl with the Vinyl Setting on your Cricut. The SVG Files are sized so that they will automatically cut to the size you see in the photos, but if you want to change the size you can. :)

3. Once the designs are cut, weed away the extra vinyl and cut a piece of transfer tape to 2.5" x 7" for the dress decal and 2” x 5.5” for the lettering. Cut away any excess backing from the vinyl design and smooth transfer tape over the design, aligning it along the top of the dress, with one set of 1/2” blocks above the decal, as shown Below. For the text, I aligned it along the bottom of the belt as shown in the pictures. Using the smoother tool, smooth the tape to the vinyl, removing any air bubbles.

Do It Yourself Bridesmaid Dress Getting Ready Wedding Tumblers #bridesmaidgift #diywedding #svgfiles
 

4. Now, transfer the dress design to your tumbler. Remove the tape and decal from the backing and smooth the dress onto the tumbler, aligning it along the top lip of the tumbler as shown in the photo. It is easiest to start at the top and smooth from top to bottom, center to outside edges.

Do It Yourself Bridesmaid Dress Getting Ready Wedding Tumblers #bridesmaidgift #diywedding #svgfiles

5. Remove the transfer tape from the tumbler, leaving the dress decal on the tumbler. If there are air bubbles (mine had some), smooth out the ones you can with the smoother tool and for smaller or hard to smooth bubbles, prick them with a needle and smooth them to remove them. :)

6. Now, transfer the lettering to you tumbler. Align the text along the skirt of the dress, working from bottom to top and using the waistband as a guide on height.If your waistband is a little off, you can always trip the belt with an exacto knife, so go for overlap on the waistband.

Do It Yourself Bridesmaid Dress Getting Ready Wedding Tumblers #bridesmaidgift #diywedding #svgfiles

I absolutely adore how these turned out and they are suprisingly easy to make once you’ve done one of them, so don’t be afraid! :)

7. Trace the letters to smooth them onto the dress on the tumbler, as shown above. Once the design is set, remove the transfer tape from the tumbler, leaving the text layer of the design on the tumbler. Repeat with all remaining tumblers.

Do It Yourself Bridesmaid Dress Getting Ready Wedding Tumblers #bridesmaidgift #diywedding #svgfiles


DIY "Does this Ring Make me Look Engaged?" Stemless Wine Glass Tumblers

This post contains affiliate links, meaning that if you click on a link I will recieve a small comission. This costs you nothing extra and I only promote products I use and love! You can read our full disclosure here

DIY "Does this Ring Make me Look Engaged?" Stemless Wine Glass Tumblers #svgfiles #diywedding #tumblers

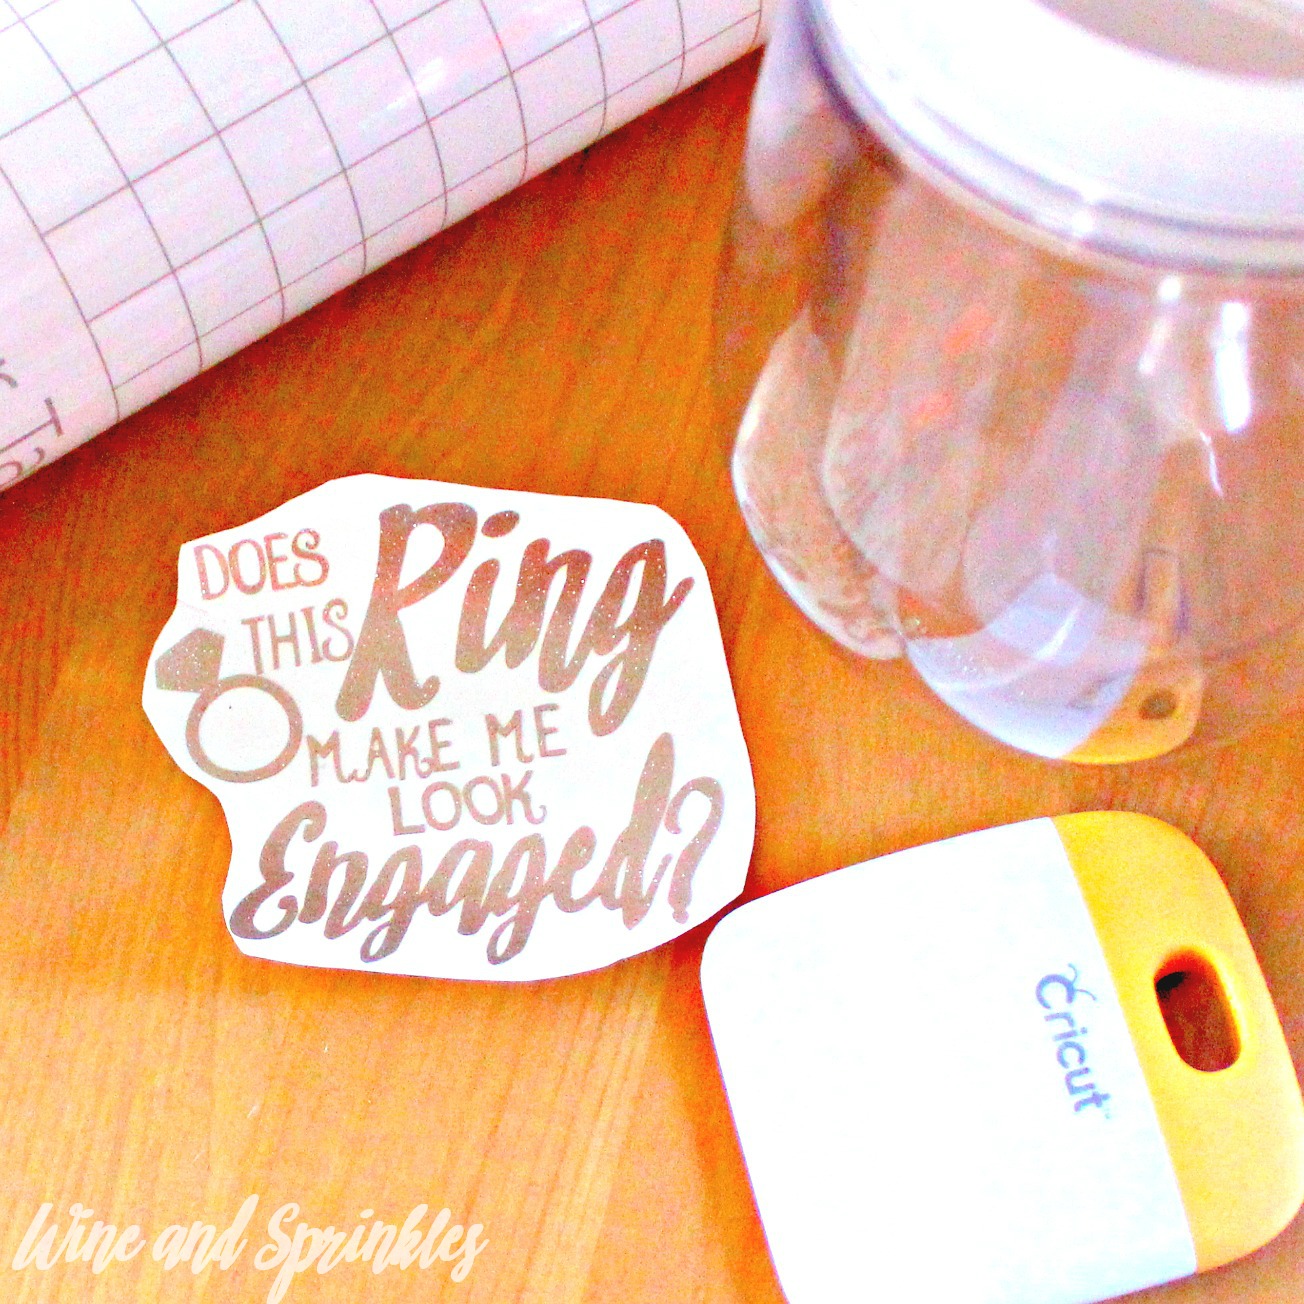
In keeping with the just engaged swag we are crafting this week, next up is this adorable stemless wine tumbler! “Does this ring make me look Engaged?” is so cute and this decal could easily be put on all sorts of glassware!

For my tumblers, I used Champagne Glitter Vinyl for the decal. The thin lines on the small text makes this one a little tougher to weed so while I used a glitter vinyl I would recommend Oracal 651 Permanent Vinyl.

Instagram with text.jpg
DIY "Does this Ring Make me Look Engaged?" Stemless Wine Glass Tumblers #svgfiles #diywedding #tumblers

1. After downloading the cut files, import them into the Cricut Software. After creating a new project, select Upload Image. Select the file you wish to upload and it will automatically take you to the final upload screen, where you can name the file the select Save. 

2. Cut the design(s) in your choice of permanent adhesive vinyl with the Vinyl Setting on your Cricut. The SVG Files are sized so that they will automatically cut to the size you see in the photos, but if you want to change the size you can. :)

3. Once the designs are cut, weed away the extra vinyl and cut a piece of transfer tape to 3" x 3.5". Cut away any excess backing from the vinyl design and smooth transfer tape over the design, aligning it along the top of the text, leaving one set of 1/2” blocks above the top of the design. Using the smoother tool, smooth the tape to the vinyl, removing any air bubbles.

DIY "Does this Ring Make me Look Engaged?" Stemless Wine Glass Tumblers #svgfiles #diywedding #tumblers

4. Now, transfer the design to your tumbler. Remove the tape and lift the decal off the backing, making sure that the entire decal is transferred to the transfer tape.

DIY "Does this Ring Make me Look Engaged?" Stemless Wine Glass Tumblers #svgfiles #diywedding #tumblers

5. Align the top of the transfer tape along the top lip of the tumbler and smooth down to the center of the design. Working from the center to the edge of the design, trace the letters to smooth them onto the tumbler. Because the surface is curved, focus on the vinyl smoothly transferring than your transfer tape looking nice and neat.

6. Once the design is set, remove the transfer tape from the tumbler, leaving the design on the tumbler. Use the smoother tool or your finger to resmooth the design and to remove the air bubbles.

DIY "Does this Ring Make me Look Engaged?" Stemless Wine Glass Tumblers #svgfiles #diywedding #tumblers


Future Mrs. Just Engaged Skinny Tumbler

This post contains affiliate links, meaning that if you click on a link I will recieve a small comission. This costs you nothing extra and I only promote products I use and love! You can read our full disclosure here

Future Mrs. Just Engaged Skinny Tumbler #svgcutfiles #diywedding

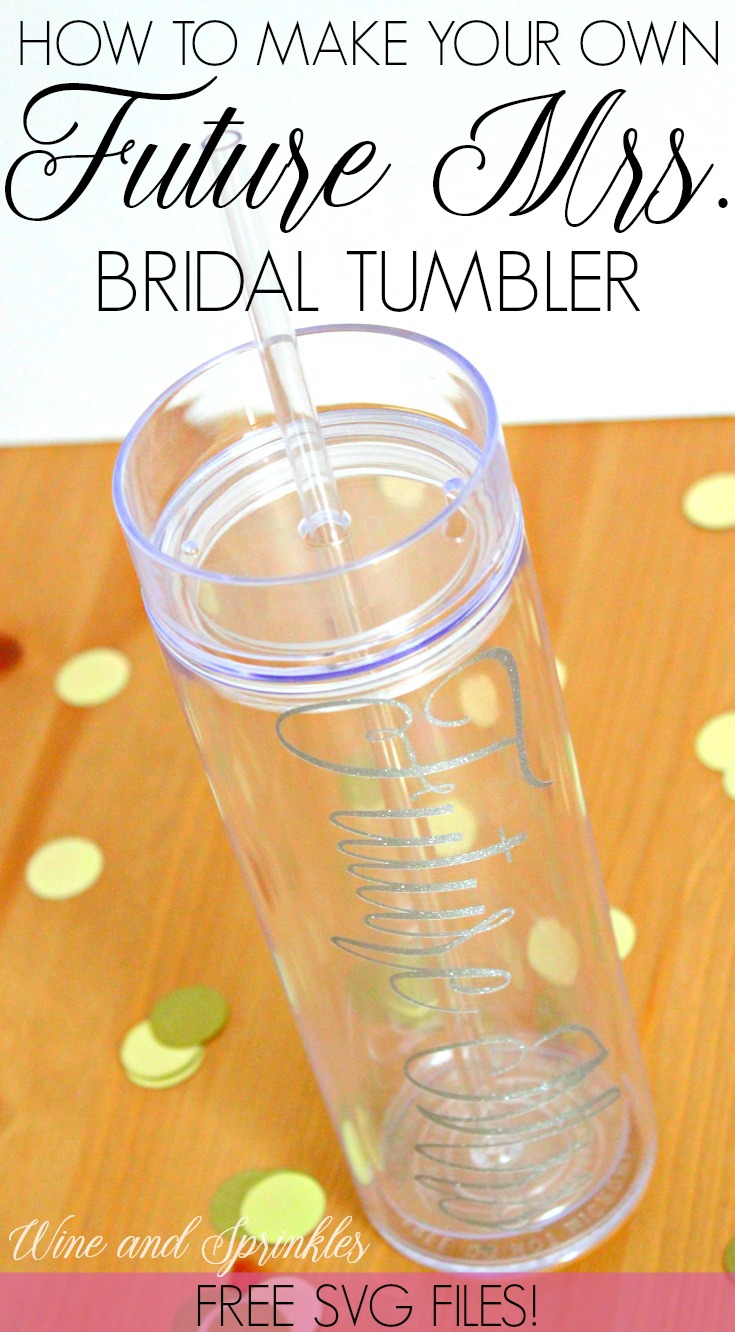
If theres’ a gift I like making for my newly engaged friends, its got to be tumblers! I’ve been having so much fun designing different decals for skinny tumblers lately, I decided to start off my tutorials for them with Just Engaged Tumbler! This “Future Mrs.” Skinny Tumbler is perfect as a work water bottle and the font is very well suited to the Glitter Permanent Vinyls.

Future Mrs. Just Engaged Skinny Tumbler #svgcutfiles #diywedding

For my tumbler, I used Silver Glitter Vinyl for the decal and I love how they turned out! While you have to be careful as far as the dot on the end of “Mrs.” this project is easy to weed and a fun first project for any new soon to be bride!

Future Mrs. Just Engaged Skinny Tumbler #svgcutfiles #diywedding

1. After downloading the cut files, import them into the Cricut Software. After creating a new project, select Upload Image. Select the file you wish to upload and it will automatically take you to the final upload screen, where you can name the file, then select Save. 

2. Cut the design(s) in your choice of permanent adhesive vinyl with the Vinyl Setting on your Cricut. The SVG Files are sized so that they will automatically cut to the size you see in the photos, but if you want to change the size you can. :)

Future Mrs. Just Engaged Skinny Tumbler #svgcutfiles #diywedding

3. Once the designs are cut, weed away the extra vinyl and cut a piece of transfer tape to 2.5" x 7.5". Cut away any excess backing from the vinyl design and smooth transfer tape over the design, aligning it with the text and arranging it such that one set of the 1/2” blocks are along the bottom left edge of the “F",. as shown below. Using the smoother tool, smooth the tape over the vinyl, removing any air bubbles.

Future Mrs. Just Engaged Skinny Tumbler #svgcutfiles #diywedding

4. Now, transfer the design to your tumbler. Remove the tape and decal from the backing, making sure that the entire decal transfers to the transfer tape.

Future Mrs. Just Engaged Skinny Tumbler #svgcutfiles #diywedding

5. Arrange the design such that the line that you aligned to the “F” on your transfer tape is along to top edge of the lip of the tumbler, as shown below. Starting from the top and working down, trace the letters to smooth them onto the tumbler. Smooth the design to remove any air bubbles,. Remove the transfer tape from the tumbler, leaving the design on the tumbler.

Future Mrs. Just Engaged Skinny Tumbler #svgcutfiles #diywedding

6. Use the smoother tool or your finger to retrace the letters after removing the transfer tape to smooth out any additional air bubbles. Then you’re done! :)

Future Mrs. Just Engaged Skinny Tumbler #svgcutfiles #diywedding


DIY Princess Inspired Bachelorette Wine Tumblers

This post contains affiliate links, meaning that if you click on a link I will recieve a small comission. This costs you nothing extra and I only promote products I use and love! You can read our full disclosure here

DIY Princess Bachelorette Wine Tumblers #princess #bachelorette #wine

With one of my best friends getting married and living in Florida, we are thinking about doing a bar crawl in the happiest place on earth, Disney World! Regardless of whether we do or not, it inspired me to design these adorable wine tumblers; all based on different fairy tale princesses!

DIY Princess Bachelorette Wine Tumblers #princess #bachelorette #wine

I mixed and matched vinyl I already had, so a couple may not be perfect color complements or you may want to change it up to something different, but the combinations I used were:

Sipping Beauty - Oracal 651 Soft Pink Vinyl Dress with Gold Metallic Vinyl Lettering
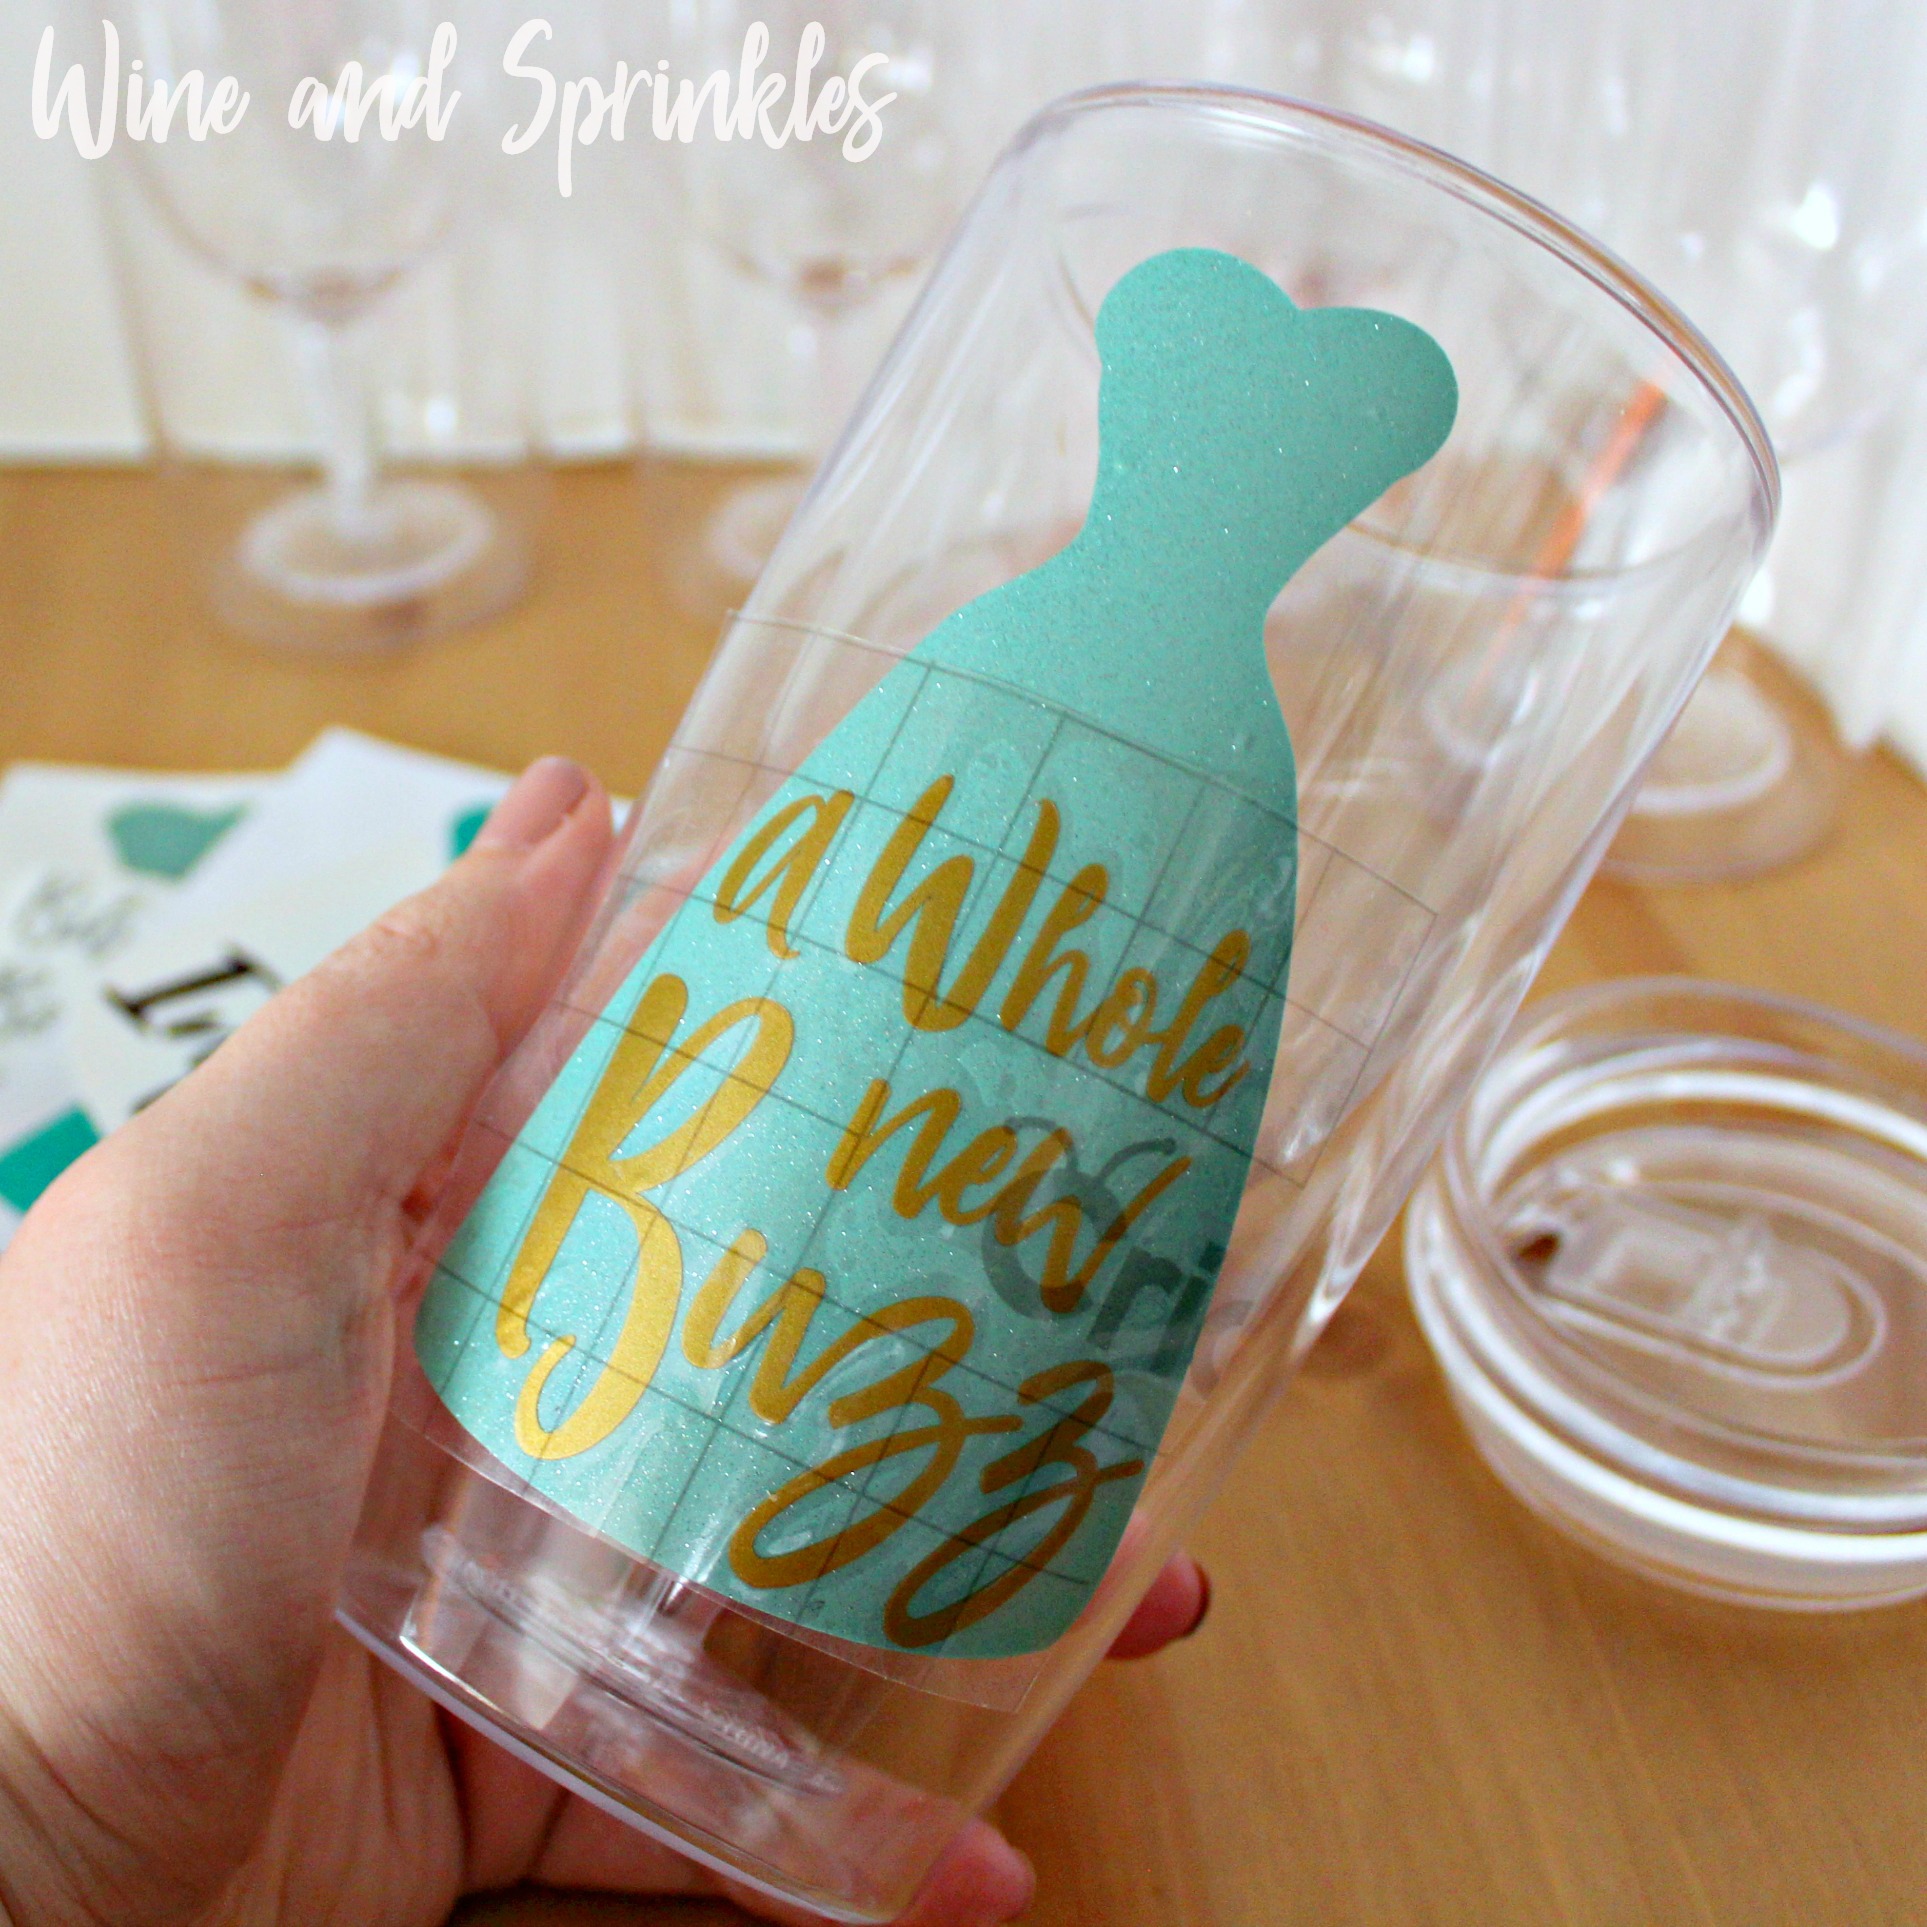
A Whole New Buzz - Tiffany Blue Glitter Vinyl Dress with Gold Metallic Vinyl Lettering
Bibbity Bobbity Boozy - Tiffany Blue Glitter Vinyl Dress with Silver Glitter Vinyl Lettering
Drunkest of them All - Oracal 651 Gold Metallic Vinyl Dress with Amethyst Glitter Vinyl Lettering
Beauty and the Bottle - Oracal 651 Gold Metallic Vinyl Dress with Red Vinyl Lettering
Under the Influence - Oracal 651 Jade Vinyl Dress with Amethyst Glitter Vinyl Lettering

DIY Princess Bachelorette Wine Tumblers #princess #bachelorette #wine

I tried transferring the designs in two ways, by transferring the dress first, then the lettering; and transferring the lettering to the dress before transferring it to the tumbler. It was far easier and cleaner to transfer the designs to the tumblers in layers as well as limiting the air bubbles from transferring and keeping the whole design smooth as its transferred to a curved surface.

DIY Princess Bachelorette Wine Tumblers #princess #bachelorette #wine

1. After downloading the cut files, import them into the Cricut Software. After creating a new project, select Upload Image. Select the file you wish to upload and it will automatically take you to the final upload screen, where you can name the file the select Save. 

2. Cut the design(s) in your choice of permanent adhesive vinyl with the Vinyl Setting on your Cricut. The SVG Files are sized so that they will automatically cut to the size you see in the photos, but if you want to change the size you can. :)

DIY Princess Bachelorette Wine Tumblers #princess #bachelorette #wine

3. Once the designs are cut, weed away the extra vinyl and cut a piece of transfer tape to 3.5" x 5.5" for the dress decal and 3” x 3” for the lettering. Cut away any excess backing from the vinyl design and smooth transfer tape over the design, aligning it along the top of the dress, with one set of 1/2” blocks for ease with transferring later, as shown above. For the text, I didn’t align it to a specific piece, but rather centered the transfer tape over the design as best I could, since transferring it to the bottom of the dress isn’t a set position. Using the smoother tool, smooth the tape to the vinyl, removing any air bubbles.

DIY Princess Bachelorette Wine Tumblers #princess #bachelorette #wine

4. Now, transfer the dress design to your tumbler. Remove the tape from the backing and smooth the dress onto the tumbler, aligning it along the top lip of the tumbler as shown below. It is easiest to start at the top and smooth from top to bottom, center to outside edges.

DIY Princess Bachelorette Wine Tumblers #princess #bachelorette #wine

5. Remove the transfer tape from the tumbler, leaving the dress decal on the tumbler. If there are air bubbles (mine had some), smooth out the ones you can with the smoother tool and for smaller or hard to smooth bubbles, prick them with a needle and smooth them to remove them. :)

DIY Princess Bachelorette Wine Tumblers #princess #bachelorette #wine

6. Now, transfer the lettering to you tumbler. Center the lettering on the bottom of the skirt of the dress, I actually didn’t have any problems aligning them since the lettering itself is staggered and made to fit inside the dress. The easiest way is to use the bottom of the dress as your guide and arrange the decal just above the bottom edge where all the letters will adhere to the dress, not the tumbler.

DIY Princess Bachelorette Wine Tumblers #princess #bachelorette #wine

7. Trace the letters to smooth them onto the bottom of the dress on the tumbler, as shown above. Because the surface is curved, focus on the vinyl smoothly transferring than your transfer tape looking nice and neat. Once the design is set, remove the transfer tape from the tumbler, leaving the design on the tumbler. Repeat with all remaining tumblers.

DIY Princess Bachelorette Wine Tumblers #princess #bachelorette #wine

I absolutely adore how these turned out and they are suprisingly easy to make once you’ve done one of them, so don’t be afraid! :) Take a look at our other Tumbler Projects Here! :)

DIY Princess Bachelorette Wine Tumblers #princess #bachelorette #wine


DIY "This is my Wedding Crafting Glass" Stemless Wine Glass Tumbler

This post contains affiliate links, meaning that if you click on a link I will recieve a small comission. This costs you nothing extra and I only promote products I use and love! You can read our full disclosure here

DIY This is my Wedding Crafting Glass Stemless Wine Tumbler #justengaged #diywedding #tumbler

If there’s one thing I love to do for weddings, it’s craft for them! (So surprising given all the projects on this blog ) There’s nothing like pouring yourself a glass of wine and getting down to DIY-ing all your special details, gifts and decorations for your big day! To start your DIY journey off on the right foot, I made this adorable stemless wine tumbler to be used during those fun, but sometimes stressful, wedding crafting nights!

DIY This is my Wedding Crafting Glass Stemless Wine Tumbler #justengaged #diywedding #tumbler

For my tumbler, I used Oracal 651 Pink Vinyl for my decal and I love how it turned out! While I had to be careful with the scissors, the rest of the design was easy enough to weed. It’s also worth noting that, since you are transferring to a curved surface, this project is slightly more difficult on the transfer, as the glass curves the words and scissors will get a little closer together than the original weeded design. It did so with my transfer and it still turned out great, as you can see in the above photo.

Supplies:
Stemless Wine Tumblers
Permanent Adhesive Vinyl
Transfer Paper
Craft Cutter and Tool Set
Adhesive Mat
Stemless Wine Tumbler Design Cut File

1. After downloading the cut files, import them into the Cricut Software. After creating a new project, select Upload Image. Select the file you wish to upload and it will automatically take you to the final upload screen, where you can name the file the select Save. 

2. Cut the design in your choice of permanent adhesive vinyl with the Vinyl Setting on your Cricut. The SVG Files are sized so that they will automatically cut to the size you see in the photos, but if you want to change the size you can. :)

DIY This is my Wedding Crafting Glass Stemless Wine Tumbler #justengaged #diywedding #tumbler

3. Once the designs are cut, weed away the extra vinyl and cut a piece of transfer tape to 3.5" x 4". Cut away any excess backing from the vinyl design and smooth transfer tape over the design, aligning it along the bottom of the text. Using the smoother tool, smooth the tape to the vinyl, removing any air bubbles. The transfer tape should overlap the backing of the design, so that you can stick the tape to an object with the backing still on the design. I aligned the transfer tape along the top of the “this is my” text, with one set of 1/2” blocks above to use in aligning it to your stemless tumbler later.

DIY This is my Wedding Crafting Glass Stemless Wine Tumbler #justengaged #diywedding #tumbler

4. Now, transfer the design to your tumbler. Remove the tape from the backing and directly place the design on the tumbler. Arrange the design in the middle of the tumbler about an inch from the top of the lip of the tumbler.

DIY This is my Wedding Crafting Glass Stemless Wine Tumbler #justengaged #diywedding #tumbler

5. Working from the middle to the edges, top to bottom, trace the letters with your fingers to smooth the design onto the tumbler. Because the surface is curved, focus on the vinyl smoothly transferring than your transfer tape looking nice and neat. I started in the top middle of the design, then would smooth the text, lifting the transfer tape from the tumbler and design as needed but never completely removing the transfer tape so that the alignment stayed consistent. Once the design is set, remove the transfer tape from the tumbler, leaving the design on the tumbler.

DIY This is my Wedding Crafting Glass Stemless Wine Tumbler #justengaged #diywedding #tumbler

6. Finally, use the smoother tool or your finger to resmooth the design id needed and to remove the air bubbles, completing your new tumbler! :)

DIY This is my Wedding Crafting Glass Stemless Wine Tumbler #justengaged #diywedding #tumbler

Write here… 

DIY This is my Wedding Crafting Glass Stemless Wine Tumbler #justengaged #diywedding #tumbler


DIY Mr. and Mrs. Stemless Wine Glass Tumblers

This post contains affiliate links, meaning that if you click on a link I will recieve a small comission. This costs you nothing extra and I only promote products I use and love! You can read our full disclosure here

Do It Yourself Vinyl Mr and Mrs Stemless wine tumblers #svgfiles #cricutprojects #beachbride

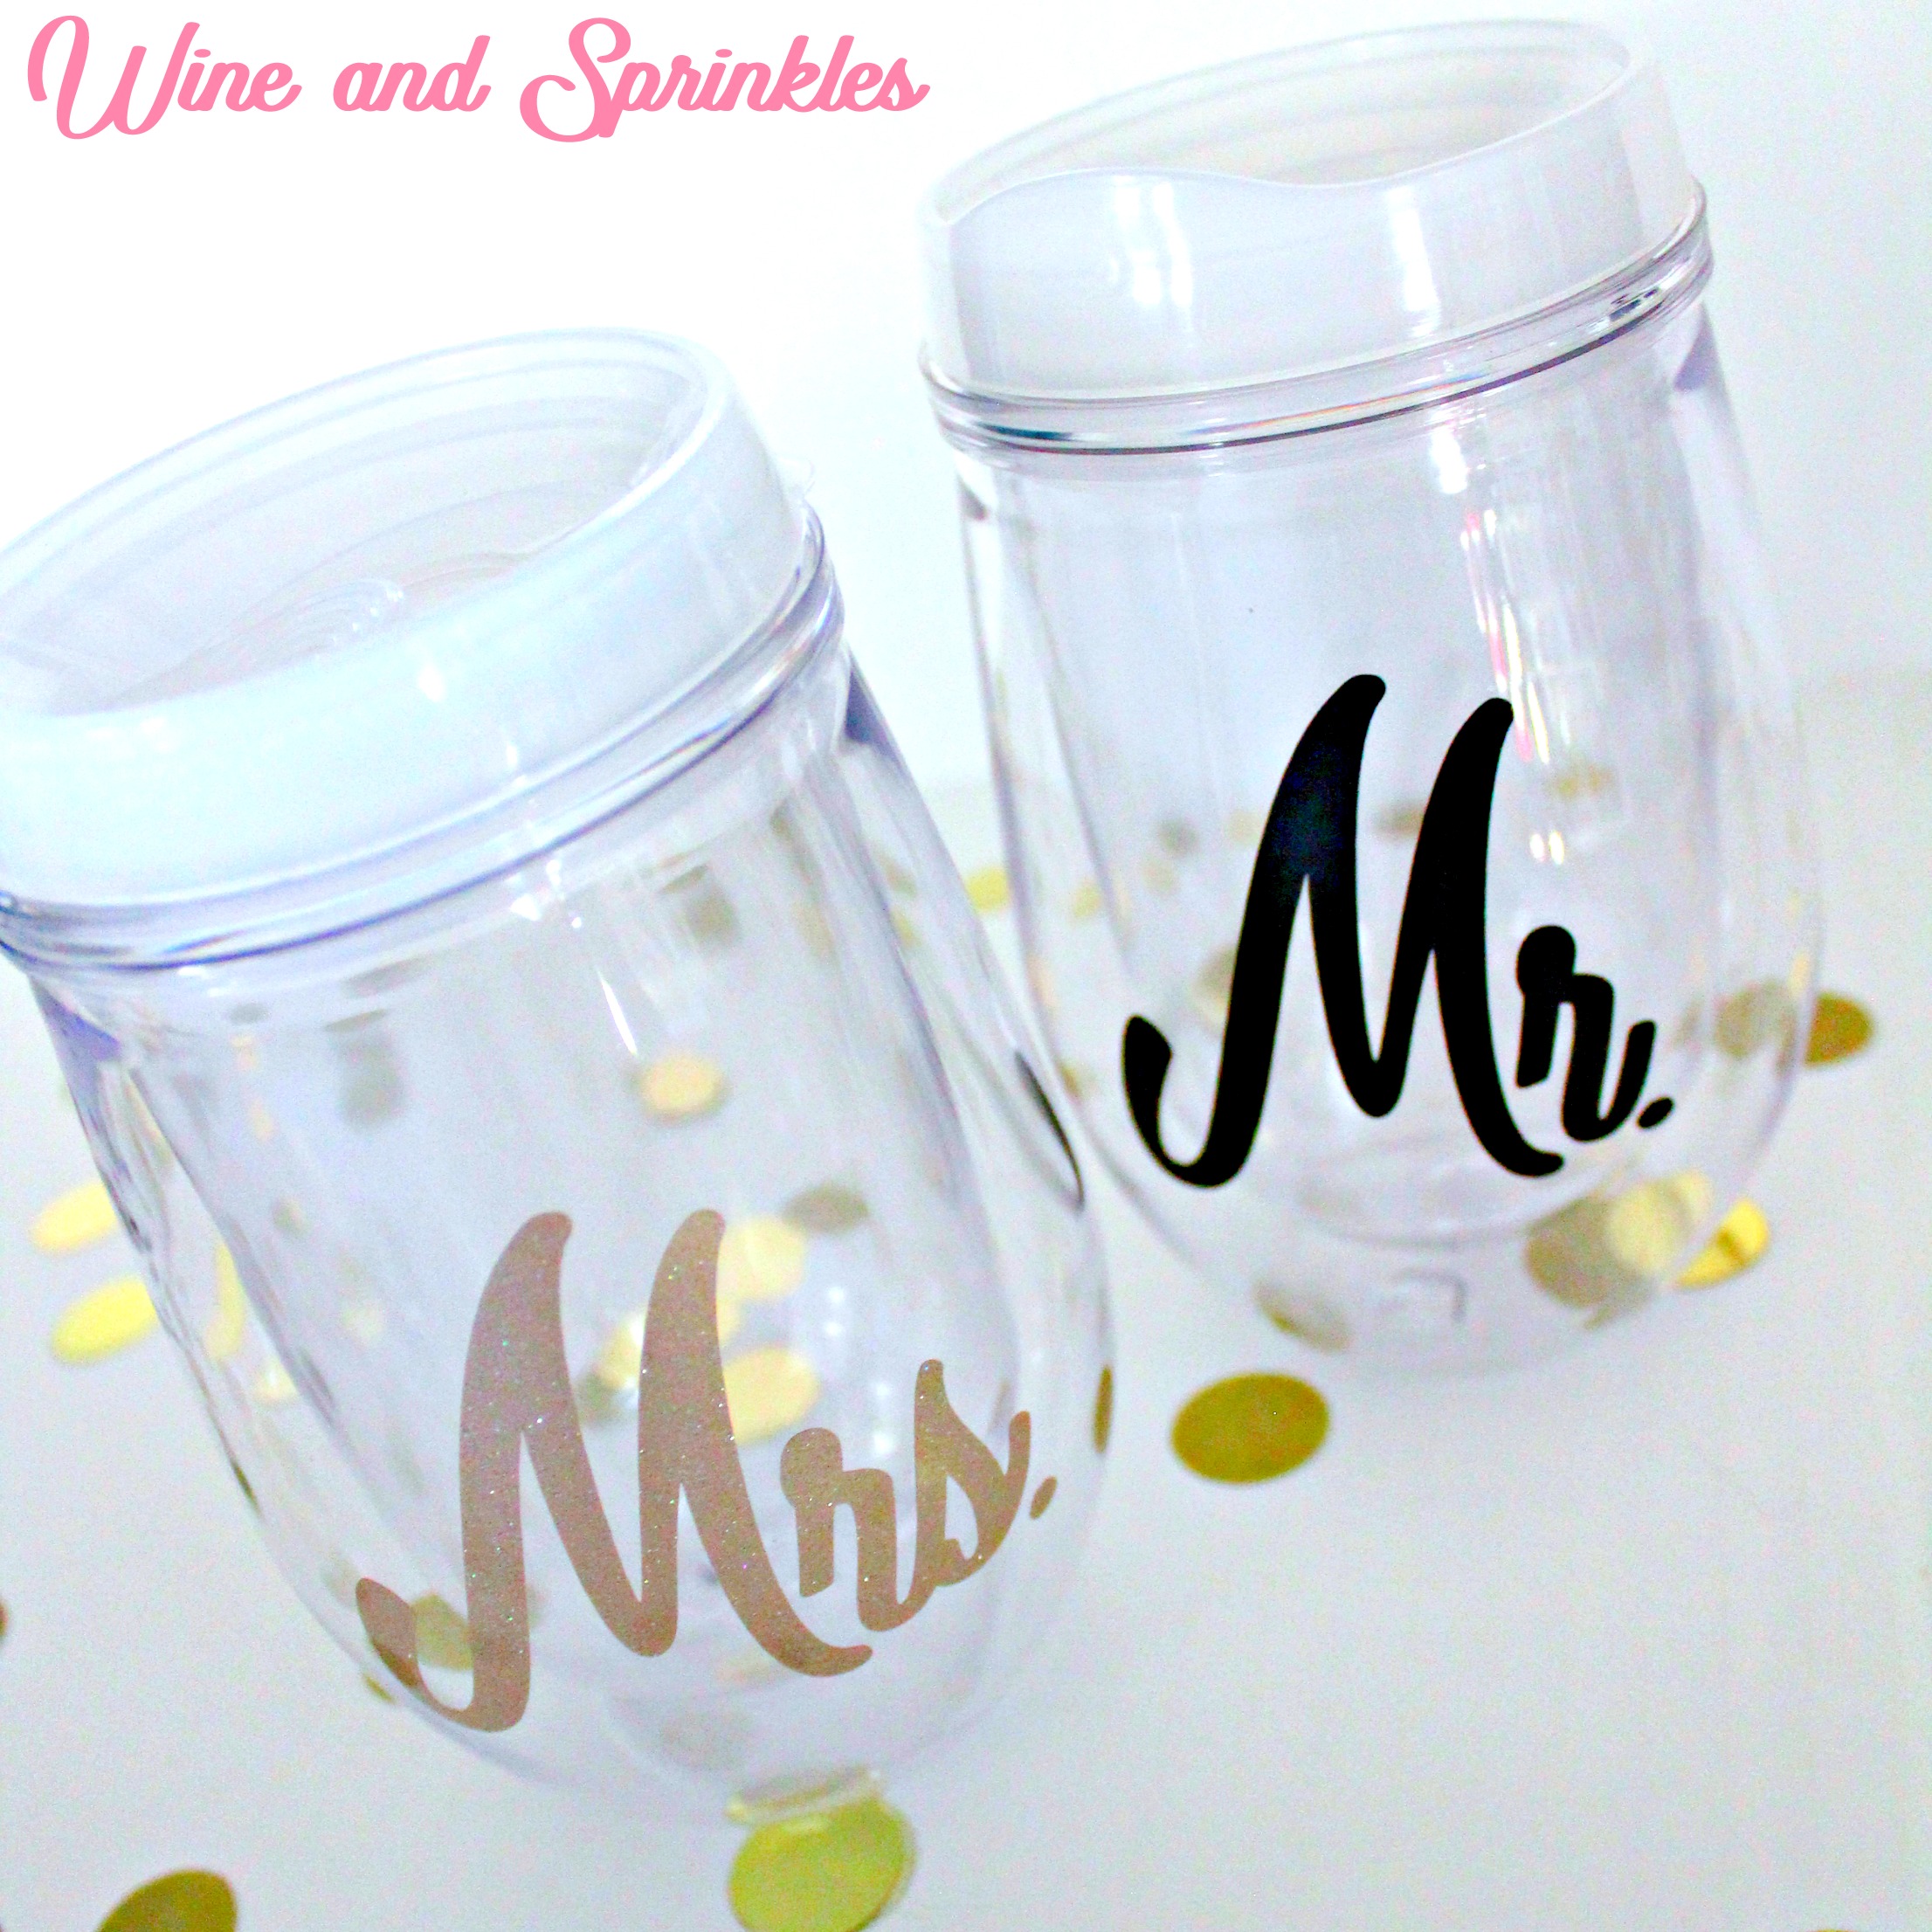
I love getting just married swag for the honeymoon and then thought of these simple Mr. and Mrs. Stemless Wine Tumblers! They are just perfect for going to the beach and can easily be made for yourself or your friends who are getting married soon!

Do It Yourself Vinyl Mr and Mrs Stemless wine tumblers #svgfiles #cricutprojects #beachbride

For my tumblers, I used Champagne Glitter Vinyl for the Mrs. and Oracal 651 Black Vinyl for the Mr. and I love how they turned out! This is a great beginner project if you aren’t used to transferring to curved surfaces, these tumblers are very easy to transfer to for this simple, bold design. And its super easy to weed! :)

Do It Yourself Vinyl Mr and Mrs Stemless wine tumblers #svgfiles #cricutprojects #beachbride

1. After downloading the cut files, import them into the Cricut Software. After creating a new project, select Upload Image. Select the file you wish to upload and it will automatically take you to the final upload screen, where you can name the file the select Save. 

2. Cut the design(s) in your choice of permanent adhesive vinyl with the Vinyl Setting on your Cricut. The SVG Files are sized so that they will automatically cut to the size you see in the photos, but if you want to change the size you can. :)

Do It Yourself Vinyl Mr and Mrs Stemless wine tumblers #svgfiles #cricutprojects #beachbride

3. Once the designs are cut, weed away the extra vinyl and cut a piece of transfer tape to 2.5" x 3". Cut away any excess backing from the vinyl design and smooth transfer tape over the design, aligning it along the bottom of the text. Using the smoother tool, smooth the tape to the vinyl, removing any air bubbles. The transfer tape should overlap the backing of the design, so that you can stick the tape to an object with the backing still on the design.

Do It Yourself Vinyl Mr and Mrs Stemless wine tumblers #svgfiles #cricutprojects #beachbride

4. Now, transfer the design to your tumbler. Remove the tape from the backing and directly place the design on the tumbler. Arrange the design in the middle of the tumbler about an inch from the top of the lip of the tumbler.

Do It Yourself Vinyl Mr and Mrs Stemless wine tumblers #svgfiles #cricutprojects #beachbride

5. Working from the center to the edge of the design, trace the letters to smooth them onto the tumbler. Because the surface is curved, focus on the vinyl smoothly transferring than your transfer tape looking nice and neat. Once the design is set, remove the transfer tape from the tumbler, leaving the design on the tumbler.

Do It Yourself Vinyl Mr and Mrs Stemless wine tumblers #svgfiles #cricutprojects #beachbride

6. Use the smoother tool or your finger to resmooth the design and to remove the air bubbles. Repeat with the Mr. Tumbler. :)

Do It Yourself Vinyl Mr and Mrs Stemless wine tumblers #svgfiles #cricutprojects #beachbride

Write here… 

Do It Yourself Vinyl Mr and Mrs Stemless wine tumblers #svgfiles #cricutprojects #beachbride


Bride Tribe Tumblers

This post contains affiliate links, meaning that if you click on a link I will recieve a small comission. This costs you nothing extra and I only promote products I use and love! You can read our full disclosure here

If there is one thing I love making for Bridal Parties, it is Tumblers! They are so cute and so useful for getting ready gifts, bachelorette party favors, or even to ask your maids in the first place.

For these tumblers, I was looking for a free dream catcher file for a more unique “Bride Tribe” tumbler, but none of them were suiting my fancy. Then I found this amazing one on Etsy! For a couple bucks it was well worth the price! Better yet, its an SVG file which are super easy to import into the Cricut Craft Cutter software.

For these tumblers and many of the wedding and bridal projects you will see on this blog, having a Cricut is required. I can’t say enough good things about mine, I wish I had had it when I was crafting for my own wedding! It would have saved me hours of work and many of the projects I did would have turned out even better! If you are a crafter, a bride, or even part of the bridal party I would highly recommend one, the one-time purchase will serve you well. :) Not only can you make tumblers like these, but you can also use it for custom cut invitations, iron on clothing, paper crafts, and removable vinyl wall decorations. I could go on and on but needless to say they are awesome!

Supplies:

Gold Adhesive Vinyl
Metallic Teal Adhesive Vinyl
Transfer Paper
Purple Tumblers
Craft Cutter and Tool Set
Adhesive Mat
Dream Catcher File
Bride File
Bride Tribe File


1.     Download the Dream catcher File and import into the Cricut software. You can do this by going to the software; and, after making a new project, click the upload button. Import the file, the click Continue.

Cricut 1-2

2.    Press save for the file to be uploaded to the software, then click the image under the Upload Tab. Select Insert Images" to insert it into the current project.

Cricut 3-4

3.     Size the dream catcher to 3.25” wide, then remove the unneeded cuts. For this image, ungroup the cuts using the button on the upper right.

Cricut 5

4.     Now, select each of the first 5 cuts and press the red "x" on the image to remove it.

Cricut 6-8

5.     Once the excess cuts are removed, copy and paste the number of dream catchers you need then click the "Make it" Button in the upper right. You can get up to six dream catchers per 12” x 12” sheet of vinyl. Press Continue to got to the cut Screen. On the Cricut itself, set the dial to "Vinyl", load the mat with Gold Vinyl, and press the Cricut button to cut.

Cricut 9-10

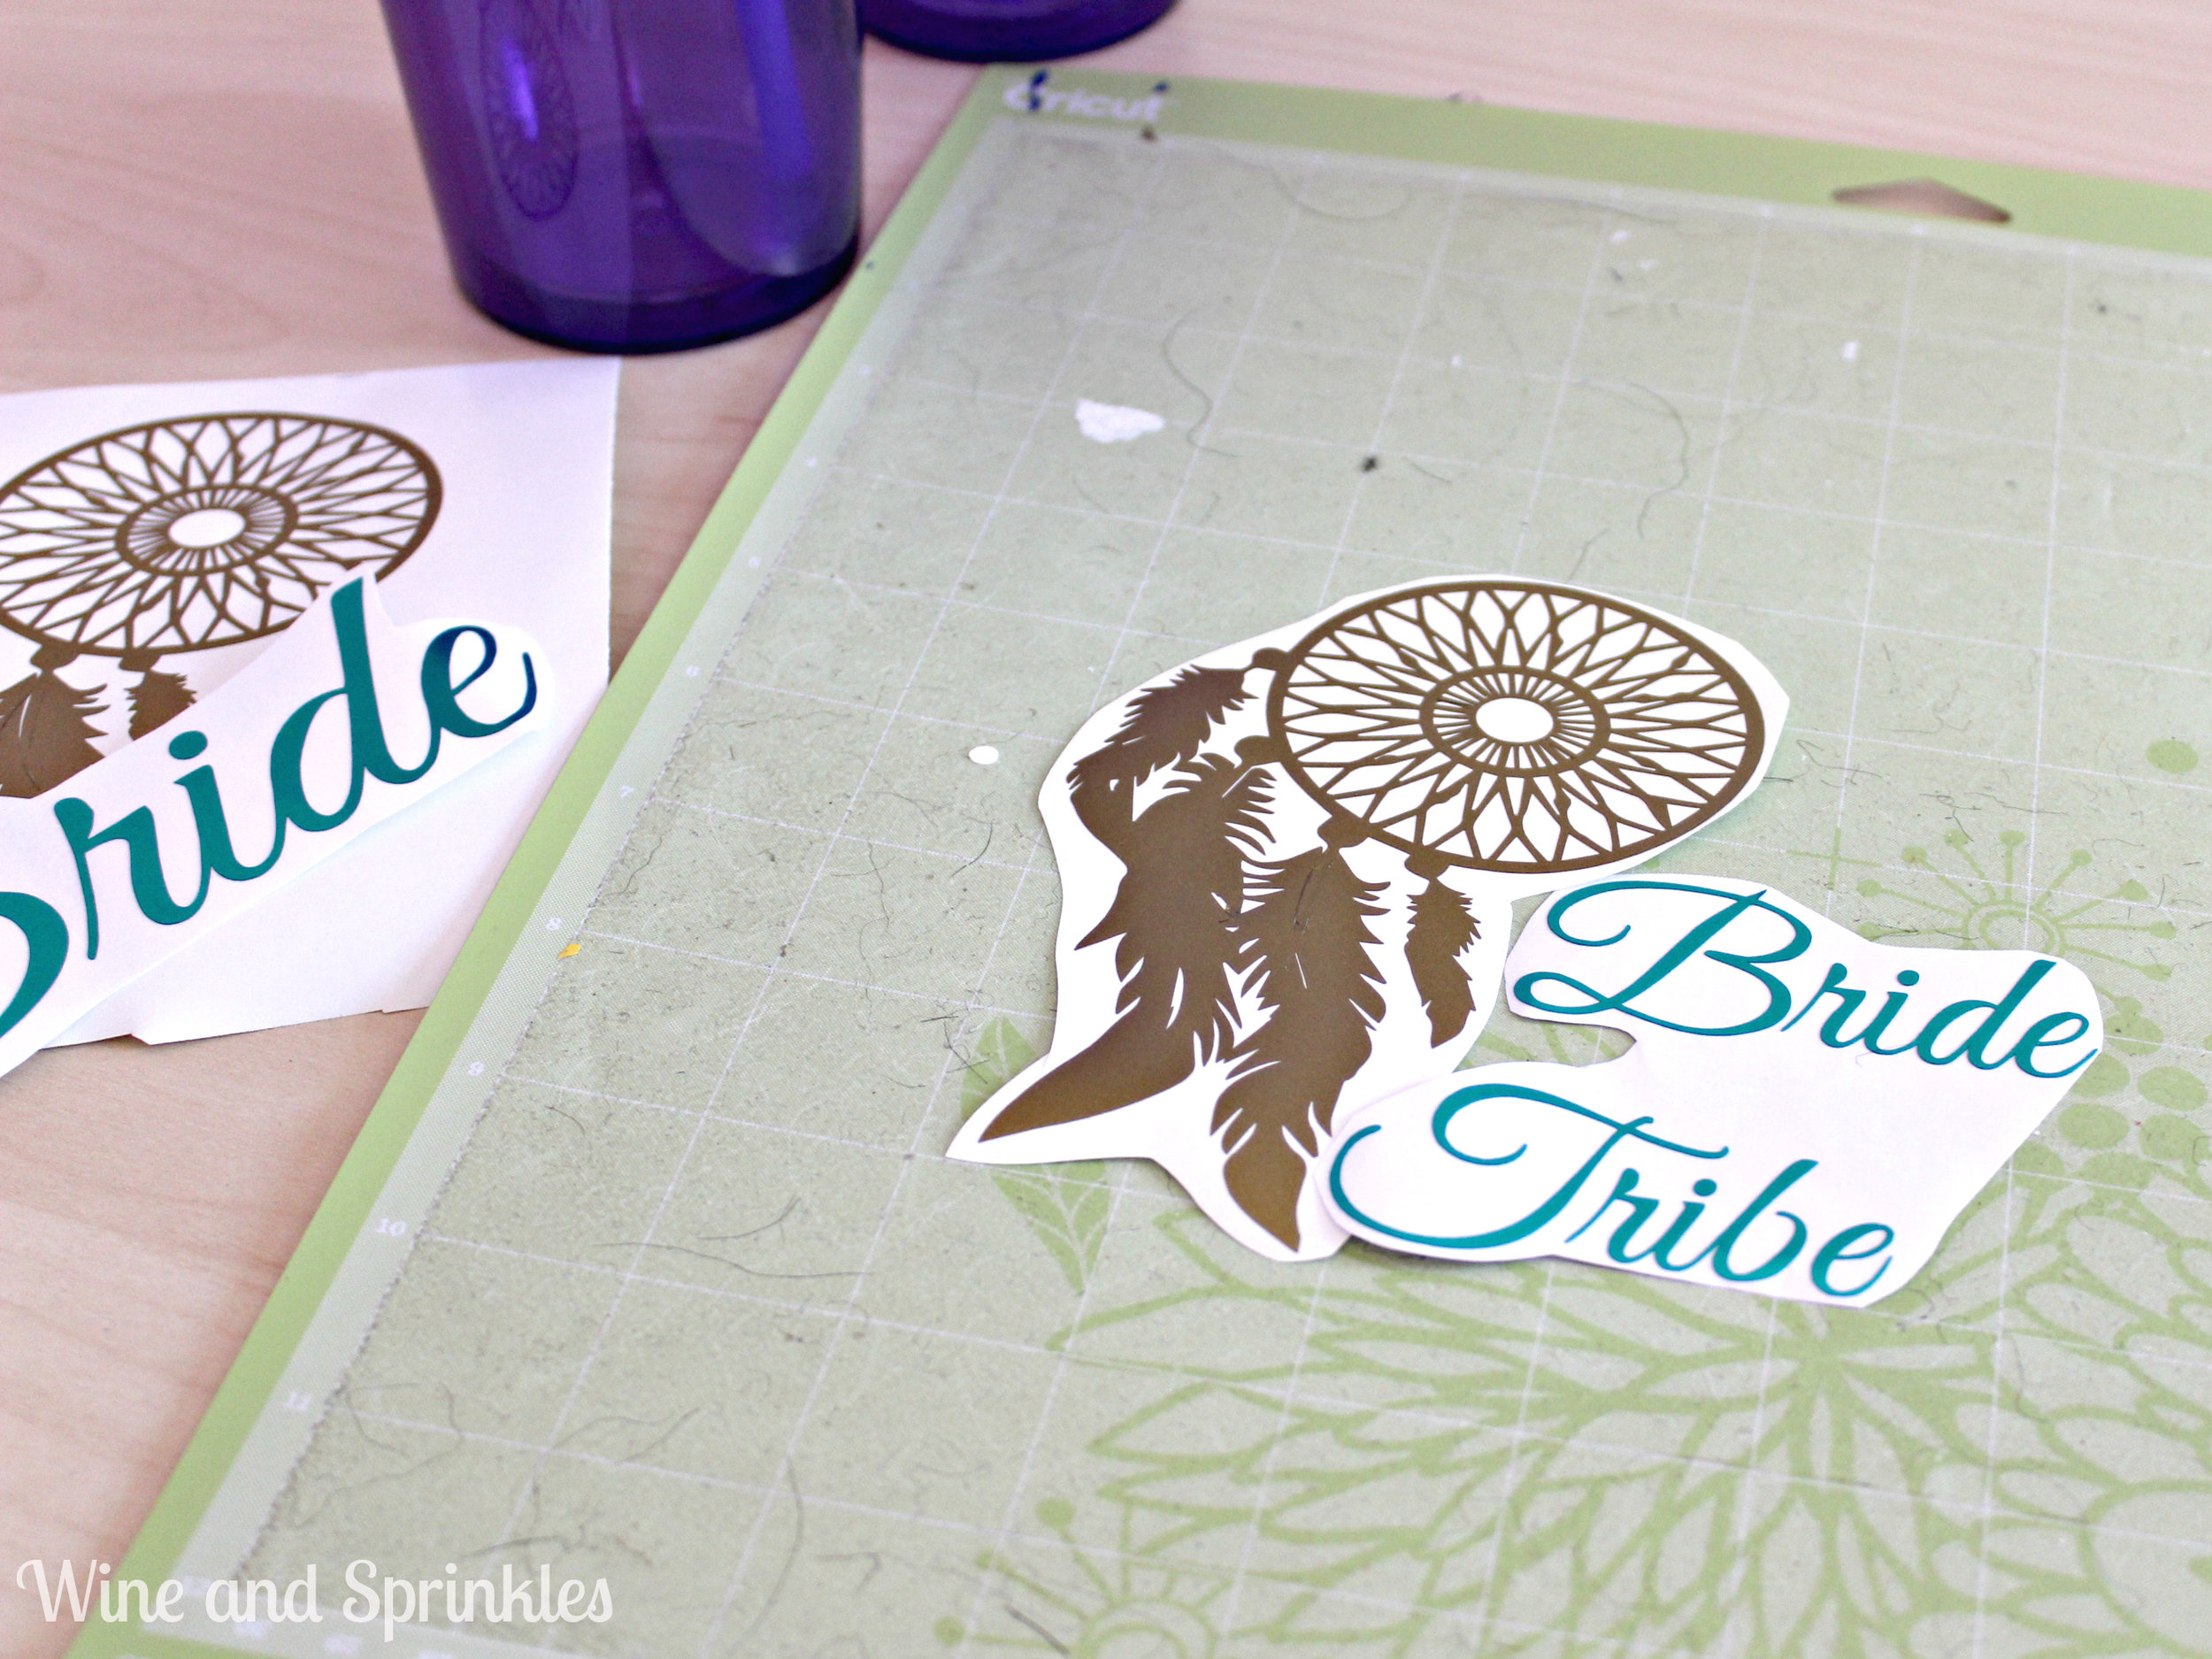
6.     Similarly, import the “Bride” and “Bride Tribe” pictures into the software, sizing them to be 2.5” tall. Cut these out in the Metallic Teal Vinyl.

7.     Remove the excess vinyl (known as weeding) until just the images and words you want to transfer are remaining.

8.     Cut away the excess backing around your vinyl designs. Fix them to the vinyl mat based on how you would like them to transfer onto the tumbler. As you can see from mine, I nested the “Bride Tribe” words into the bottom right of the Dream Catcher.

vinyl arrangement

9.     Cover the design with transfer paper. Push out all the air bubbles and press it into the design, such that when you lift the transfer paper the design comes up with it without its backing. I prefer the lined transfer paper as it makes it easier to orient the designs on their final resting places.

transfer paper

10.     Starting at the top of the tumbler, line up and press the transfer paper onto the tumbler, working top left to bottom right. Because it is curved, it will not stay exactly parallel with the top, this is ok! Pres the transfer paper as flat as you can against the tumbler, rubbing the design especially to get out any air bubbles. Lift the transfer paper, leaving the design on the tumbler.

Bride Tribe Tumbler

11.     For the Bride Tumbler, I wanted the letters to overlap the Dream Catcher. So the same steps as above are followed, but you first transfer the dream catcher, then the test as two separate transfers.

Bride Tumbler

Using these basic instructions, you can also design whatever tumbler you like to make your own custom tumblers for you, your bride, or your wedding party (if you are the bride!).

DIY Mean Girls Bachelorette Tumblers

This post contains affiliate links, meaning that if you click on a link I will recieve a small comission. This costs you nothing extra and I only promote products I use and love! You can read our full disclosure here

Mean Girls Tumbler Title.jpg

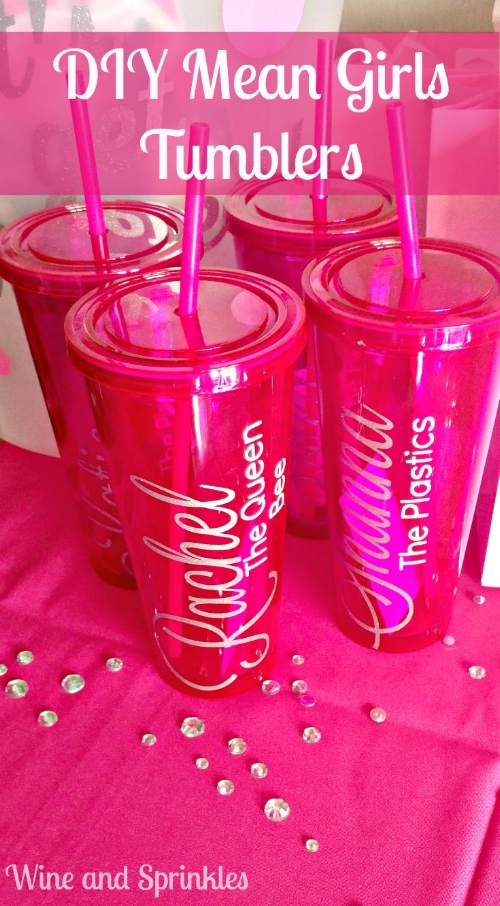
If you’ve ever been on Etsy, there are so many cute and creative tumblers you can get for your bridal party! These tumblers were by far the favorite and most useful item I made for our Mean Girls Bachelorette Party. Since we had it in Las Vegas, we could easily fill them with any drink we wanted from the rooms and take them around with us as we walked the Strip and through all the different hotels and casinos. After the party is long gone, I still use mine all the time for iced coffee for work, so they make an excellent take home favor!

Once again, with a craft cutter this project becomes incredibly simple and can be customized to anything your heart desires! In addition to that, making them yourself will cost you significantly less than ordering them premade. :)

Note: This page may contain affiliate links, meaning that if you click on the link and buy the product, I will receive a small commission. This will not change your cost at all and I only recommend products I use and love!

Supplies:
Pink Tumblers
Silver Glitter Vinyl
White Vinyl
Grid lined Transfer Tape
Craft Cutter and Tool Set
Adhesive Mat

1.     Clean and dry the tumblers.

2.     Design your names: I used Pic Monkey to make both the names and titles for the Tumblers. The name is made with the Lavanderia font and the title was made with the Didact Gothic font. For the Bride I used the title “The Queen Bee” and the Bridesmaids were called “The Plastics” in true Mean Girls fashion. J You can use the design feature in PicMonkey to place text and save as a picture, which I find to be far easier than using the Cricut Design software to make the text as it tends to make the software run slowly.

Note: The Lavanderia Font is only part of PicMonkey Premium, which I use for some of my party designs and photo editing. You can do both monthly or yearly billing for it, and both are very inexpensive! :)

3.     When I made the names and titles, I made all the words the same size and part of the same picture (Names were one picture, titles were another picture). This will help with keeping them all the same size for the cutting phase. Once you have saved your text as pictures, upload them into the Cricut (or other cutter) design software. I made the longest name about 6 inches long. Cut the names out in Silver Glitter Vinyl.

Cameo 3 Bundles by Expressions Vinyl

4.     Next, import the titles into the design software. Using the names as they are sized, size the titles so that they fit nicely under the names (I did this by feel). Once you have your titles sized, delete the name picture and cut the titles out in white vinyl.

5.     After weeding the excess vinyl from the designs, cut the excess backing away from the text as much as possible. Using the sticky mat that goes with your cutter, arrange the white text under the name.

6.     Lay transfer tape over the text, aligning the gridlines under the name so that everything stays straight.

7.     Transfer the vinyl to the tumbler. Having gridline tape is very helpful here as you can use it to make sure that your text is perpendicular to the bottom of the tumbler. Press the vinyl onto the tumbler and remove the tape, and then you’re done!

Yes, that does feel like a lot of steps, but once you get the hang of it it takes no time at all! The big time crunch came in picking a font and designing the names, once I had the vinyl cut the transfer process took maybe 5-10 minutes a tumbler. Leave any questions you have in the comments!