This post contains affiliate links, meaning that if you click on a link I will recieve a small comission. This costs you nothing extra and I only promote products I use and love! You can read our full disclosure here

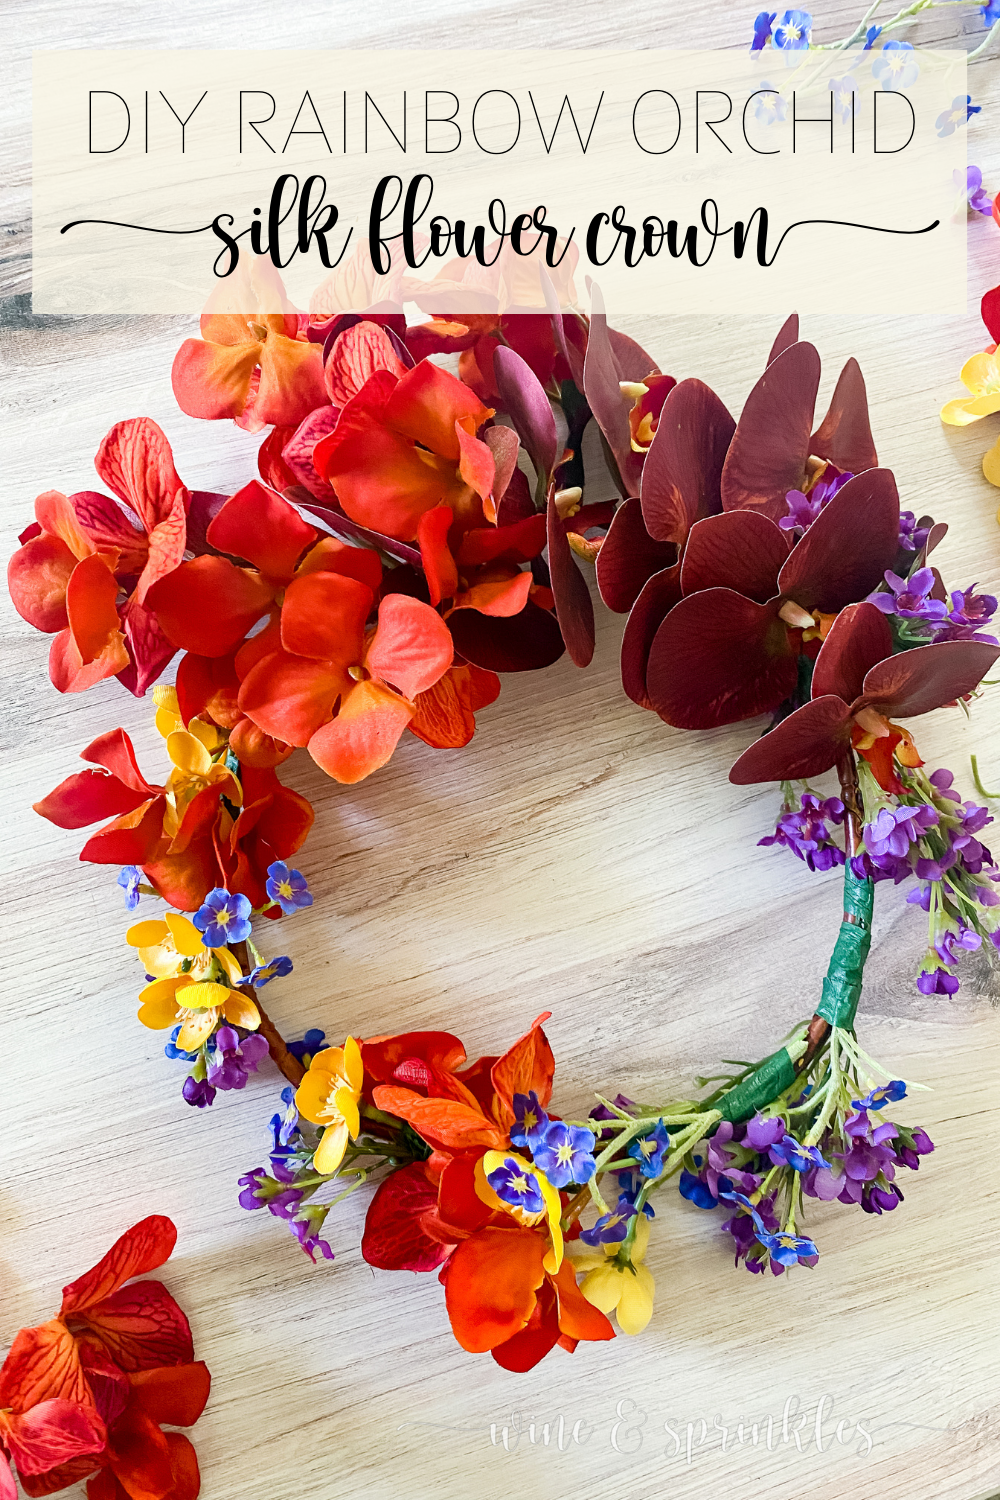
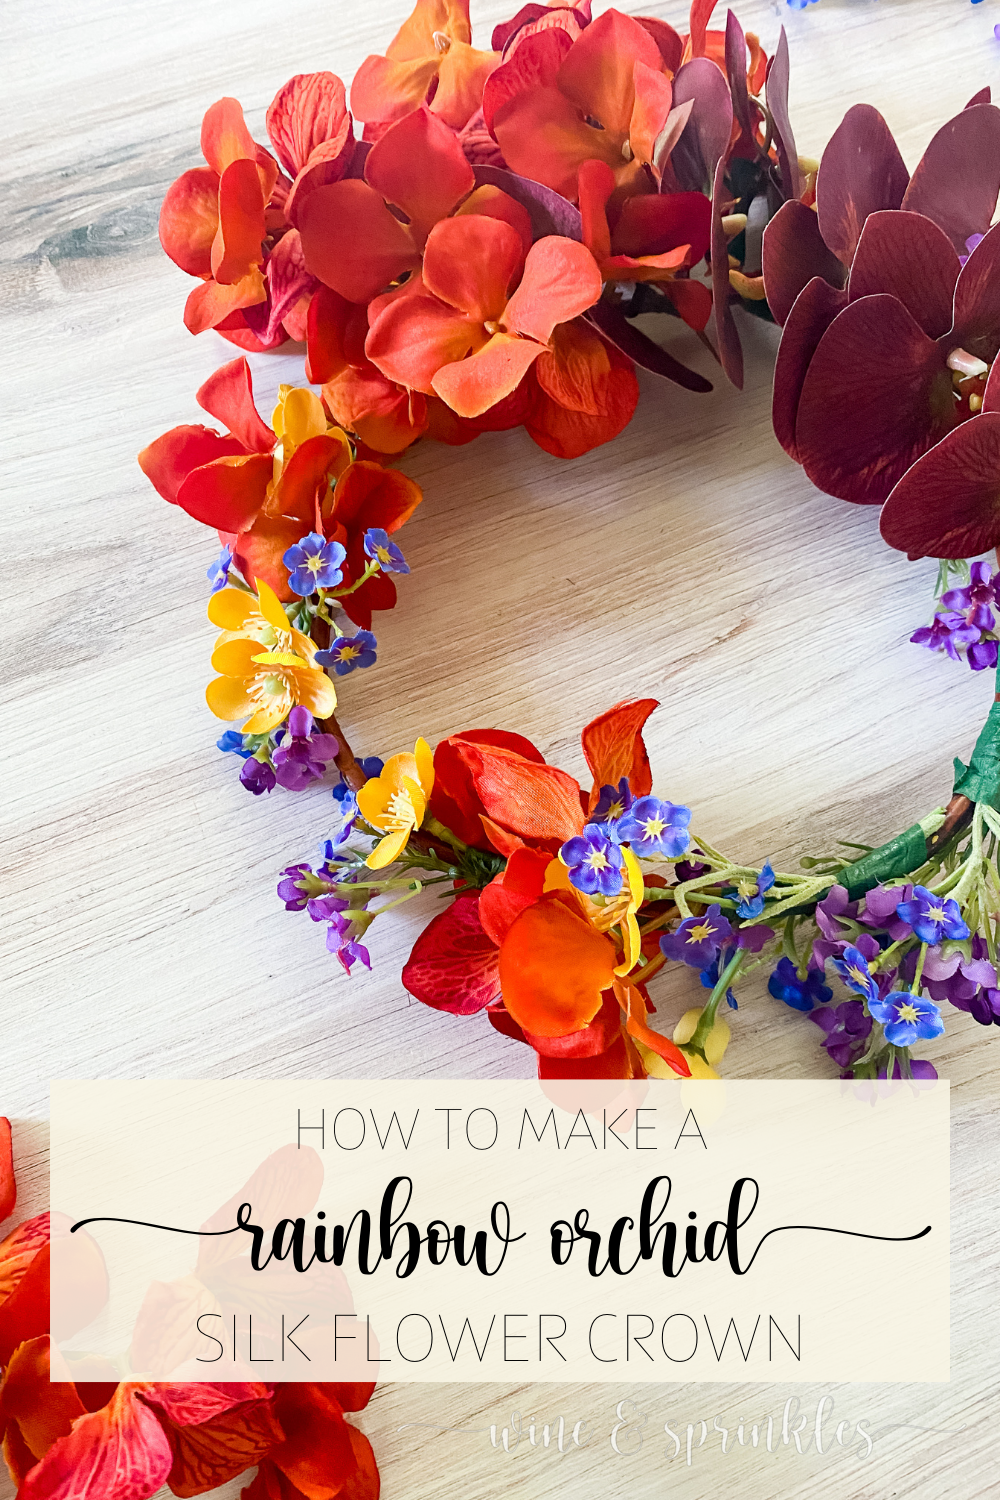
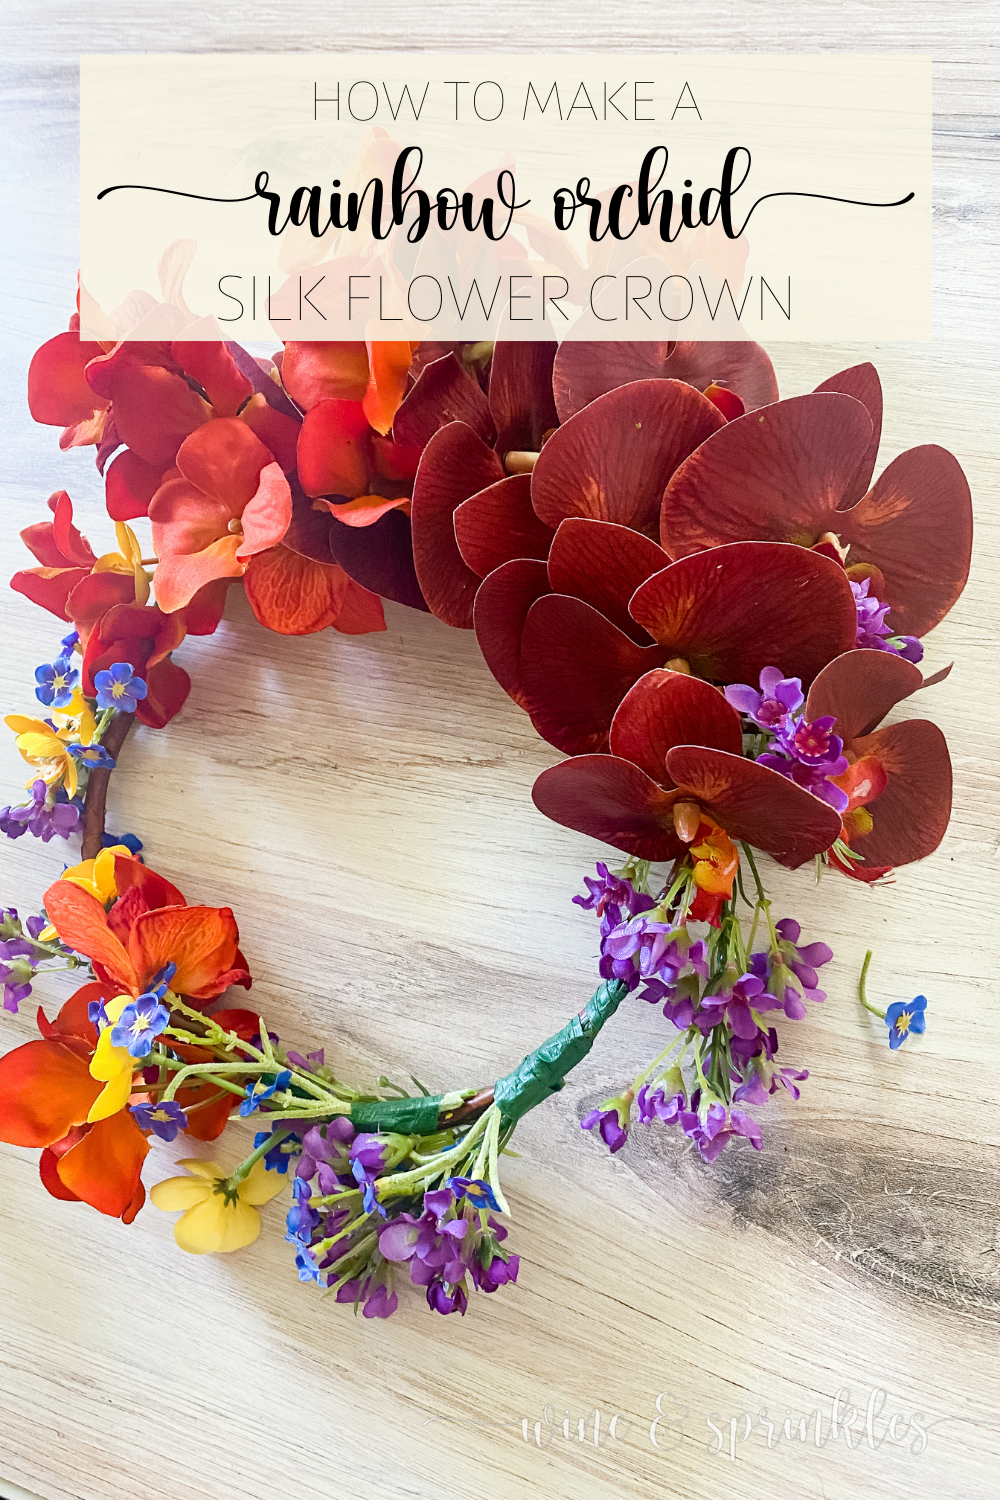
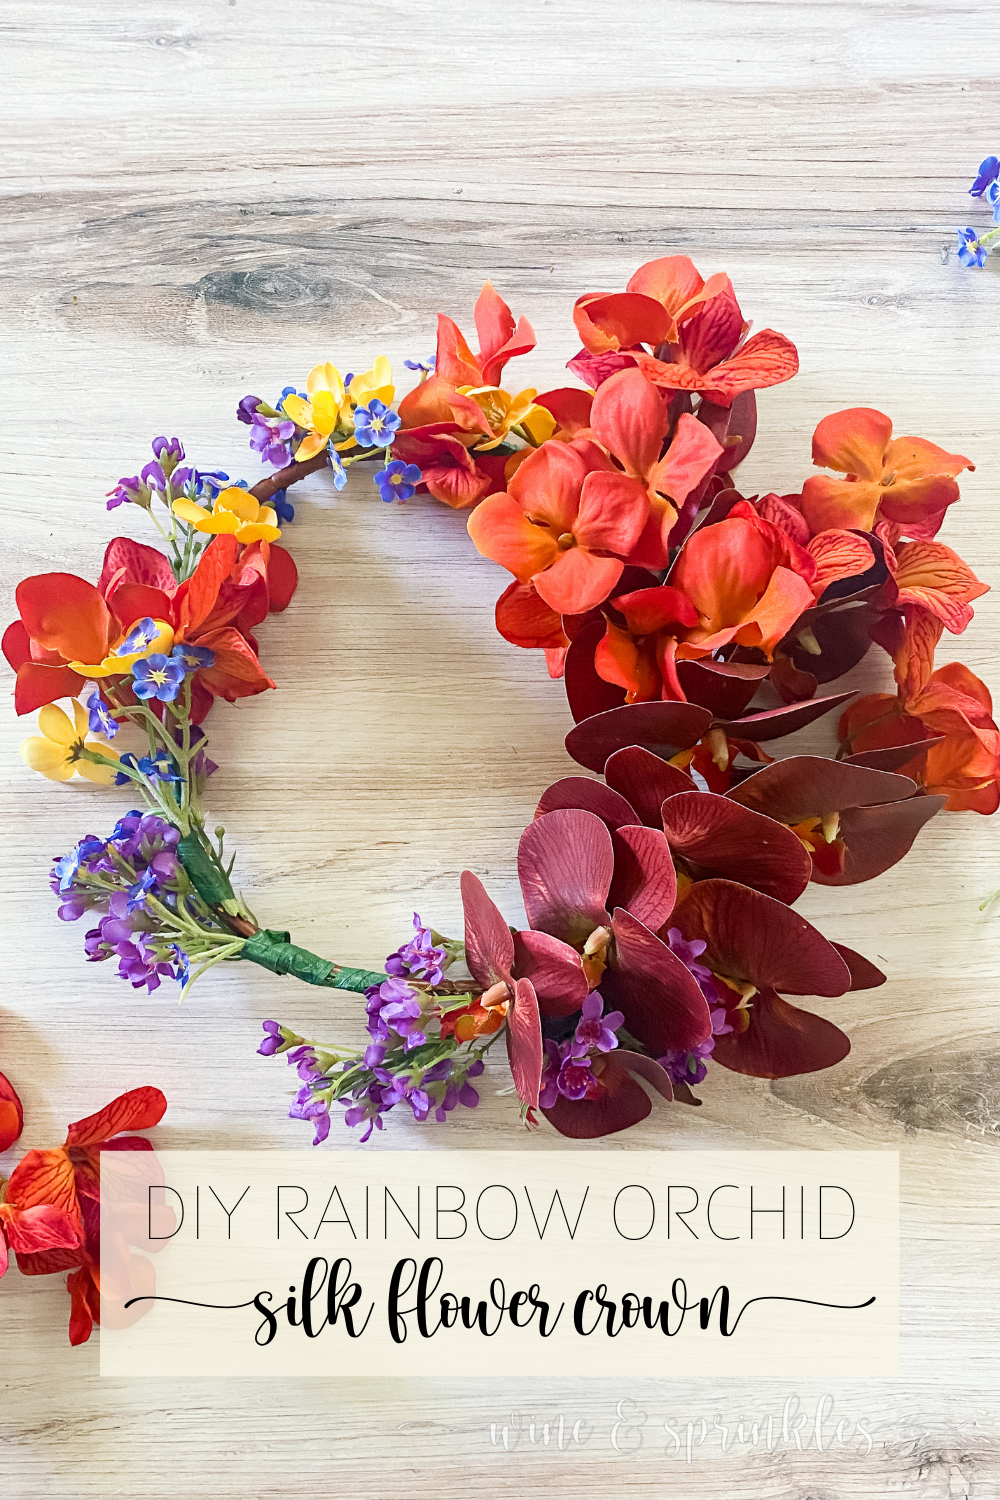
It’s been a parade of flower crowns on the blog the last month, and now it's time for the next crown to join the group! While I started my crafting journey with light and bright crowns with pastel hues, the lovely lady that requested this crown had only one preference, that was lots of color! So while my first two crowns focused on much lighter and more neutral blush and white palettes, this was my perfect chance to create an over the top rainbow crown for my friend’s May birthday and for all those who need color in their lives!
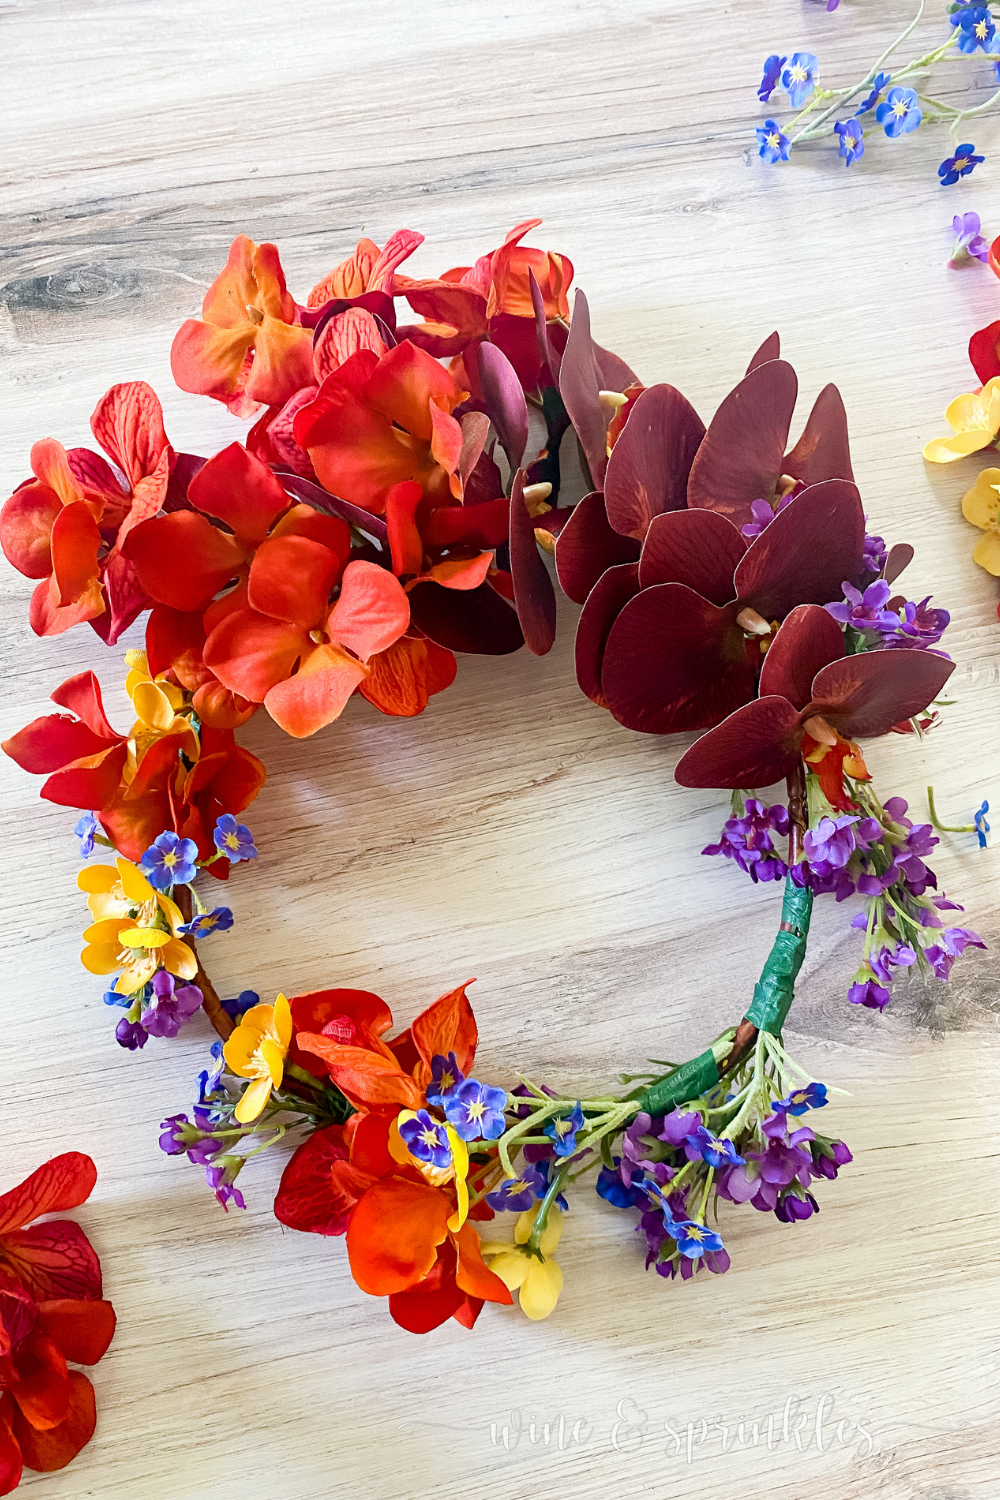
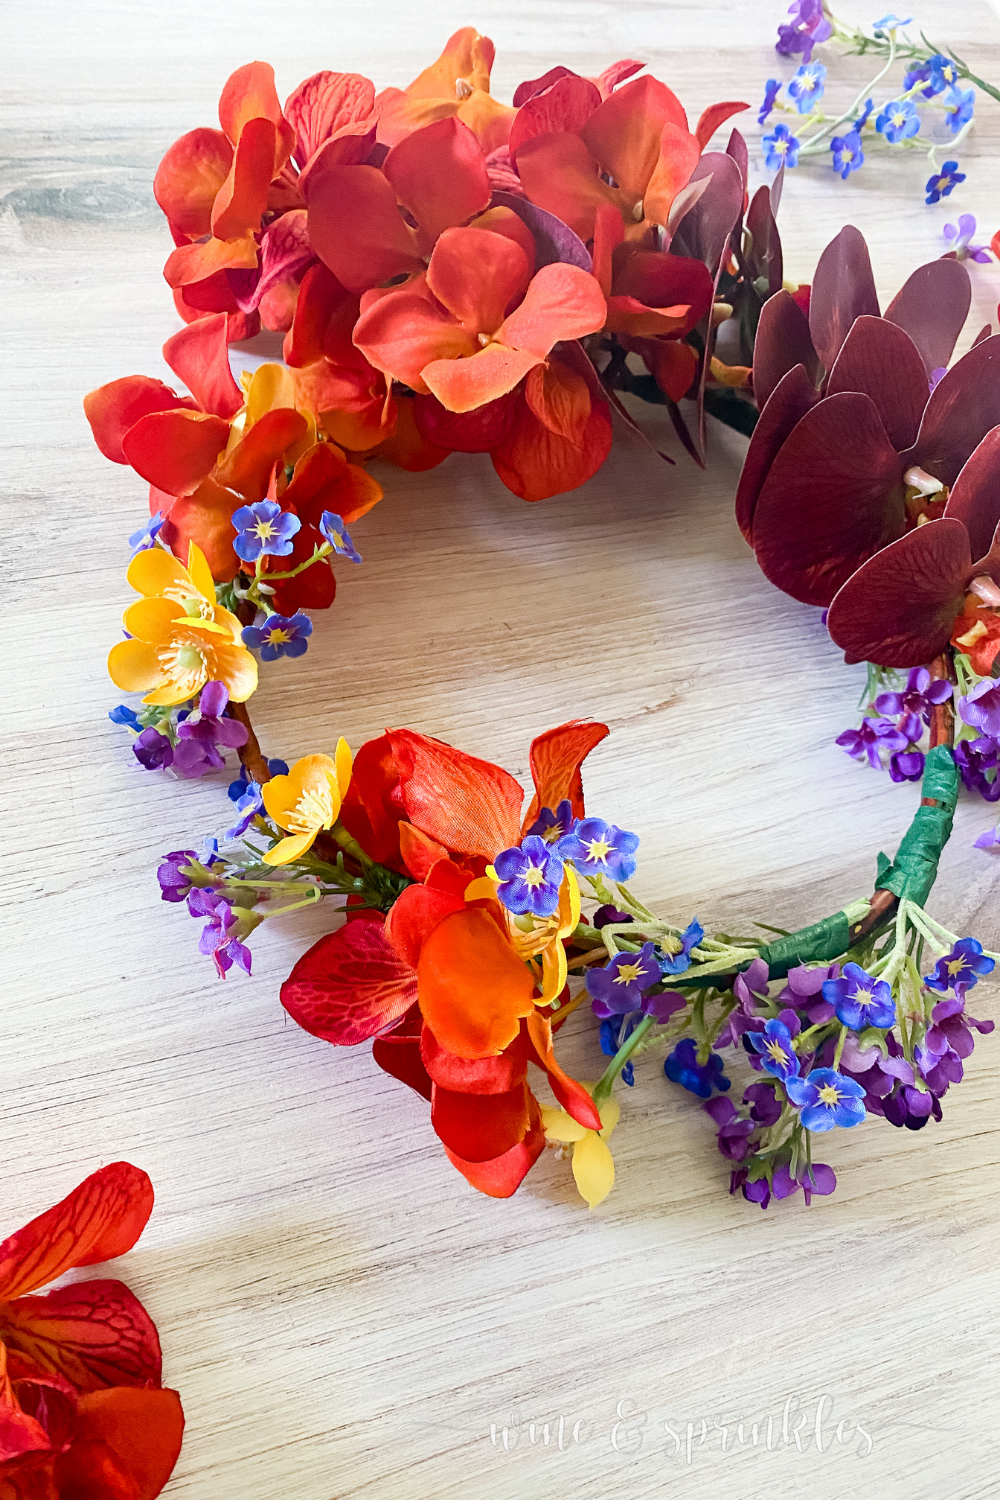
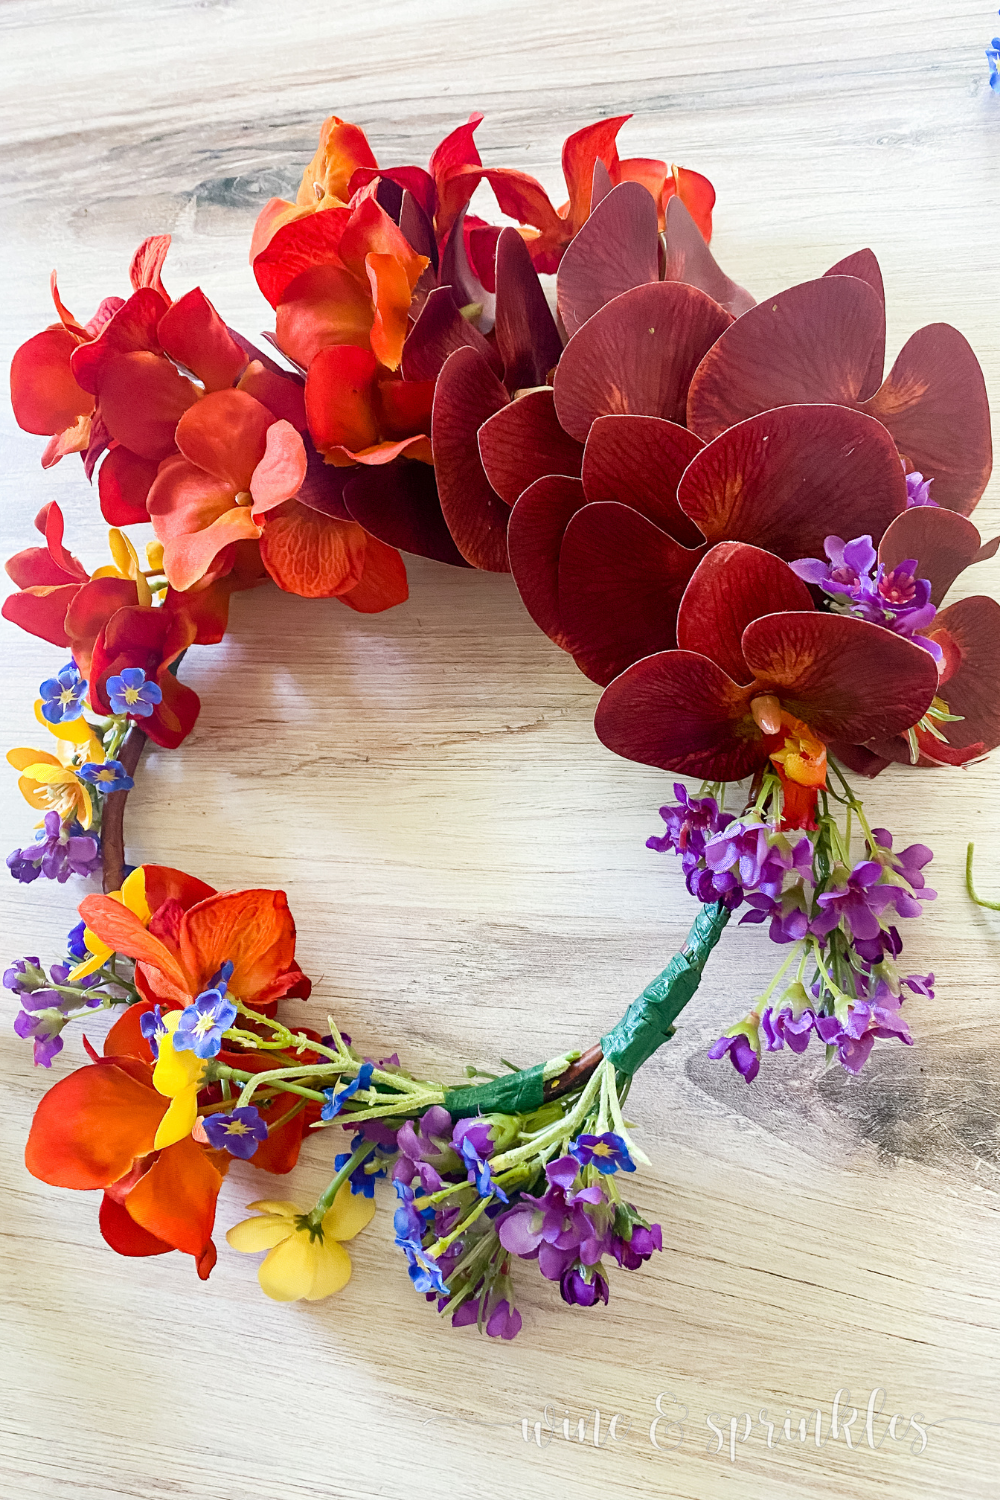
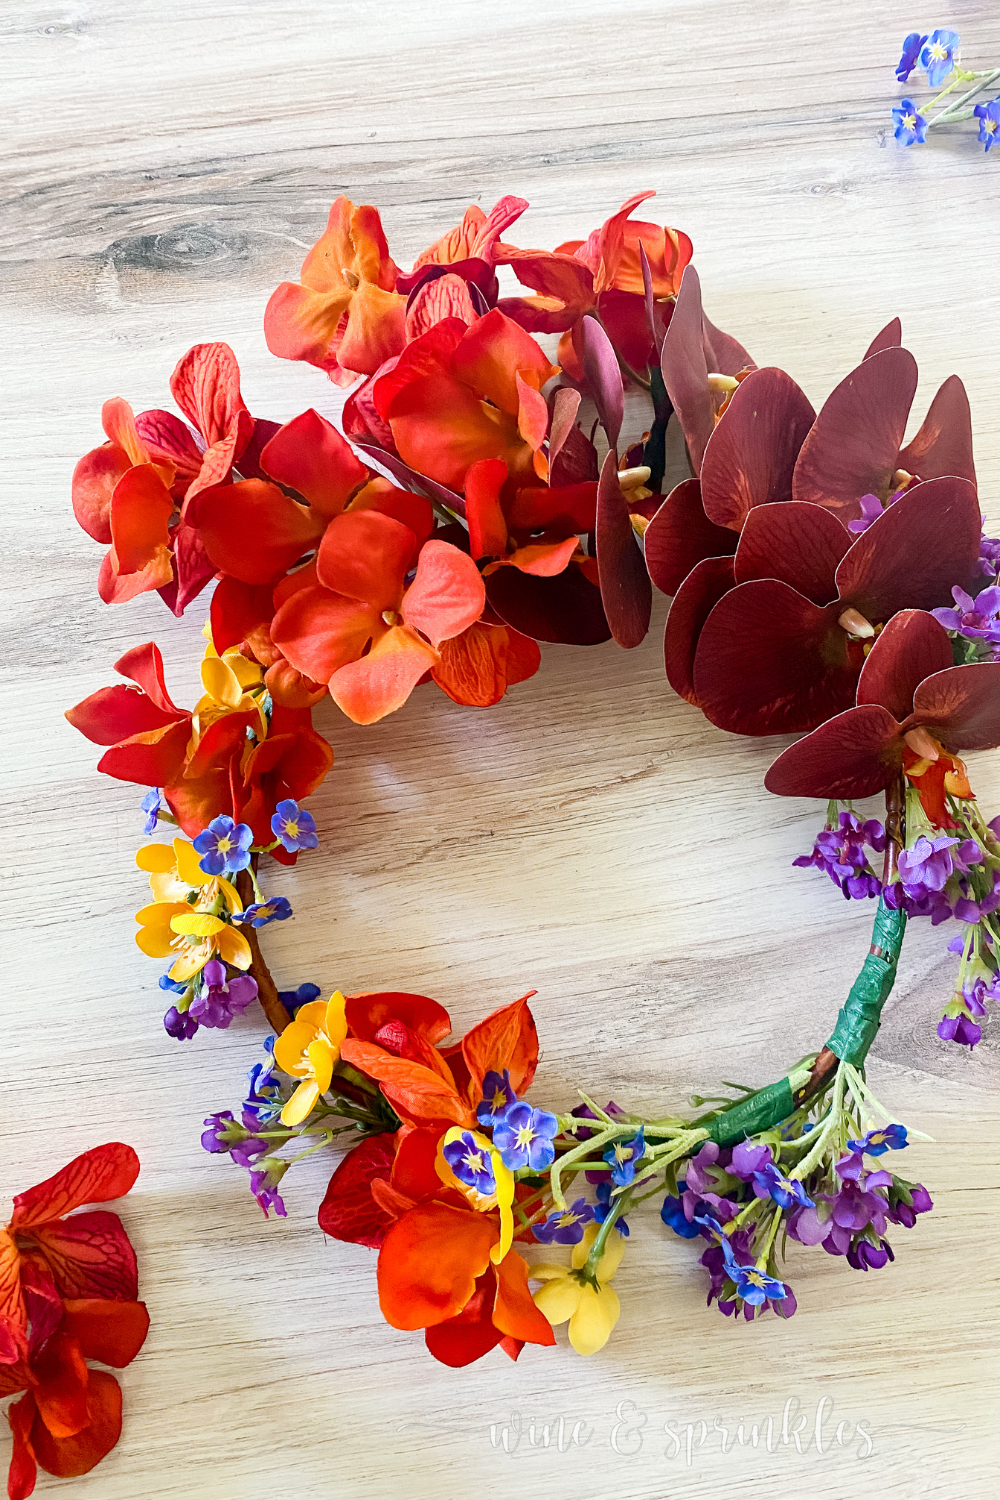
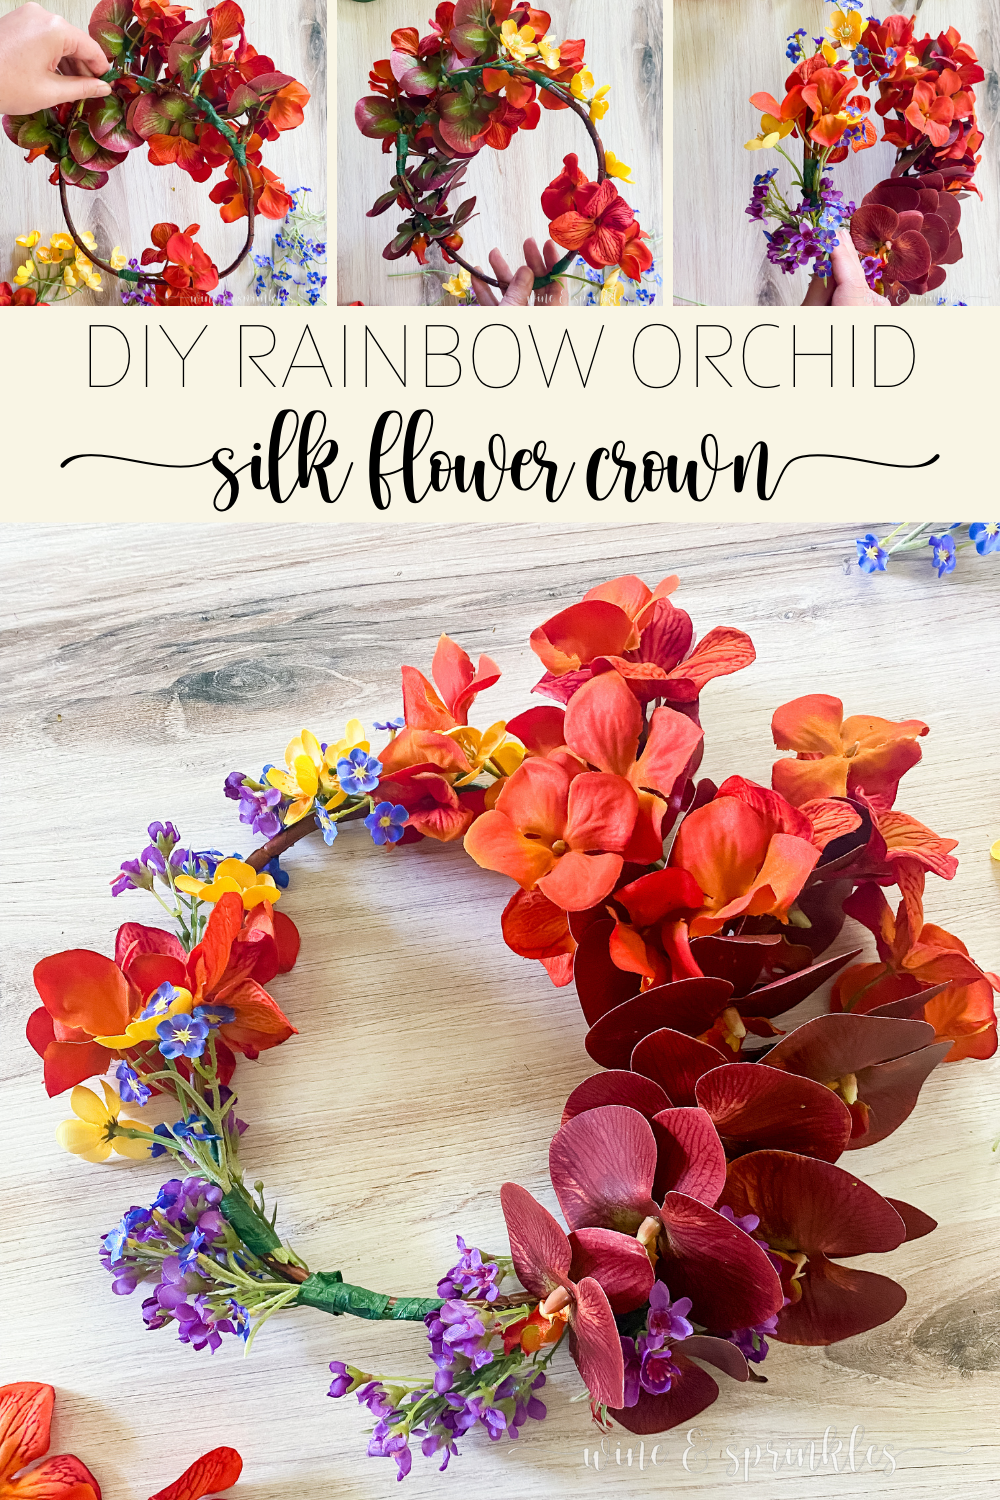
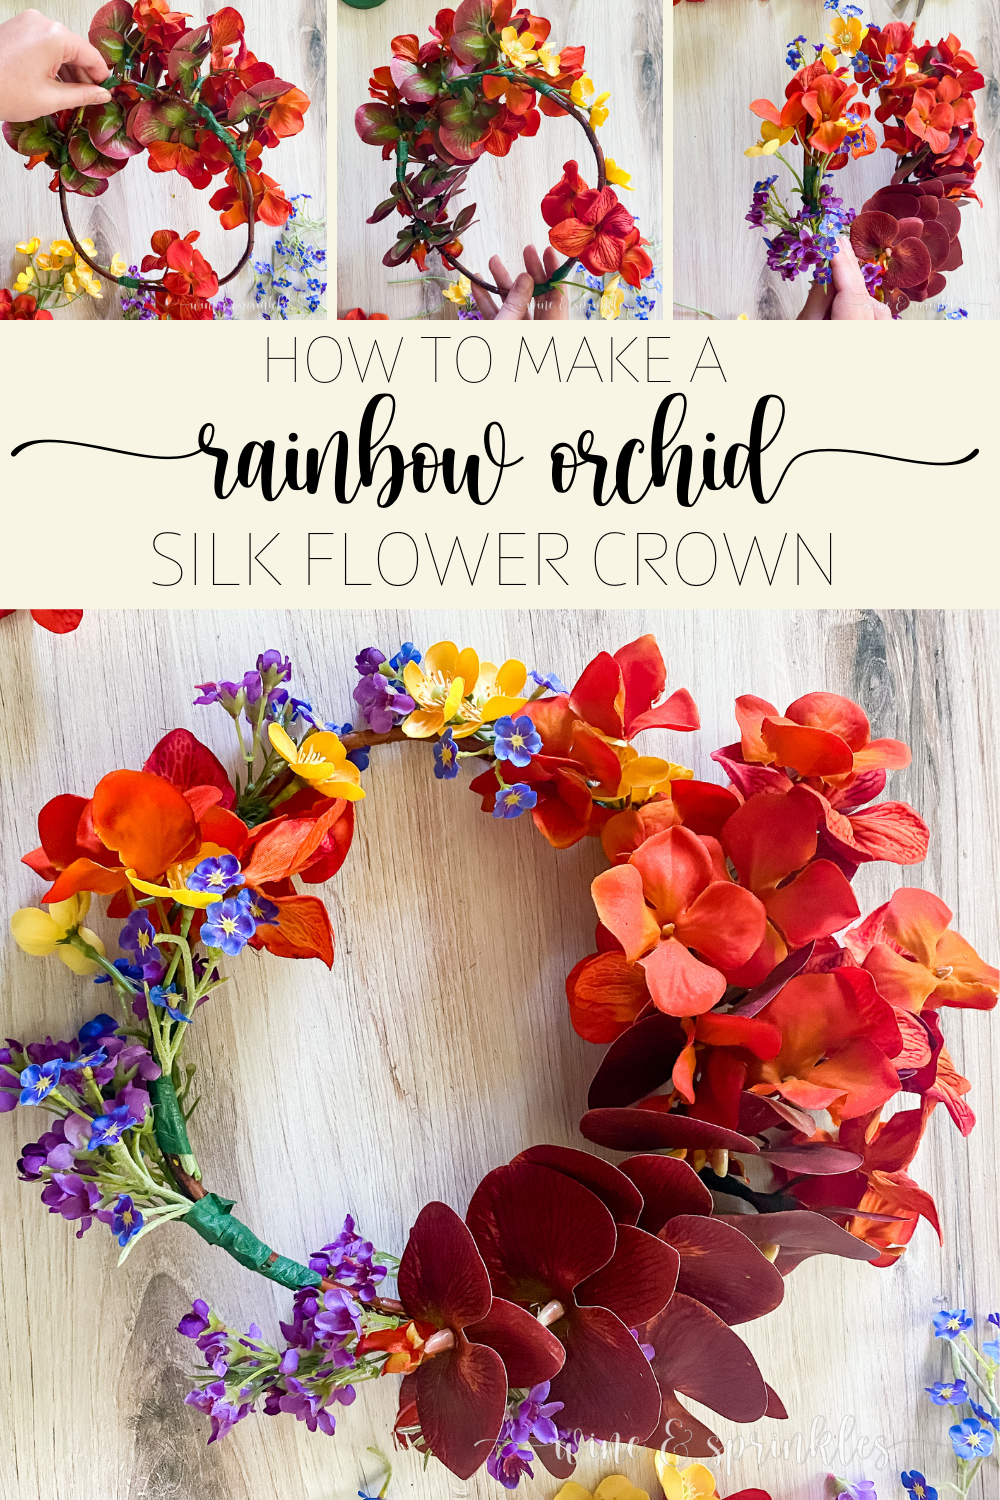
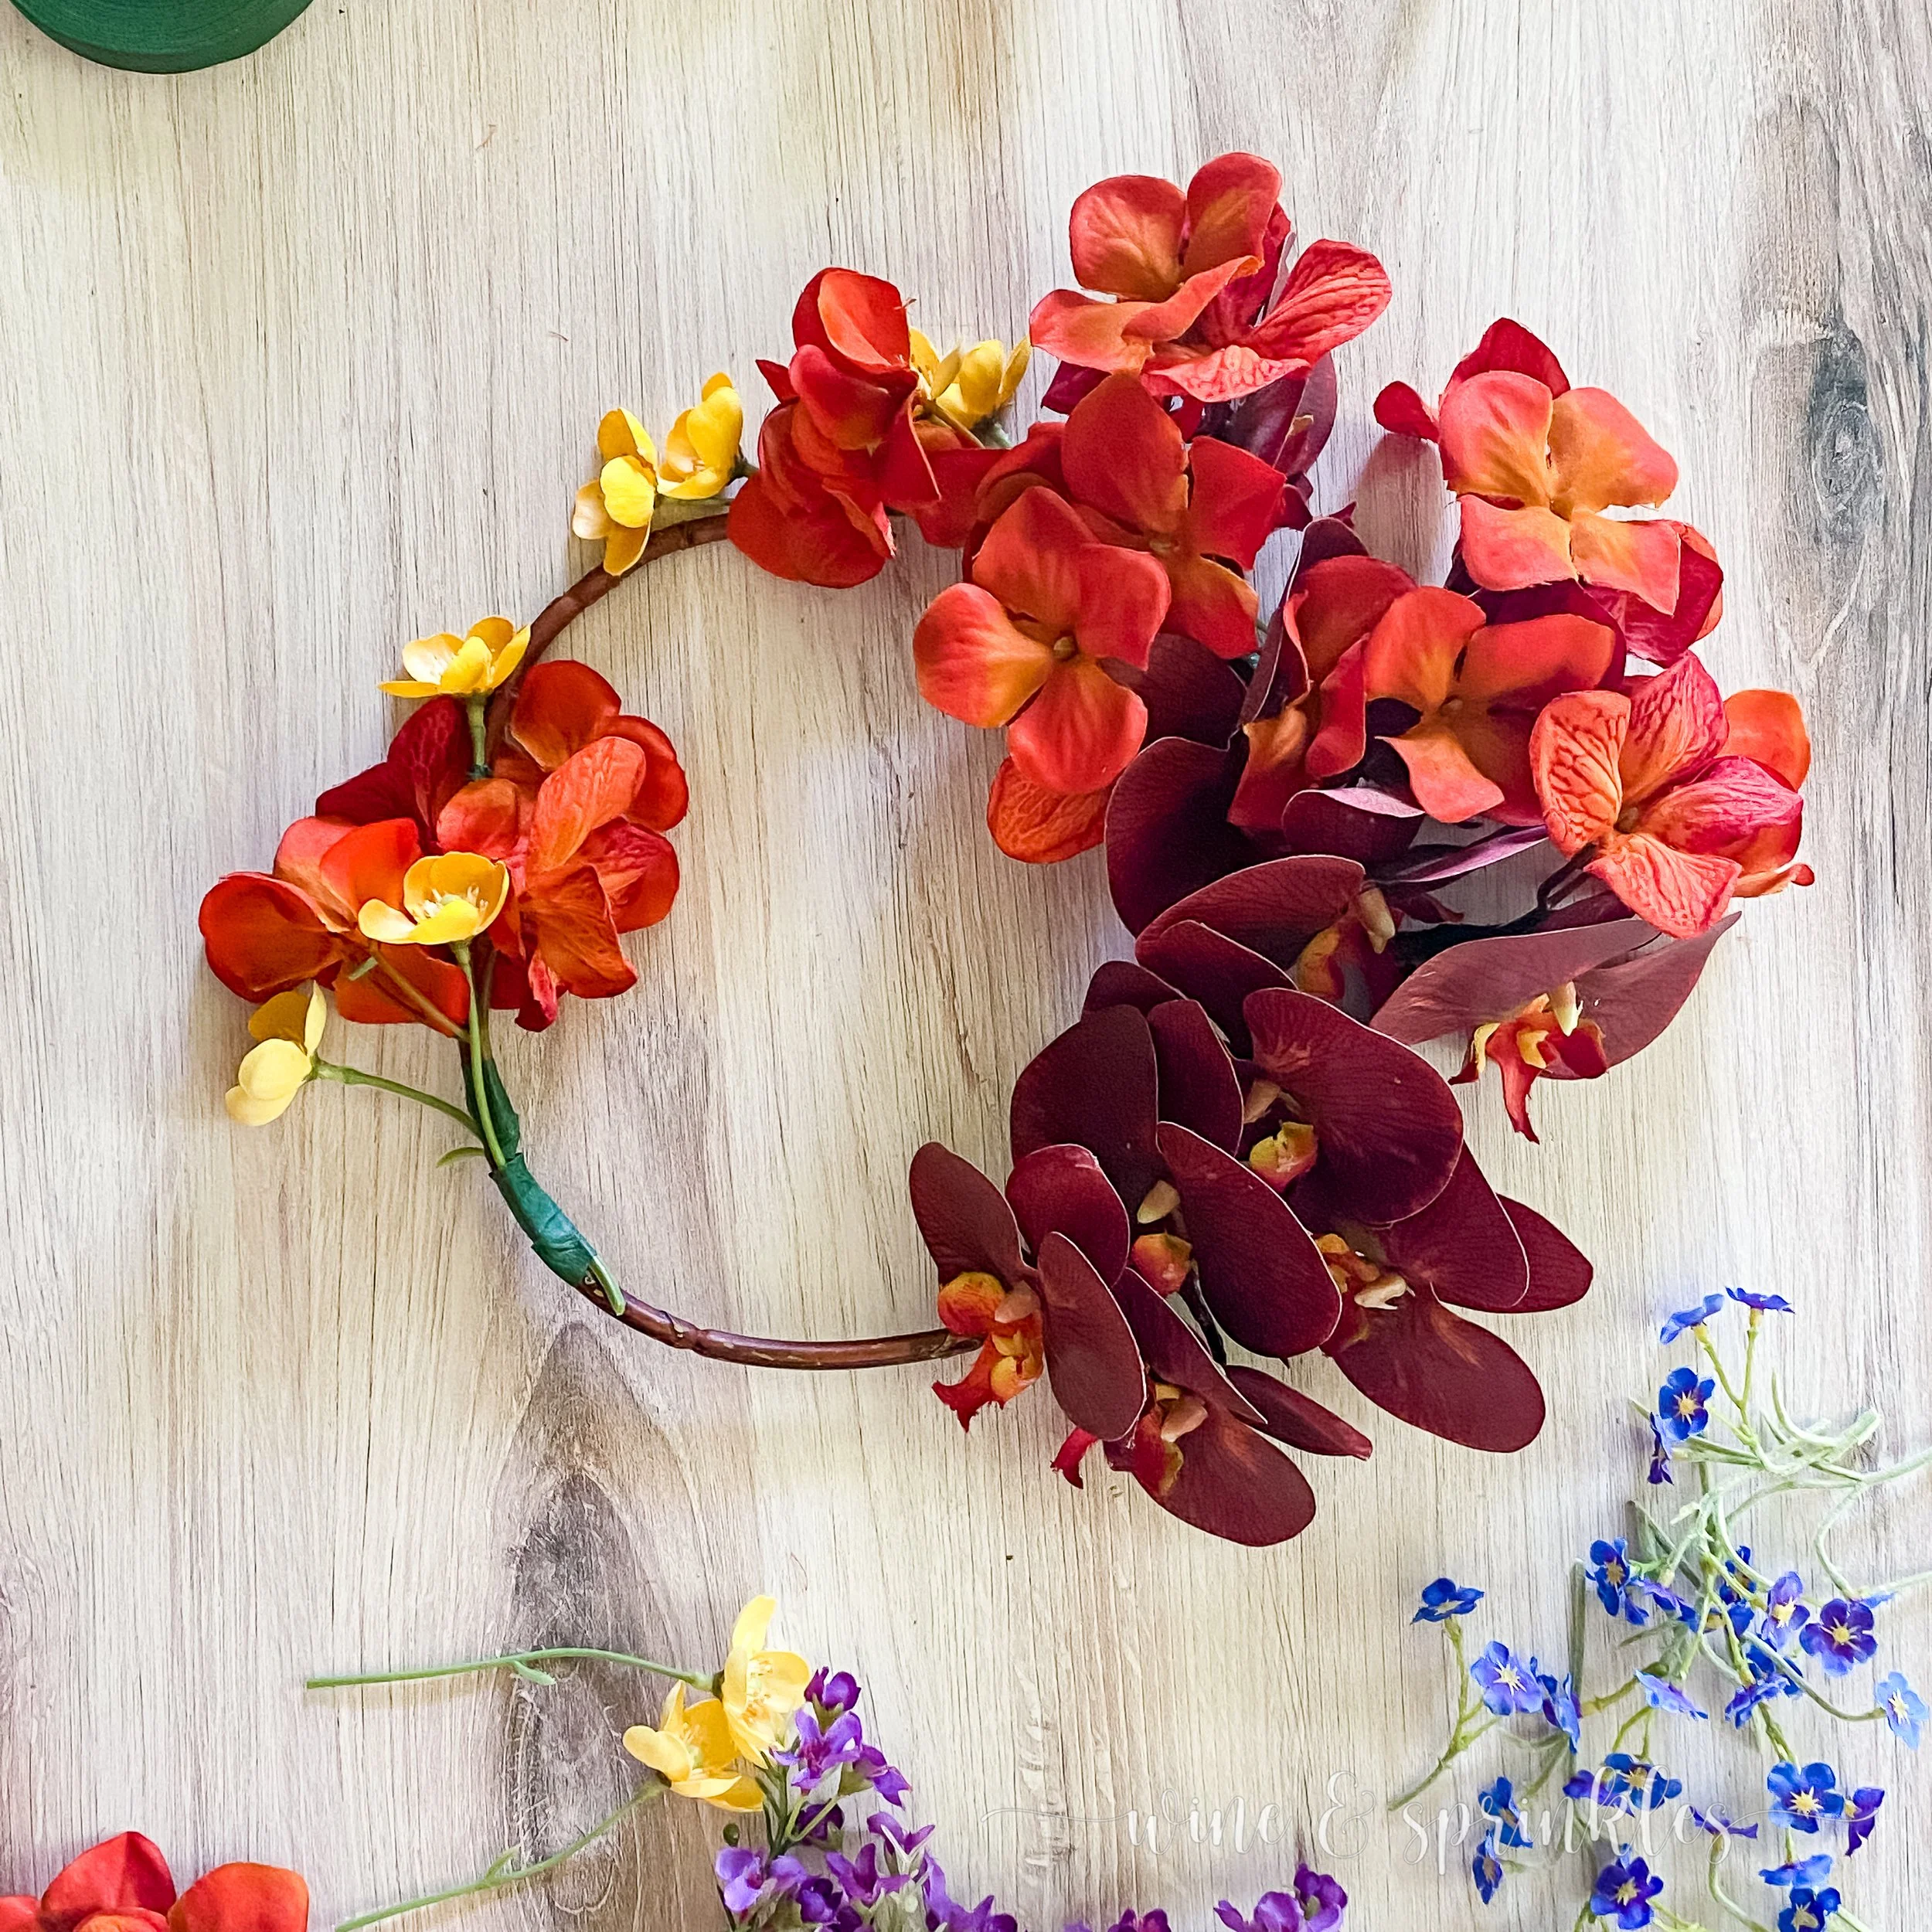
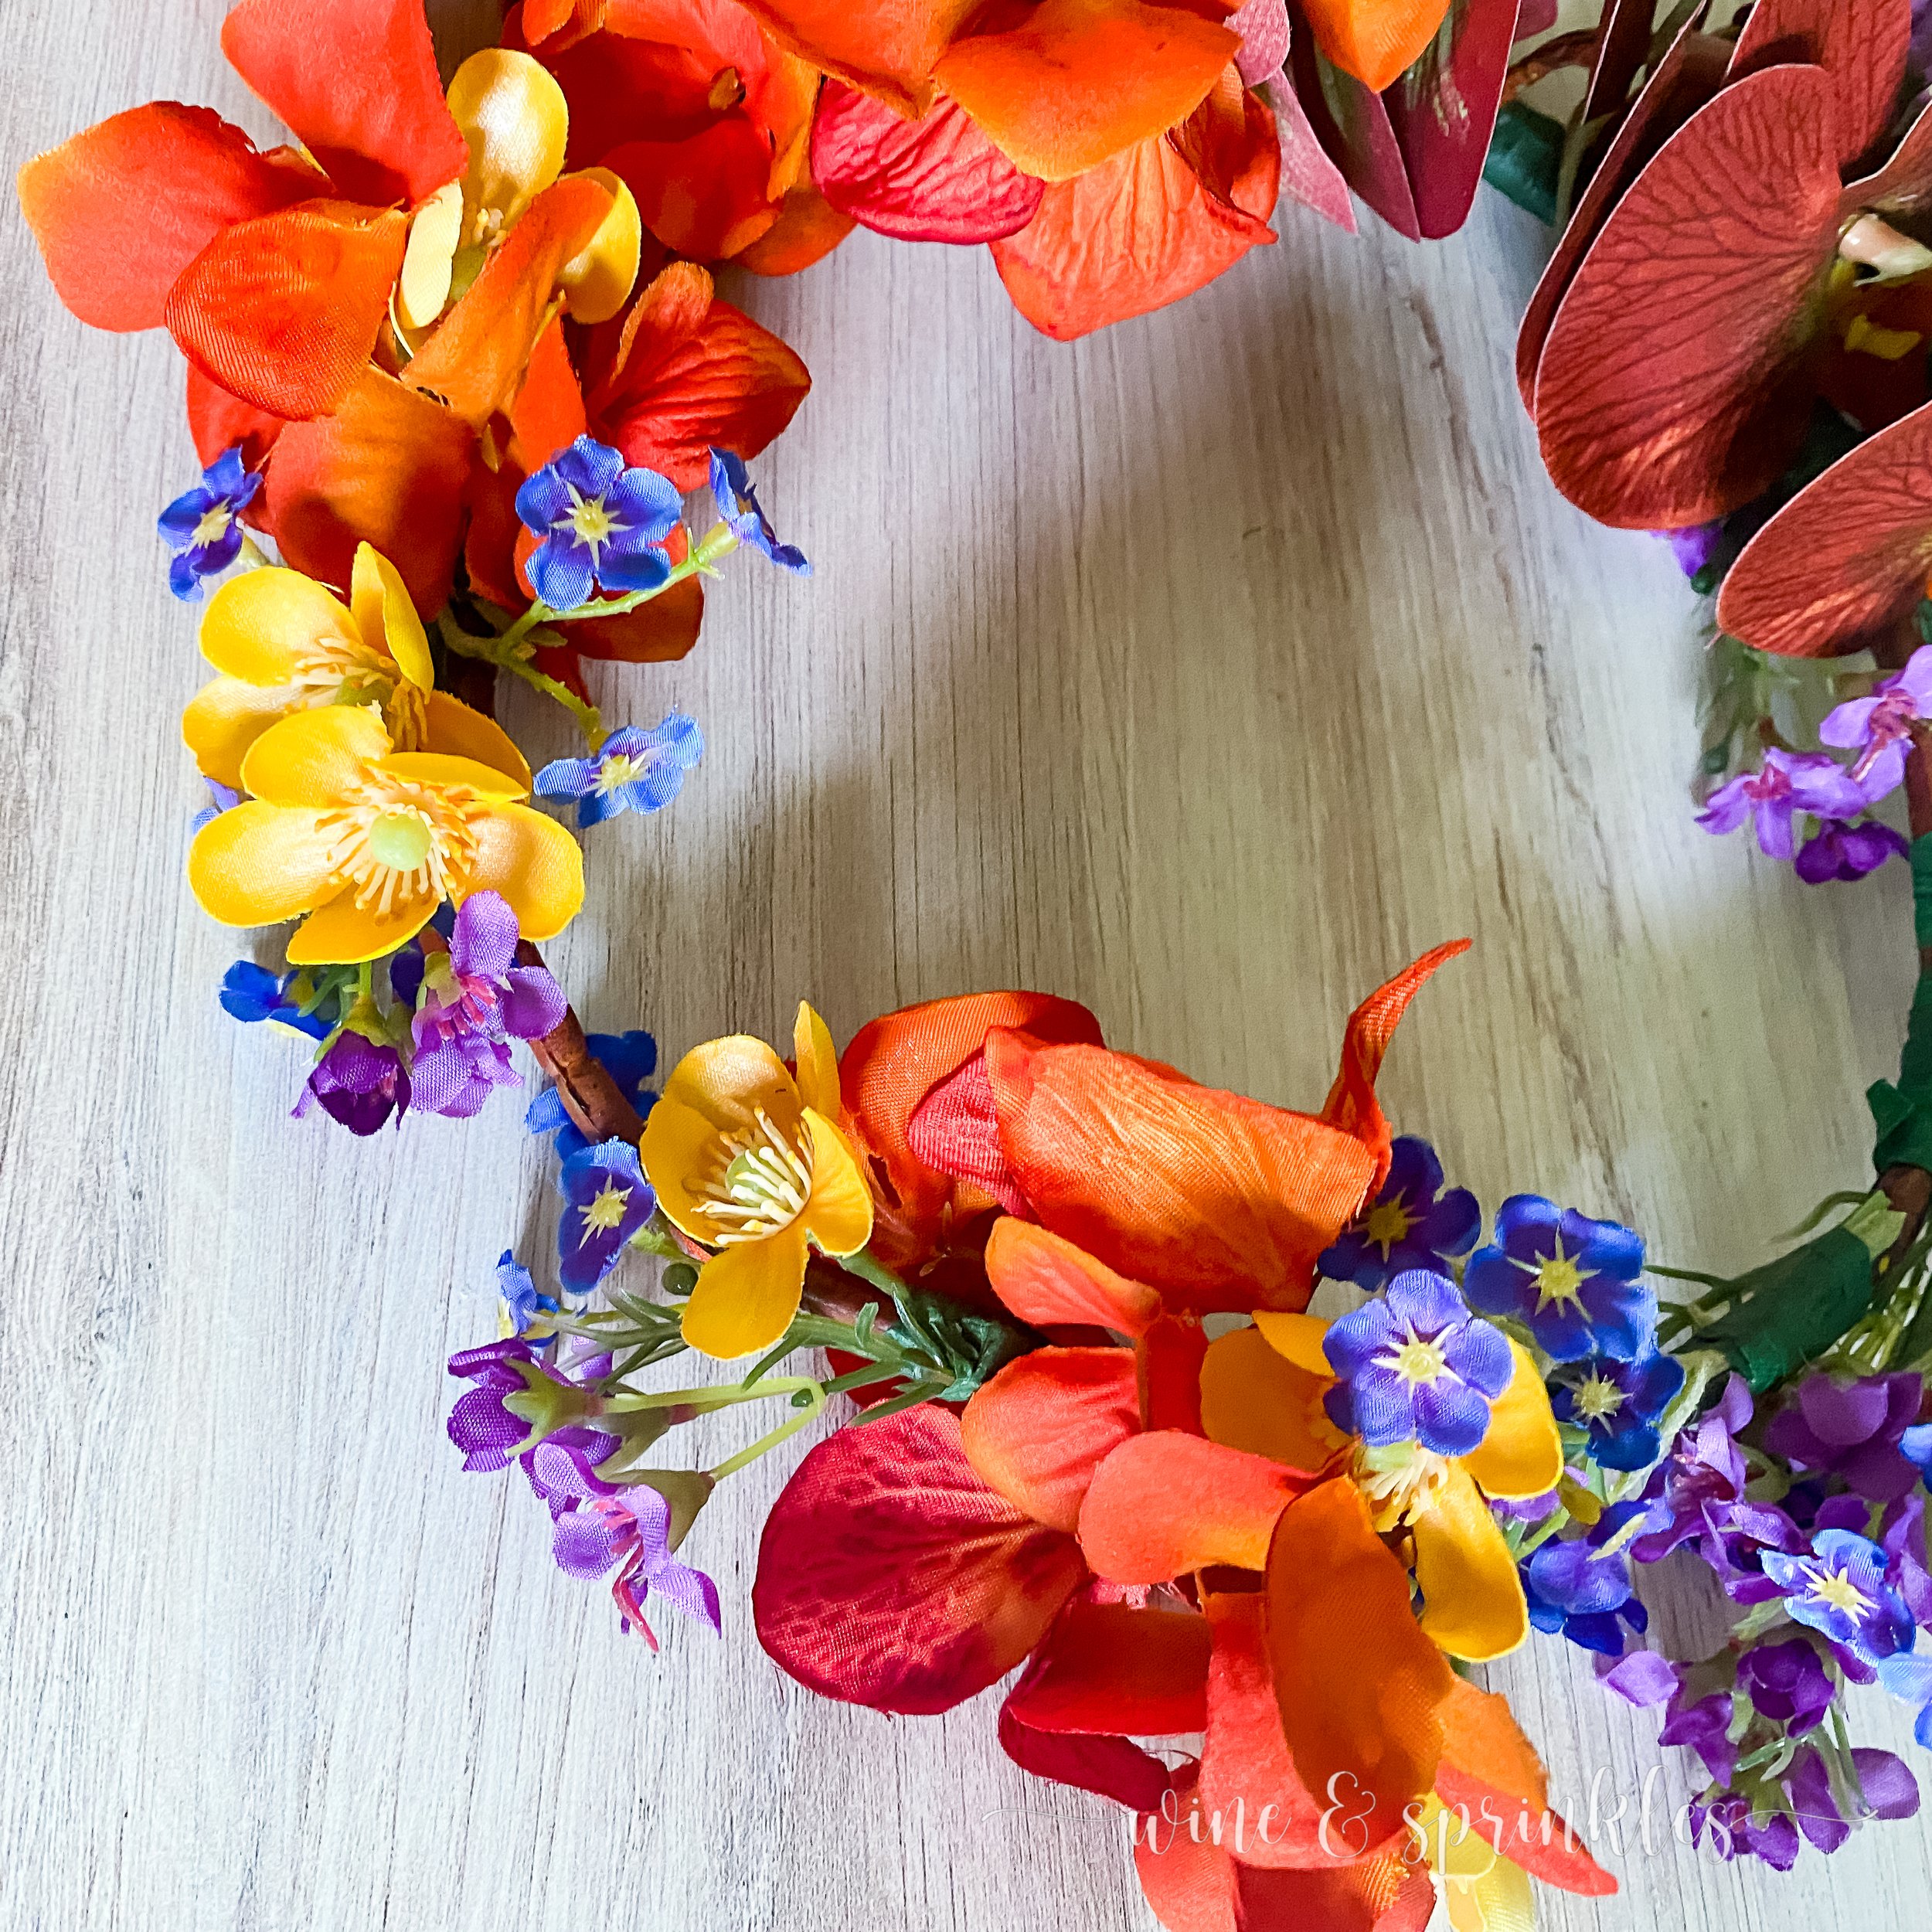
Similarly to my Orchid and Cherry Blossom Crown, this is an asymmetrical crown with a beautiful orchid branch being the base for the headpiece, but this time I went with a beautiful deep burgundy to be the red of my rainbow and accented with bold and beautiful orange hydrangea blossoms, to give the same volume as the cherry blossoms in my last crown. These orange clusters also made the perfect base for the side fascinator of this crown, so I could build the rainbow pattern out from multiple sides. I completed my crown with a variety of yellow, blue and purple wildflowers, gathering them in bunches and blending them out from the hydrangeas and orchid, in rainbow order, for a super colorful gorgeous crown for one of my favorite ladies!
I purchased all these beautiful flowers from my favorite online silk flower supplier, Afloral! This shop specializes in providing a large variety of silk and dried flowers for DIY centerpieces, flower arrangements, and in this case, flower crowns! I’ve used their flowers in all of my Silk Flower Garlands and Centerpieces as well as my flower crowns; and all the products I’ve used have been the best silk flowers I’ve seen and used. Check out my review on the products I’ve tried so far and check out all the beautiful blooms they have to offer for your own DIY Projects!
While I wrote about it as the perfect start to Pride Month, this bold and colorful beauty is a perfect accessory for baby shower mamas, holiday outfits (I’ll be using rainbows in my St. Patricks day outfit next year), birthday crowns, or any rainbow themed event!

SUPPLIES
MAIN FLOWERS
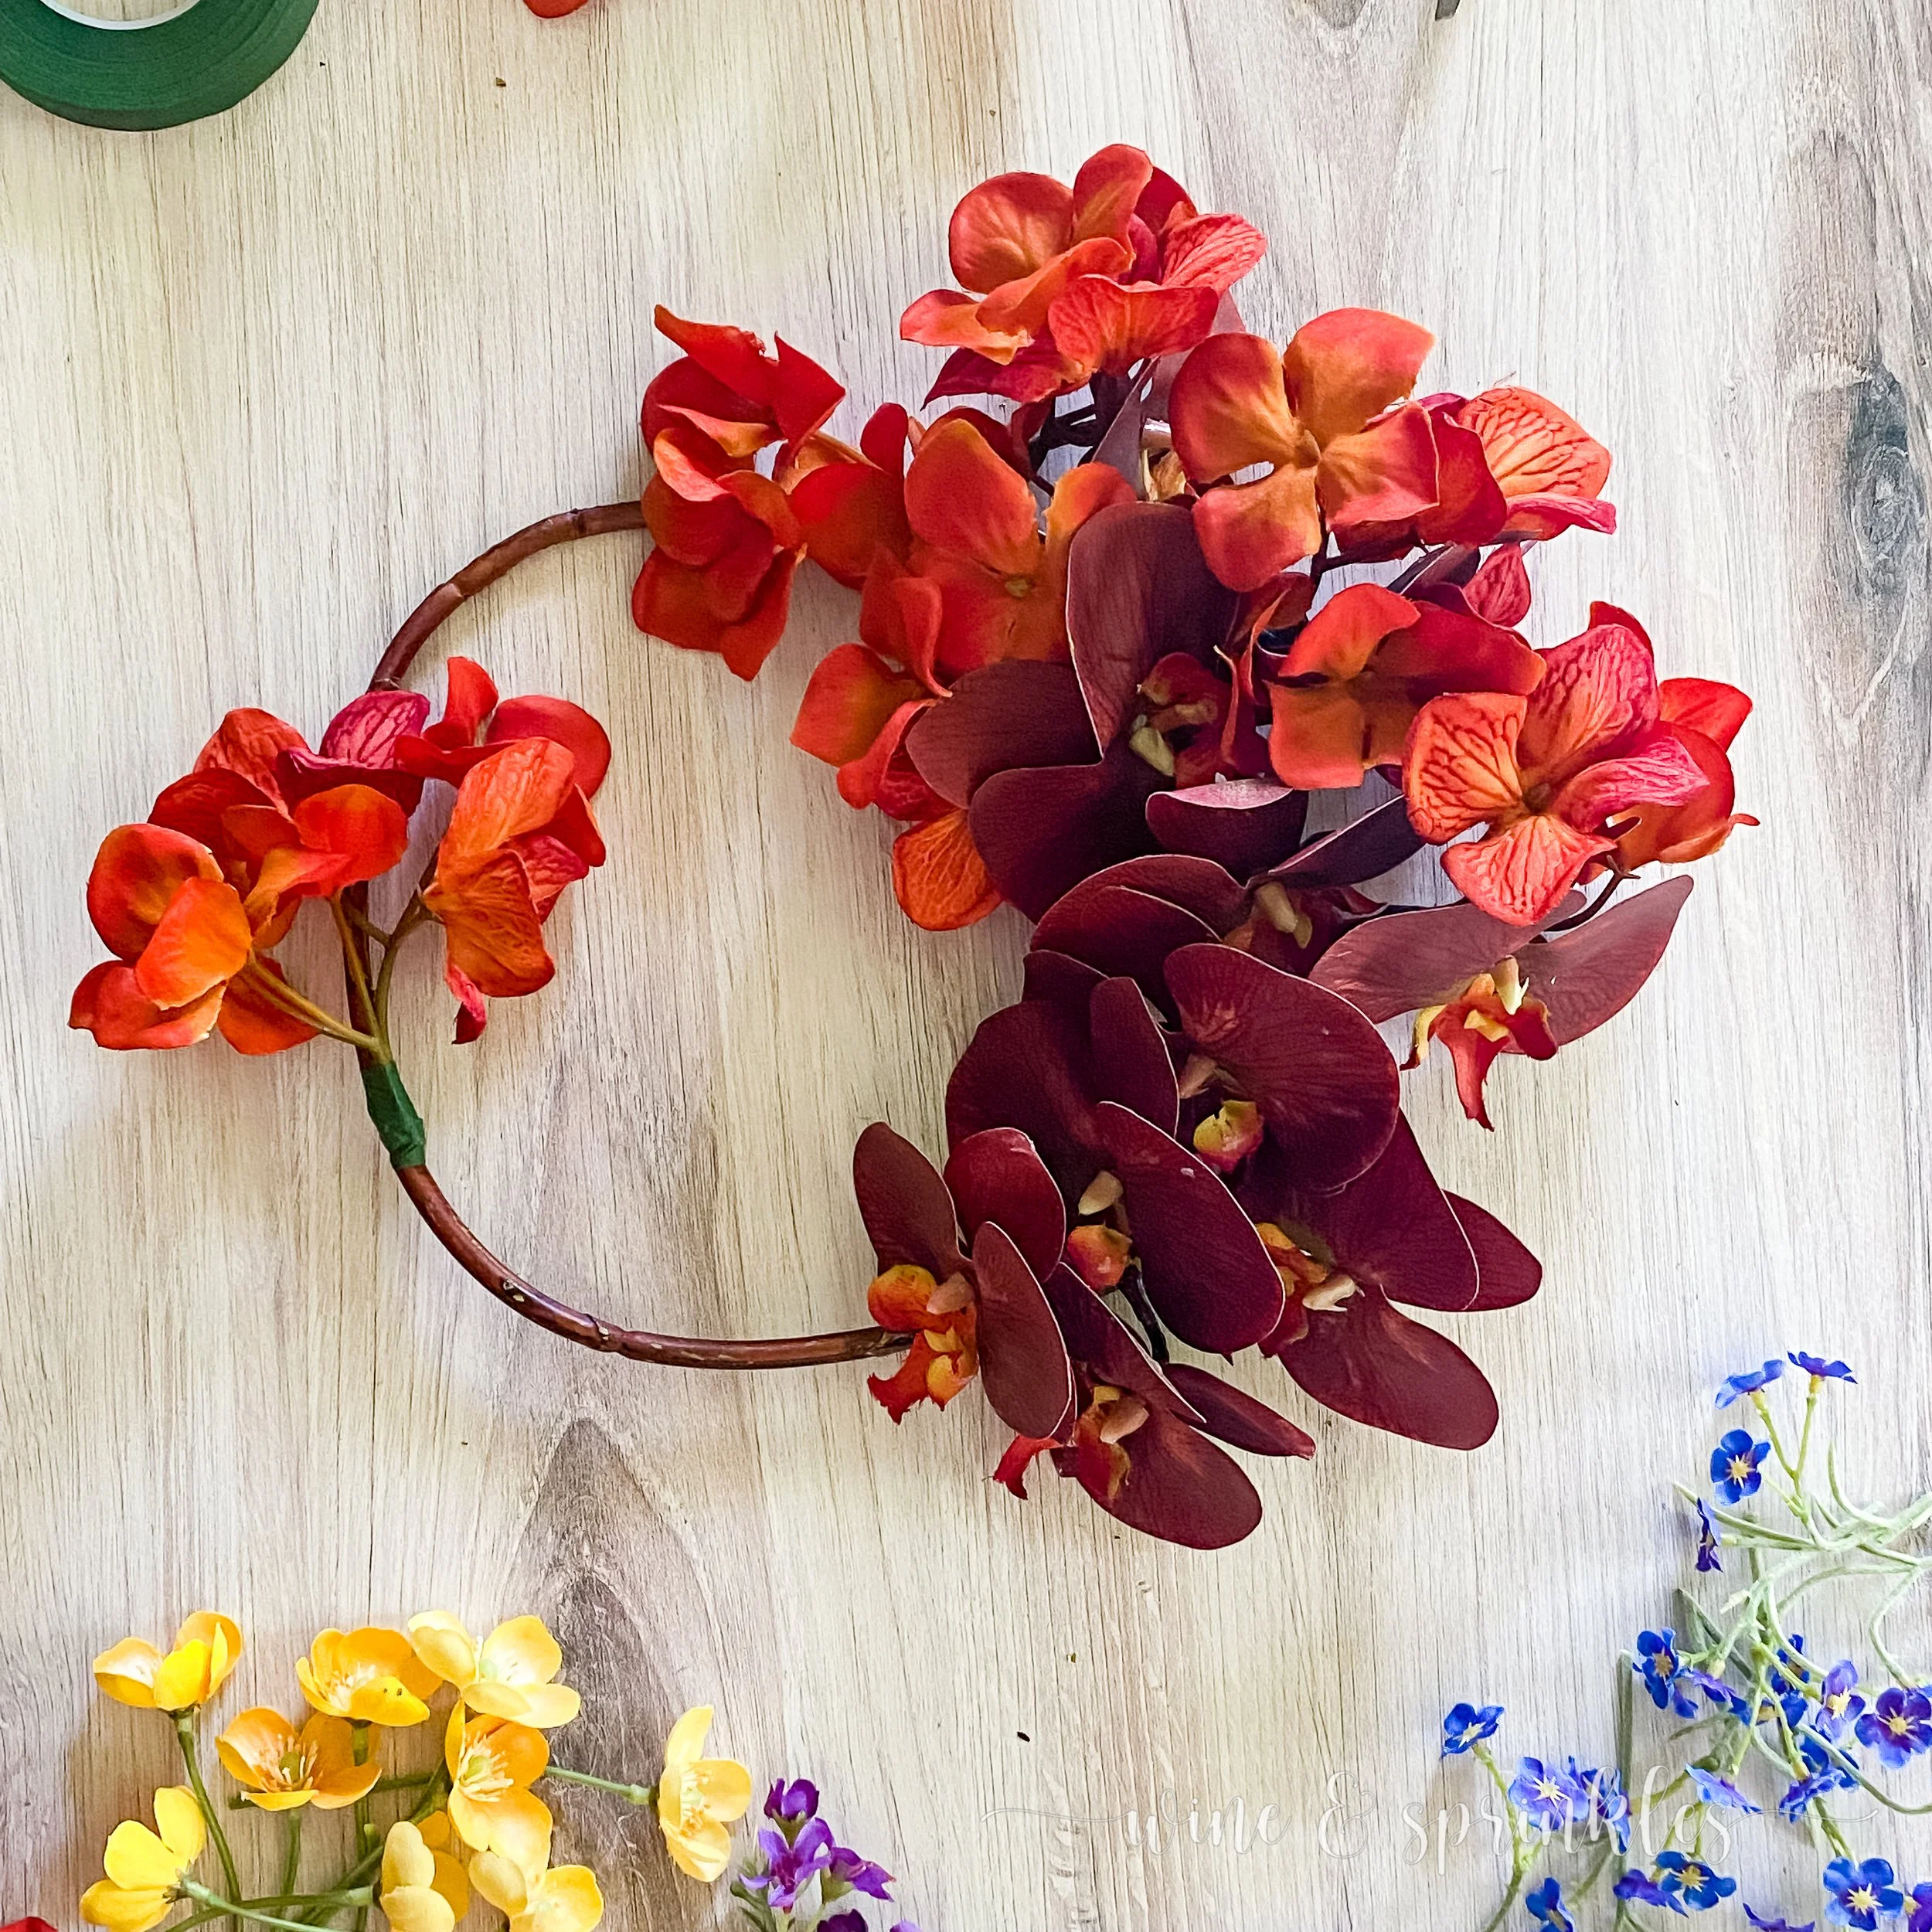
Red Orchid Branch: just like my last Orchid and Cherry Blossom crown, an orchid made both the crown base and main flower to showcase in this crown, but instead of light and bright, I went for deep colorful hues through all my flowers for this lady! This orchid was the perfect place to start, with its deep burgundy color perfectly matching the darker tones in the orange hydrangeas I found. A word to the wise, this particular branch did not like all my bending the get it taped into a crown shape, so it shed some of its outer stem coating, I just brushed it off and there were so many blooms taped into the crown, I never noticed it after it was finished! While Afloral doesn’t have this pretty stem anymore, I found one that I linked through Amazon to keep colors consistent!
Orange Hydrangea: while I still wanted a nice voluminous flower to offset the orchids in this crown, none of the Cherry Blossom Branches were giving me the color or pop I wanted. Enter the Hydrangea, one of my favorite flowers and a great filler option for any floral project! This burnt orange colored one was the perfect fade from the deep red orchids, and the perfect base for starting the smaller yellow, blue, and purple wildflower clusters in the crown. Similarly to my orchid, Afloral is fresh out of orange but they have lots of other Silk Hydrangeas in a variety of colors for other crowns!
SUPPORT FLOWERS
Yellow Buttercup Wildflowers: with the red and orange of my rainbow crown chosen, I wanted the other colored support flowers to be more whimsical and less voluminous to keep a posh asymmetry to the crowns style, and these yellow buttercups were the perfect place to start! I ended up trimming them into single blossoms, then grouped and taped them together around the orange hydrangeas, which was a perfect fade to yellow and the smaller pops of blue and purples from the bigger and bolder flowers of the crown.
Blue Forget Me Not Wildflowers: with the green of the stems being the green in my rainbow, my flowers popped from yellow to blue, and nothing like a forget me not with its blue petals and yellow centers to be the perfect transition! These got trimmed into clusters of 5-7 small flowers and taped them right with the buttercups, leaving my purple flowers to fill in empty spaces and complete the crown
Purple Waxflowers: when I first saw pink waxflowers in my 30th birthday bouquet, I knew I wanted to use them myself someday, so when I found these purple waxflowers, I knew they would be the perfect bloom to complete this crown! These groupings were more voluminous that the yellow and blue flowers, being a perfect choice to blend the bottom red of the orchids into the blue and yellow of the bottom of the crown, as well as being a great accent color blending from the blues in the top of the crown too! While wax flowers are now in short supply, you can also substitute purple babies breath like the kind I’ve linked too!
TOOLS & OTHER SUPPLIES
Floral Shears: for trimming your stems
Floral Tape: for taping your crown and flowers together
Sewing Tape: to measure your head and make your crown the right size!
SUPPLIES LIST:
[for 1 flower crown]
MAIN FLOWERS
Red Orchid Branch x 1
Orange Hydrangea x 1
SUPPORT FLOWERS
Yellow Buttercup Wildflowers x 1
Blue Forget Me Not Wildflowers x 1
Purple Waxflowers x 1
TOOLS & OTHER SUPPLIES
Artificial Flower Shears x 1
Floral Tape x 1
Sewing Tape x 1

DIRECTIONS
PART 1: CREATE THE FLOWER CROWN BASE


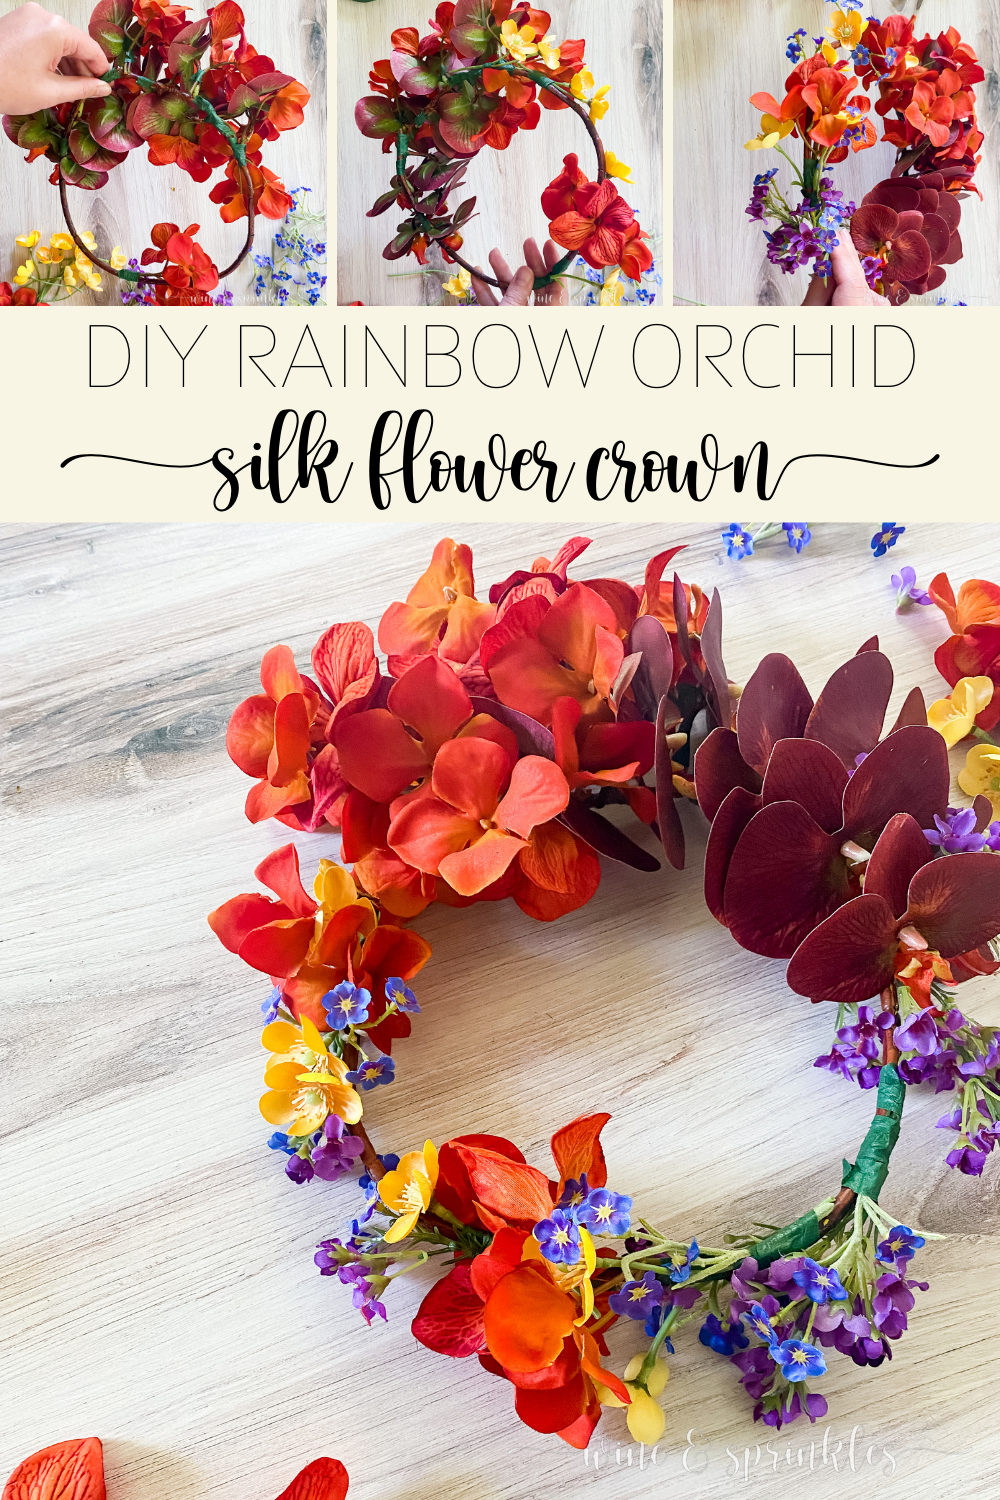
1. Using silk flower shears, cut the end of your orchid branch at the notch where it meets the first orchid blossom, trimming any orchid bulbs from the stem. Set aside the rest of your long orchid branch to create the crown base; then trim the stems on your other flowers and branches so that they are about 1-2” long, leaving this to use for securing them to your crown.
Trim your yellow, blue, and purple wildflowers to be many smaller sprays of several wildflowers, and cut your hydrangea blossoms into clusters of 3 blossoms each. My purple clusters came out as small stems with a couple blossoms and the tops as bigger bunches, with my yellow flowers being single blooms and my blue flowers being in small sprigs of 3-5 blossoms.


2. Using a sewing tape, measure around your head where you would like the flower crown to lay. Taking your orchid branch, arrange the stems so they overlap a couple inches and, when taped together, their overall circumference of your crown base is the same as your head. I found this to be easiest by measuring my head, then using the sewing tape to measure the branch from the base of the flower down the stem. Hold the end of the stem where you measured your head circumference to be, then bring it to meet the flower side of your crown.
Bring the ends of your branches together to form a ring, then secure with floral tape along where the stem overlaps to create the base of your crown.


PART 2: ARRANGE & ATTACH SUPPORT FLOWERS

3. Now it’s time to start adding your flowers to the crown. Generally, I start with bigger flowers and work in but in this case, I added the flowers based on color, filling them in around the orchids in a rainbow pattern around the crown.
Starting with the orange hydrangea clusters, begin floral taping them along the backs of the orchid blossom stems, starting every other flower about halfway down the crown, then making it more voluminous and taping 1-2 clusters behind each flower at the top. My hydrangea had some flowers with a blend of red and orange tones, so these I used around the burgundy orchids, with the clusters moving out becoming more all over orange blossoms. With the last of your orange blossom clusters, floral tape it along the opposite side of the crown where the blossoms would naturally hit just above your ear.

4. Next, take the yellow wildflowers and start taping them into the crown, starting with 1-2 clusters around the top of the red orchids, working them into your orange flowers on both sides, arranging them so that the blossoms are taped going towards the top of the crown.


5. Finally, it's time to add your blue and purple flowers! I wanted the rainbow to work from both sides of the orchid branch, so I started by taping my blue forget-me-nots on either sides of where my yellow flowers hit, building both toward the top of the crown and under the orange hydrangea and wildflower cluster.

Lastly, floral tape in the purple blossoms, starting near the bottom 2-3 orchid blossoms, blending it in similarly to the hydrangeas, and working them, around the bottom edge of the crown to the blue forget me knots; including a couple smaller sprigs along the top. I used the bigger bunches of purple flowers in the orchids and the bottom of the crown, with a couple smaller pieces being taped between the blue flowers on the top to finish my floral rainbow all the way around!


I was nervous at first to see how so many colors would come together, but building the colors out like a rainbow led to a perfectly whimsical crown with pops of color everywhere, without being too chaotic in the least! I can’t wait to see what other creative crowns I can craft up next, and in the meantime try your hand at making a colorful crown all your own!

SEE OUR RELATED POSTS HERE:


OUR PINS FOR THIS POST: