Baby Gifts

Everyday I’m Cuddlin’ DIY HTV Baby Onesie

This post contains affiliate links, meaning that if you click on a link I will recieve a small comission. This costs you nothing extra and I only promote products I use and love! You can read our full disclosure here

Everyday I’m Cuddlin’ DIY HTV Baby Onesie #babydiy #onesie #svgfile

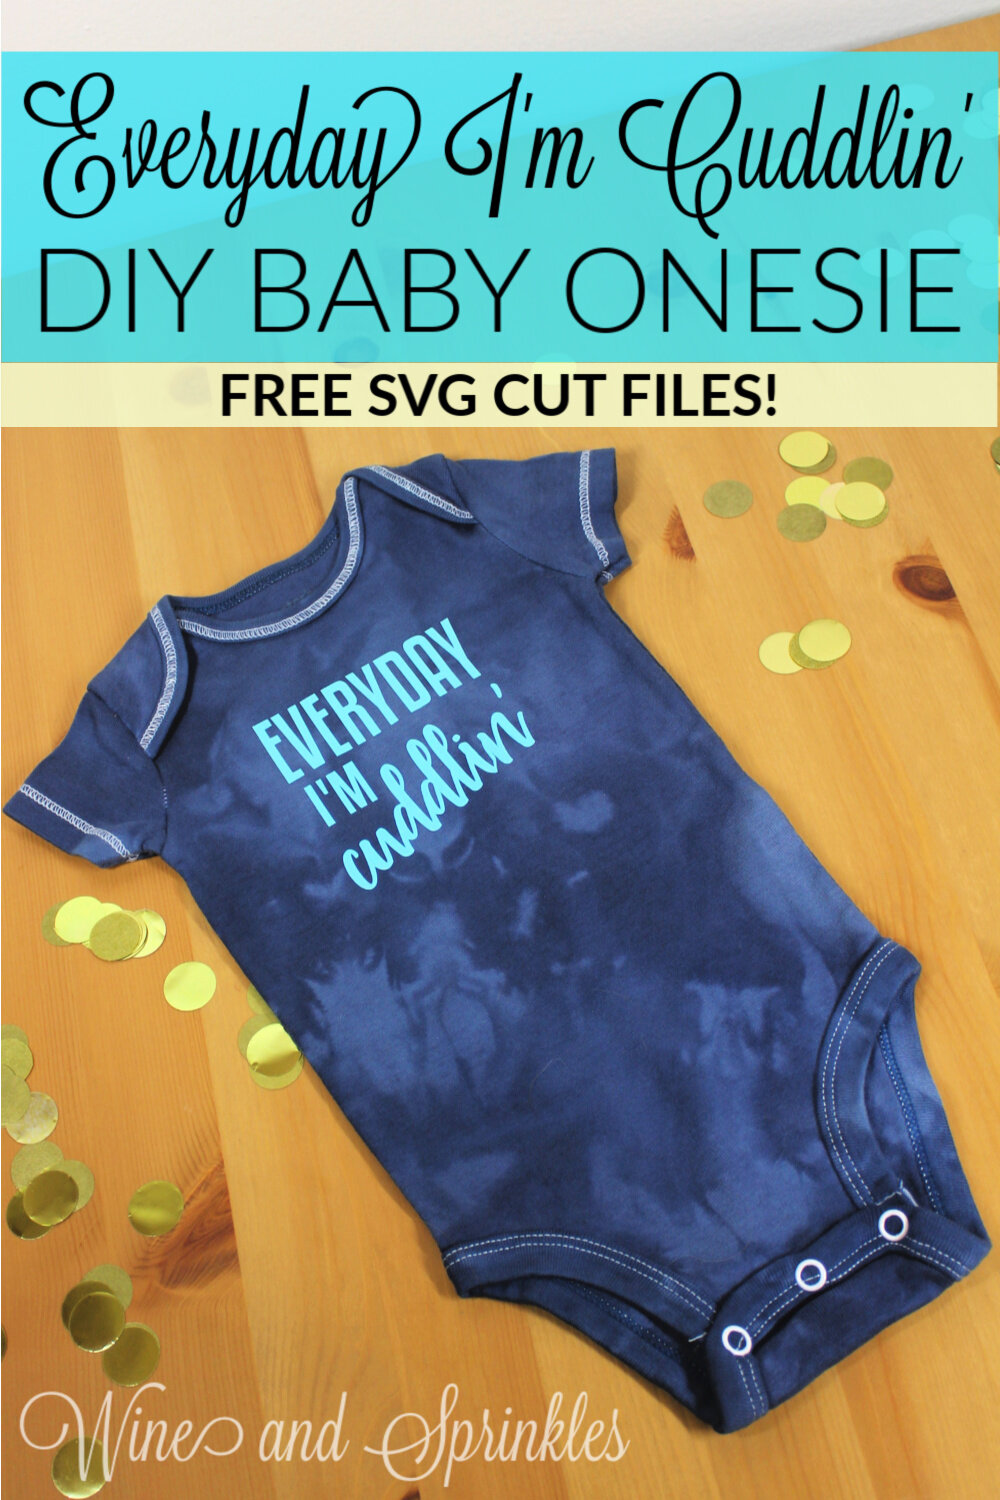
One of the best things about babies is that they are the cutest cuddle bugs! Nothing beats baby cuddles and snuggles, so I had to include this punny Everyday I’m Cuddlin’ Onesie in my design collection!


I made the decal with Tiffany Blue Easyweed HTV on a Denim Hand Dyed Onesie and the color combination is wonderful! I love the contrast of the light decal on the darker onesie and the blue shades in them both make it an easy pairing. I used the fonts Kenyan Coffee and Passengers Script in the design, which is free to download on dafont.com for additional customization on this onesie or any other baby projects you can think of!

Make sure to check out our other Baby Onesie Projects for more DIY Baby Shower Gift Inspiration!

Everyday I’m Cuddlin’ DIY HTV Baby Onesie #babydiy #onesie #svgfile


Everyday I’m Cuddlin’ DIY HTV Baby Onesie #babydiy #onesie #svgfile
  1. After downloading the cut files, import them into the Cricut Software. After creating a new project, select Upload Image. Select the file you wish to upload and it will automatically take you to the final upload screen, where you can name the file, then select Save. The SVG Files are sized so that they will automatically cut to the size you see in the photos, but if you want to change the size you can do so to fit your onesies the way you like.

  2. After selecting “Make It” Make sure to select the Mirror Mode on the cutting screen. Cut the design in your choice of heat transfer vinyl with the Iron On (for Easyweed HTV) or Iron On+ (for Glitter HTV) Setting on your Cricut, with the shiny side of the material down.

  3. Weed the additional material off of the backing material so that, looking down with the shiny side up, you can see your design with the correct orientation.Iron your onesie to remove any creases, then center the design over the top half of the onesie. Arrange the design shiny side up, then cover with parchment paper. Make sure to keep the parchment paper between the design and the iron.

Everyday I’m Cuddlin’ DIY HTV Baby Onesie #babydiy #onesie #svgfile

4. Set your Iron to the second Highest setting. Cover the parchment paper and decal with your iron, pressing down firmly on the design. Using your iron like a small heat press, press the design for at least 20-30 seconds, repeating and overlapping the last position as you move across the design. Luckily, onesie decals are so small, you should be able to fit the whole decal under the iron in a single press!

5. Remove the parchment paper and peel the clear  backing from the decal, leaving the design on the onesie.

Everyday I’m Cuddlin’ DIY HTV Baby Onesie #babydiy #onesie #svgfile

Check out our other Baby Onesie Projects for more DIY Baby Shower Gift Inspiration!

Everyday I’m Cuddlin’ DIY HTV Baby Onesie #babydiy #onesie #svgfile

Auntie’s Little Homie DIY HTV Baby Onesie

This post contains affiliate links, meaning that if you click on a link I will recieve a small comission. This costs you nothing extra and I only promote products I use and love! You can read our full disclosure here

Auntie’s Little Homie DIY HTV Baby Onesie #auntie #babydiy #onesie #svgfile

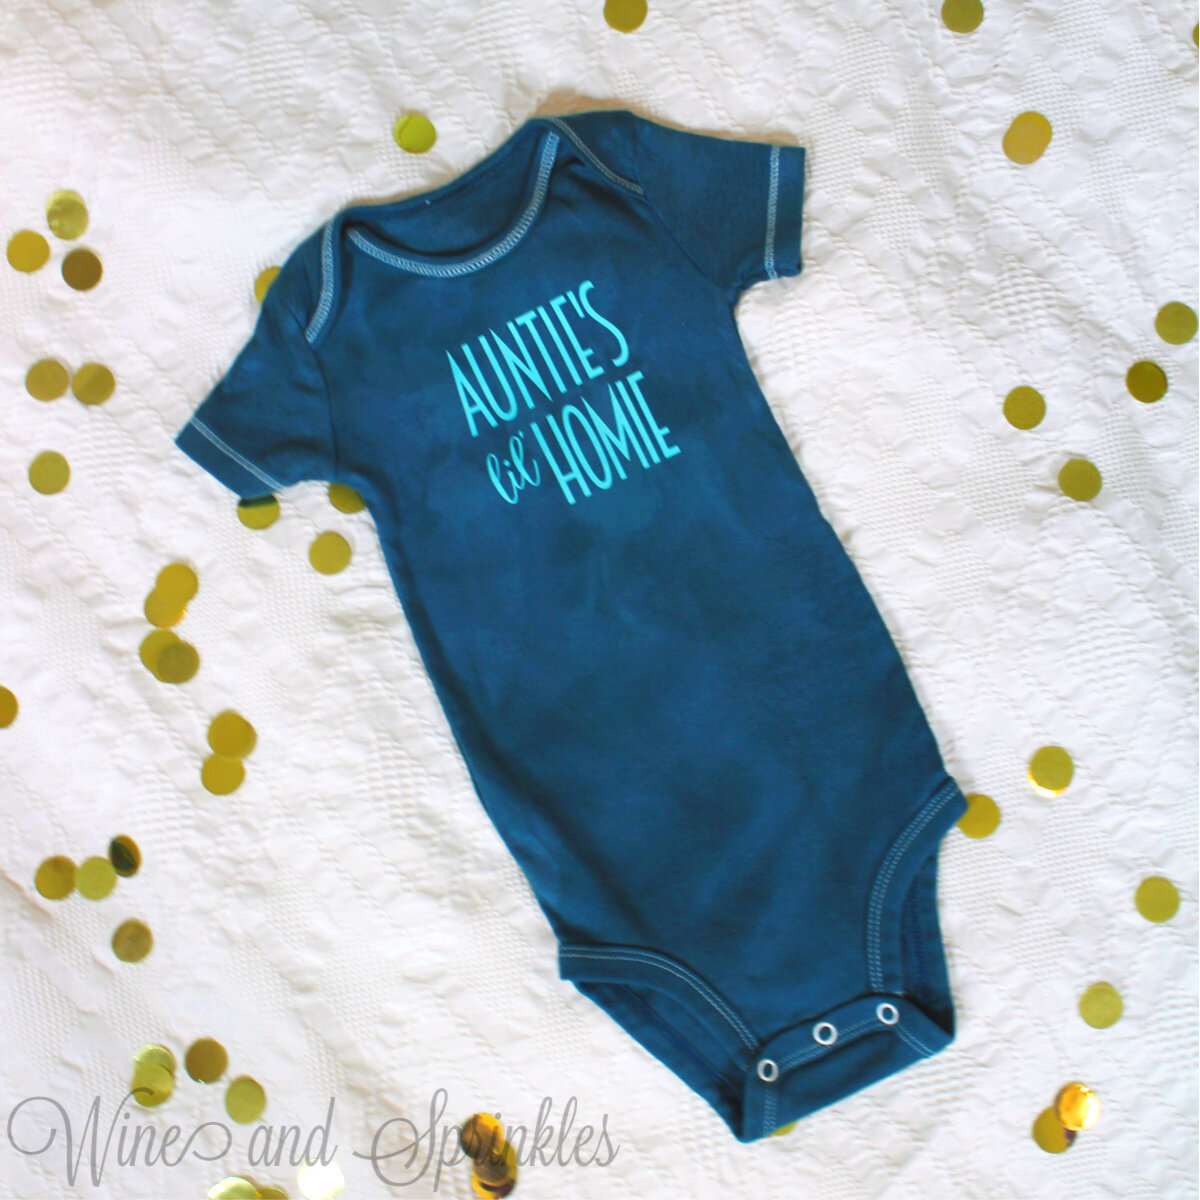
As a new Auntie this year with the birth of my sister’s first child, I had so much fun crafting for the newest little one to join our family! I was also not above making a onesie for my own benefit, and as I always use the super cool phrase “home-skillet” with other little ones in my life, my newest niece needed an Auntie’s Little Homie Onesie!

I made the decal out of Tiffany Blue Easyweed HTV on a Blue Green Hand Dyed Onesie and I love the color combination of light and dark blueish greens! At the time we thought my niece was a nephew (suprise!) so if I made it now I’d probably want to make it in light and dark pinks, but she will still look adorable in it with a nice big bow! :) I used the fonts Breamcatcher and Belista while designing this decal, which are both free to download at dafont.com for future crafts and designs of your own!

Auntie’s Little Homie DIY HTV Baby Onesie #auntie #babydiy #onesie #svgfile

Make sure to check out our other Baby Onesie Projects for more DIY Baby Shower Gift Inspiration!


Auntie’s Little Homie DIY HTV Baby Onesie #auntie #babydiy #onesie #svgfile
  1. After downloading the cut files, import them into the Cricut Software. After creating a new project, select Upload Image. Select the file you wish to upload and it will automatically take you to the final upload screen, where you can name the file, then select Save. The SVG Files are sized so that they will automatically cut to the size you see in the photos, but if you want to change the size you can do so to fit your onesies the way you like.

  2. After selecting “Make It” Make sure to select the Mirror Mode on the cutting screen. Cut the design in your choice of heat transfer vinyl with the Iron On (for Easyweed HTV) or Iron On+ (for Glitter HTV) Setting on your Cricut, with the shiny side of the material down.

  3. Weed the additional material off of the backing material so that, looking down with the shiny side up, you can see your design with the correct orientation.Iron your onesie to remove any creases, then center the design over the top half of the onesie. Arrange the design shiny side up, then cover with parchment paper. Make sure to keep the parchment paper between the design and the iron.

Auntie’s Little Homie DIY HTV Baby Onesie #auntie #babydiy #onesie #svgfile

4. Set your Iron to the second Highest setting. Cover the parchment paper and decal with your iron, pressing down firmly on the design. Using your iron like a small heat press, press the design for at least 20-30 seconds, repeating and overlapping the last position as you move across the design. Luckily, onesie decals are so small, you should be able to fit the whole decal under the iron in a single press!

5. Remove the parchment paper and peel the clear backing from the decal, leaving the design on the onesie.

Check out our other Baby Onesie Projects for more DIY Baby Shower Gift Inspiration!
Auntie’s Little Homie DIY HTV Baby Onesie #auntie #babydiy #onesie #svgfile

DIY HTV Never Grow Up Baby Onesie

This post contains affiliate links, meaning that if you click on a link I will recieve a small comission. This costs you nothing extra and I only promote products I use and love! You can read our full disclosure here

Never Grow Up DIY HTV Baby Onesie #nevergrowup #babydiy #svgfile

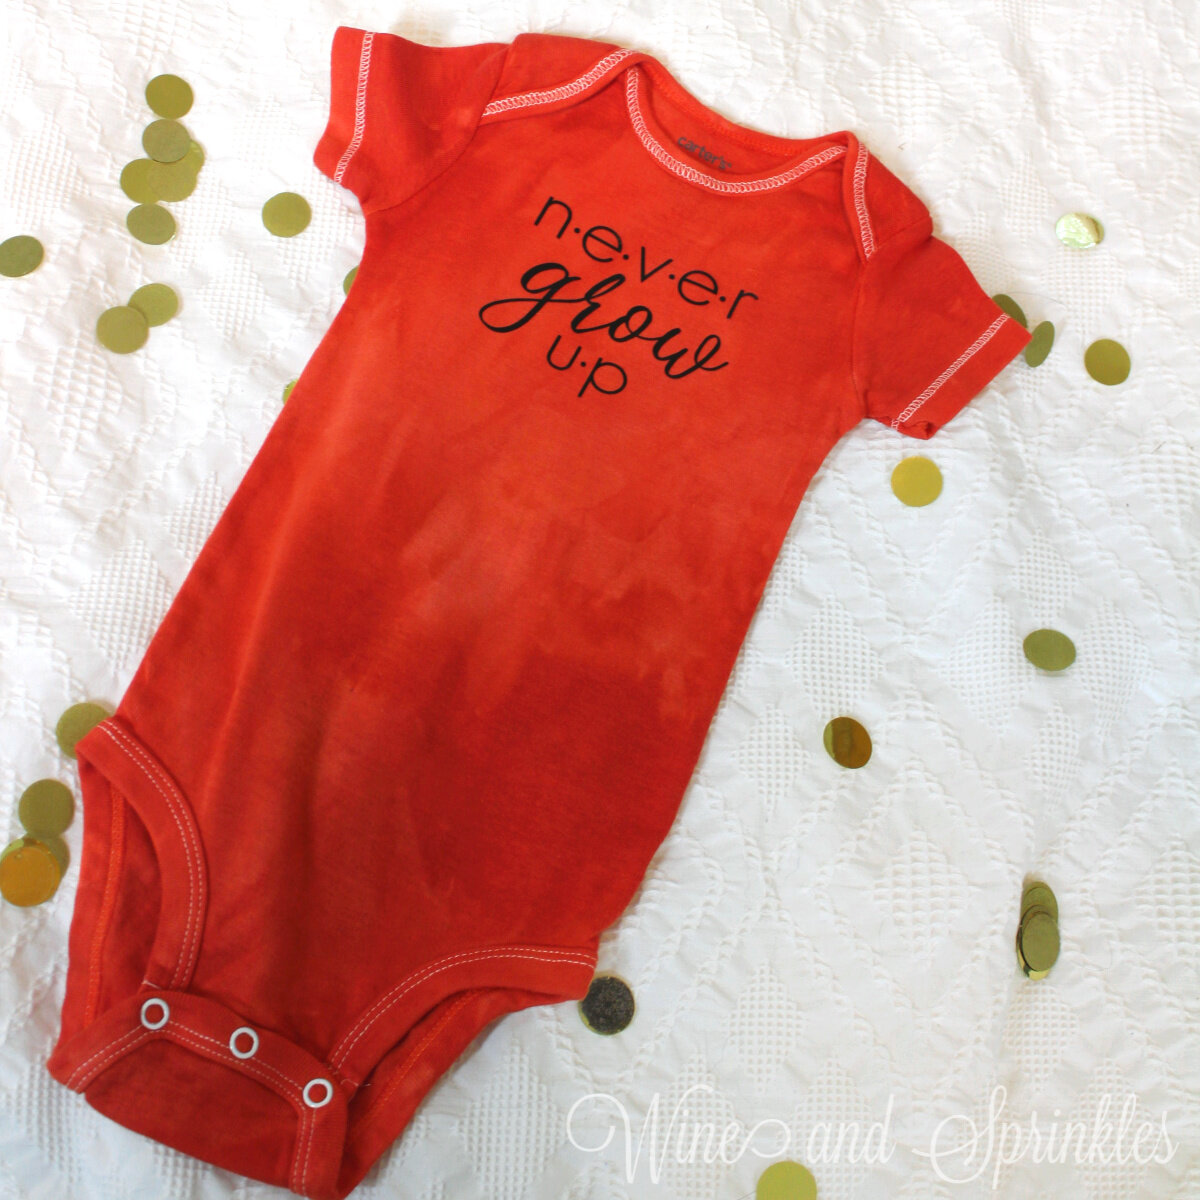
If there is a universal truth among mothers, it's that babies grow up too darn fast! While I can’t decide if I like it most because it reminds me of Peter Pan and his motto, or that little one’s time as babies is too short, this Never Grow Up Onesie catches my feelings perfectly!


I used Black Easyweed HTV for the decal on a Orange Hand Dyed Onesie and it turned out beautifully, but you could try literally any combination of onesie and HTV for the simple modern decal! While the lettering is thin, I had no issues with cutting or weeding this design, making it great for both beginners and those experienced with HTV transfer projects. I used the fonts Geo Sans Light and Clarissa for the design, which are both free to download at dafont.com to customize your onesie further or to include in your other crafting projects!

Make sure to check out our other Baby Onesie Projects for more DIY Baby Shower Gift Inspiration!

Never Grow Up DIY HTV Baby Onesie #nevergrowup #babydiy #svgfile


Never Grow Up DIY HTV Baby Onesie #nevergrowup #babydiy #svgfile
  1. After downloading the cut files, import them into the Cricut Software. After creating a new project, select Upload Image. Select the file you wish to upload and it will automatically take you to the final upload screen, where you can name the file, then select Save. The SVG Files are sized so that they will automatically cut to the size you see in the photos, but if you want to change the size you can do so to fit your onesies the way you like.

  2. After selecting “Make It” Make sure to select the Mirror Mode on the cutting screen. Cut the design in your choice of heat transfer vinyl with the Iron On (for Easyweed HTV) or Iron On+ (for Glitter HTV) Setting on your Cricut, with the shiny side of the material down.


Never Grow Up DIY HTV Baby Onesie #nevergrowup #babydiy #svgfile

3. Weed the additional material off of the backing material so that, looking down with the shiny side up, you can see your design with the correct orientation.Iron your onesie to remove any creases, then center the design over the top half of the onesie. Arrange the design shiny side up, then cover with parchment paper. Make sure to keep the parchment paper between the design and the iron.

Never Grow Up DIY HTV Baby Onesie #nevergrowup #babydiy #svgfile

4. Set your Iron to the second Highest setting. Cover the parchment paper and decal with your iron, pressing down firmly on the design. Using your iron like a small heat press, press the design for at least 20-30 seconds, repeating and overlapping the last position as you move across the design. Luckily, onesie decals are so small, you should be able to fit the whole decal under the iron in a single press!

5. Remove the parchment paper and peel the clear  backing from the decal, leaving the design on the onesie.

Never Grow Up DIY HTV Baby Onesie #nevergrowup #babydiy #svgfile

Check out our other Baby Onesie Projects for more DIY Baby Shower Gift Inspiration!

Never Grow Up DIY HTV Baby Onesie #nevergrowup #babydiy #svgfile

DIY HTV “I Like Big Trucks” Baby Onesie

This post contains affiliate links, meaning that if you click on a link I will recieve a small comission. This costs you nothing extra and I only promote products I use and love! You can read our full disclosure here

DIY HTV I LIke Big Trucks Construction Themed Baby Onesie #babygift #onesie #babydiy

While we just sold our truck, trucks certainly hold a special place in my husband and I’s heart as it was our primary mode of transportation and pulling our trailer/house for a year of USA travelling! So when I was designing onesies, the first time I saw the phrase “I like big Trucks and I cannot Lie” I knew I HAD to make one, not only as a fun punny construction themed onesie but because we love big trucks!

I used Royal Blue HTV on an Orange Hand Dyed Onesie for this design and it was perfect for a construction themed onesie! The lettering is a mix of two fonts, Bebas Kai and The Bold Font, which are both free to download at dafont.com for all your crafting needs!

DIY HTV I LIke Big Trucks Construction Themed Baby Onesie #babygift #onesie #babydiy

Make sure to check out our other Baby Onesie Projects for more DIY Baby Shower Gift Inspiration!


DIY HTV I LIke Big Trucks Construction Themed Baby Onesie #babygift #onesie #babydiy
  1. After downloading the cut files, import them into the Cricut Software. After creating a new project, select Upload Image. Select the file you wish to upload and it will automatically take you to the final upload screen, where you can name the file, then select Save. The SVG Files are sized so that they will automatically cut to the size you see in the photos, but if you want to change the size you can do so to fit your onesies the way you like.

  2. After selecting “Make It” Make sure to select the Mirror Mode on the cutting screen. Cut the design in your choice of heat transfer vinyl with the Iron On (for Easyweed HTV) or Iron On+ (for Glitter HTV) Setting on your Cricut, with the shiny side of the material down.

  3. Weed the additional material off of the backing material so that, looking down with the shiny side up, you can see your design with the correct orientation.Iron your onesie to remove any creases, then center the design over the top half of the onesie. Arrange the design shiny side up, then cover with parchment paper. Make sure to keep the parchment paper between the design and the iron.

DIY HTV I LIke Big Trucks Construction Themed Baby Onesie #babygift #onesie #babydiy

4. Set your Iron to the second Highest setting. Cover the parchment paper and decal with your iron, pressing down firmly on the design. Using your iron like a small heat press, press the design for at least 20-30 seconds, repeating and overlapping the last position as you move across the design. Luckily, onesie decals are so small, you should be able to fit the whole decal under the iron in a single press!

5. Remove the parchment paper and peel the clear  backing from the decal, leaving the design on the onesie.

DIY HTV I LIke Big Trucks Construction Themed Baby Onesie #babygift #onesie #babydiy

Check out our other Baby Onesie Projects for more DIY Baby Shower Gift Inspiration!

DIY HTV I LIke Big Trucks Construction Themed Baby Onesie #babygift #onesie #babydiy

DIY HTV Lil’ Peanut Baby Onesie

This post contains affiliate links, meaning that if you click on a link I will recieve a small comission. This costs you nothing extra and I only promote products I use and love! You can read our full disclosure here

DIY HTV Lil’ Peanut Elephant Themed Baby Onesie #littlepeanut #babygift #svgfile

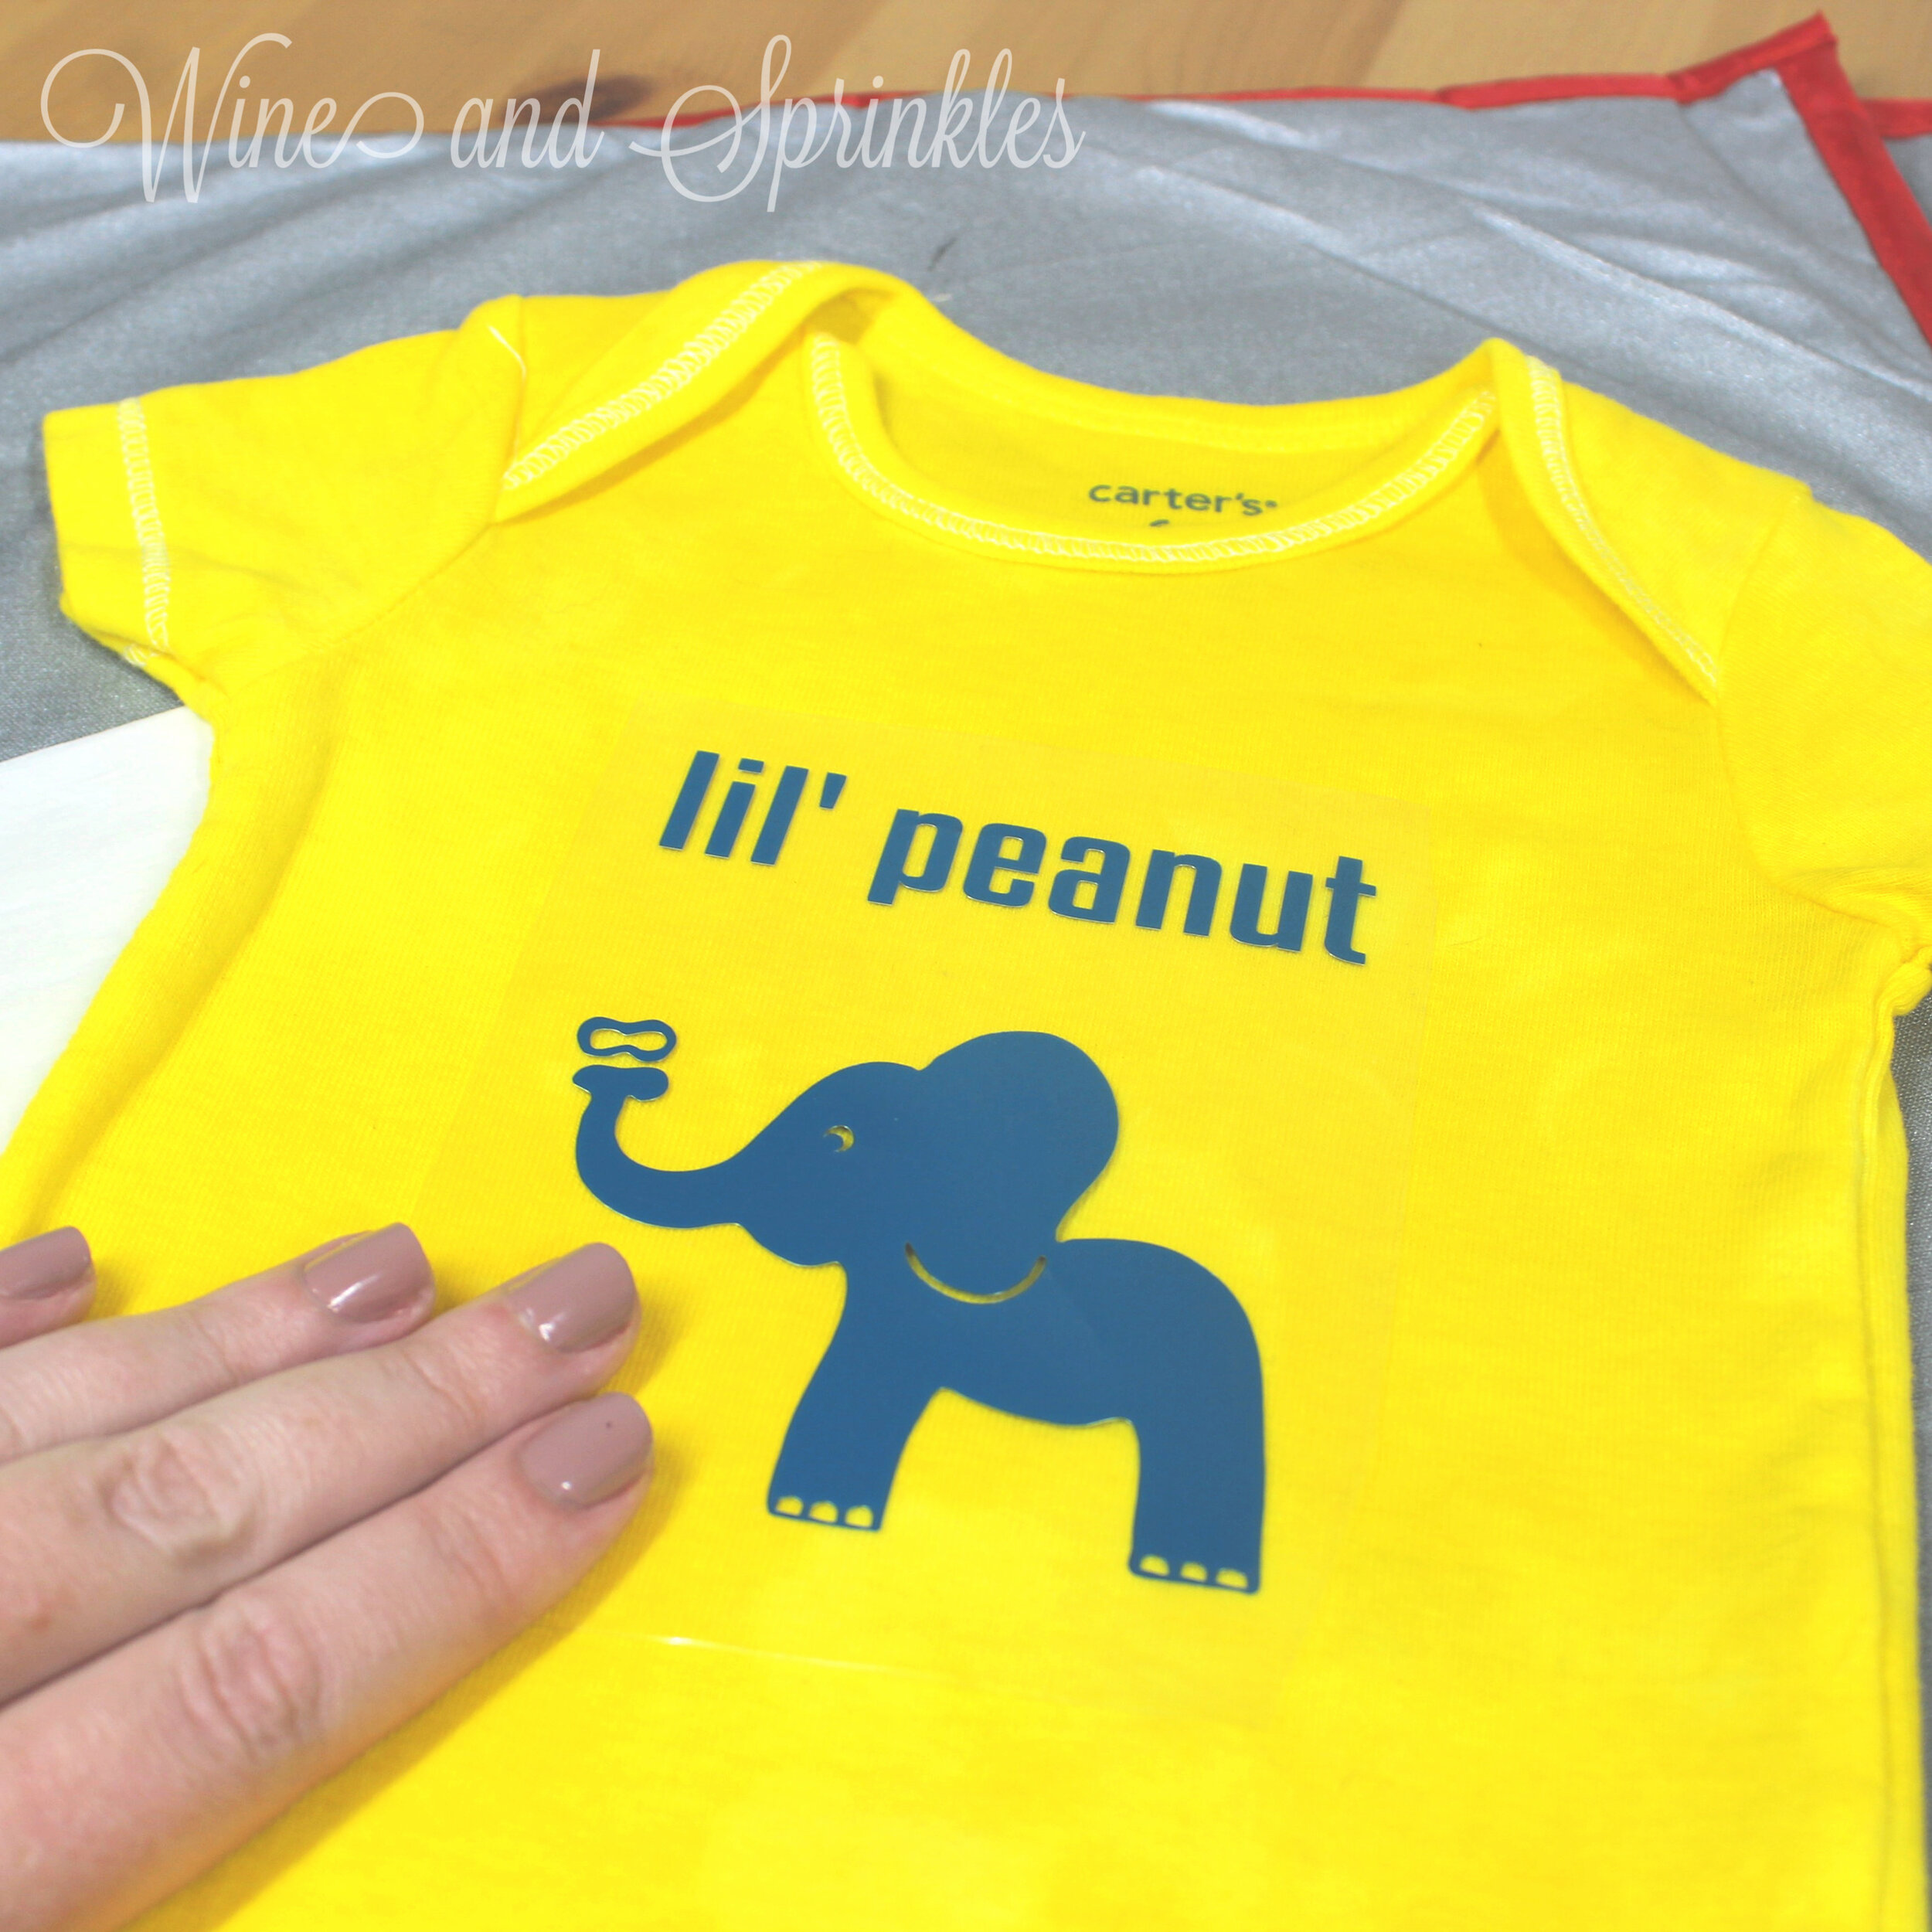
Today we are finishing up the Zoo themed onesies with another of my favorite animals, elephants! Since I love calling little ones little peanuts, this Lil’ Peanut onesie was the perfect combination of cute, punny, and safari!


The decal was cut from Turquoise Easyweed HTV for a Yellow Hand Dyed Onesie, and I think the color combination is perfect for an elephant safari style onesie, but I would love to try it in a with lavender HTV on dark pink onesie for a little girl!  I used the font Kenyan Coffee for the decal which is free to download at dafont.com to further personalize your onesie or other DIY baby projects!

DIY HTV Lil’ Peanut Elephant Themed Baby Onesie #littlepeanut #babygift #svgfile

Make sure to check out our other Baby Onesie Projects for more DIY Baby Shower Gift Inspiration!


DIY HTV Lil’ Peanut Elephant Themed Baby Onesie #littlepeanut #babygift #svgfile
  1. After downloading the cut files, import them into the Cricut Software. After creating a new project, select Upload Image. Select the file you wish to upload and it will automatically take you to the final upload screen, where you can name the file, then select Save. The SVG Files are sized so that they will automatically cut to the size you see in the photos, but if you want to change the size you can do so to fit your onesies the way you like.

  2. After selecting “Make It” Make sure to select the Mirror Mode on the cutting screen. Cut the design in your choice of heat transfer vinyl with the Iron On (for Easyweed HTV) or Iron On+ (for Glitter HTV) Setting on your Cricut, with the shiny side of the material down.

DIY HTV Lil’ Peanut Elephant Themed Baby Onesie #littlepeanut #babygift #svgfile

3. Weed the additional material off of the backing material so that, looking down with the shiny side up, you can see your design with the correct orientation.Iron your onesie to remove any creases, then center the design over the top half of the onesie. Arrange the design shiny side up, then cover with parchment paper. Make sure to keep the parchment paper between the design and the iron.

4. Set your Iron to the second Highest setting. Cover the parchment paper and decal with your iron, pressing down firmly on the design. Using your iron like a small heat press, press the design for at least 20-30 seconds, repeating and overlapping the last position as you move across the design. Luckily, onesie decals are so small, you should be able to fit the whole decal under the iron in a single press!

DIY HTV Lil’ Peanut Elephant Themed Baby Onesie #littlepeanut #babygift #svgfile

5. Remove the parchment paper and peel the clear  backing from the decal, leaving the design on the onesie. Pair this design with our Wild One Onesie for a fun zoo themed two pack!

Check out our other Baby Onesie Projects for more DIY Baby Shower Gift Inspiration!

DIY HTV Lil’ Peanut Elephant Themed Baby Onesie #littlepeanut #babygift #svgfile
 
DIY HTV Lil’ Peanut Elephant Themed Baby Onesie #littlepeanut #babygift #svgfile

DIY HTV Man Cub Baby Onesie

This post contains affiliate links, meaning that if you click on a link I will recieve a small comission. This costs you nothing extra and I only promote products I use and love! You can read our full disclosure here

DIY HTV Man Cub Baby Onesie #mancub #babygift #svgfile

There are so many fun animal themed onesies that it was hard to decide who to include for our safari themed set! But as soon as I saw my first among many Man Cub onesies, I had to design one for my own collection! While this onesie works great with any of our safari themed onesies, I also love the idea of pairing this onesie with the Baby Bear Onesie for a fun forestry bear cub themed gift!


I made the decal with Black Easyweed HTV on a Hand Dyed Red Onesie and it turned out adorable! Similar to the Wild Child Onesie, I used the font African in this design but paired it with Breamcatcher for a fun safari feel! You can download these fonts for free at dafont.com to use for further personalization or to use in your other DIY projects.

DIY HTV Man Cub Baby Onesie #mancub #babygift #svgfile

Make sure to check out our other Baby Onesie Projects for more DIY Baby Shower Gift Inspiration!


DIY HTV Man Cub Baby Onesie #mancub #babygift #svgfile
  1. After downloading the cut files, import them into the Cricut Software. After creating a new project, select Upload Image. Select the file you wish to upload and it will automatically take you to the final upload screen, where you can name the file, then select Save. The SVG Files are sized so that they will automatically cut to the size you see in the photos, but if you want to change the size you can do so to fit your onesies the way you like.

  2. After selecting “Make It” Make sure to select the Mirror Mode on the cutting screen. Cut the design in your choice of heat transfer vinyl with the Iron On (for Easyweed HTV) or Iron On+ (for Glitter HTV) Setting on your Cricut, with the shiny side of the material down.

  3. Weed the additional material off of the backing material so that, looking down with the shiny side up, you can see your design with the correct orientation.Iron your onesie to remove any creases, then center the design over the top half of the onesie. Arrange the design shiny side up, then cover with parchment paper. Make sure to keep the parchment paper between the design and the iron.

DIY HTV Man Cub Baby Onesie #mancub #babygift #svgfile

4. Set your Iron to the second Highest setting. Cover the parchment paper and decal with your iron, pressing down firmly on the design. Using your iron like a small heat press, press the design for at least 20-30 seconds, repeating and overlapping the last position as you move across the design. Luckily, onesie decals are so small, you should be able to fit the whole decal under the iron in a single press!

5. Remove the parchment paper and peel the clear  backing from the decal, leaving the design on the onesie. Pair this design with our Wild Child Onesie for a cute safari themed set for any new mother and baby

DIY HTV Man Cub Baby Onesie #mancub #babygift #svgfile

Check out our other Baby Onesie Projects for more DIY Baby Shower Gift Inspiration!

DIY HTV Man Cub Baby Onesie #mancub #babygift #svgfile

DIY HTV Wild One Baby Onesie

This post contains affiliate links, meaning that if you click on a link I will recieve a small comission. This costs you nothing extra and I only promote products I use and love! You can read our full disclosure here

DIY HTV Wild One Baby Onesie #wildone #onesie #babyshowergift

When I was little, and even now, I absolutely adored zoos and all sorts of animals. So as I started brainstorming different onesie ideas, it's no surprise that there were a couple safari themed ones in the mix! We’ve already featured our cute, lion inspired Wild Child Onesie, but I couldn’t resist also making a Wild One onesie too! This onesie is also perfect for a little one’s first birthday, especially at the zoo!


Like our New to the Crew Onesie and our Dino Footprint Pattern Onesie, I made the decal in Gold Metal Foil HTV on a Red Hand Dyed Onesie and the color combination was perfect! I used the font Breamcatcher for this design, which is free to download at dafont.com to continue to personalize your onesie, or for other DIY projects you want to create!

DIY HTV Wild One Baby Onesie #wildone #onesie #babyshowergift

Make sure to check out our other Baby Onesie Projects for more DIY Baby Shower Gift Inspiration!


DIY HTV Wild One Baby Onesie #wildone #onesie #babyshowergift
  1. After downloading the cut files, import them into the Cricut Software. After creating a new project, select Upload Image. Select the file you wish to upload and it will automatically take you to the final upload screen, where you can name the file, then select Save. The SVG Files are sized so that they will automatically cut to the size you see in the photos, but if you want to change the size you can do so to fit your onesies the way you like.

  2. After selecting “Make It” Make sure to select the Mirror Mode on the cutting screen. Cut the design in your choice of heat transfer vinyl with the Iron On (for Easyweed HTV) or Iron On+ (for Glitter HTV) Setting on your Cricut, with the shiny side of the material down.

DIY HTV Wild One Baby Onesie #wildone #onesie #babyshowergift

3. Weed the additional material off of the backing material so that, looking down with the shiny side up, you can see your design with the correct orientation.Iron your onesie to remove any creases, then center the design over the top half of the onesie. Arrange the design shiny side up, then cover with parchment paper. Make sure to keep the parchment paper between the design and the iron.

4. Set your Iron to the second Highest setting. Cover the parchment paper and decal with your iron, pressing down firmly on the design. Using your iron like a small heat press, press the design for 10-15 seconds for the Metal HTV or at least 20-30 seconds for Easyweed or Glitter HTV, repeating and overlapping the last position as you move across the design. Luckily, onesie decals are so small, you should be able to fit the whole decal under the iron in a single press!

5. Remove the parchment paper and peel the clear  backing from the decal, leaving the design on the onesie.

Check out our other Baby Onesie Projects for more DIY Baby Shower Gift Inspiration!

DIY HTV Wild One Baby Onesie #wildone #onesie #babyshowergift

DIY HTV “Rawr means I Love You in Dinosaur” Baby Onesie

This post contains affiliate links, meaning that if you click on a link I will recieve a small comission. This costs you nothing extra and I only promote products I use and love! You can read our full disclosure here

DIY HTV “Aroarable” Dinosaur Themed Baby Onesie #aroarable #babygift #svgfile

I remember I first heard the fun phrase, “RAWR means I love you in Dinosaur” years ago and thought it was the cutest thing ever! At that time, it was for fun with my now husband, but I also adore it as a baby saying, especially since sometimes it feels like baby sounds are kind of like a dinosaur rawr. :) Similar to the A-roar-able Baby Onesie, this onesie also comes with a cute little longneck dinosaur decal for your favorite little milk-a-voire!

I cut the decal in Jade Glitter HTV and transferred it to a Denim Hand Dyed Onesie, and while it still turned out cute next time I think I’ll try it on a lighter colored onesie for contrast, but I can’t say no to the fun Glitter HTV’s one onesies and the jade is great for dinosaurs!I used the font The Bold Font when I designed this decal, which is free to download from dafont.com for further customization or to use in any of your other baby projects.


DIY HTV “Aroarable” Dinosaur Themed Baby Onesie #aroarable #babygift #svgfile

Make sure to check out our other Baby Onesie Projects for more DIY Baby Shower Gift Inspiration!


DIY HTV “Rawr means I Love You in Dinosaur” Baby Onesie #rawr #babygift #svgfile
  1. After downloading the cut files, import them into the Cricut Software. After creating a new project, select Upload Image. Select the file you wish to upload and it will automatically take you to the final upload screen, where you can name the file, then select Save. The SVG Files are sized so that they will automatically cut to the size you see in the photos, but if you want to change the size you can do so to fit your onesies the way you like.

  2. After selecting “Make It” Make sure to select the Mirror Mode on the cutting screen. Cut the design in your choice of heat transfer vinyl with the Iron On (for Easyweed HTV) or Iron On+ (for Glitter HTV) Setting on your Cricut, with the shiny side of the material down.

  3. Weed the additional material off of the backing material so that, looking down with the shiny side up, you can see your design with the correct orientation.Iron your onesie to remove any creases, then center the design over the top half of the onesie. Arrange the design shiny side up, then cover with parchment paper. Make sure to keep the parchment paper between the design and the iron.

DIY HTV “Rawr means I Love You in Dinosaur” Baby Onesie #rawr #babygift #svgfile

4. Set your Iron to the second Highest setting. Cover the parchment paper and decal with your iron, pressing down firmly on the design. Using your iron like a small heat press, press the design for at least 20-30 seconds, repeating and overlapping the last position as you move across the design. Luckily, onesie decals are so small, you should be able to fit the whole decal under the iron in a single press!

5. Remove the parchment paper and peel the clear  backing from the decal, leaving the design on the onesie. Pair this design with our Aroarable Dino Onesie for an adorable Dino Onesie Duo!

DIY HTV “Rawr means I Love You in Dinosaur” Baby Onesie #rawr #babygift #svgfile

Check out our other Baby Onesie Projects for more DIY Baby Shower Gift Inspiration!

DIY HTV “Rawr means I Love You in Dinosaur” Baby Onesie #rawr #babygift #svgfile

DIY HTV “Velocinaptor” Dinosaur Themed Baby Onesie

This post contains affiliate links, meaning that if you click on a link I will recieve a small comission. This costs you nothing extra and I only promote products I use and love! You can read our full disclosure here

DIY HTV “Velocinaptor” Dinosaur Themed Baby Onesie #babygift #svgfile

For the end of our Dinosaur themed decals, I had to have an ode to my favorite dino, the Velociraptor! And then once I heard the adorably punny “Veloci-nap-tor,” I knew I had to make one for my sister’s baby. I had so much fun drawing the little raptor with a bottle, it may be my favorite of all the dino onesies!

The decal is made of Purple Easyweed HTV on an Orange Hand Dyed Onesie and it came out so cute! I used the font Breamcatcher in this design, a font that is free to download from dafont.com to use to personalize this onesie or for your other crafting projects! 

DIY HTV “Velocinaptor” Dinosaur Themed Baby Onesie #babygift #svgfile

Make sure to check out our other Baby Onesie Projects for more DIY Baby Shower Gift Inspiration!


DIY HTV “Velocinaptor” Dinosaur Themed Baby Onesie #babygift #svgfile
  1. After downloading the cut files, import them into the Cricut Software. After creating a new project, select Upload Image. Select the file you wish to upload and it will automatically take you to the final upload screen, where you can name the file, then select Save. The SVG Files are sized so that they will automatically cut to the size you see in the photos, but if you want to change the size you can do so to fit your onesies the way you like.

  2. After selecting “Make It” Make sure to select the Mirror Mode on the cutting screen. Cut the design in your choice of heat transfer vinyl with the Iron On (for Easyweed HTV) or Iron On+ (for Glitter HTV) Setting on your Cricut, with the shiny side of the material down.

  3. Weed the additional material off of the backing material so that, looking down with the shiny side up, you can see your design with the correct orientation.Iron your onesie to remove any creases, then center the design over the top half of the onesie. Arrange the design shiny side up, then cover with parchment paper. Make sure to keep the parchment paper between the design and the iron.

DIY HTV “Velocinaptor” Dinosaur Themed Baby Onesie #babygift #svgfile

4. Set your Iron to the second Highest setting. Cover the parchment paper and decal with your iron, pressing down firmly on the design. Using your iron like a small heat press, press the design for at least 20-30 seconds, repeating and overlapping the last position as you move across the design. Luckily, onesie decals are so small, you should be able to fit the whole decal under the iron in a single press!

5. Remove the parchment paper and peel the clear  backing from the decal, leaving the design on the onesie. Pair this design with our Dino Footprints Baby Onesie of any of our other Dino Onesies for a perfect pair to give any new dino loving mama and baby!

DIY HTV “Velocinaptor” Dinosaur Themed Baby Onesie #babygift #svgfile

Check out our other Baby Onesie Projects for more DIY Baby Shower Gift Inspiration!

DIY HTV “Velocinaptor” Dinosaur Themed Baby Onesie #babygift #svgfile

DIY HTV Dino Footprints Baby Onesie

This post contains affiliate links, meaning that if you click on a link I will recieve a small comission. This costs you nothing extra and I only promote products I use and love! You can read our full disclosure here

DIY HTV Dinosaur Footprint Patterned Baby Onesie #onesie #babygift #svgfile

When I was designing all my Critter themed onesies, I adored the Paw Print Patterned Baby Onesie because it was perfect to pair with any of the other onesie designs, making it a great for lots of critter themed baby gift sets. So upon designing a bunch of dino themed onesies I had to include a dinosaur footprint design too!

This decal was cut in Gold Metal Foil HTV for a Red Hand Dyed Baby Onesie and I adore the color combination, not only for this onesie, but for any onesie design in general! I’ve used it on our New to the Crew Onesie as well as on projects coming soon and I never get tired of it! :)  

DIY HTV Dinosaur Footprint Patterned Baby Onesie #onesie #babygift #svgfile

Make sure to check out our other Baby Onesie Projects for more DIY Baby Shower Gift Inspiration!


DIY HTV Dinosaur Footprint Patterned Baby Onesie #onesie #babygift #svgfile
  1. After downloading the cut files, import them into the Cricut Software. After creating a new project, select Upload Image. Select the file you wish to upload and it will automatically take you to the final upload screen, where you can name the file, then select Save. The SVG Files are sized so that they will automatically cut to the size you see in the photos, but if you want to change the size you can do so to fit your onesies the way you like.

  2. After selecting “Make It” Make sure to select the Mirror Mode on the cutting screen. Cut the design in your choice of heat transfer vinyl with the Iron On (for Easyweed HTV) or Iron On+ (for Glitter HTV) Setting on your Cricut, with the shiny side of the material down.

  3. Weed the additional material off of the backing material so that, looking down with the shiny side up, you can see your design with the correct orientation.Iron your onesie to remove any creases, then arrange the decals on the onesie for transfer. I arranged my decal for under the left arm to the neckline, as shown in the photos, but you could also add one to the right side like our Paw Print Patterned Onesie. Arrange the design shiny side up, then cover with parchment paper. Make sure to keep the parchment paper between the design and the iron.

DIY HTV Dinosaur Footprint Patterned Baby Onesie #onesie #babygift #svgfile

4. Set your Iron to the second Highest setting. Cover the parchment paper and decal with your iron, pressing down firmly on the design. Using your iron like a small heat press, press the design for 10-15 seconds for the Metal HTV or at least 20-30 seconds for Easyweed or Glitter HTV, repeating and overlapping the last position as you move across the design. Luckily, onesie decals are so small, you should be able to fit the whole decal under the iron in a single press!

5. Remove the parchment paper and peel the clear  backing from the decal, leaving the design on the onesie.

DIY HTV Dinosaur Footprint Patterned Baby Onesie #onesie #babygift #svgfile

Check out our other Baby Onesie Projects for more DIY Baby Shower Gift Inspiration!

DIY HTV Dinosaur Footprint Patterned Baby Onesie #onesie #babygift #svgfile

DIY HTV A-Roar-able Baby Onesie

This post contains affiliate links, meaning that if you click on a link I will recieve a small comission. This costs you nothing extra and I only promote products I use and love! You can read our full disclosure here

DIY HTV “Aroarable” Dinosaur Themed Baby Onesie #aroarable #babygift #svgfile

Dinosaurs are easily one of my favorite baby themes, especially because there are so many cute, punny, sayings I see on dino themed baby onesies! The very first one I designed was this A-roar-able onesie, complete with, as Little Foot would say, a cute little Longneck dinosaur decal.

I made the decal with Tiffany Blue Easyweed HTV on an Emerald Hand Dyed Onesie and the color combination is amazing! I love the contrast of the light decal on the darker onesie and the green shades in them both are perfect for any little dino loving baby or parents! I used the font Bebas Kai in the design, which is free to download on dafont.com for additional customization on this onesie or any other baby projects you can think of!

DIY HTV “Aroarable” Dinosaur Themed Baby Onesie #aroarable #babygift #svgfile

Make sure to check out our other Baby Onesie Projects for more DIY Baby Shower Gift Inspiration!


DIY HTV “Aroarable” Dinosaur Themed Baby Onesie #aroarable #babygift #svgfile
  1. After downloading the cut files, import them into the Cricut Software. After creating a new project, select Upload Image. Select the file you wish to upload and it will automatically take you to the final upload screen, where you can name the file, then select Save. The SVG Files are sized so that they will automatically cut to the size you see in the photos, but if you want to change the size you can do so to fit your onesies the way you like.

  2. After selecting “Make It” Make sure to select the Mirror Mode on the cutting screen. Cut the design in your choice of heat transfer vinyl with the Iron On (for Easyweed HTV) or Iron On+ (for Glitter HTV) Setting on your Cricut, with the shiny side of the material down.

  3. Weed the additional material off of the backing material so that, looking down with the shiny side up, you can see your design with the correct orientation.Iron your onesie to remove any creases, then center the design over the top half of the onesie. Arrange the design shiny side up, then cover with parchment paper. Make sure to keep the parchment paper between the design and the iron.

DIY HTV “Aroarable” Dinosaur Themed Baby Onesie #aroarable #babygift #svgfile

4. Set your Iron to the second Highest setting. Cover the parchment paper and decal with your iron, pressing down firmly on the design. Using your iron like a small heat press, press the design for at least 20-30 seconds, repeating and overlapping the last position as you move across the design. Luckily, onesie decals are so small, you should be able to fit the whole decal under the iron in a single press!

5. Remove the parchment paper and peel the clear backing from the decal, leaving the design on the onesie.

DIY HTV “Aroarable” Dinosaur Themed Baby Onesie #aroarable #babygift #svgfile

Check out our other Baby Onesie Projects for more DIY Baby Shower Gift Inspiration!

DIY HTV “Aroarable” Dinosaur Themed Baby Onesie #aroarable #babygift #svgfile

Bath Time Essentials Baby Gift Bento Box

This post contains affiliate links, meaning that if you click on a link I will recieve a small comission. This costs you nothing extra and I only promote products I use and love! You can read our full disclosure here

Bath Time Essentials Baby Gift Bento Box #babygift #babybento #babyshowergift

One of my favorite gifts to bring to baby showers are baby bath time supplies, in fact the first baby shower gift I ever bought was a set of baby towels, washcloths and bath supplies that I made a gift basket for in an inflatable baby tub. So when I first started thinking of fun ways to package and give baby gifts, a bathtime essentials gift box was a must!

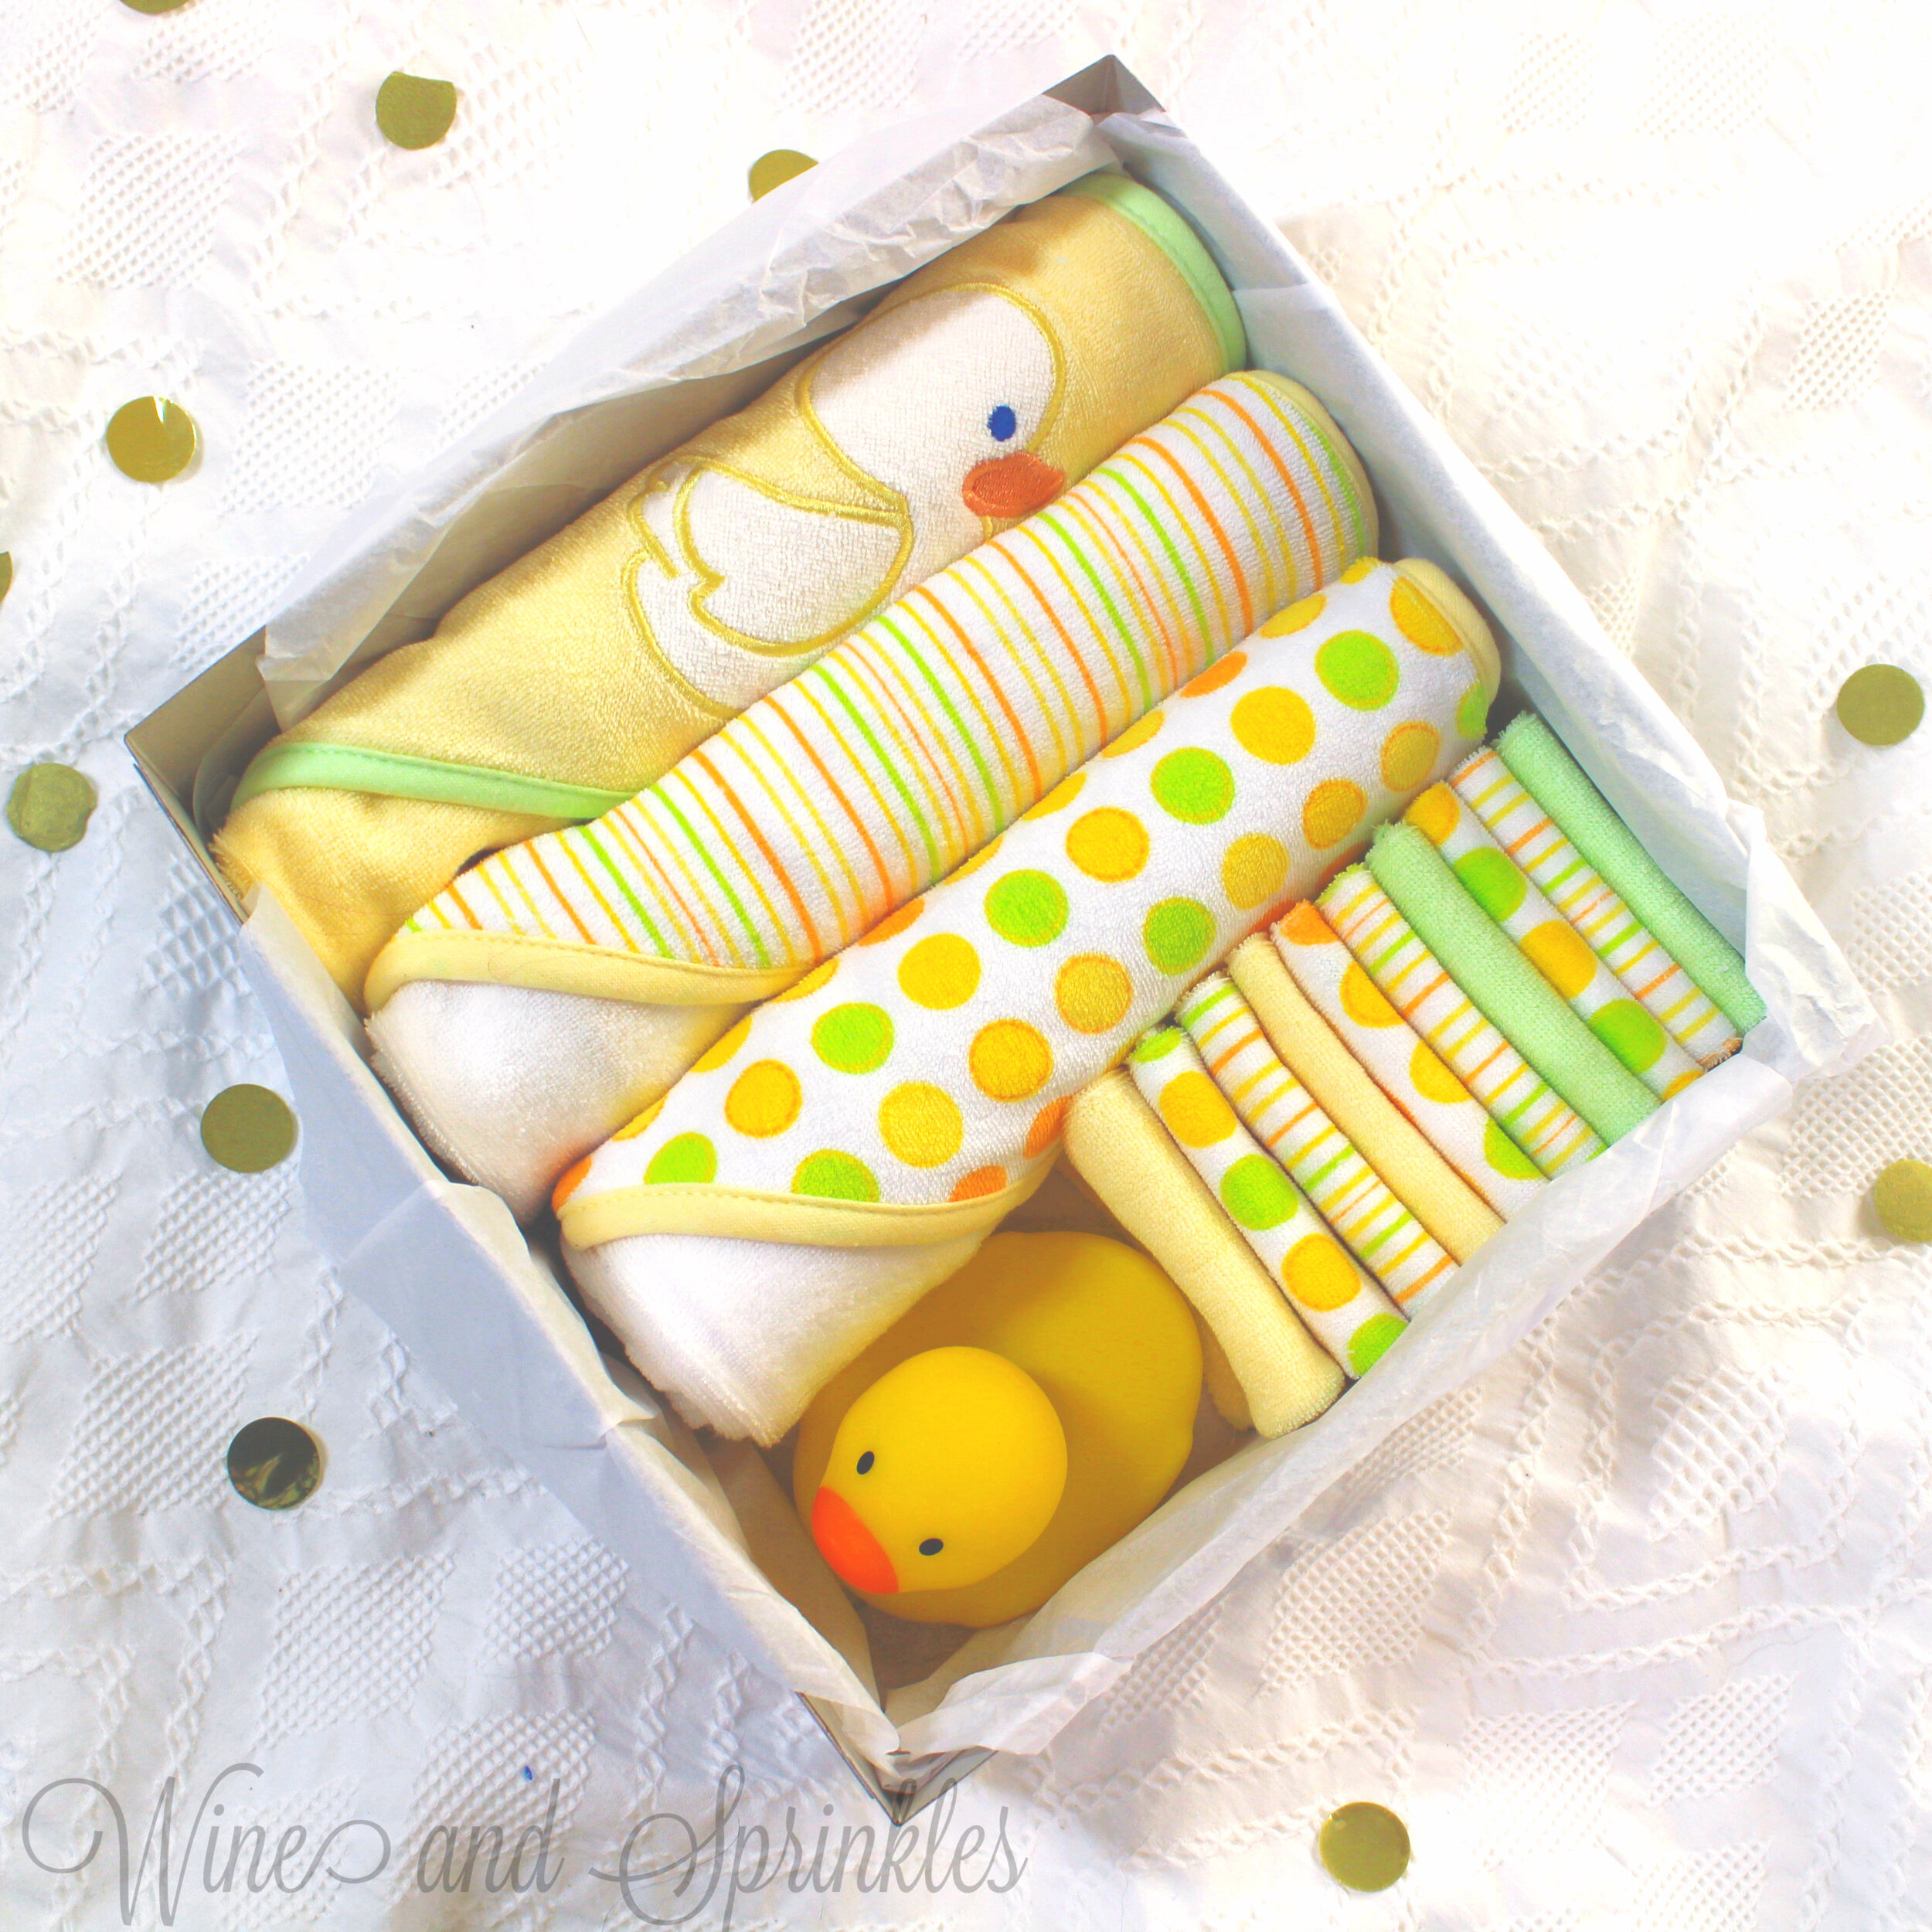
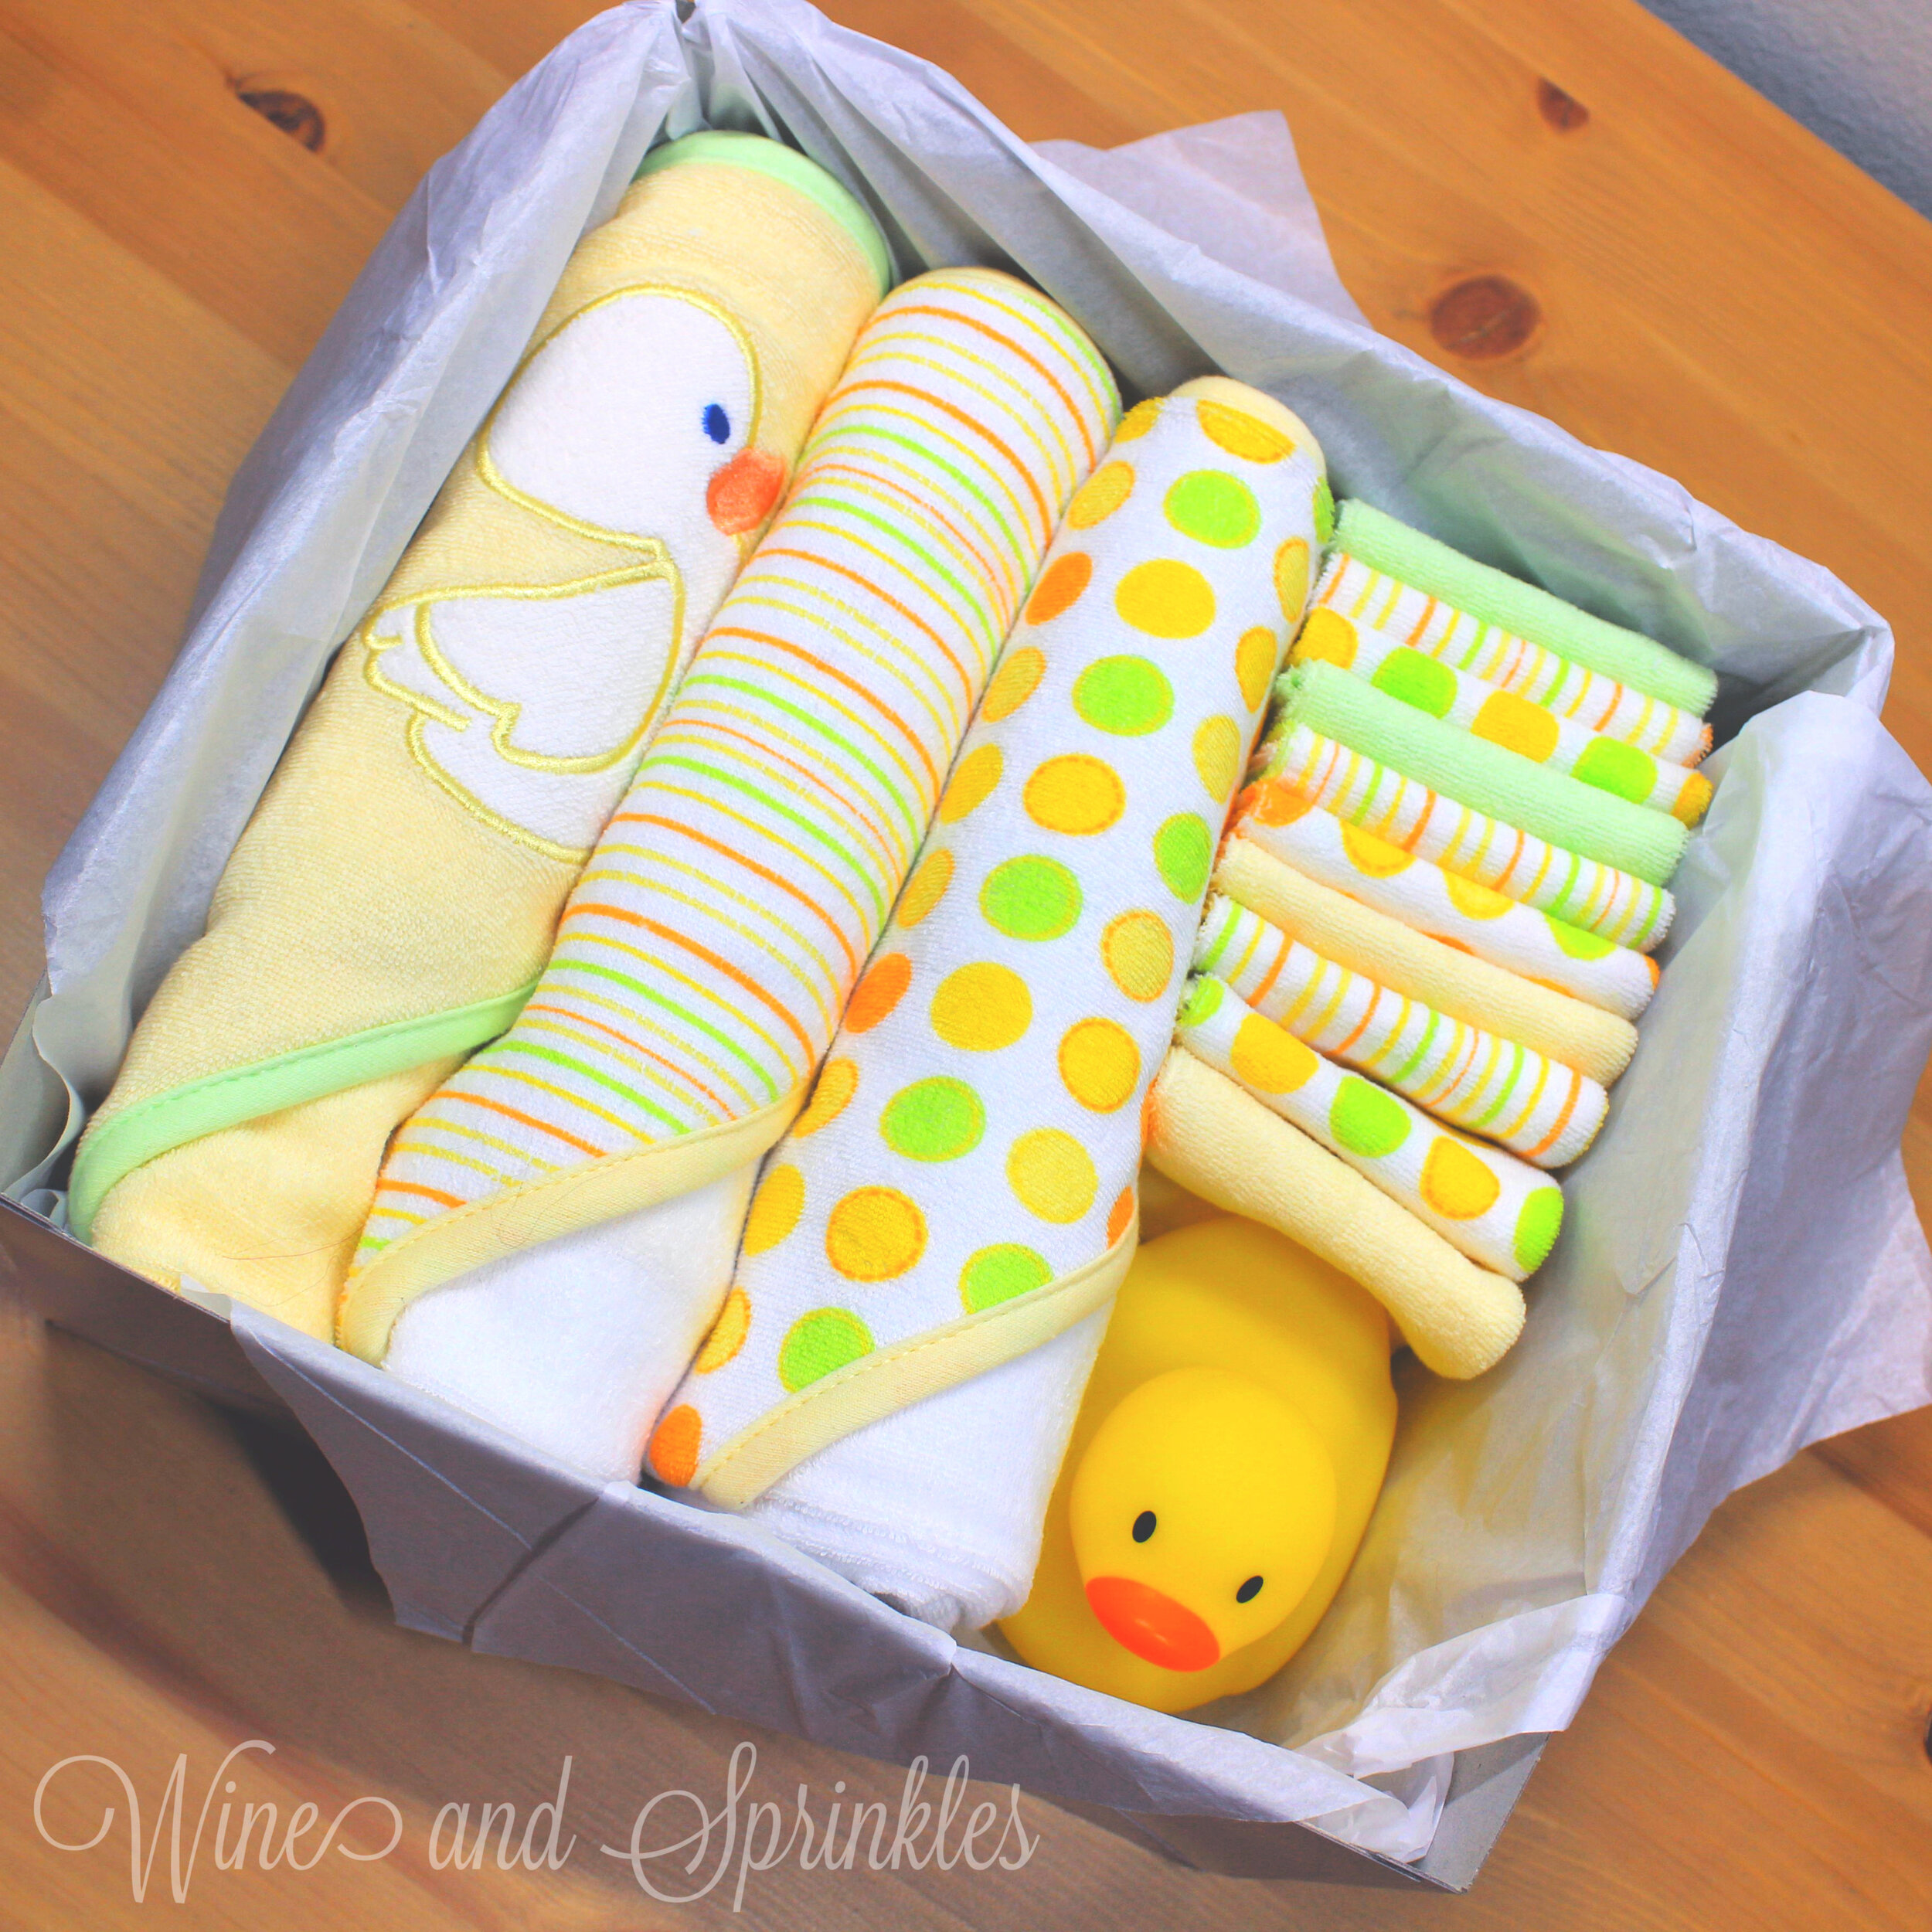
Complete with Hooded Towels, Washcloths, and a Bath Temperature Safety Duck; this Bento Box comes with starter products every baby bath needs and is an adorable way to present all the goodies to an expecting mama. And as every baby needs them, you will likely be purchasing much needed items already on their registry!


Bath Time Essentials Baby Gift Bento Box #babygift #babybento #babyshowergift

For these and other Baby Gift Box Bentos, I used a 10 inch square box to house our gifts and it was the perfect size for this Bath time Bento! While you can use other sizes of boxes for this project, you will have to play around a little with the towel folding to make them fit just right, though the washcloths can squeeze into a smaller box more easily.

Bath Time Essentials Baby Gift Bento Box #babygift #babybento #babyshowergift

These boxes are also great as mailable presents for if you cannot visit your mama to be but still want to send a personal and thoughtful gift. Regardless of if you are mailing or giving in person, I encourage you to stuff the top of your box with tissue paper so that items don’t move around while shipping or wrapping, plus it makes it a fun presentation removing the tissue paper to a lovely organized baby gift!


PART 1: FOLDING TOWELS

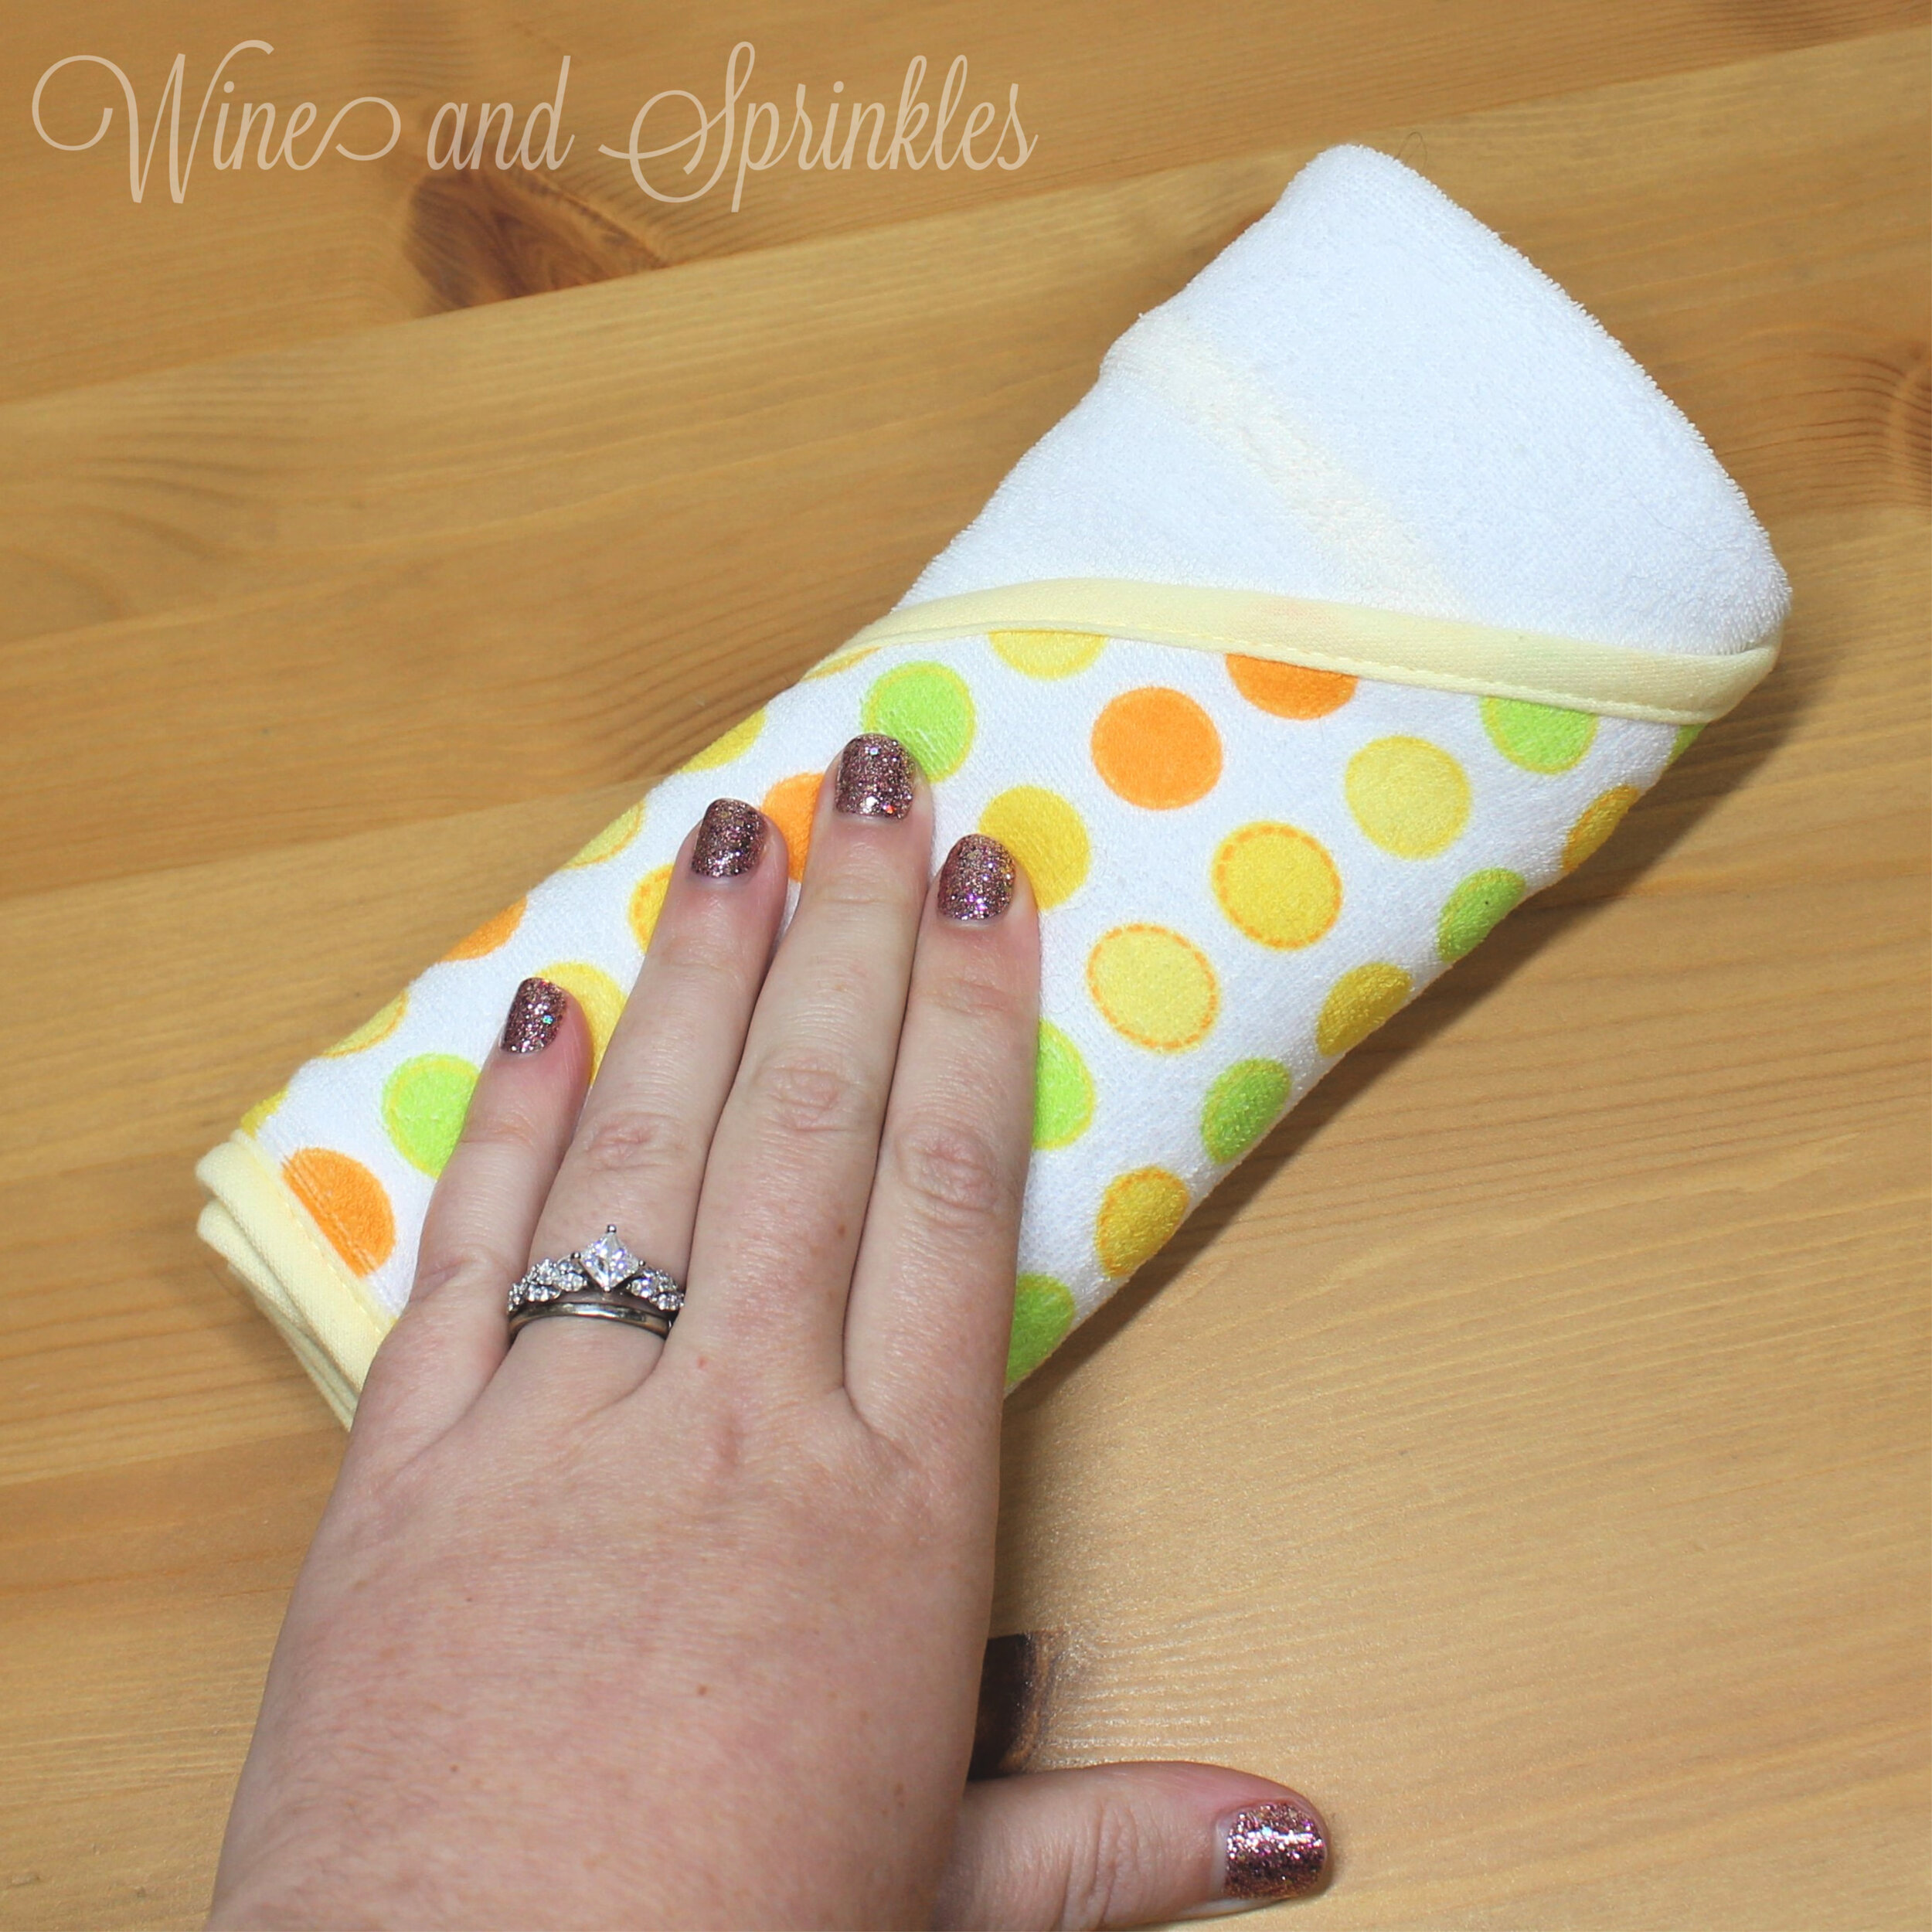
When I first received my towels in the mail, they were already rolled into clever little bundles like these and could be easily arranged in a gift box without unfolding. In case yours are not, here is the method I used for folding towels for the bath time bento box!

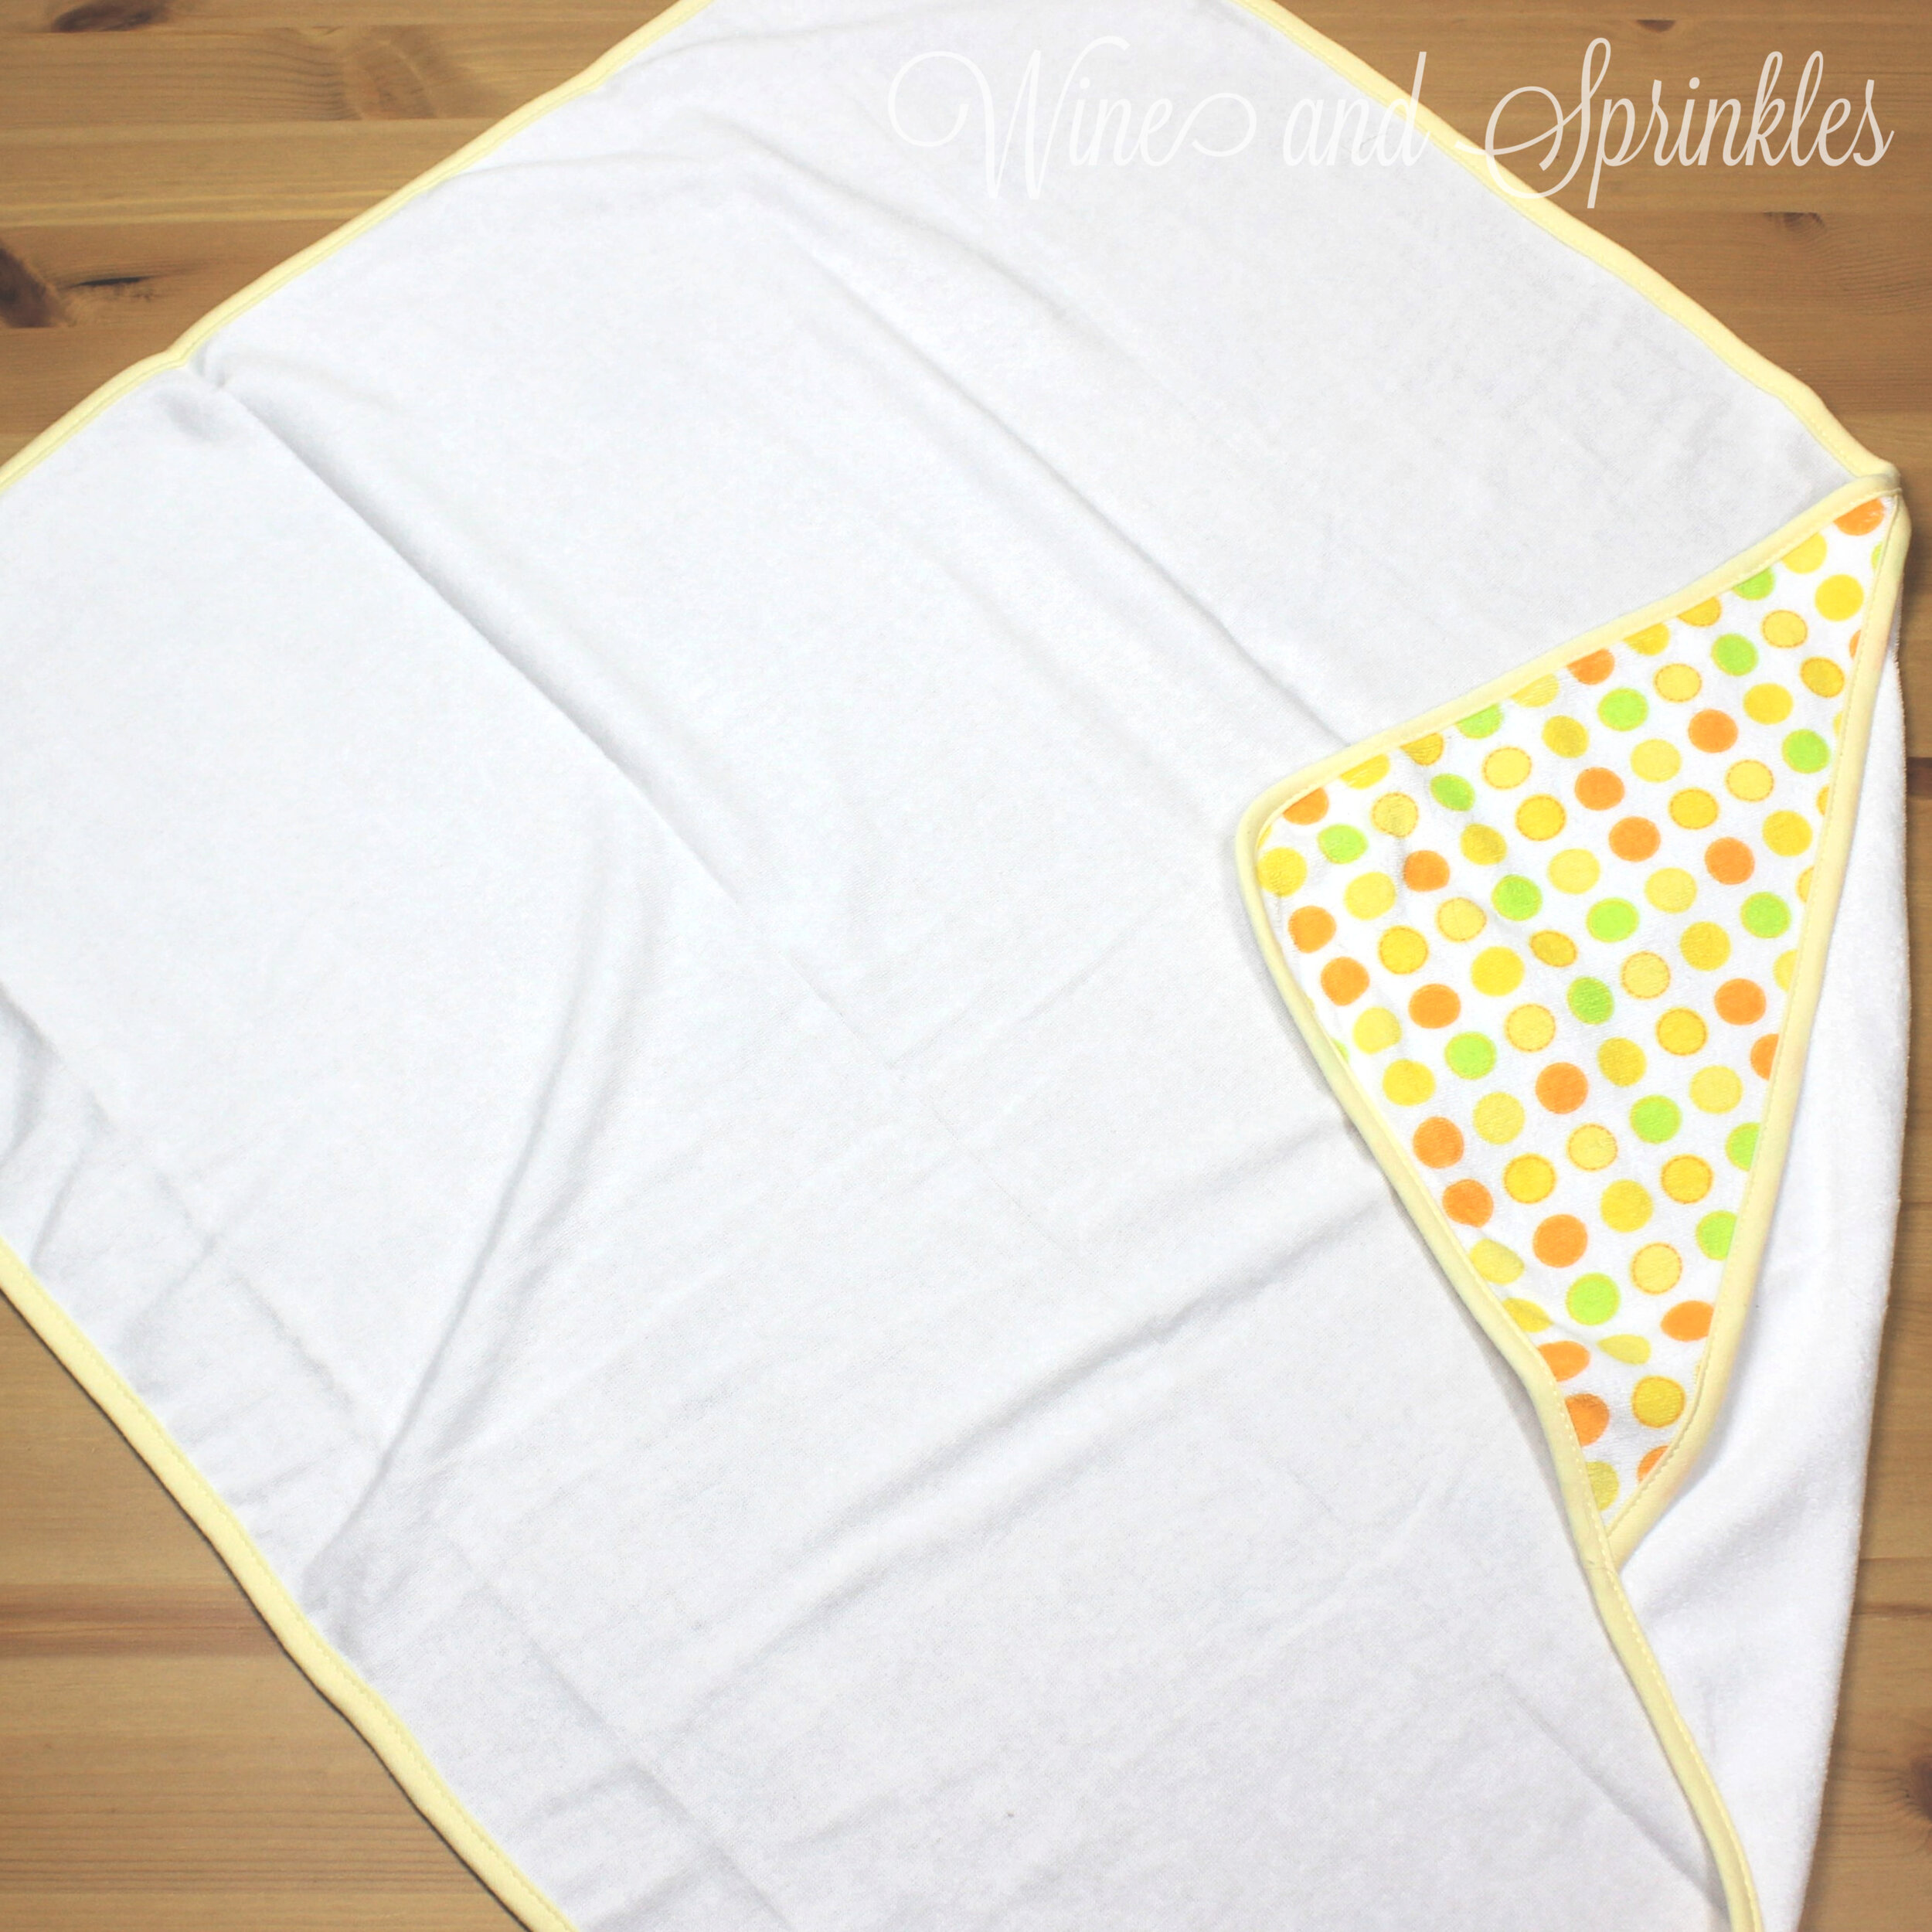
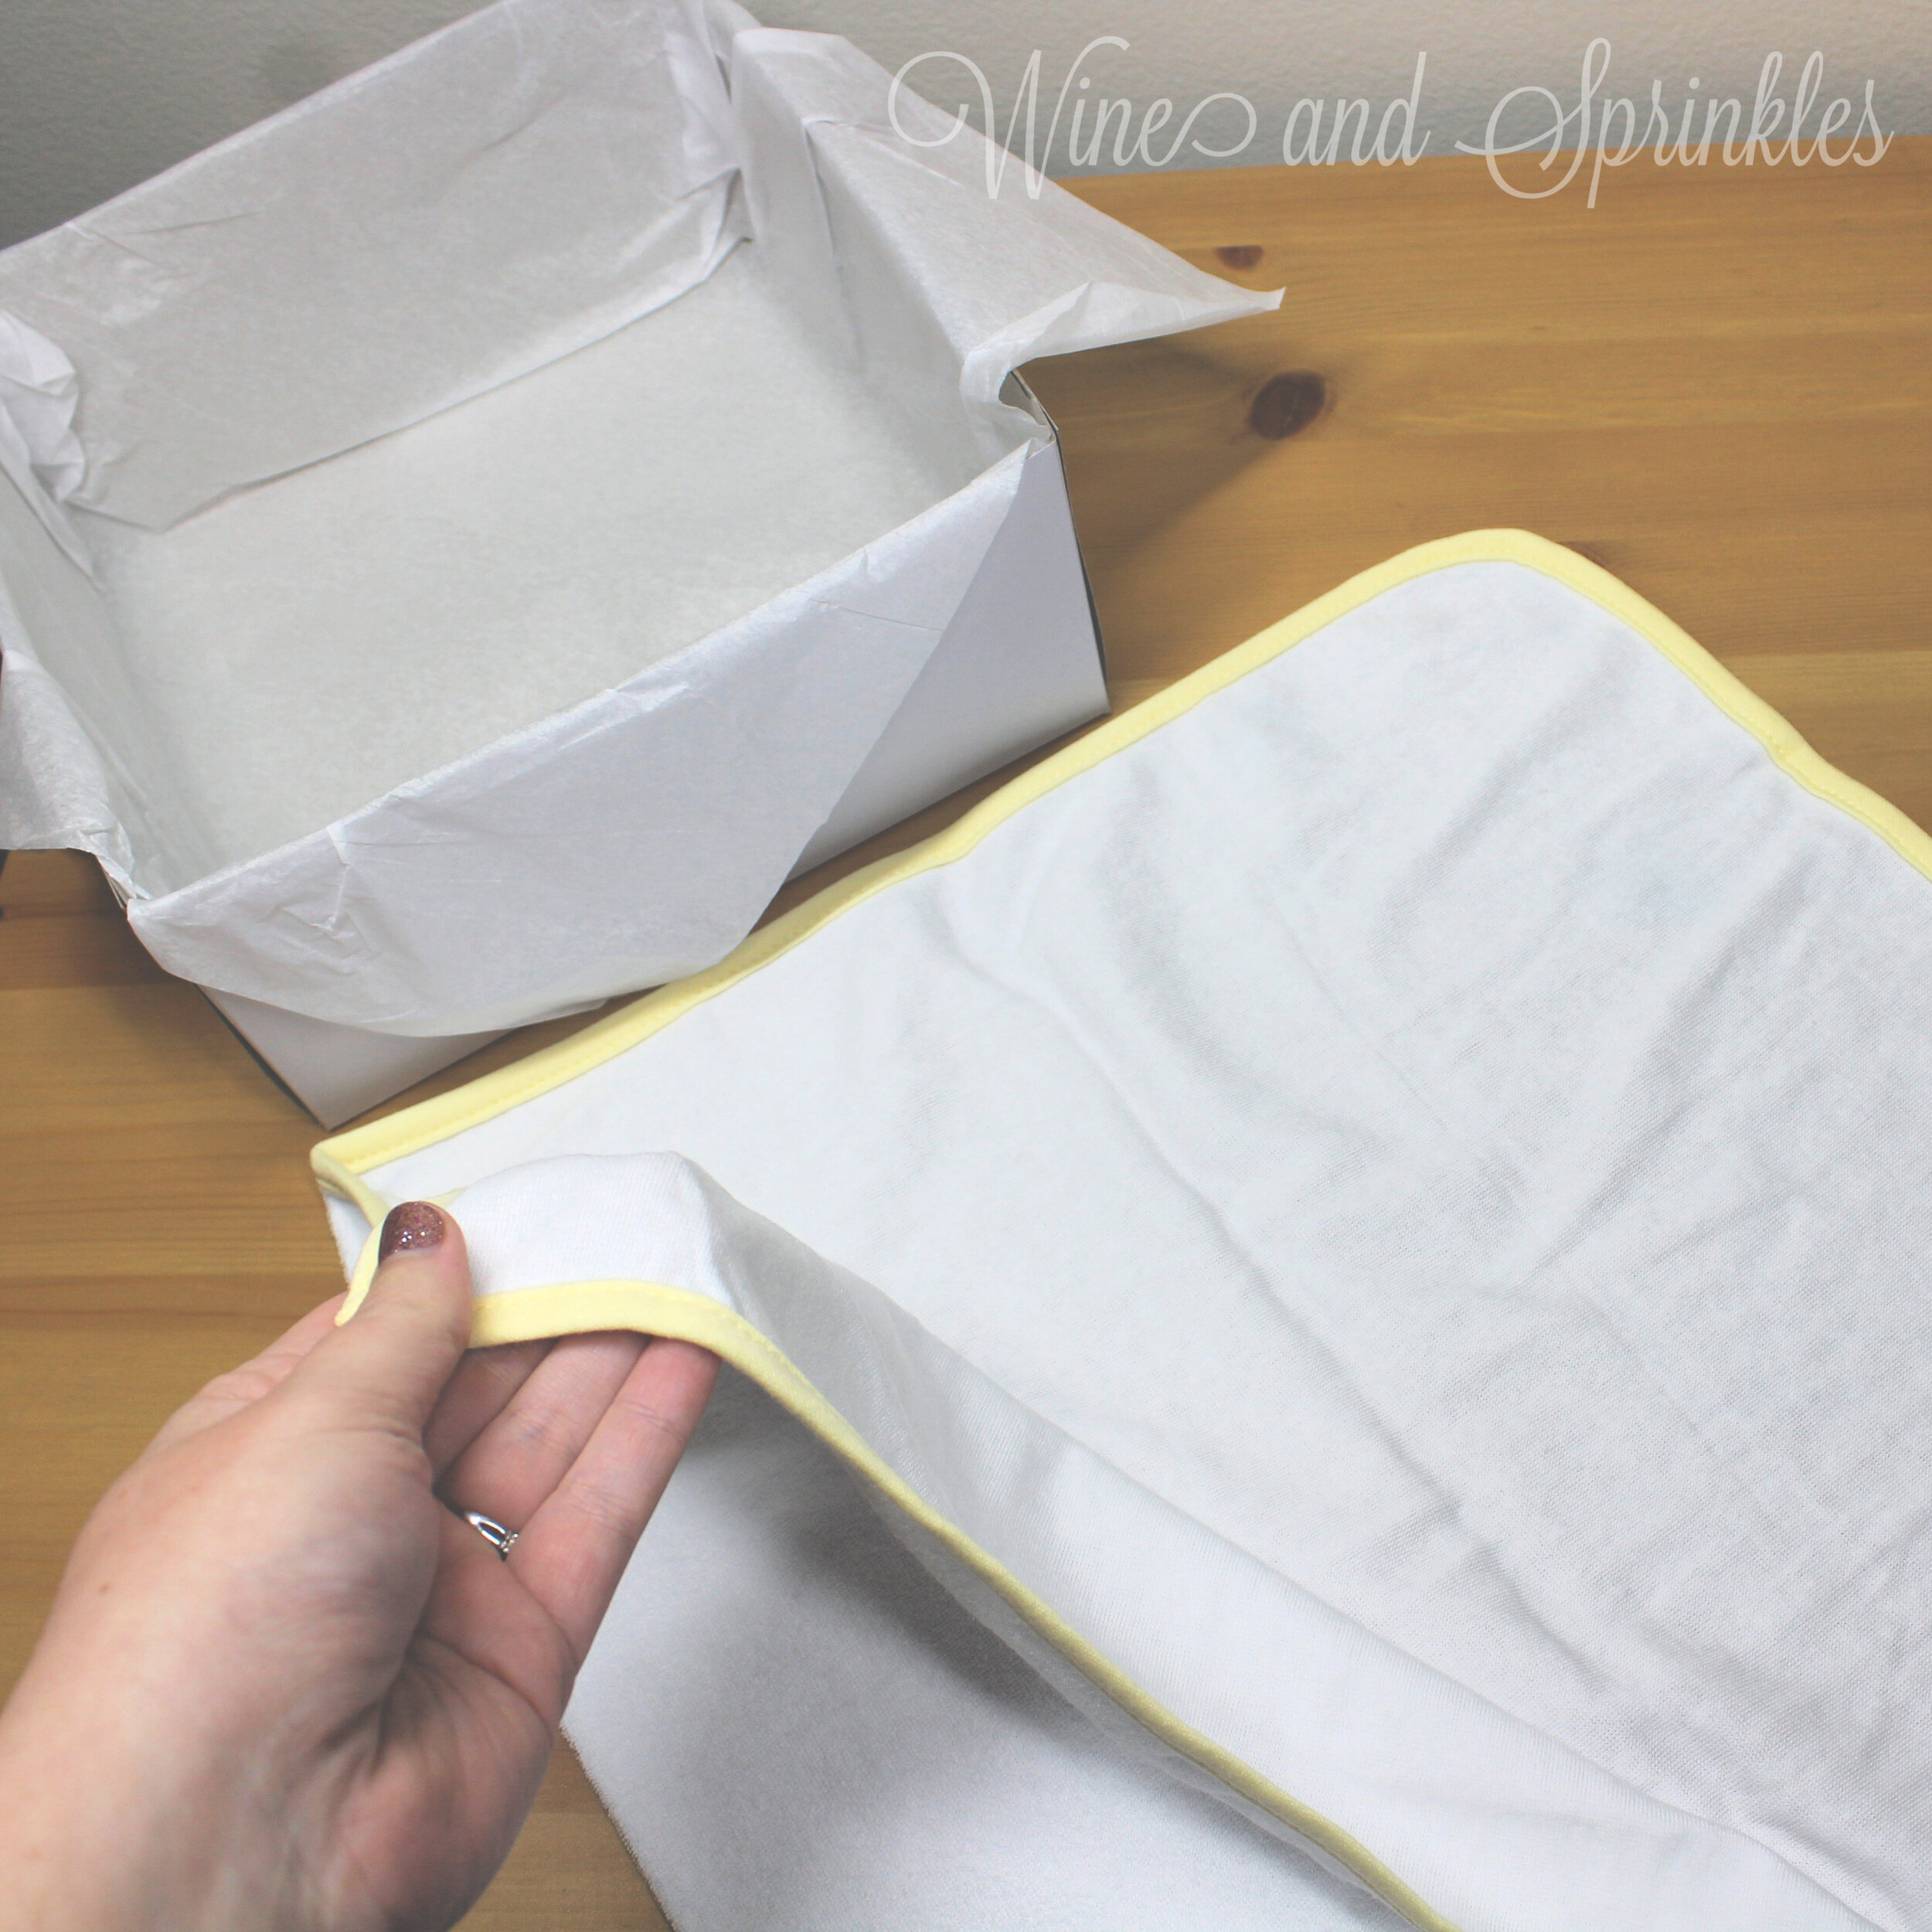
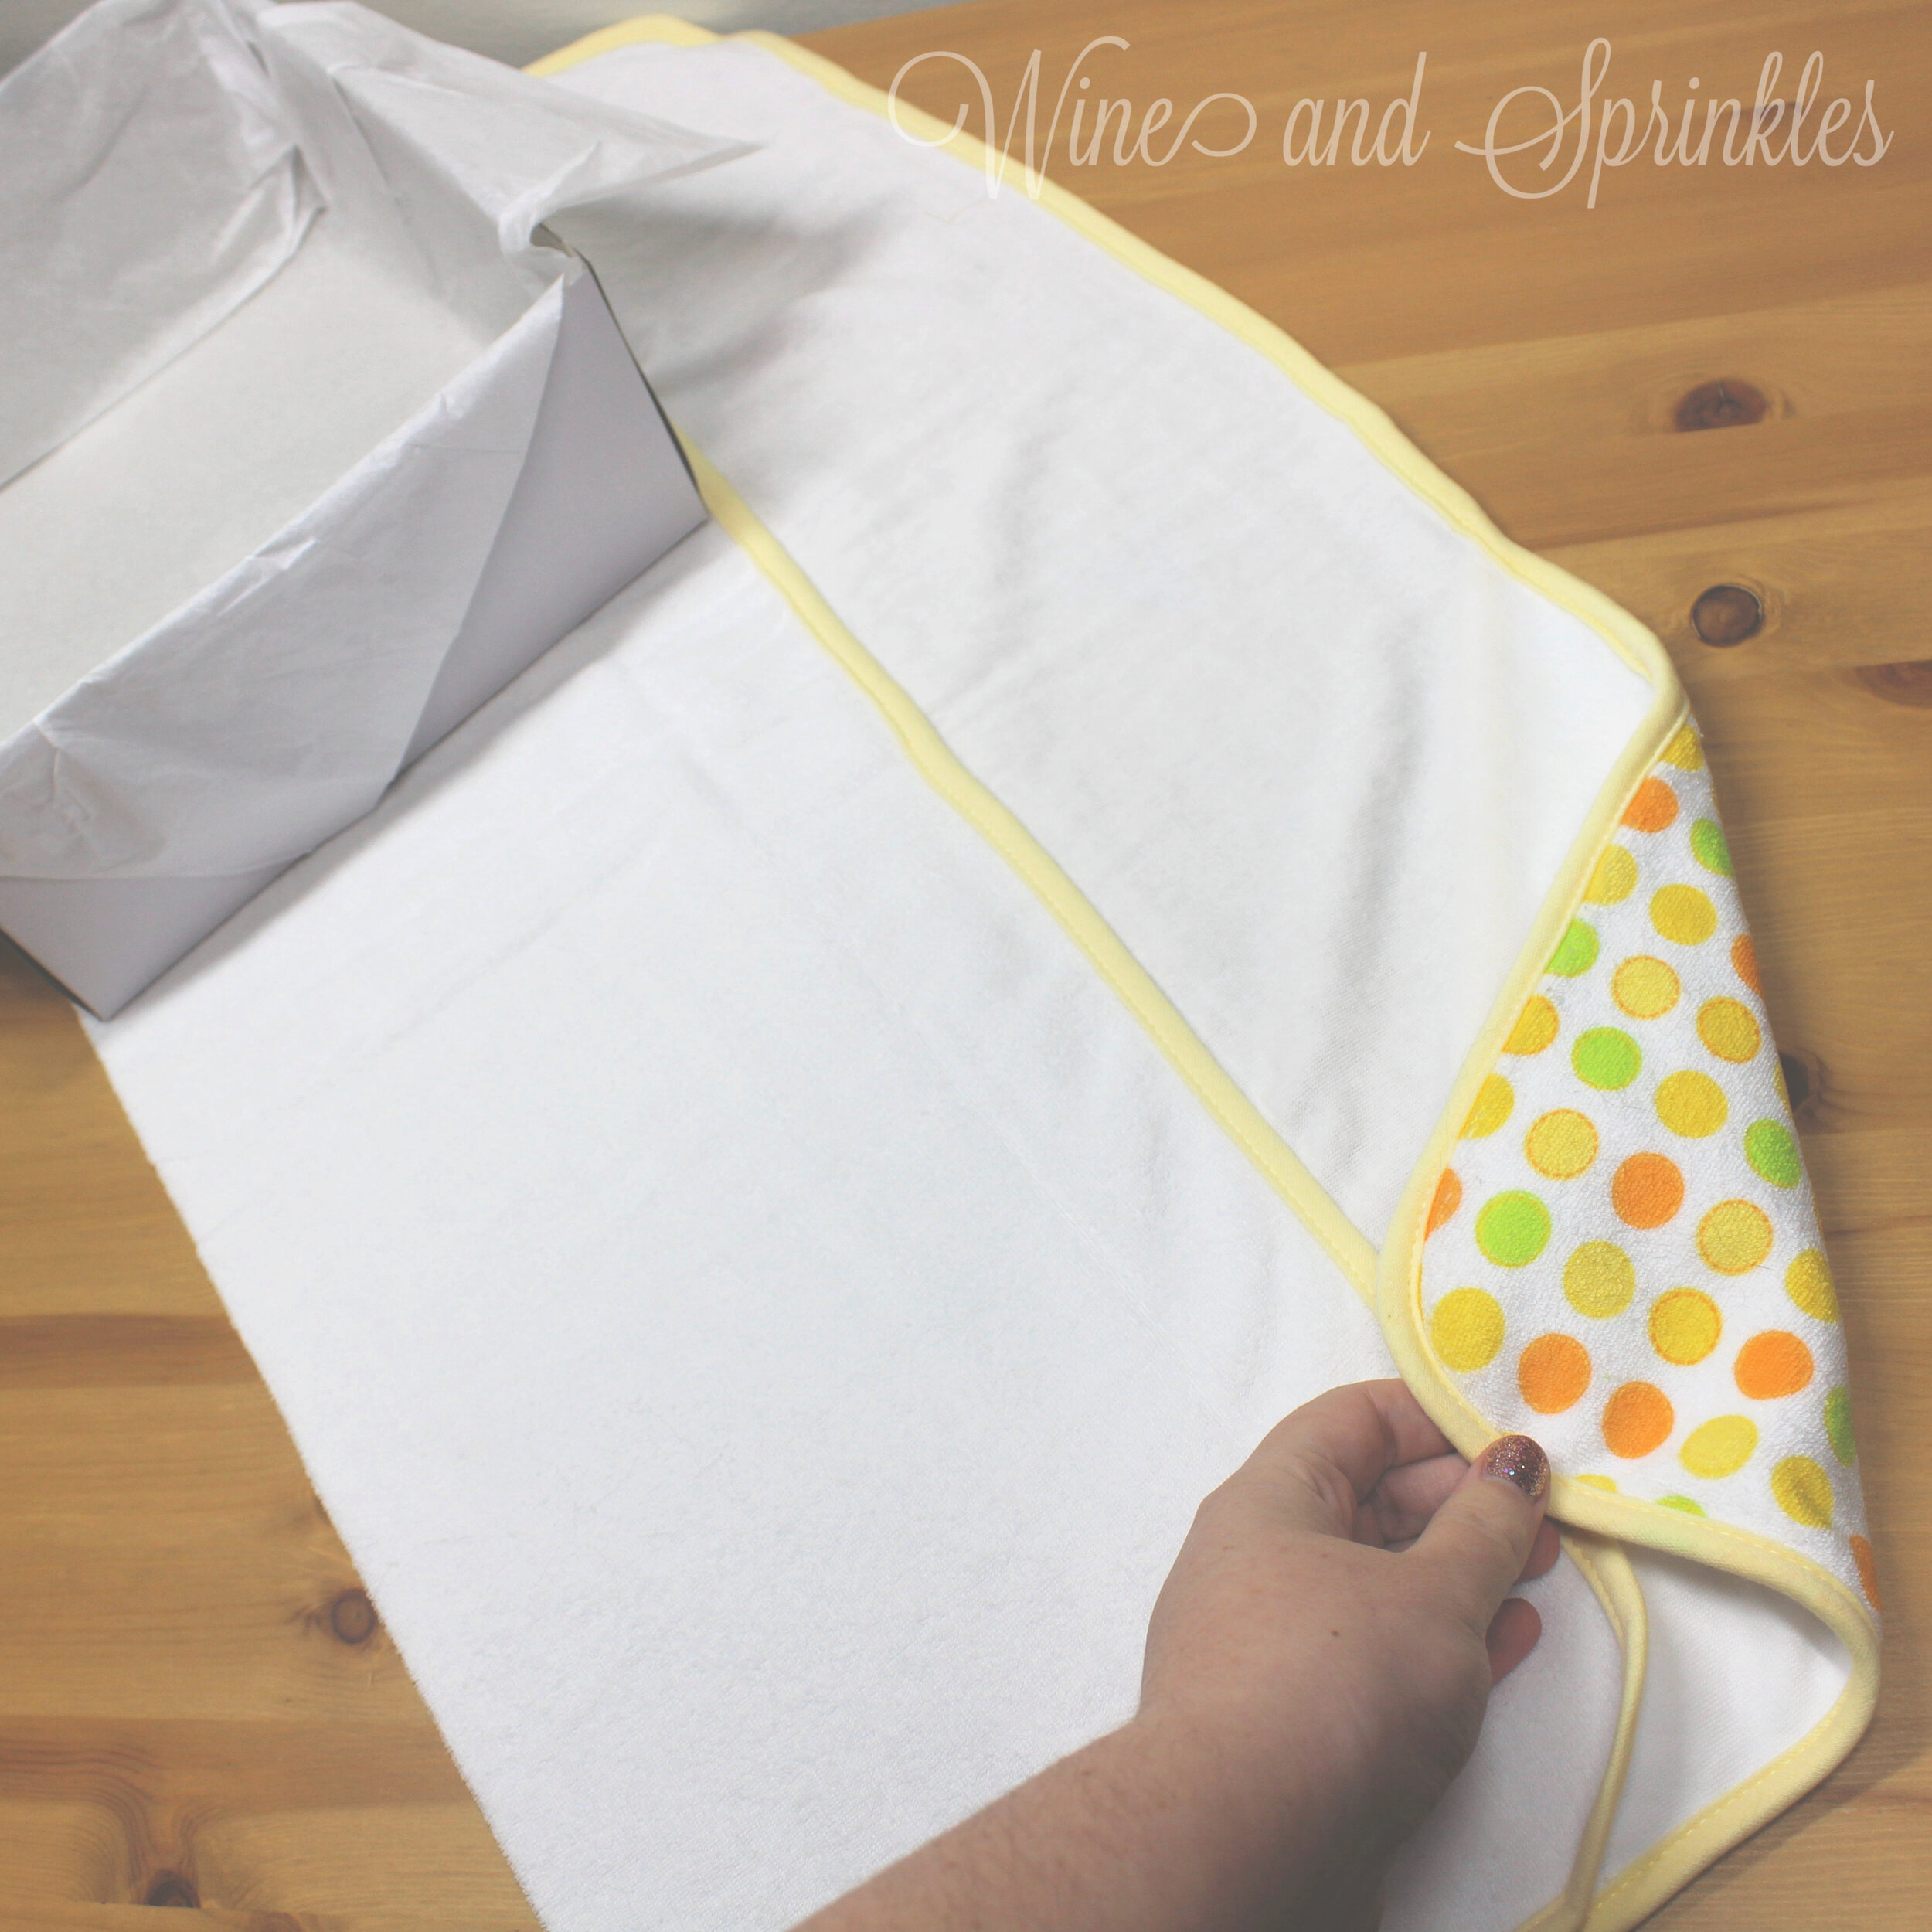
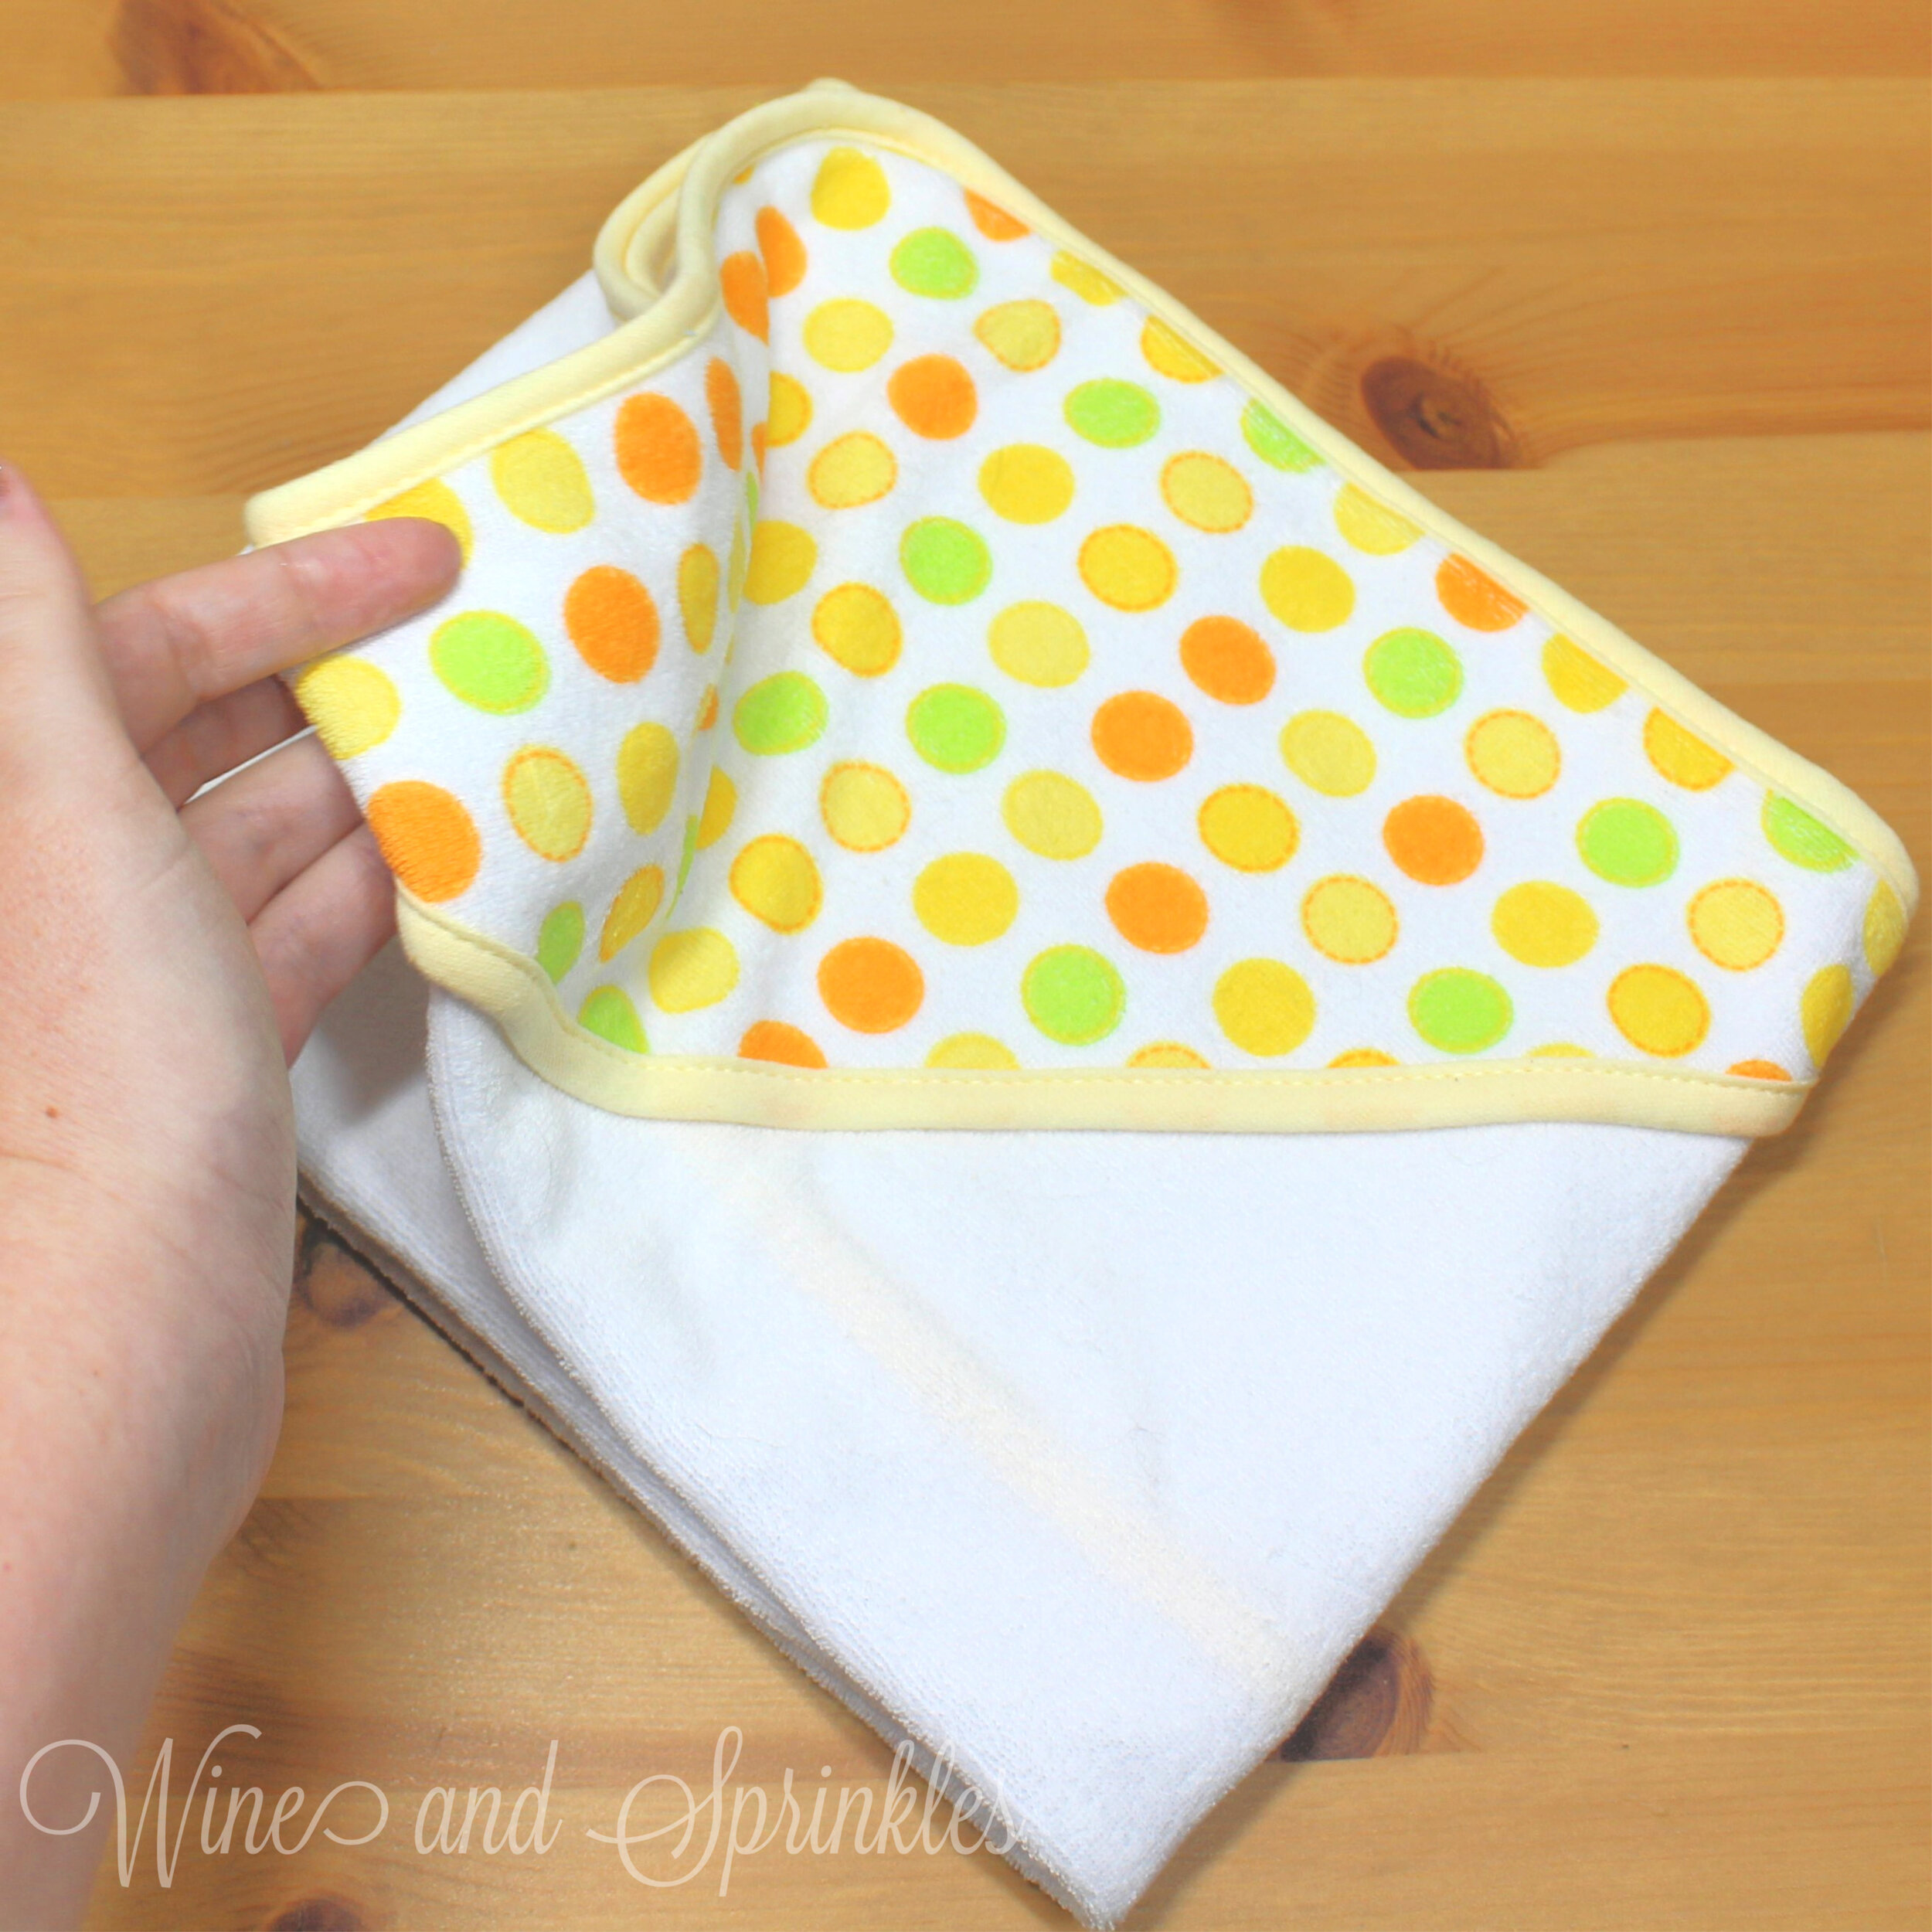
  1. Start with your hooded towel unfolded, with the hood facing away from you to the lower right. Using your gift box as a guide, fold the towel lengthwise in thirds, starting with the non-hooded side first, then folding over the hood to make a long rectangle. The rectangle should have the width of the box you are using, which may require the second fold of your towel to “overlap” the first fold, but the important thing is the width! Once folded, flip over the towel so that the hood side is down and closest to you, as shown in the next set of photos.

Bath Time Essentials Baby Gift Bento Box #babygift #babybento #babyshowergift

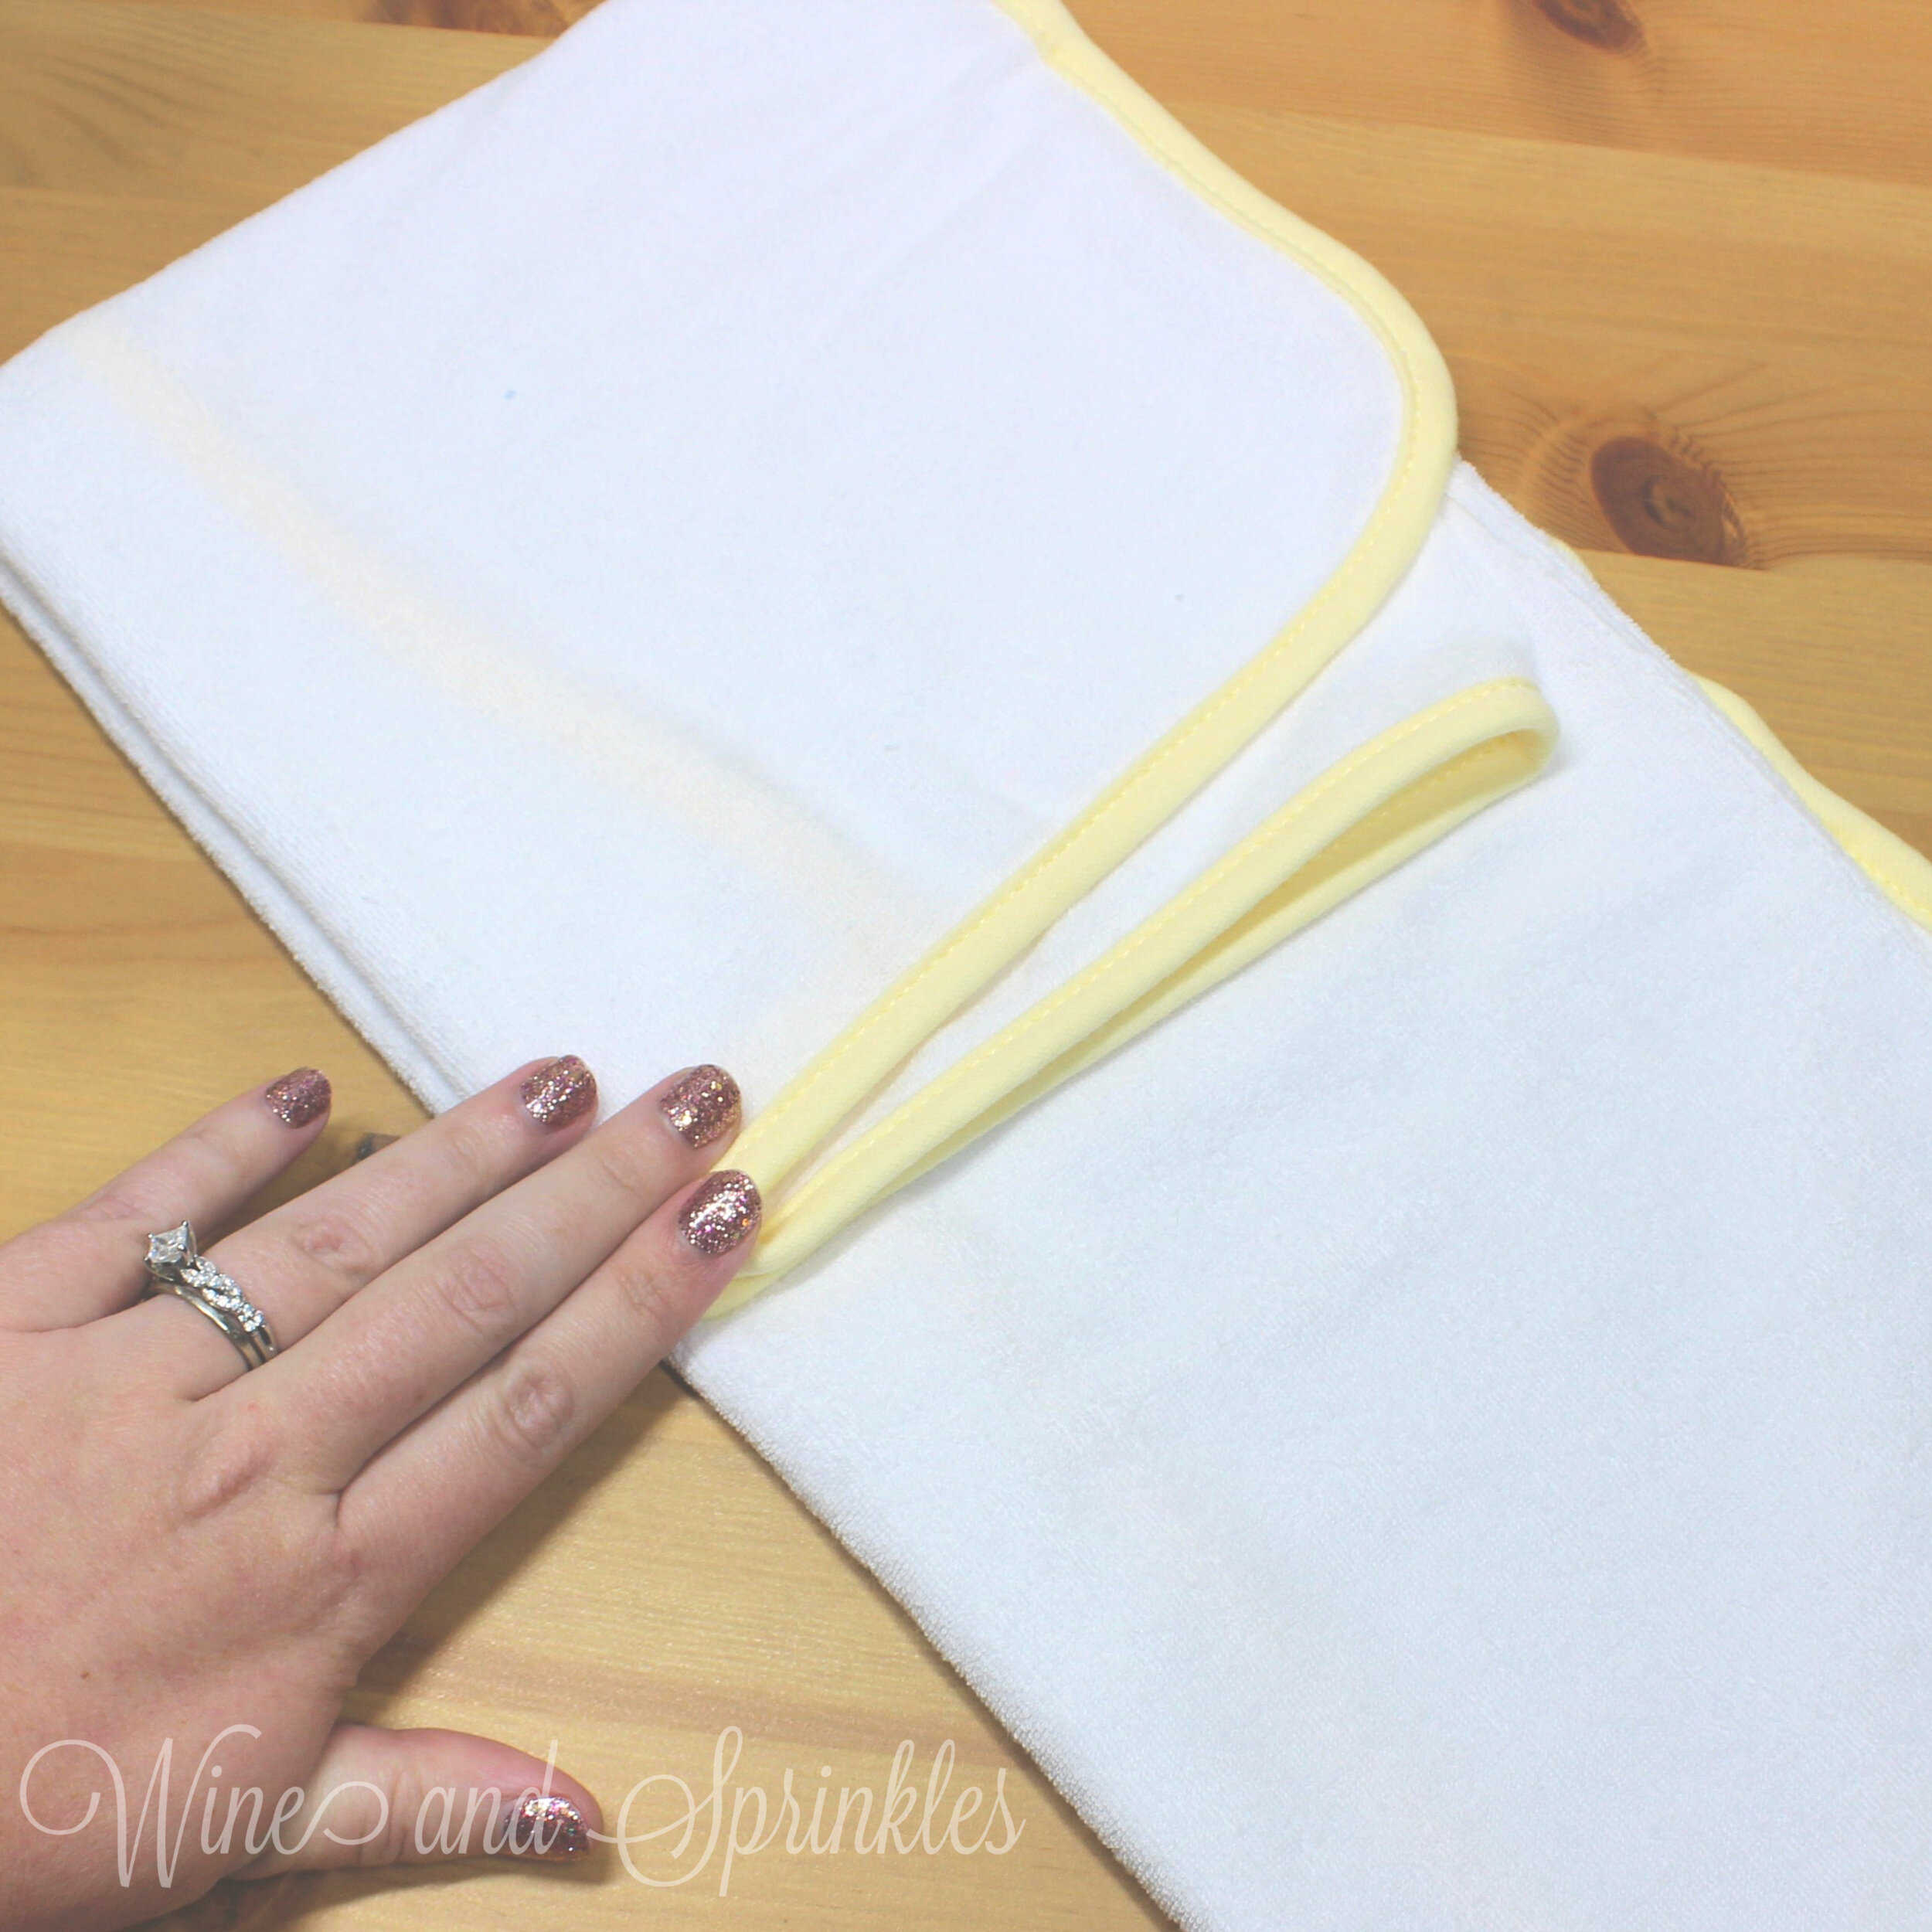
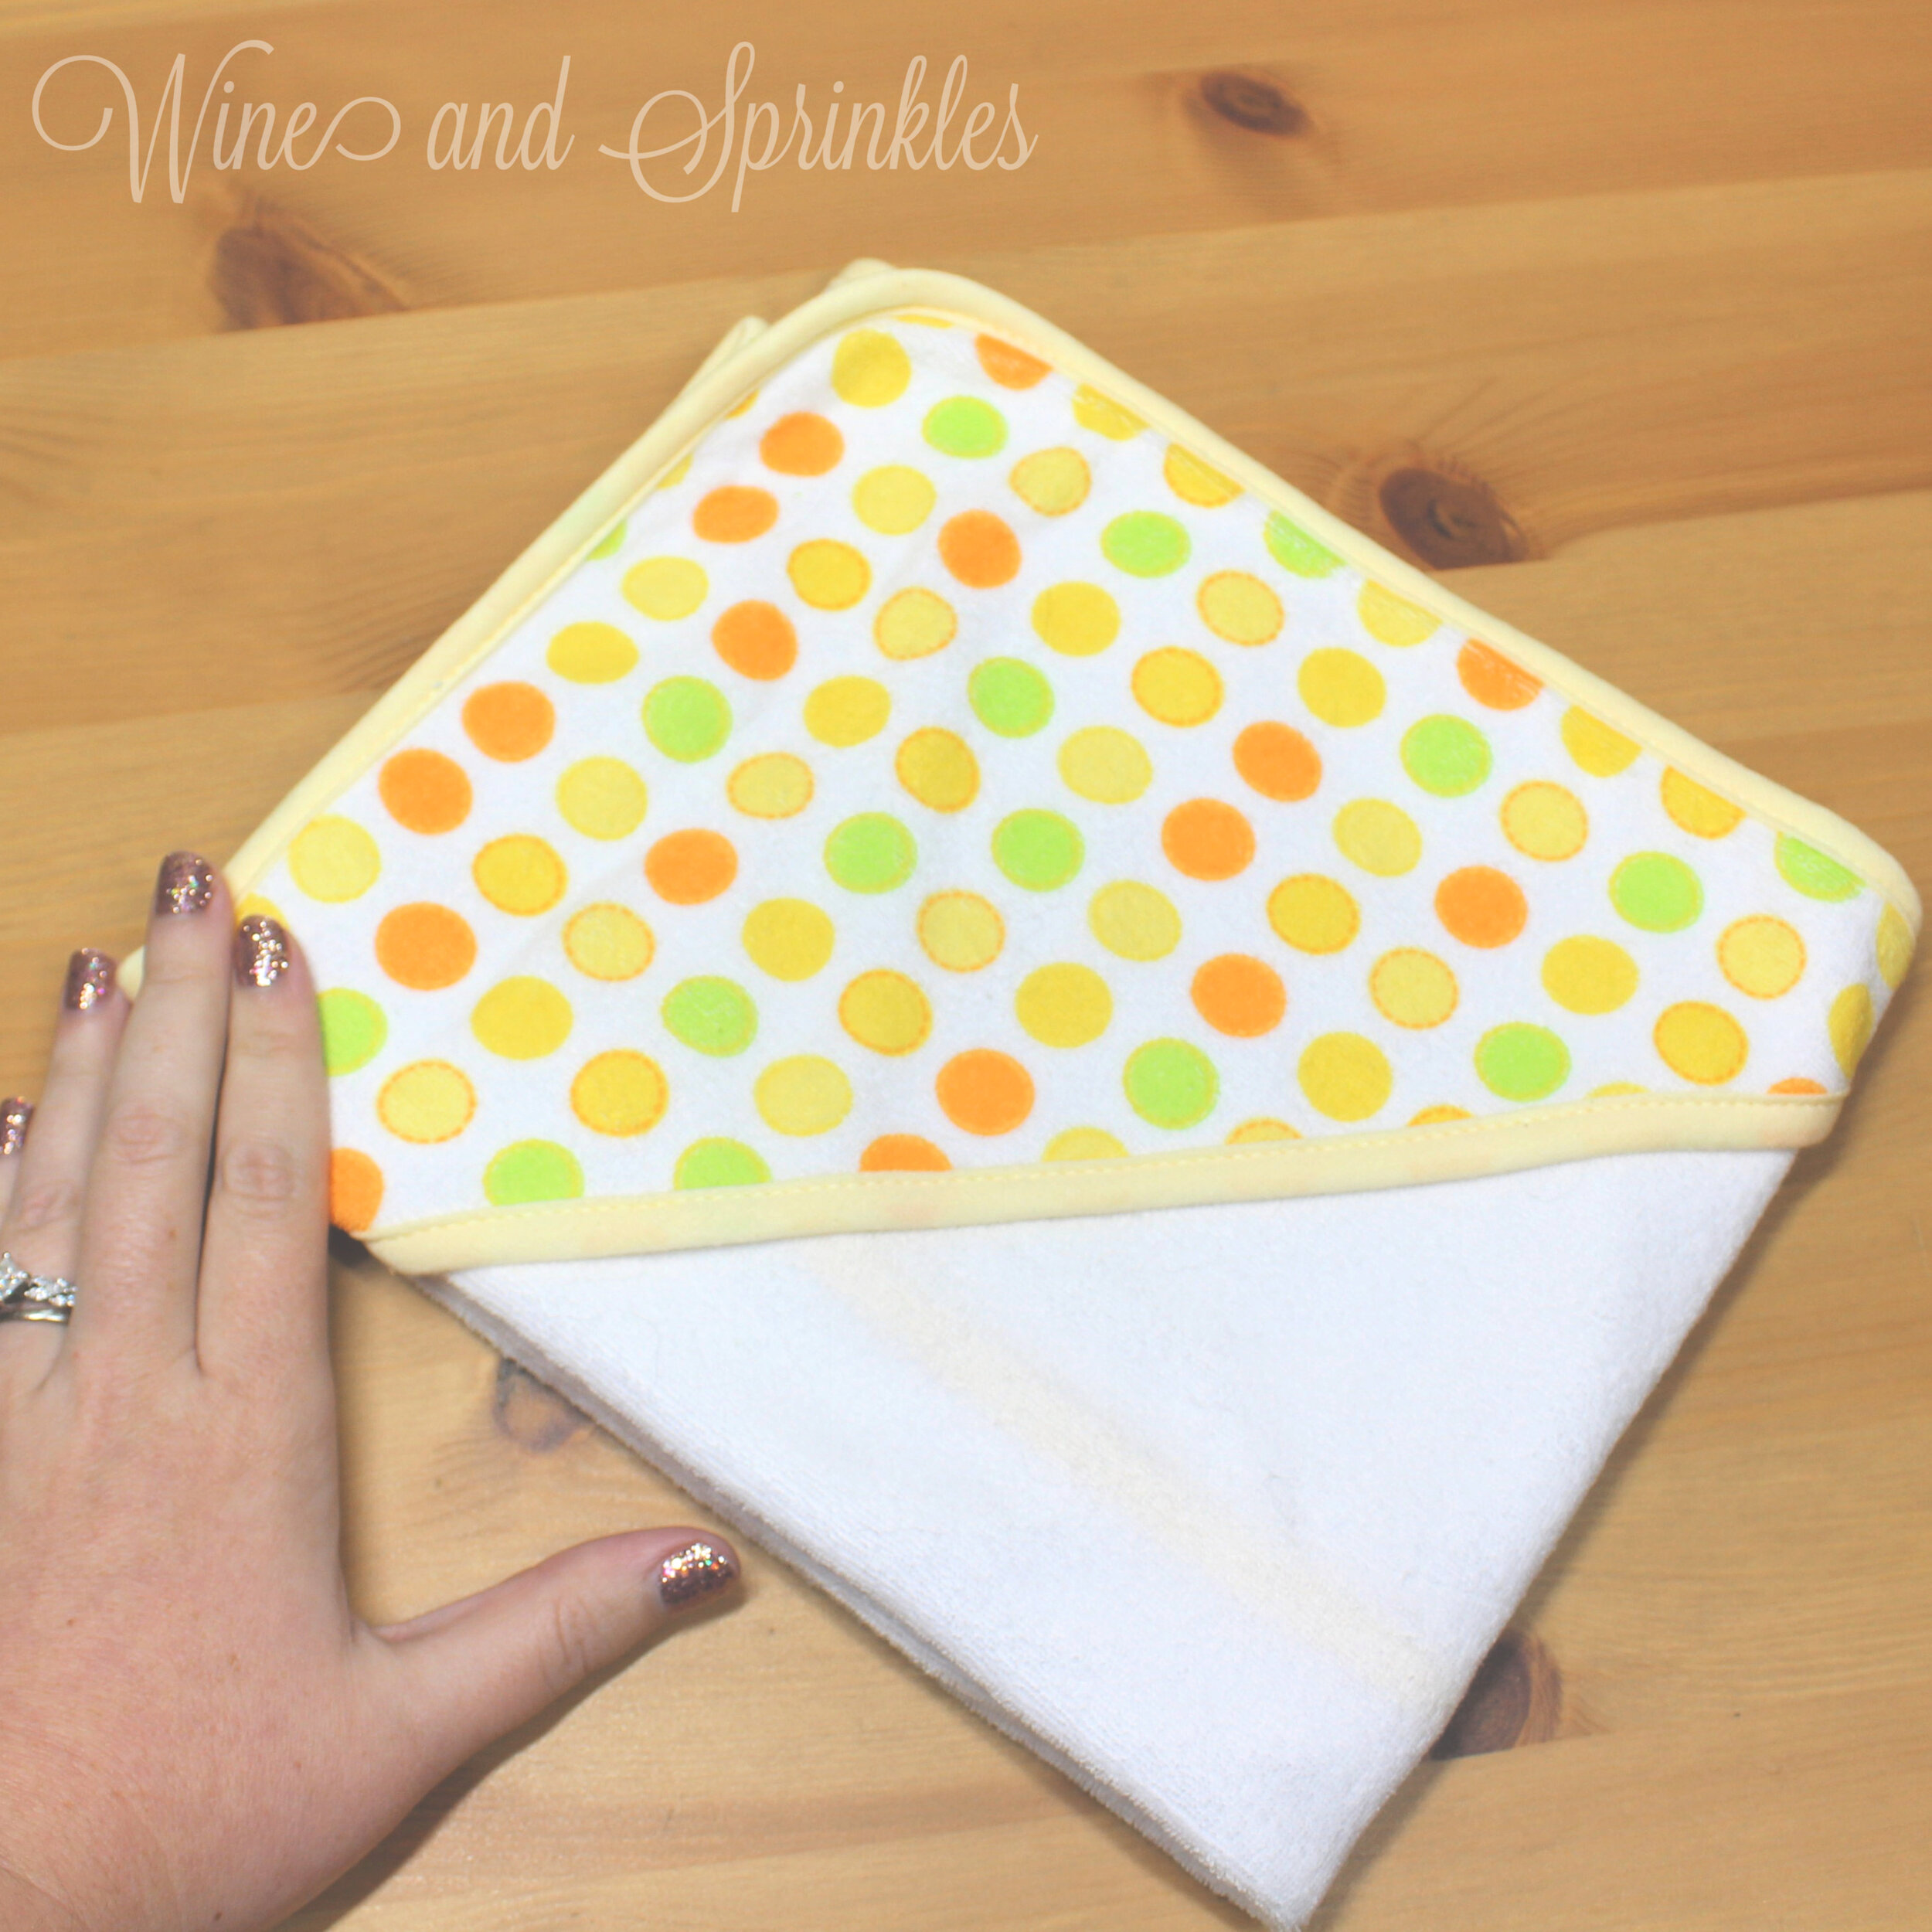
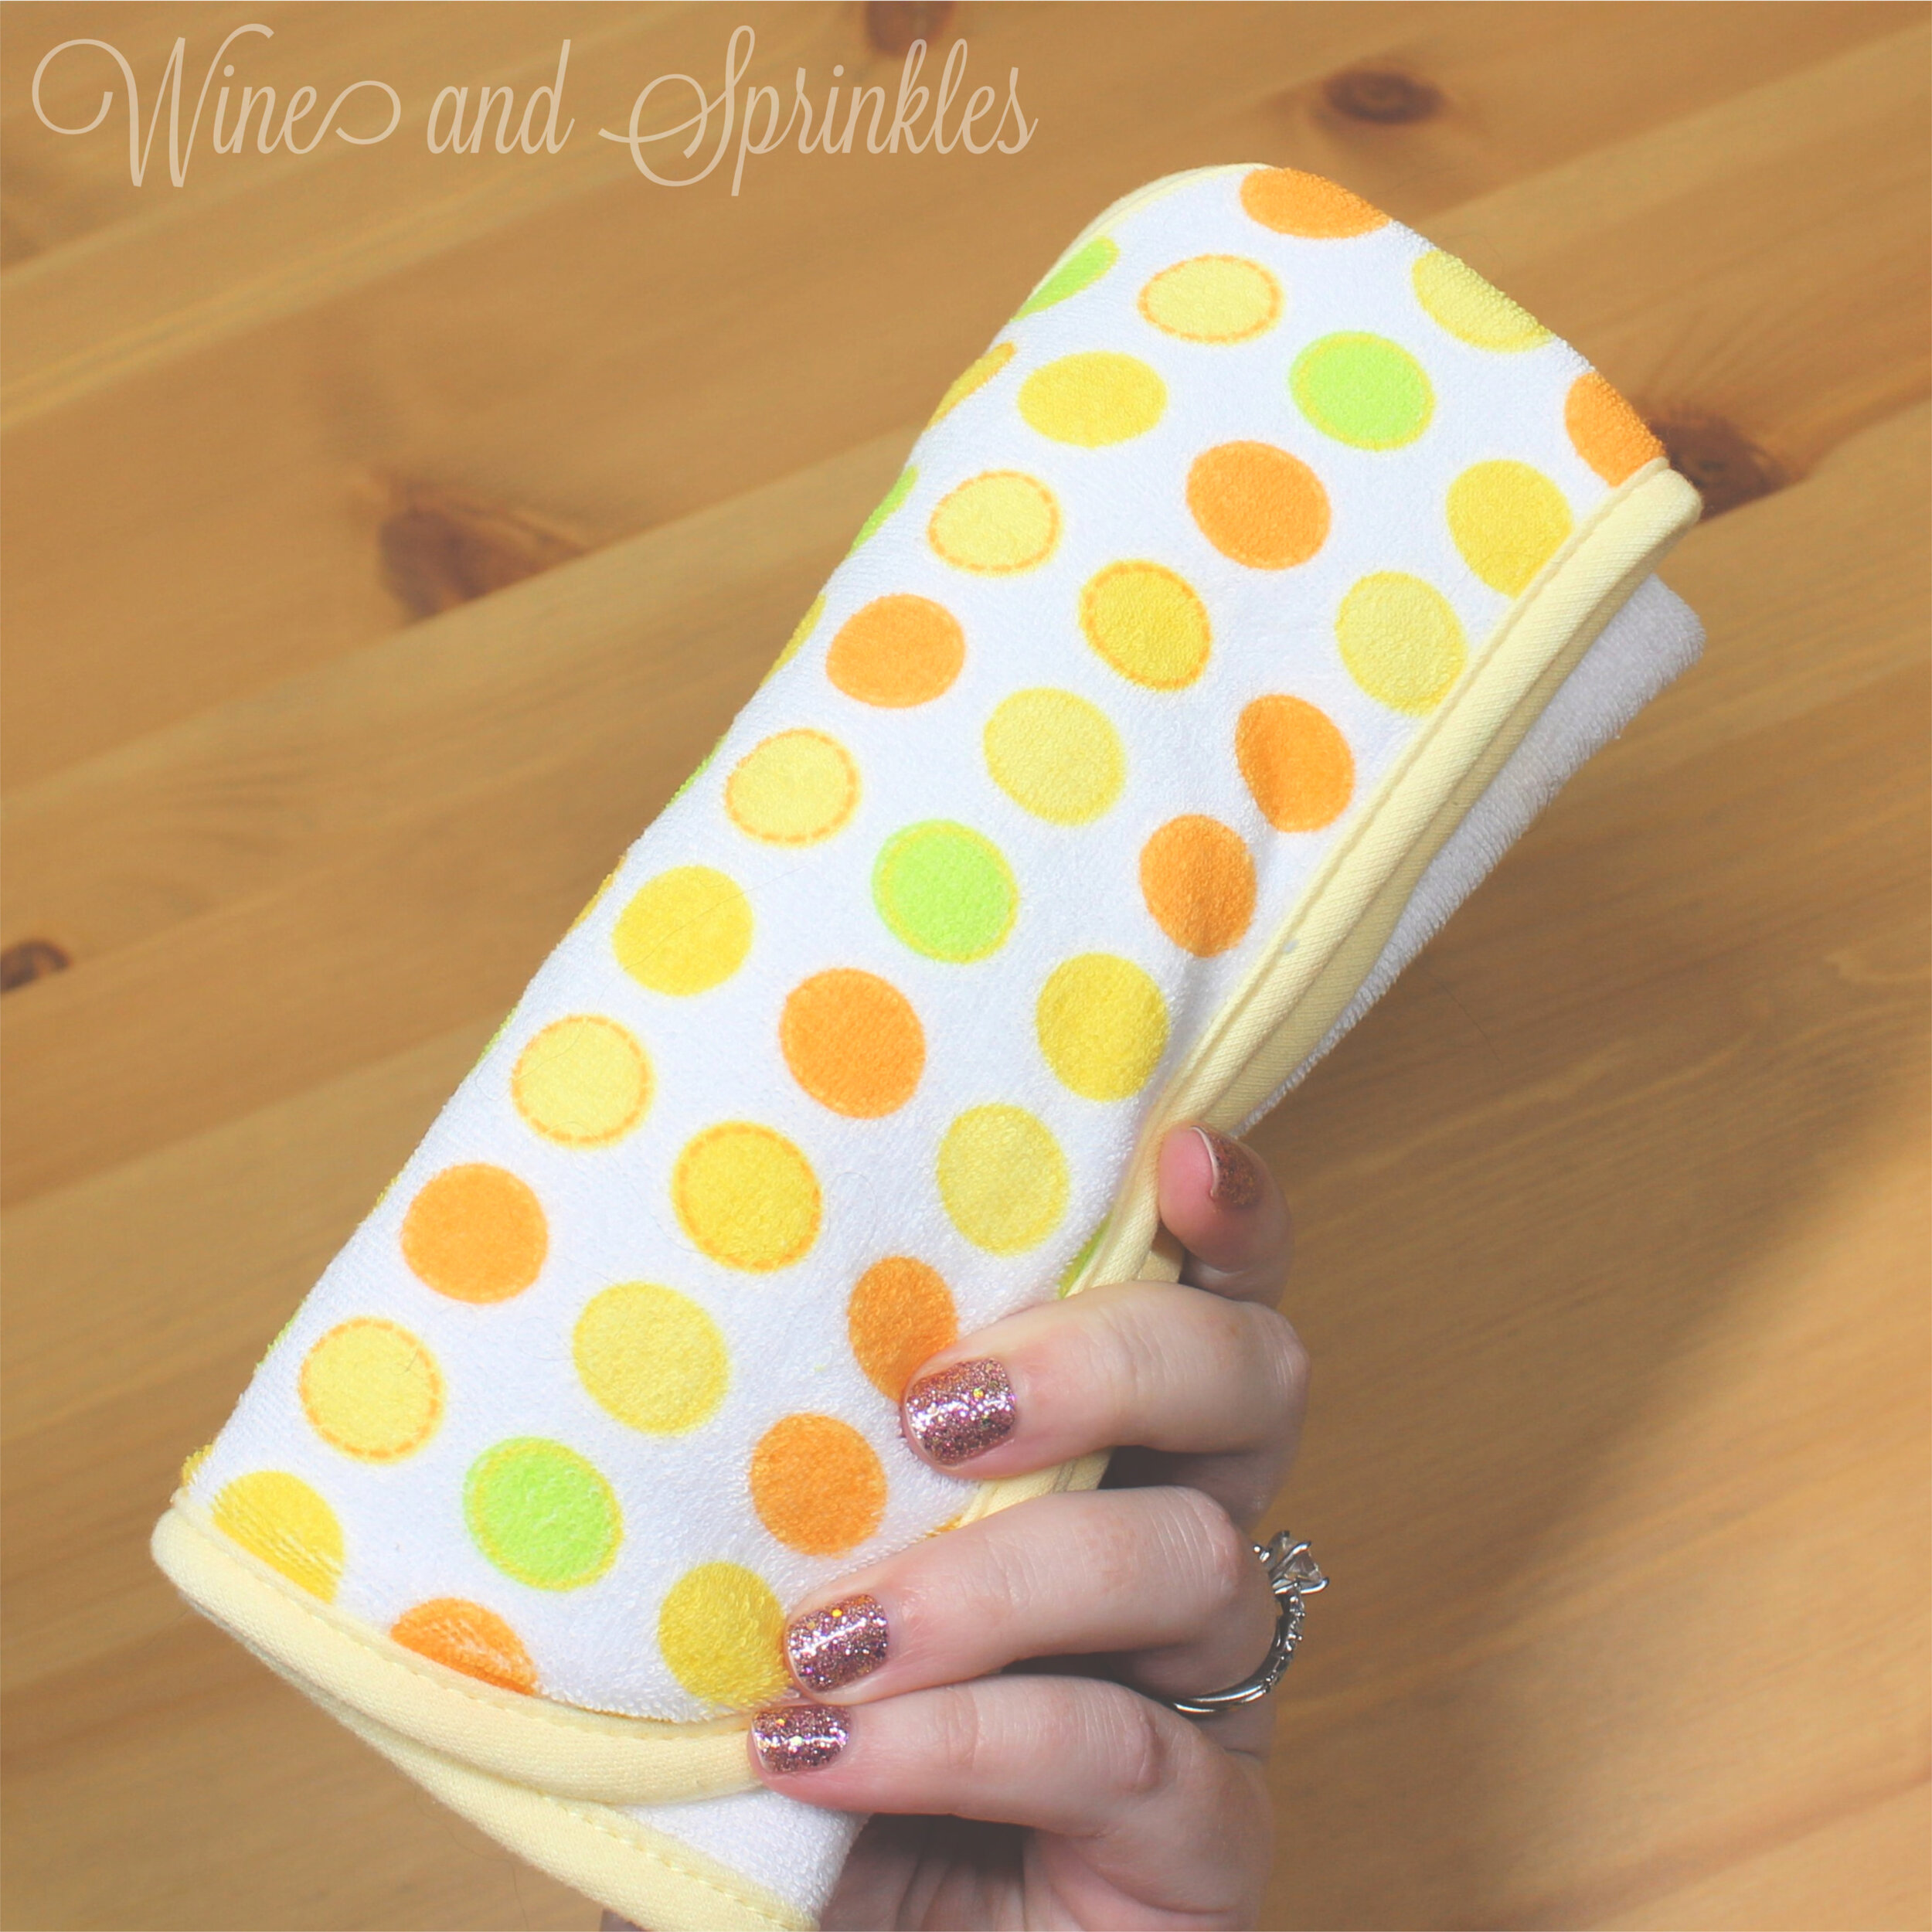
2. Starting with the non-hood side, fold your long rectangle in thirds again, this time width-wise. After the first fold, bring the hooded side up to the opposite edge to form a squarish packet with the patterned hood displayed as shown in the photos above.

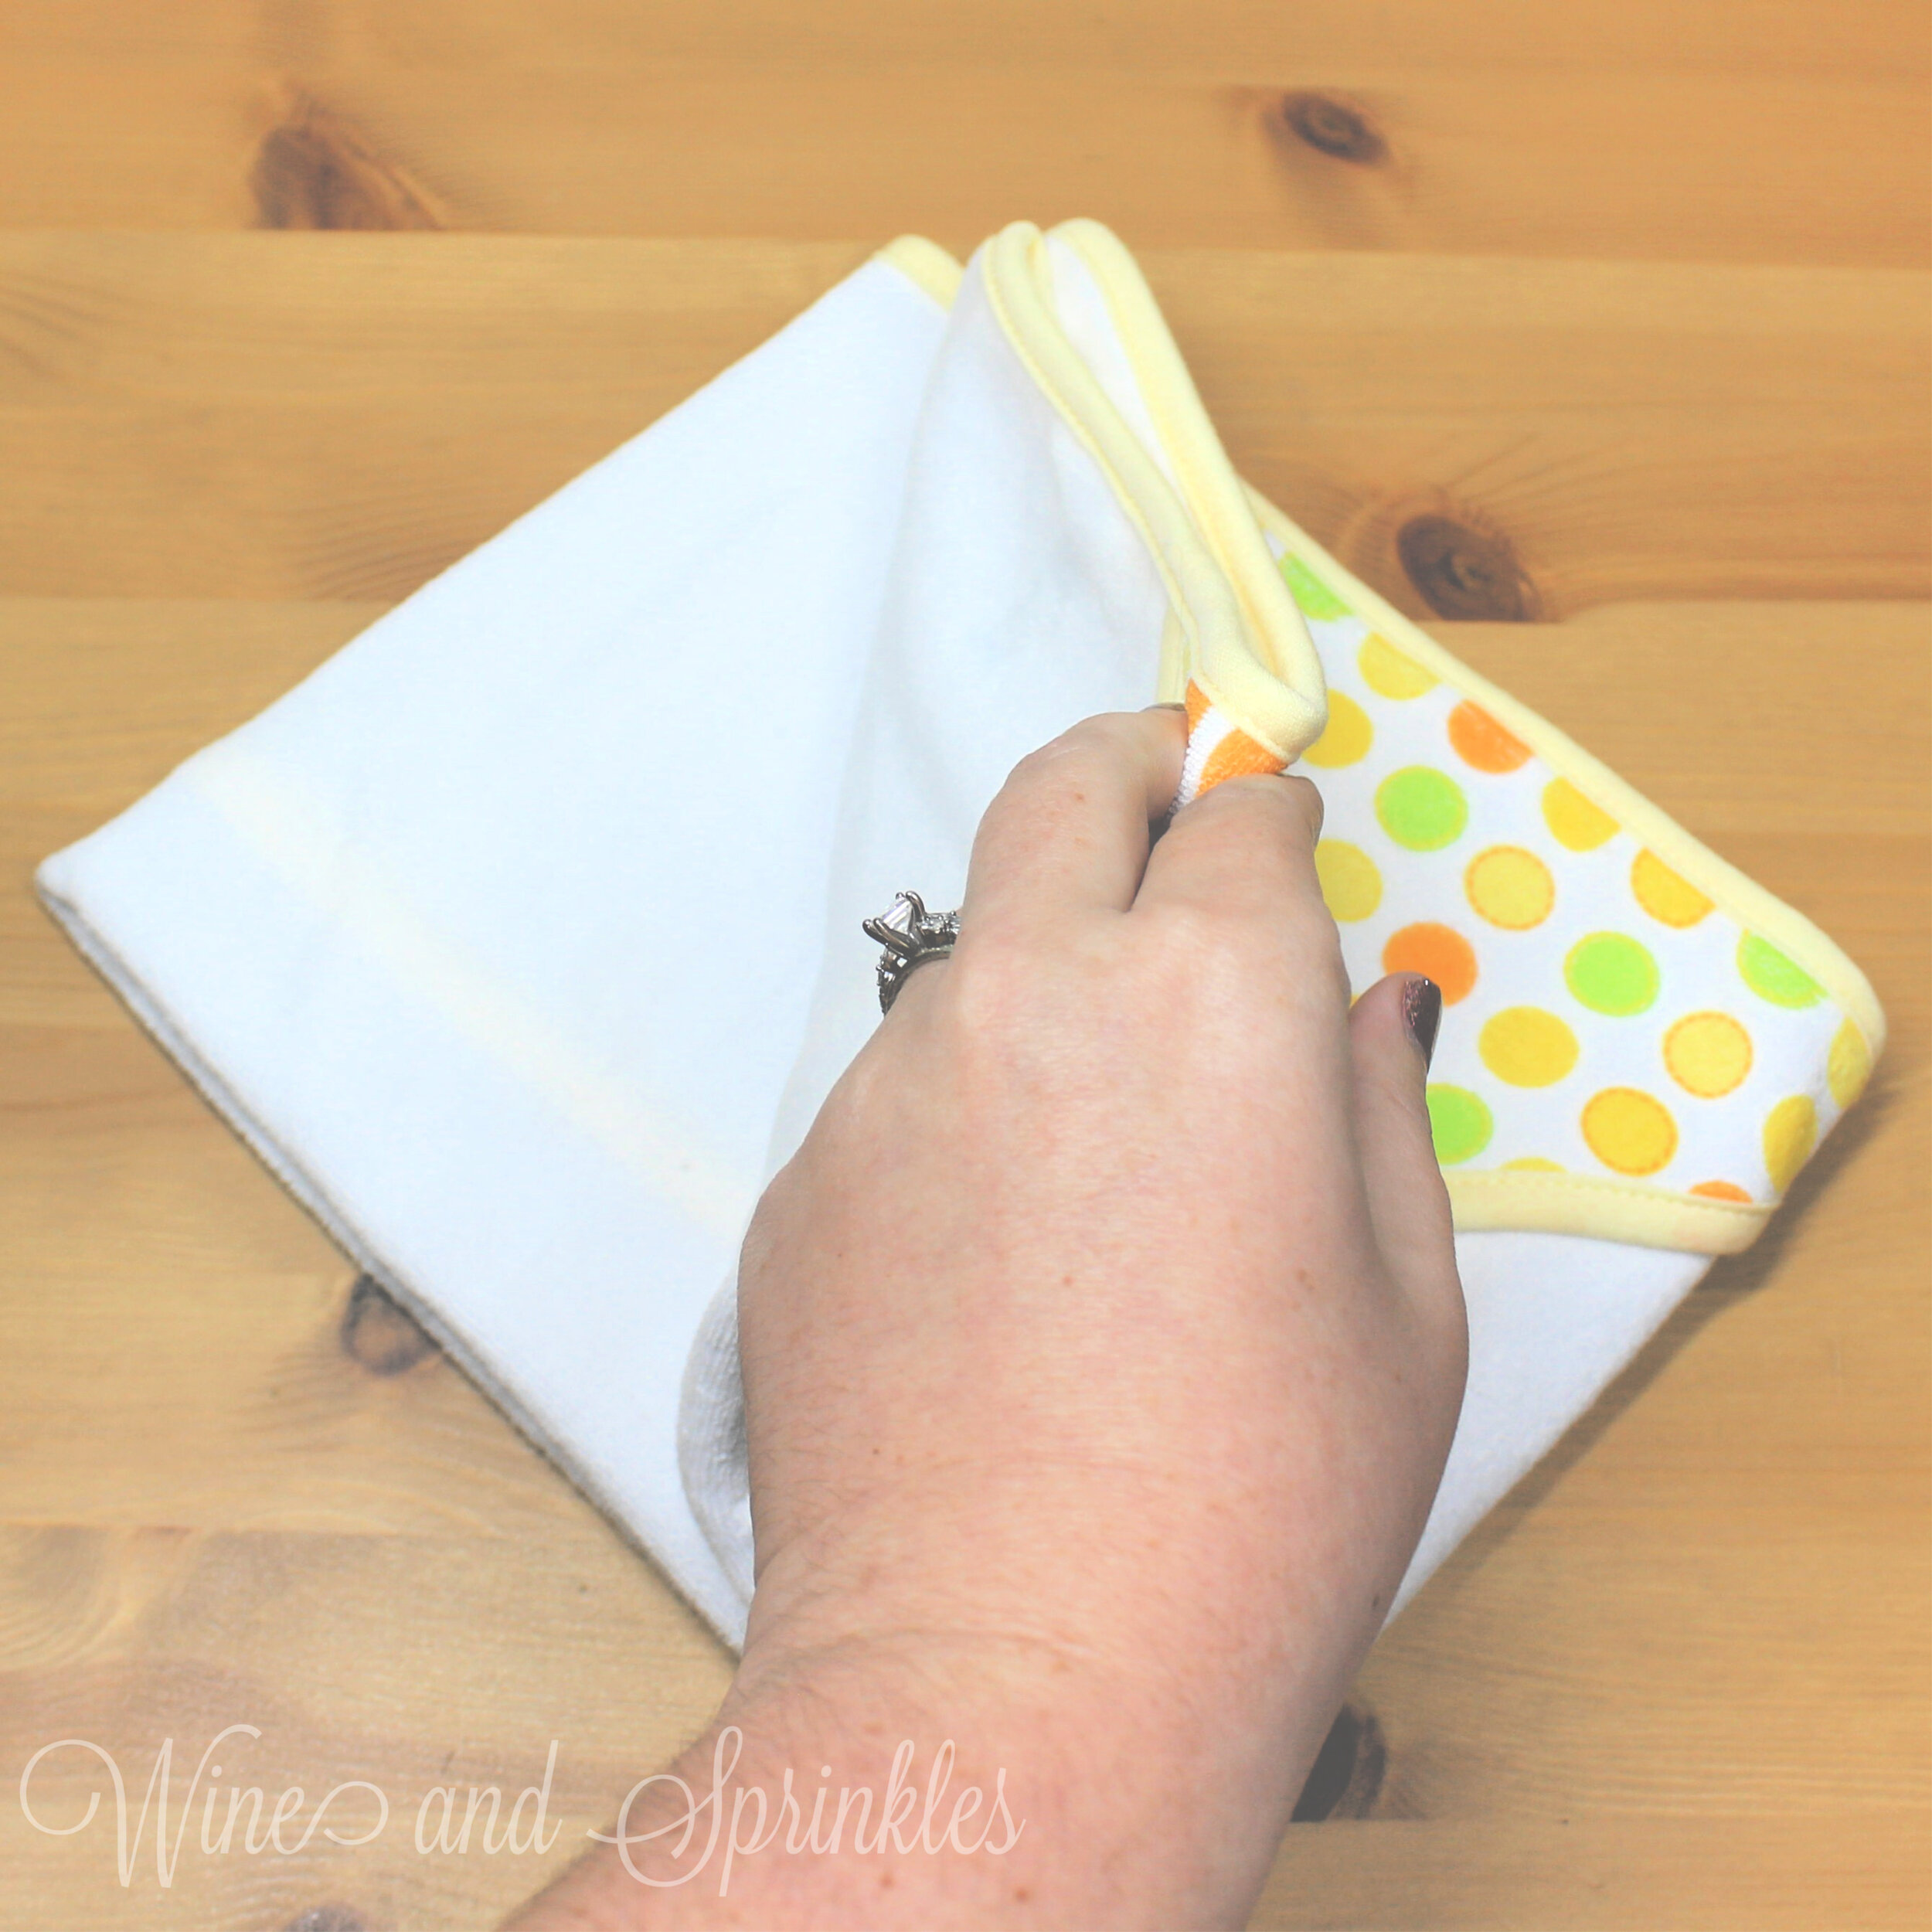
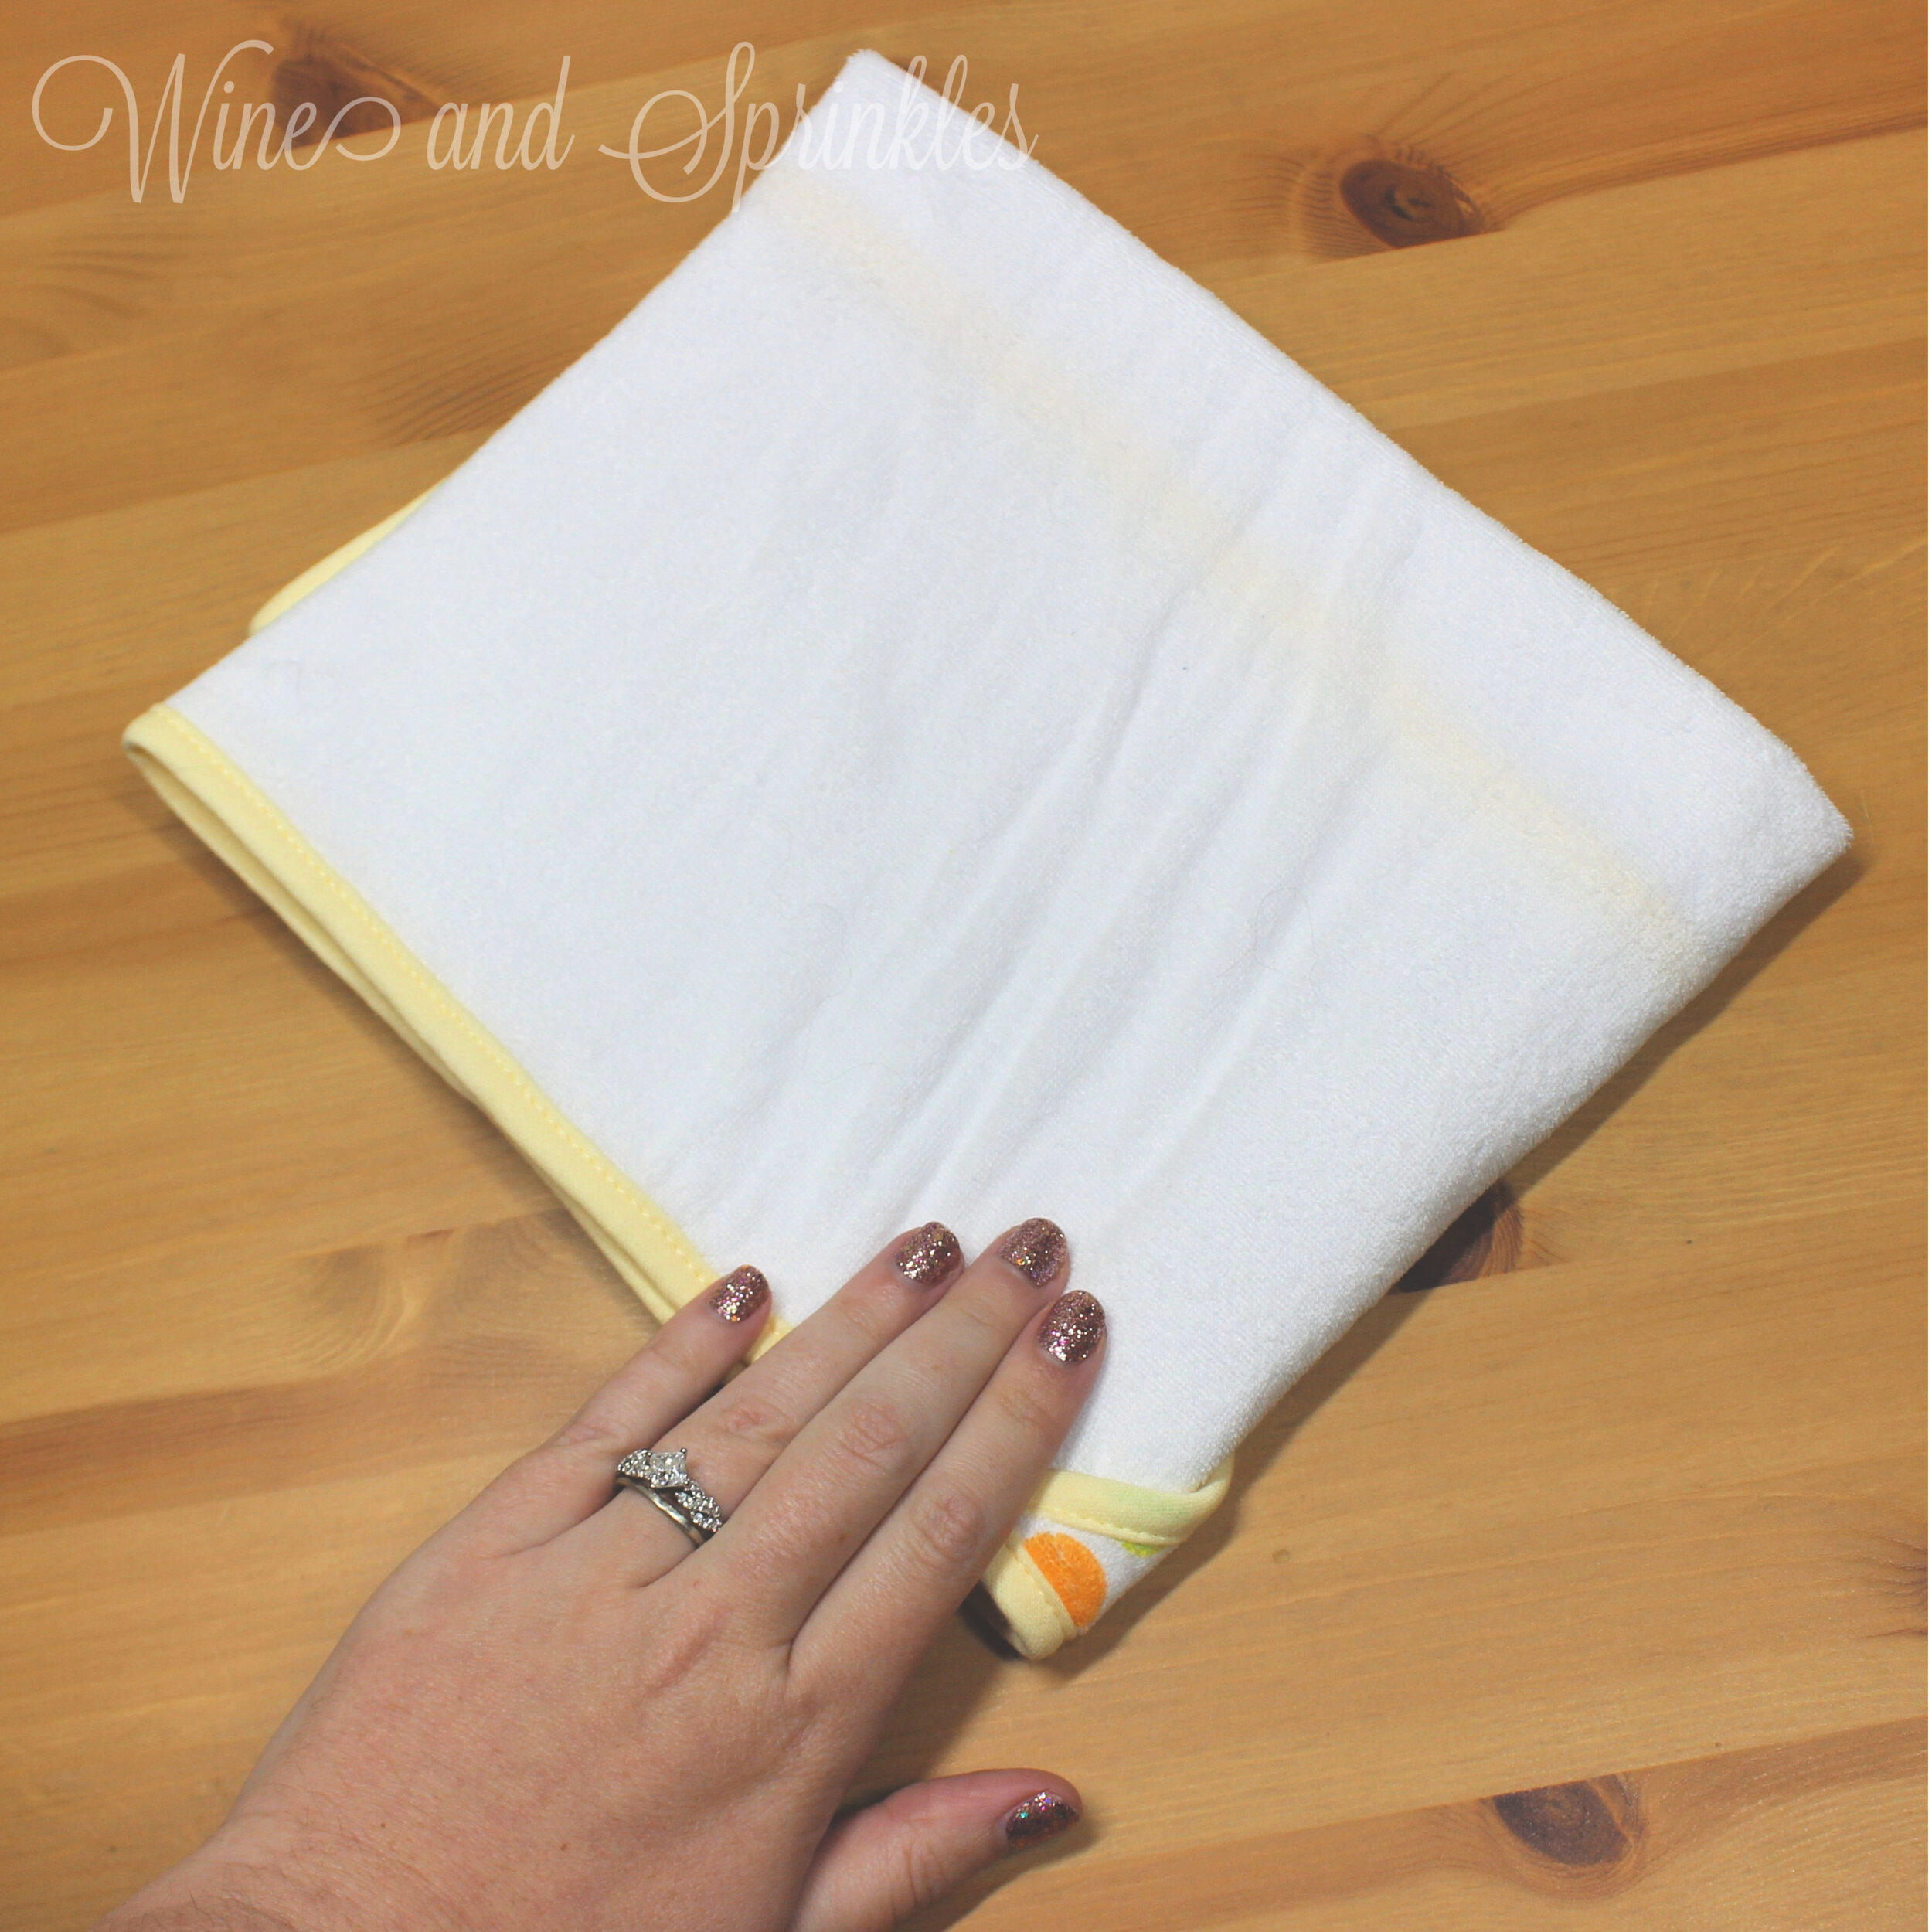
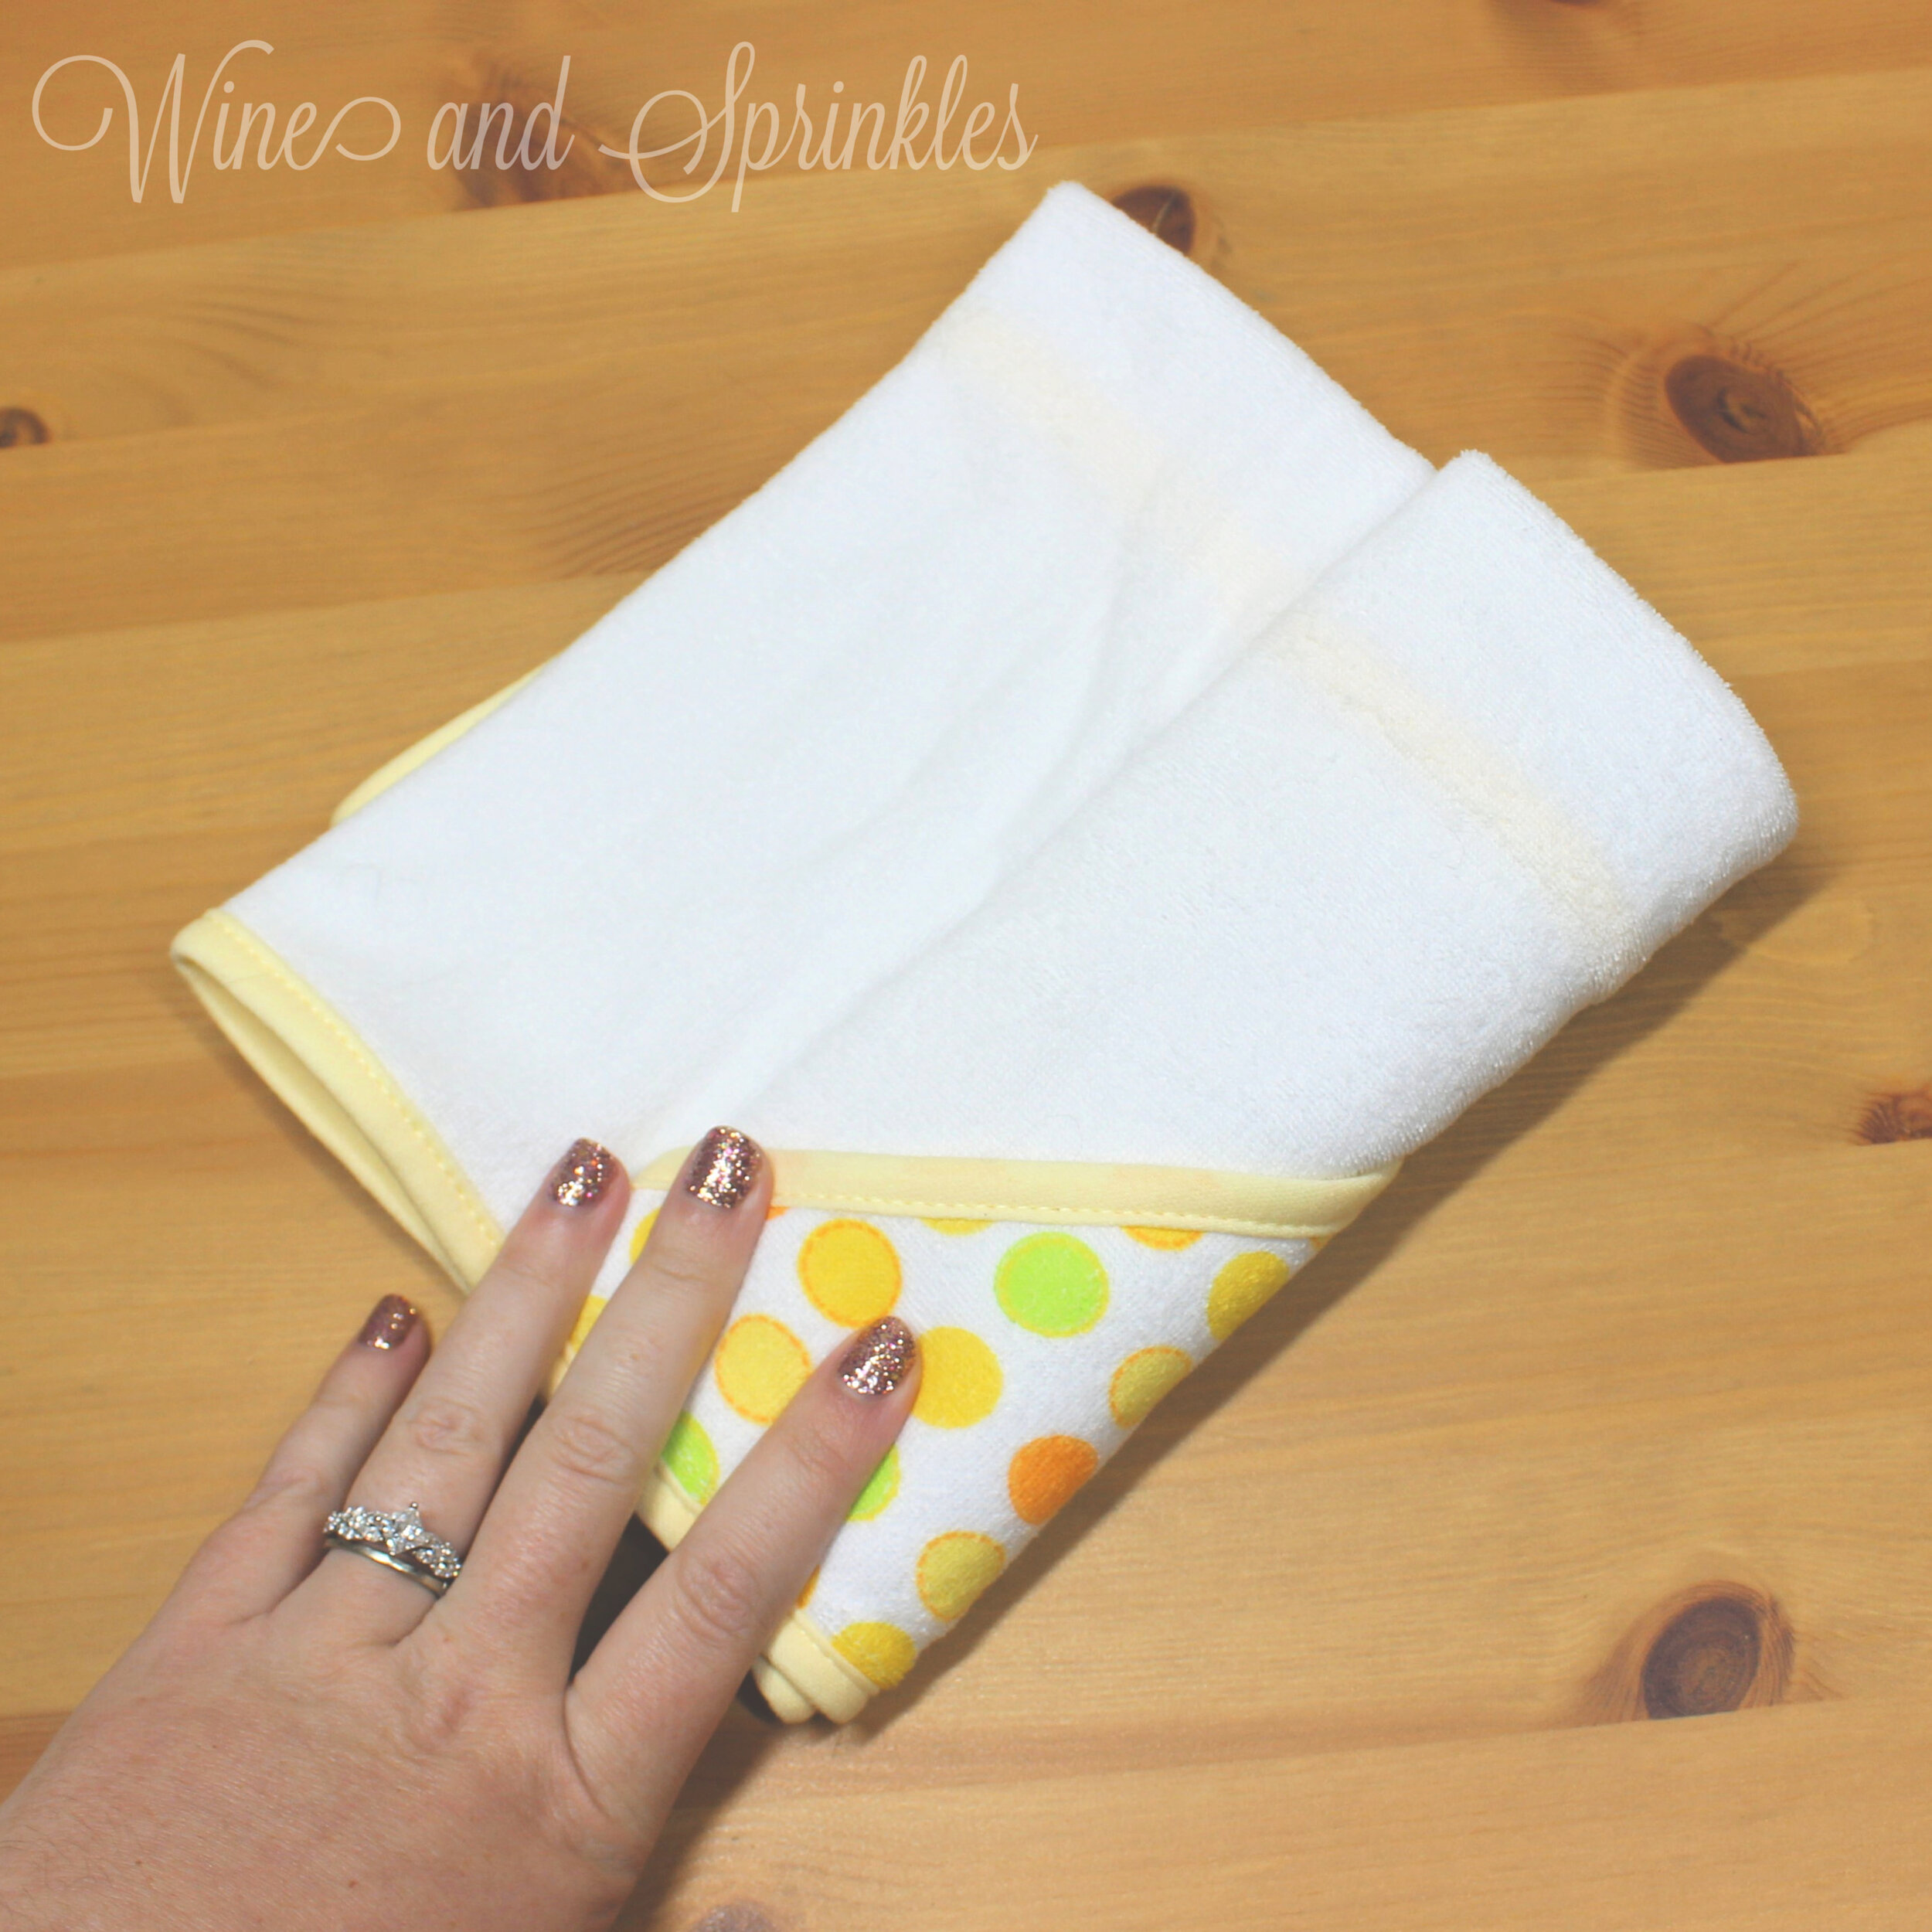
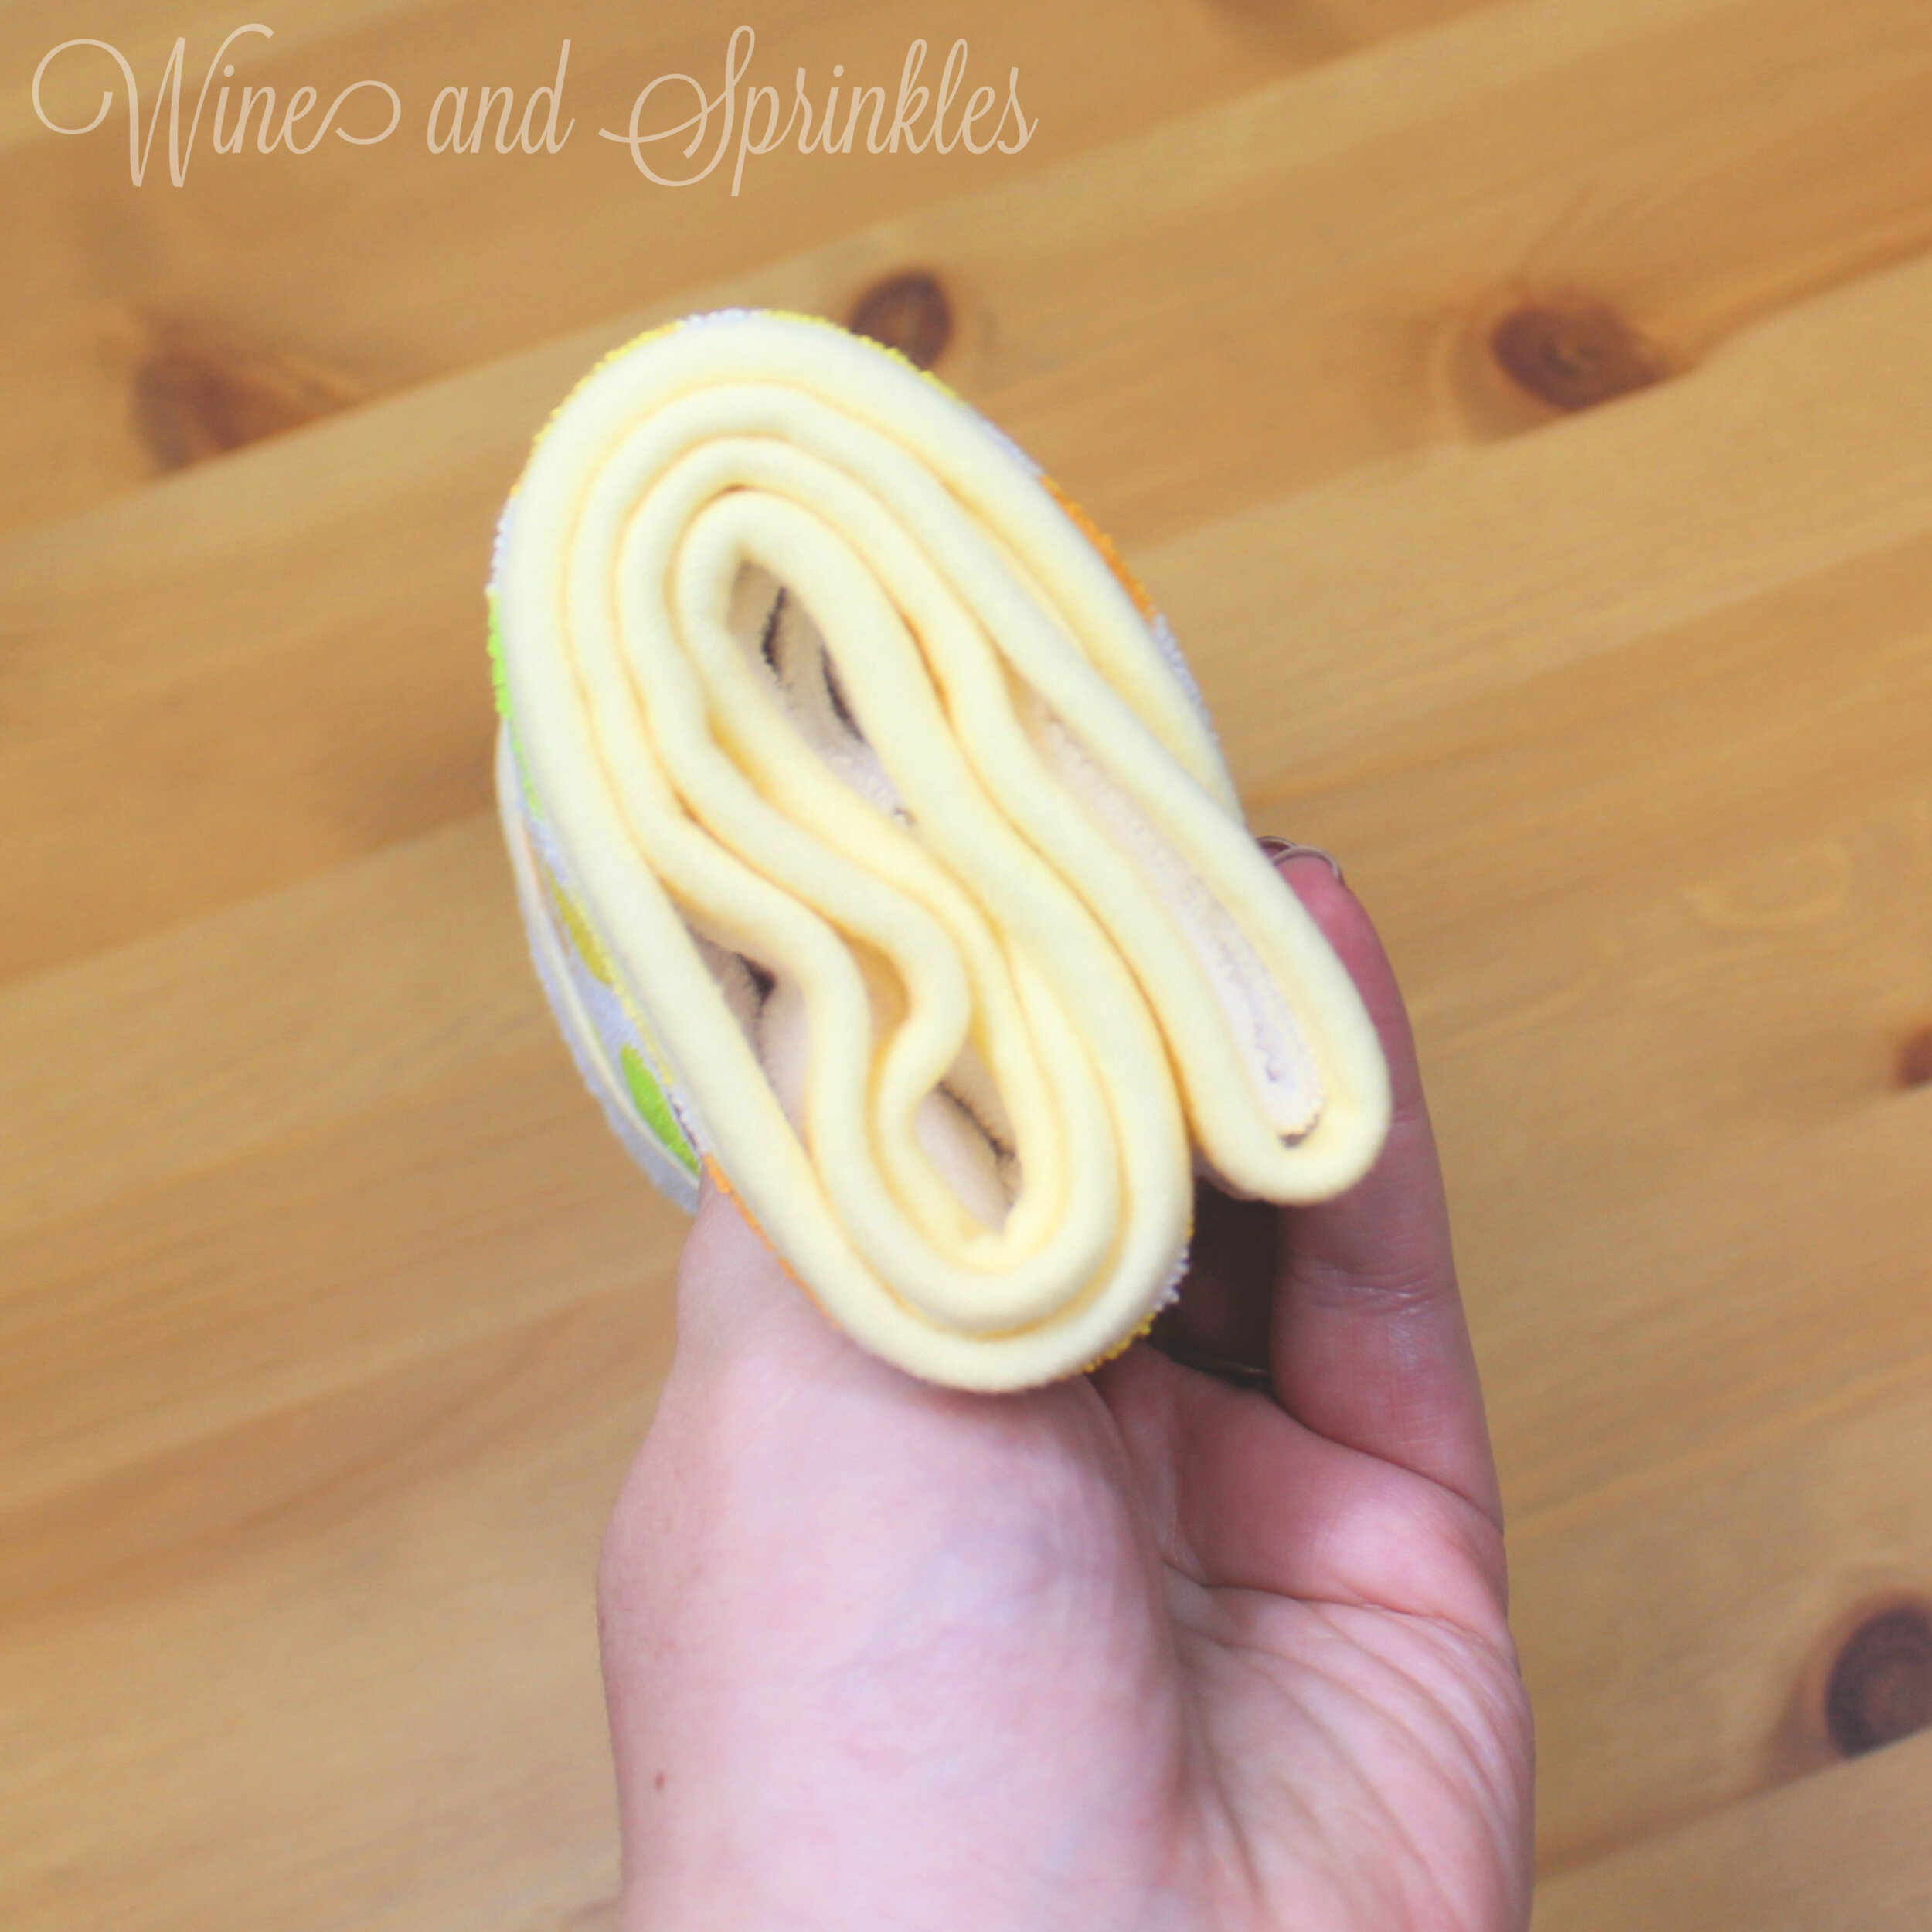
3. Flip the towel over again, with the folded edge towards you. You will see a bit of the hood peeking out from the lower left corner and all the open edges of the towel will be on the opposite side. Once again, fold your towel in thirds as shown in the photos, starting with the folded edge, essentially rolling it into a rectangular tube,with the patterned hood completely showing on one side and the hood with a white triangle showing on the other side. Repeat the process with the other two towels.

4. Now the towels can be placed in the gift box! Starting on the left side of the box and holding each towel as you add another, place each towel in the box; with the open seam of the hood towards the bottom, as shown below. Holding the towels in the box to the left, secure their placement by inserting the rubber duck into the right side. This will keep the towels secure and folded while you fold the washcloths!

Bath Time Essentials Baby Gift Bento Box #babygift #babybento #babyshowergift

PART 2: FOLDING WASHCLOTHS

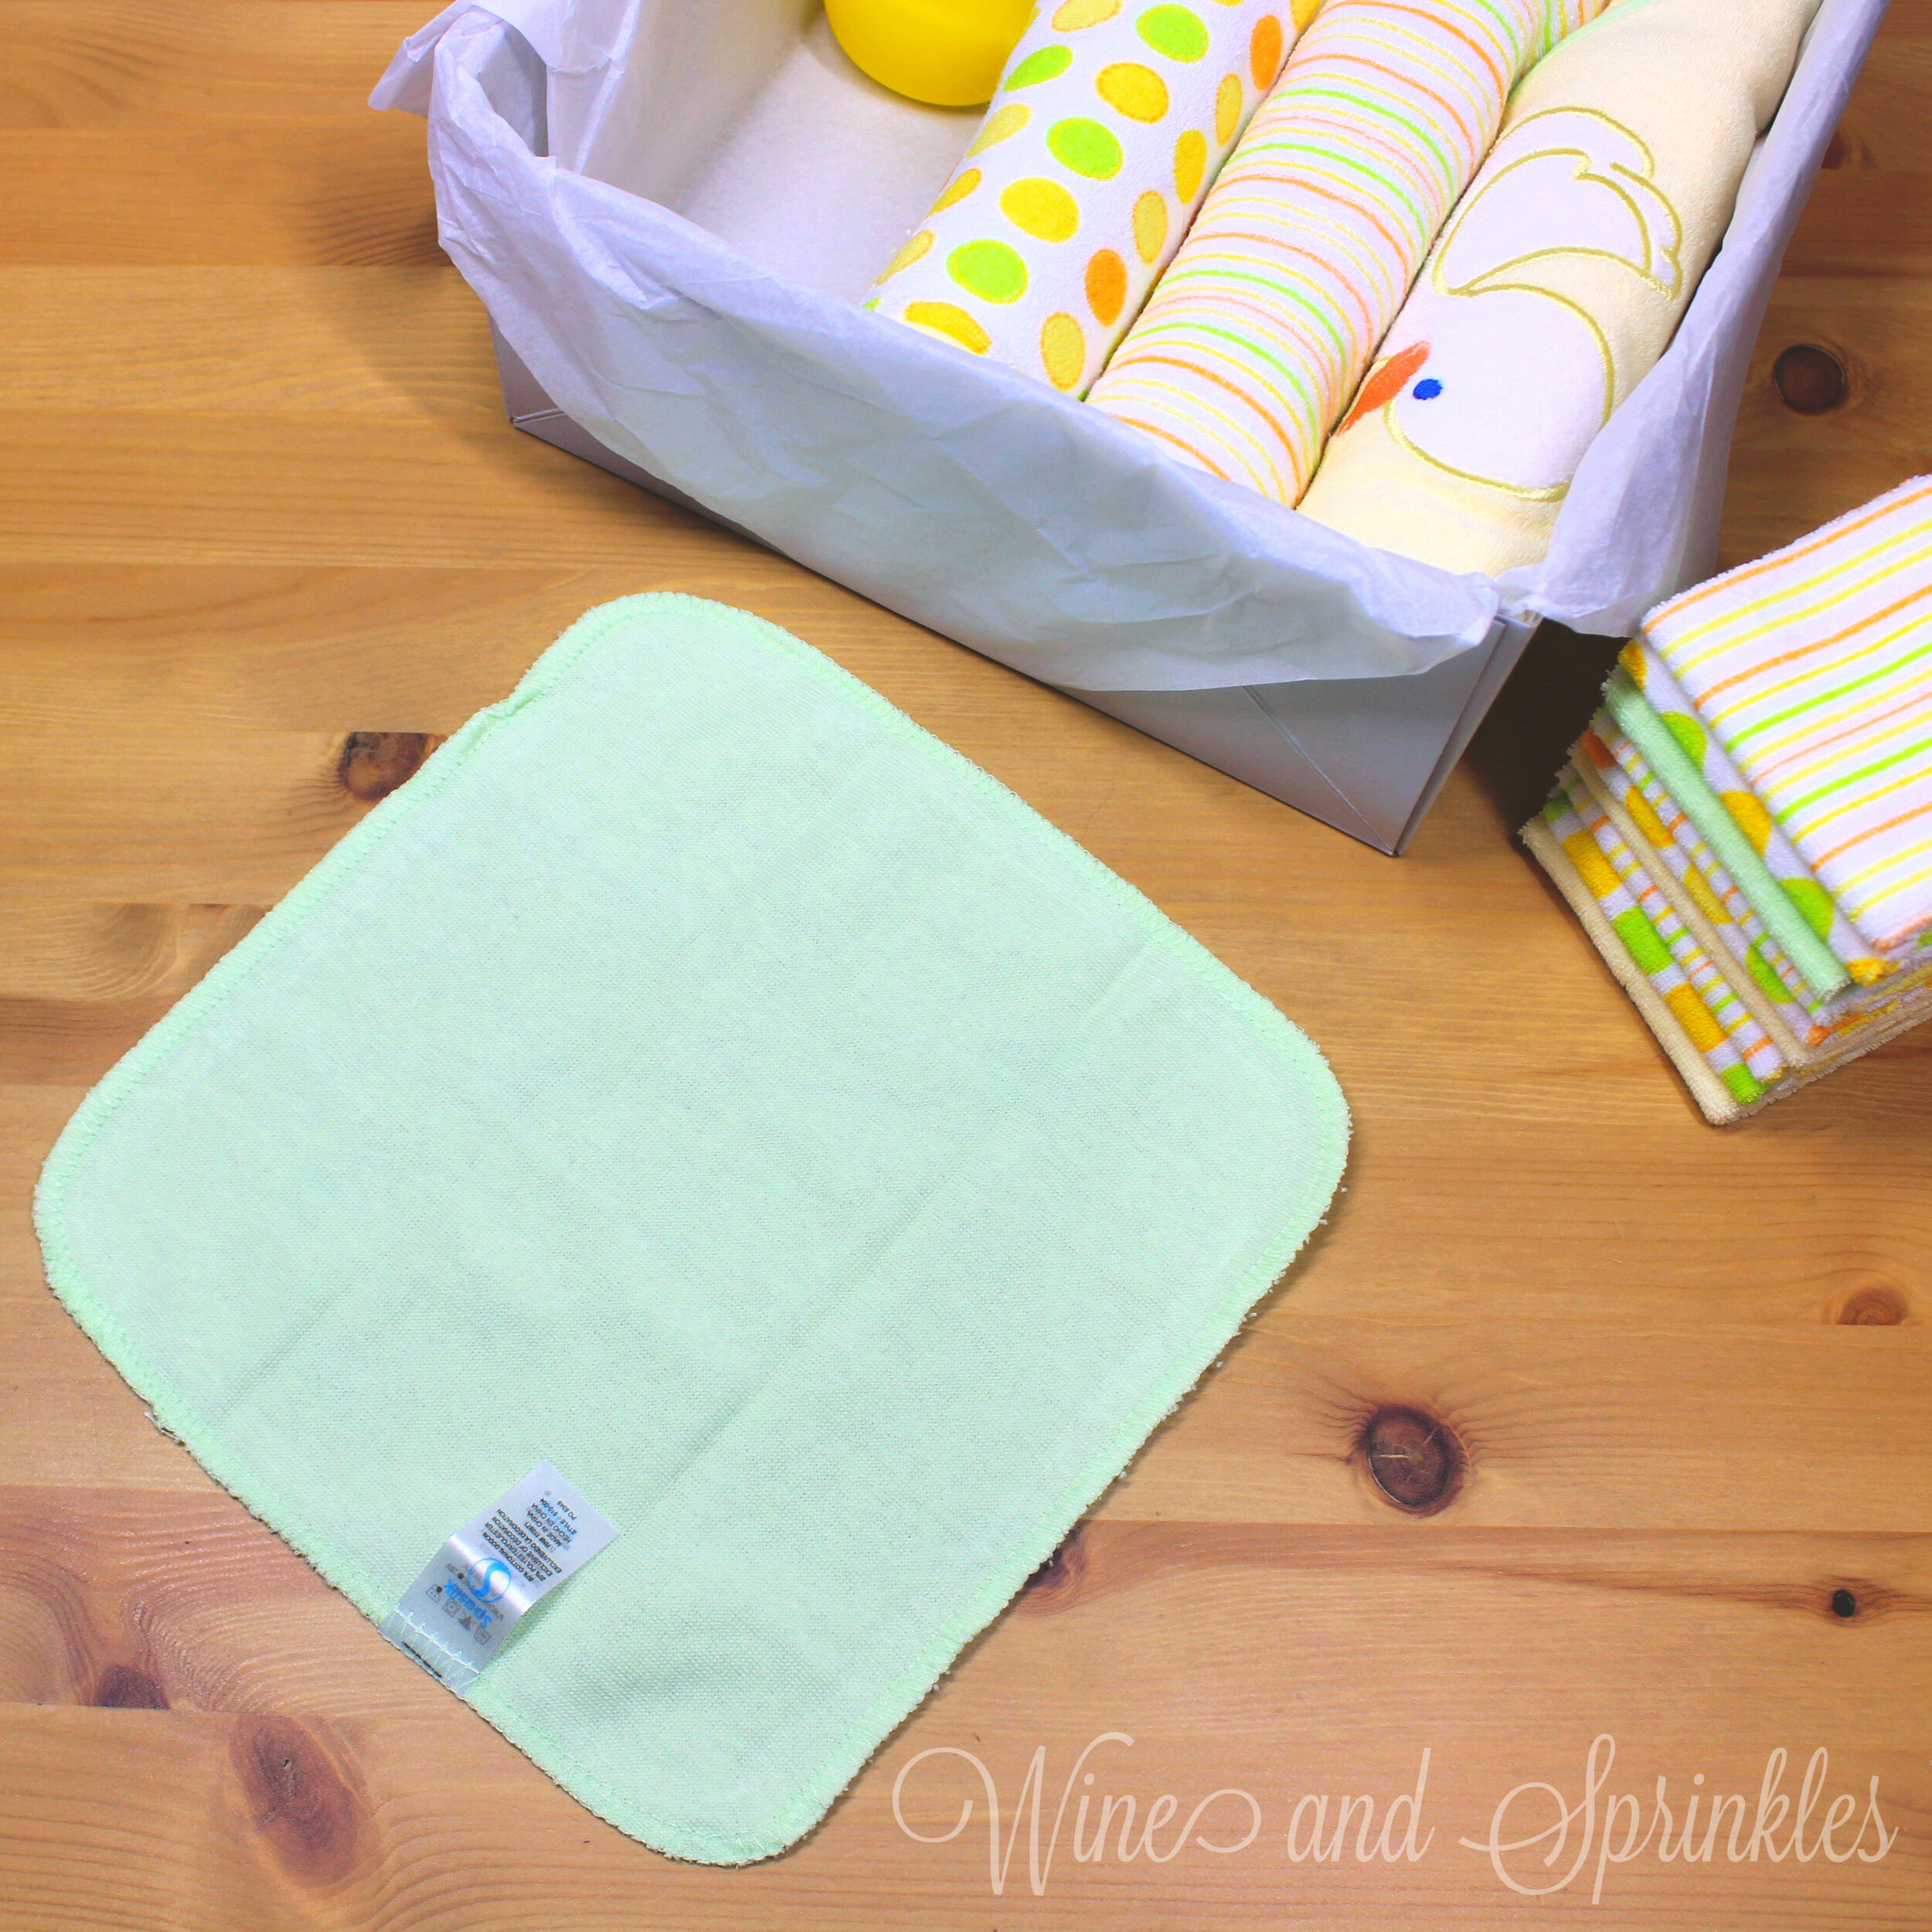
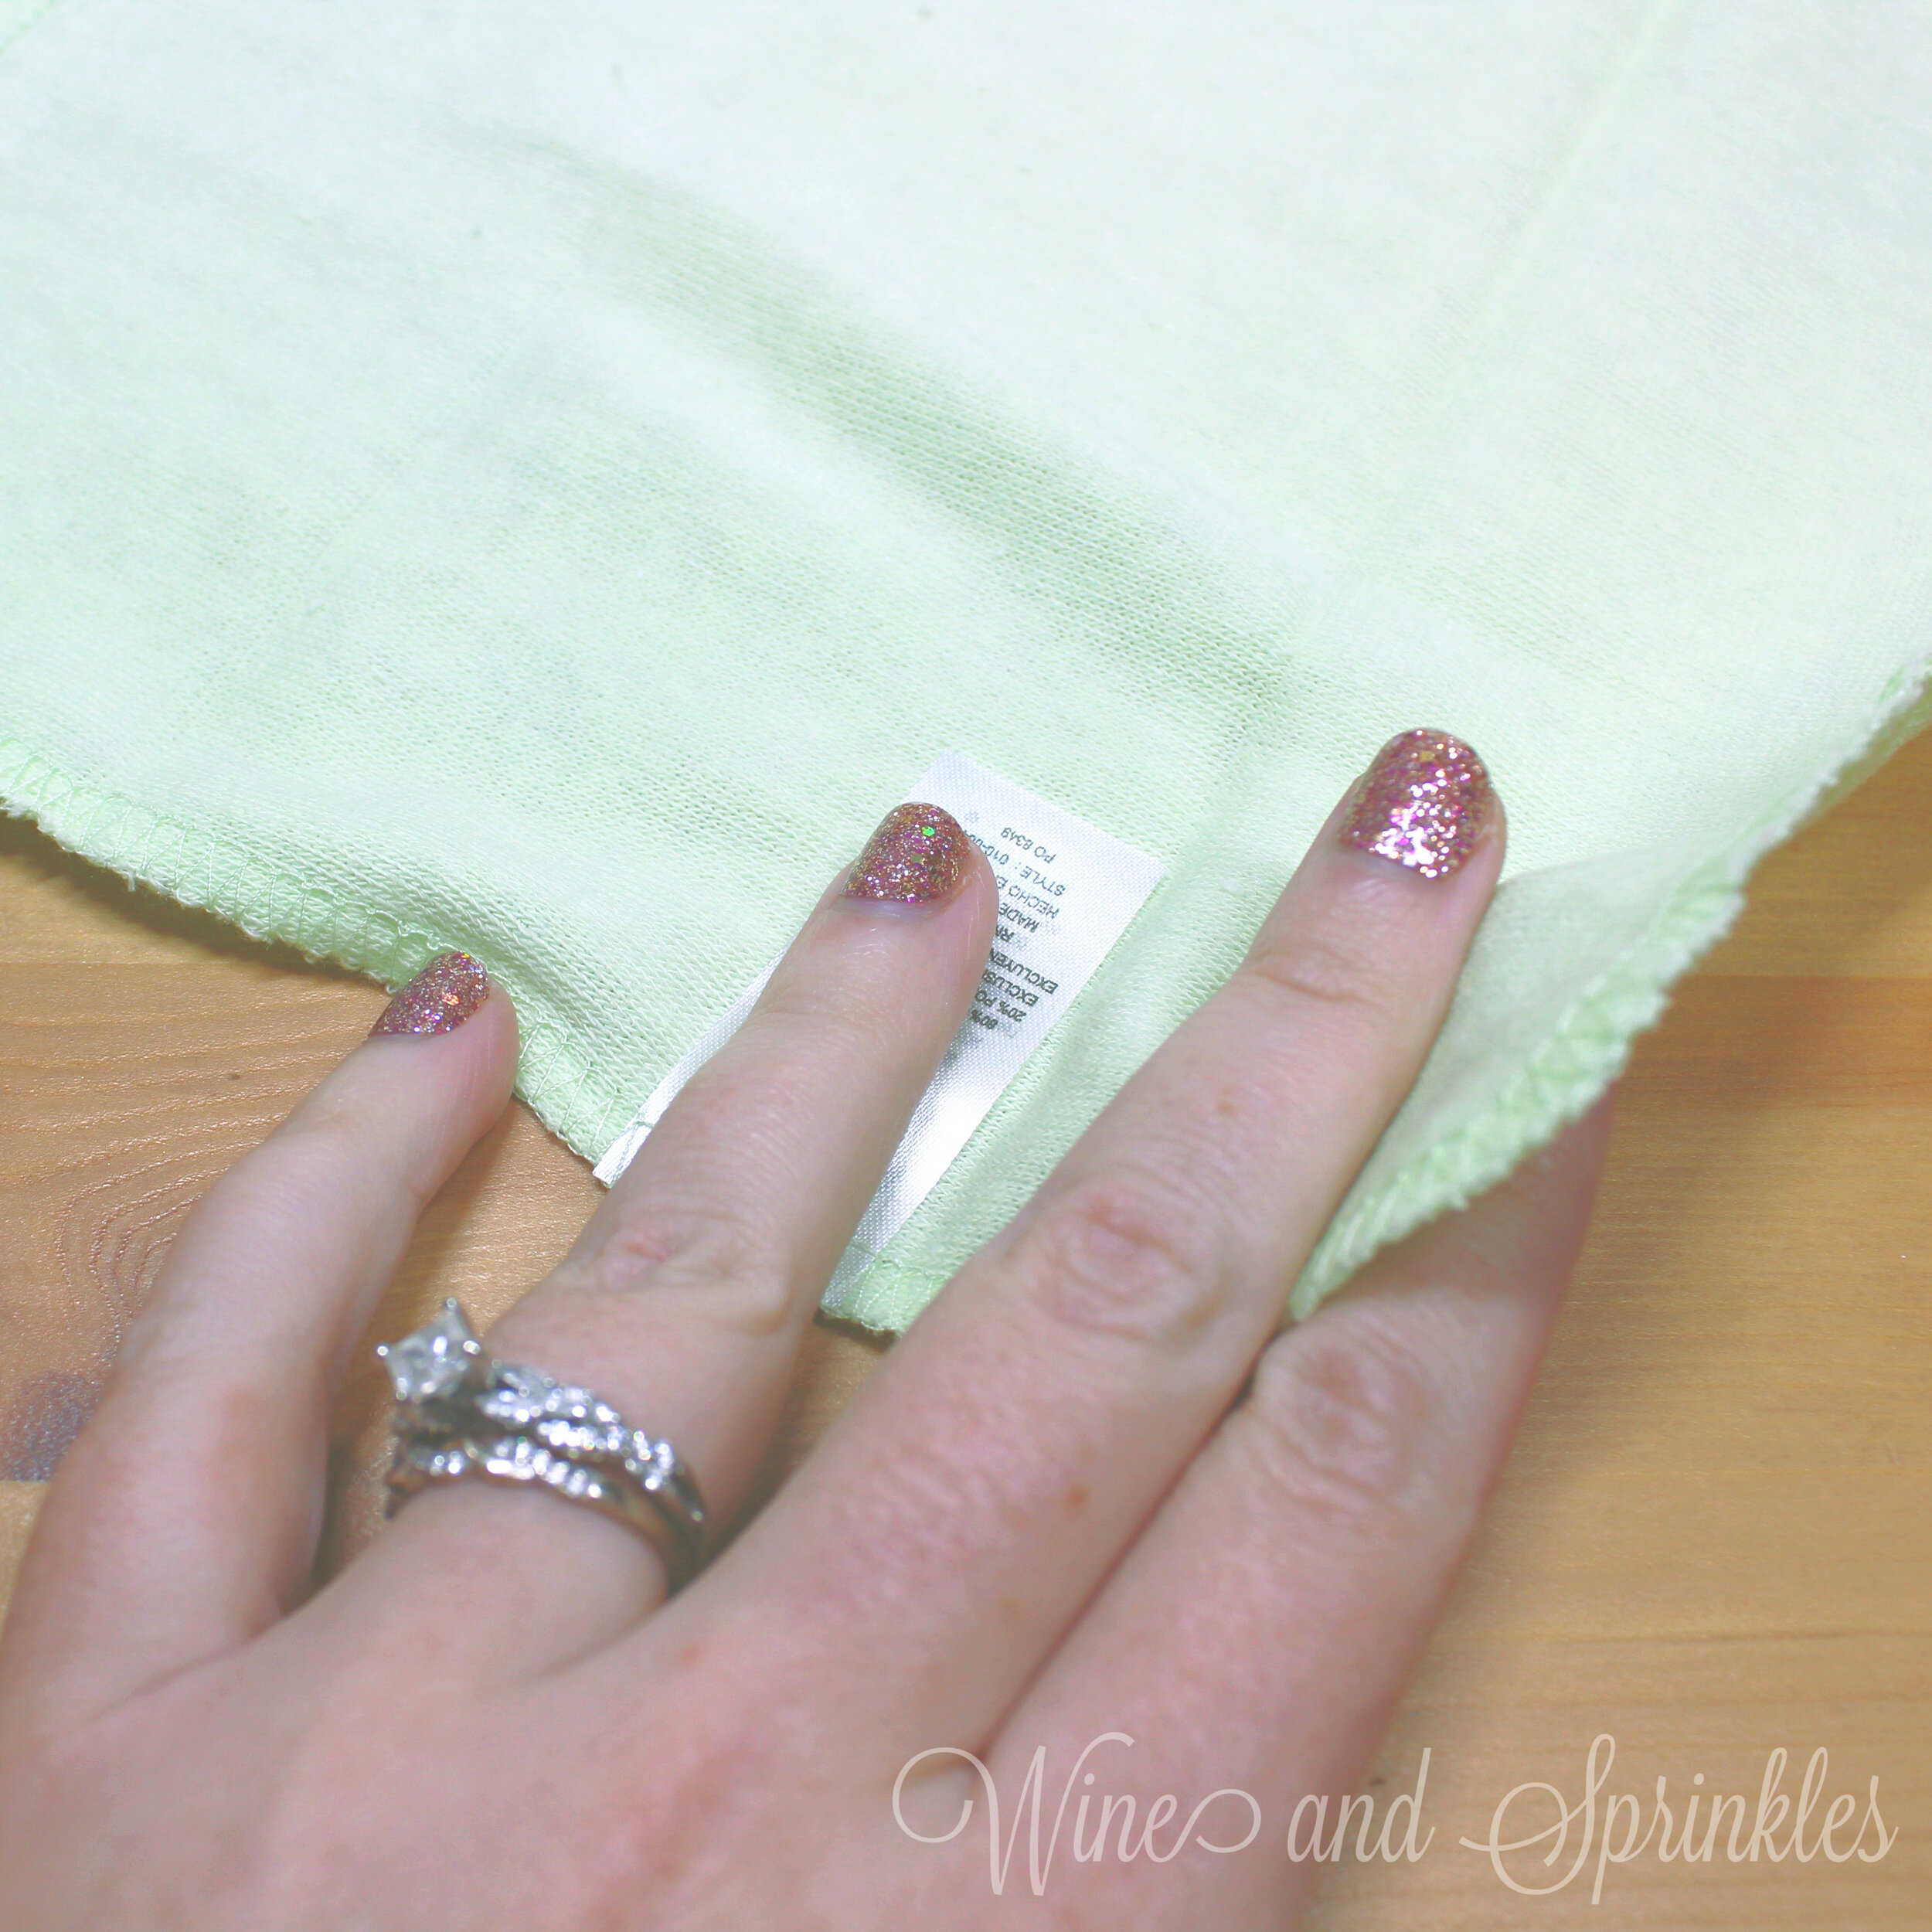
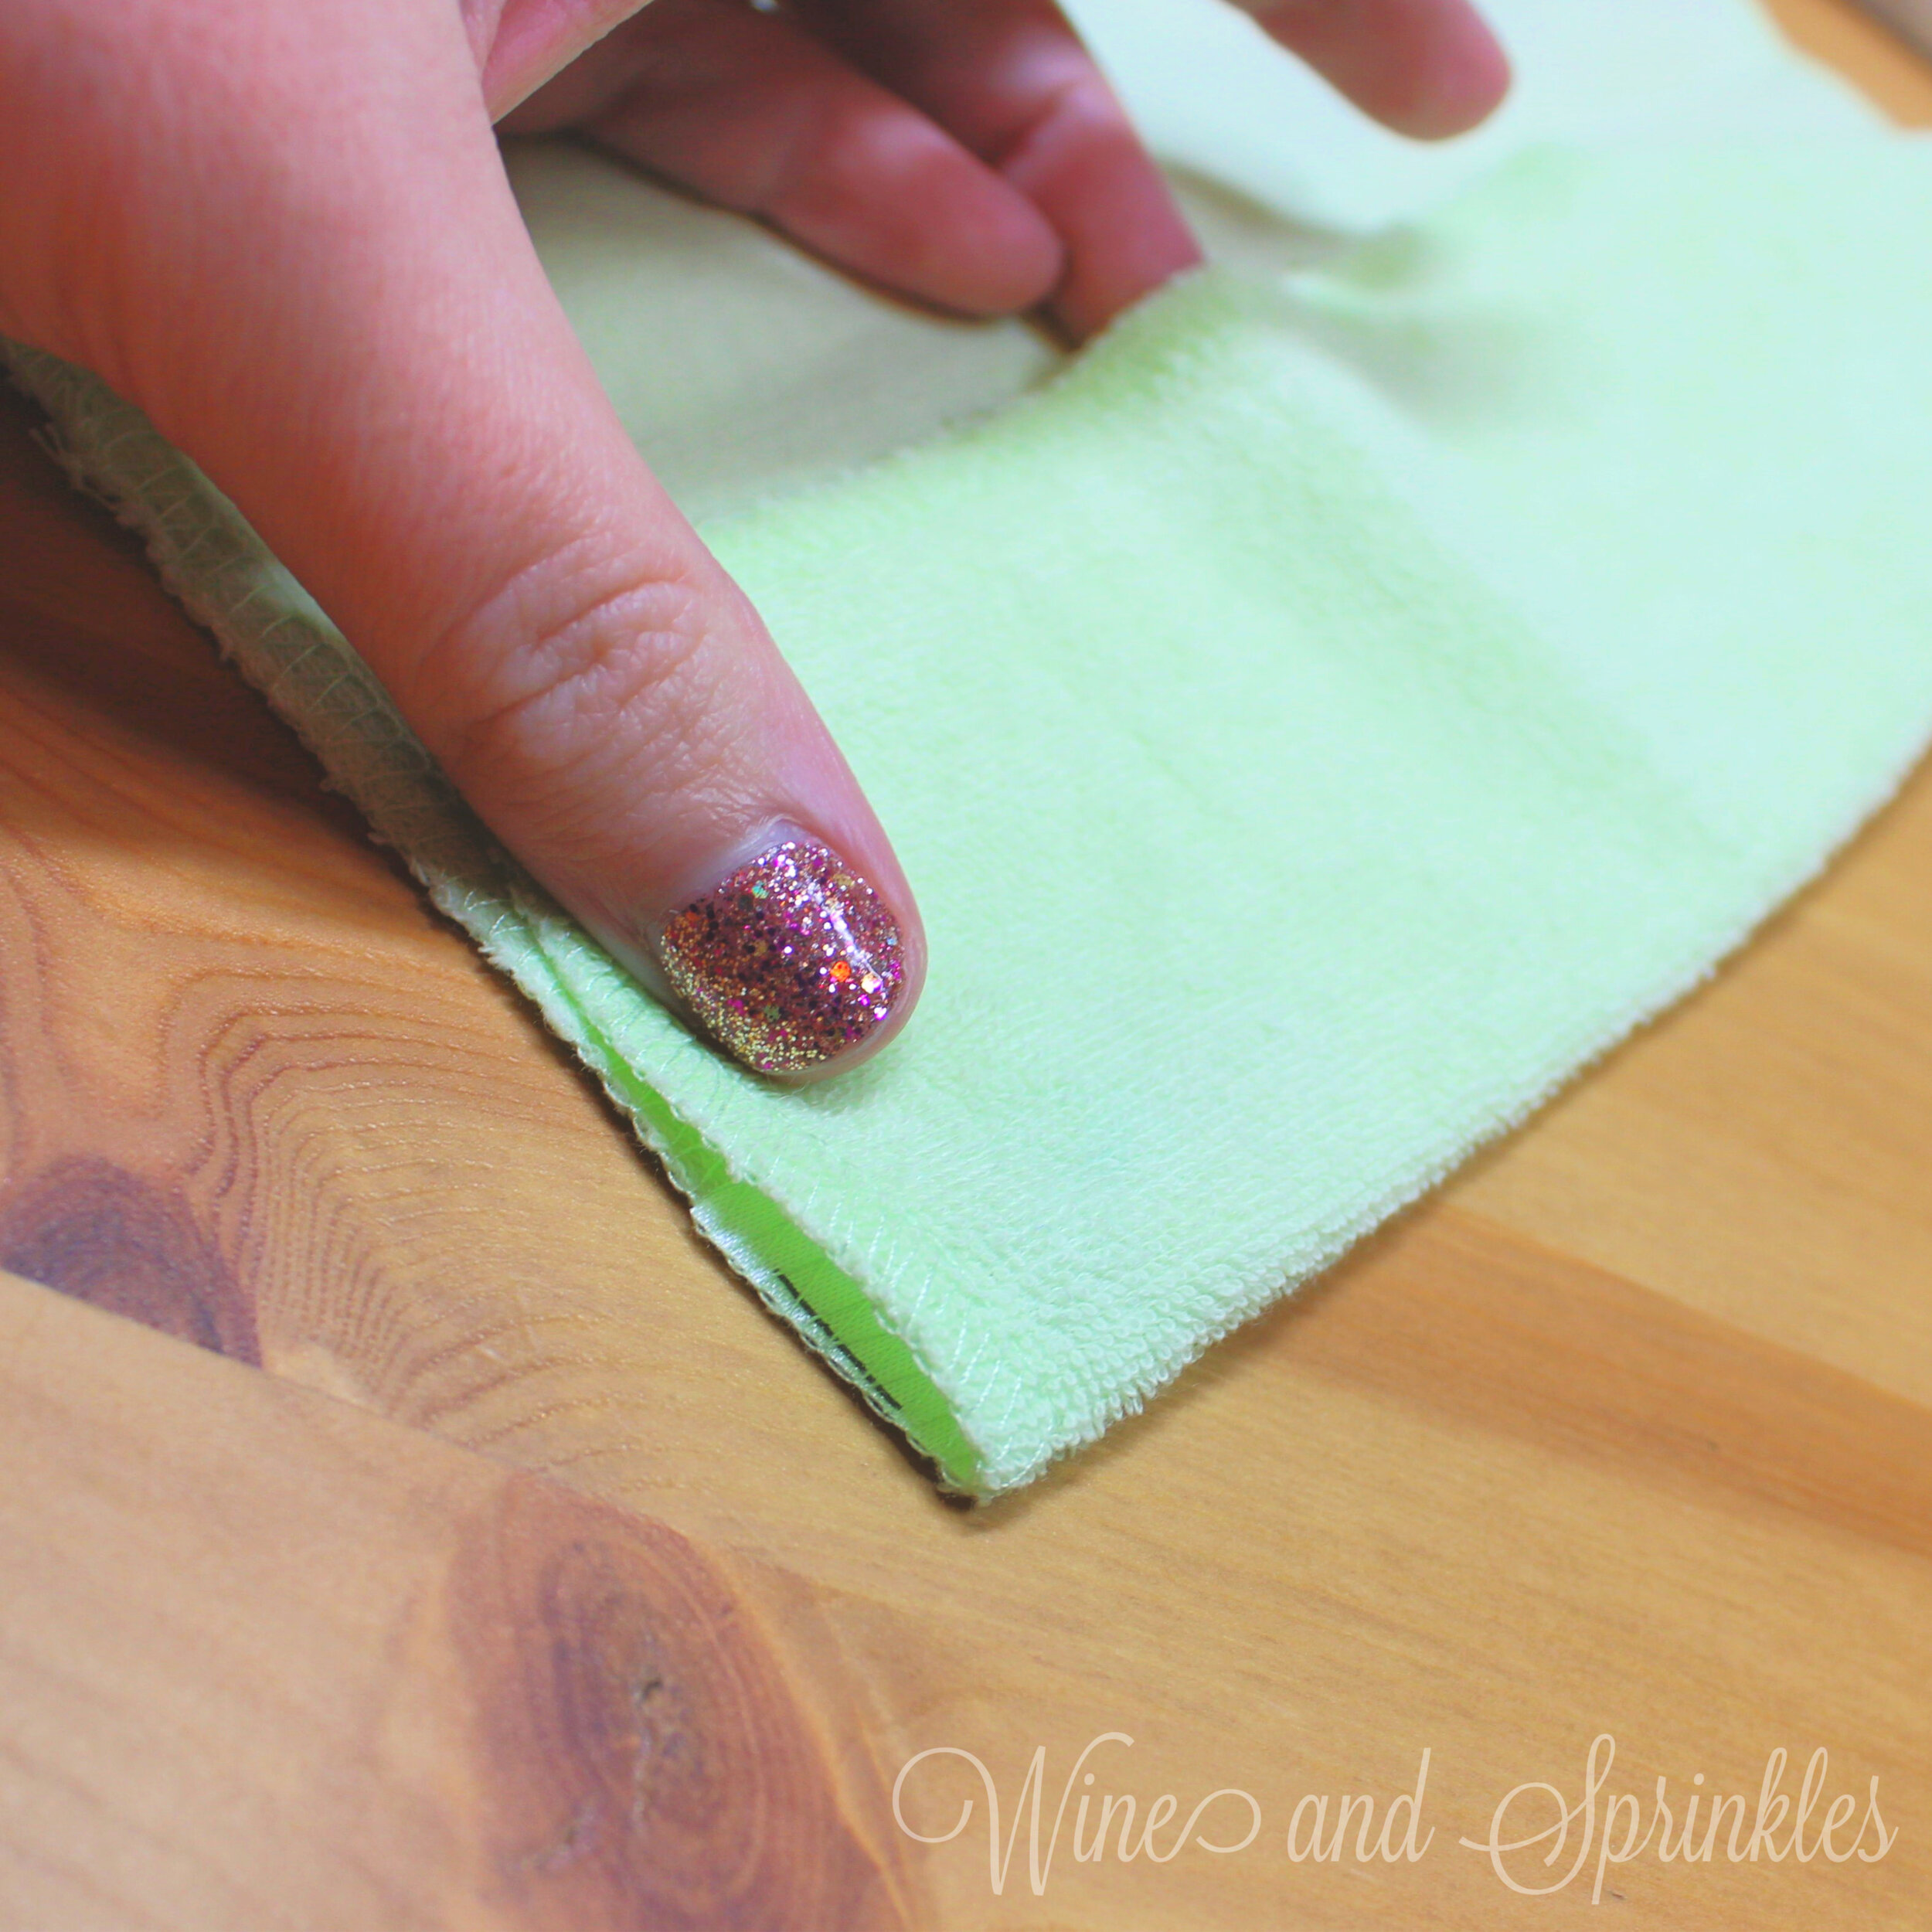
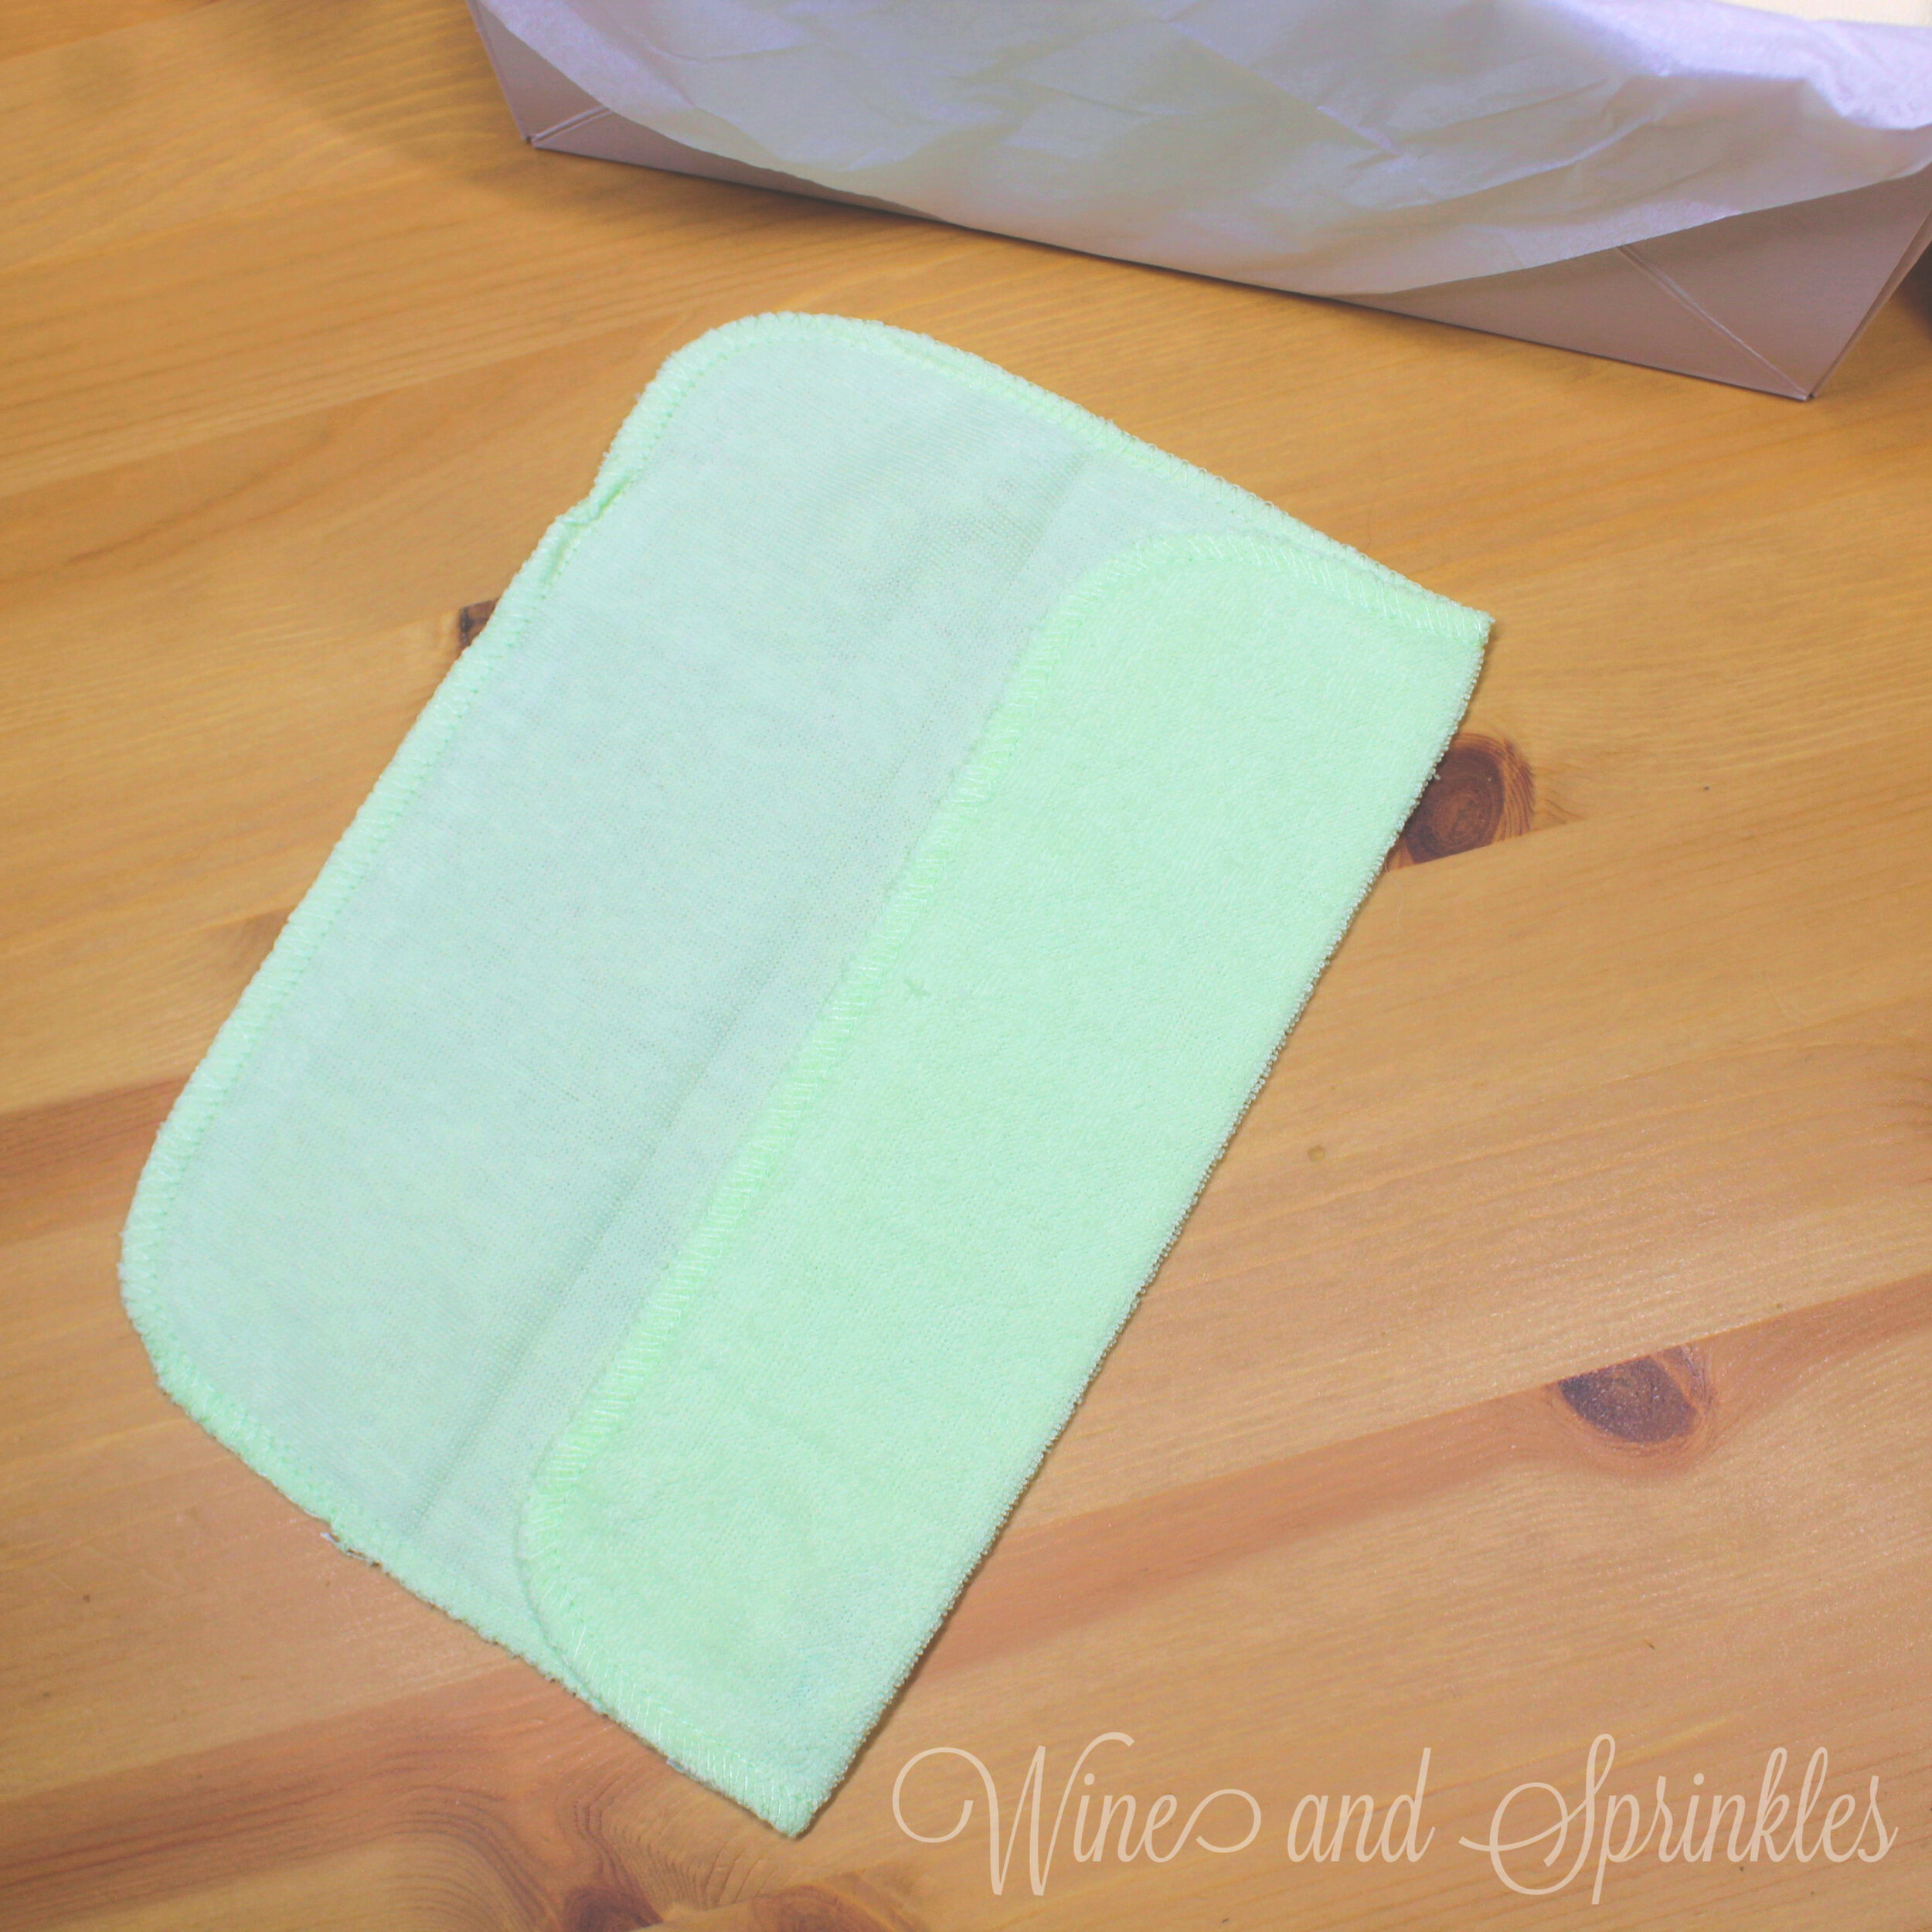
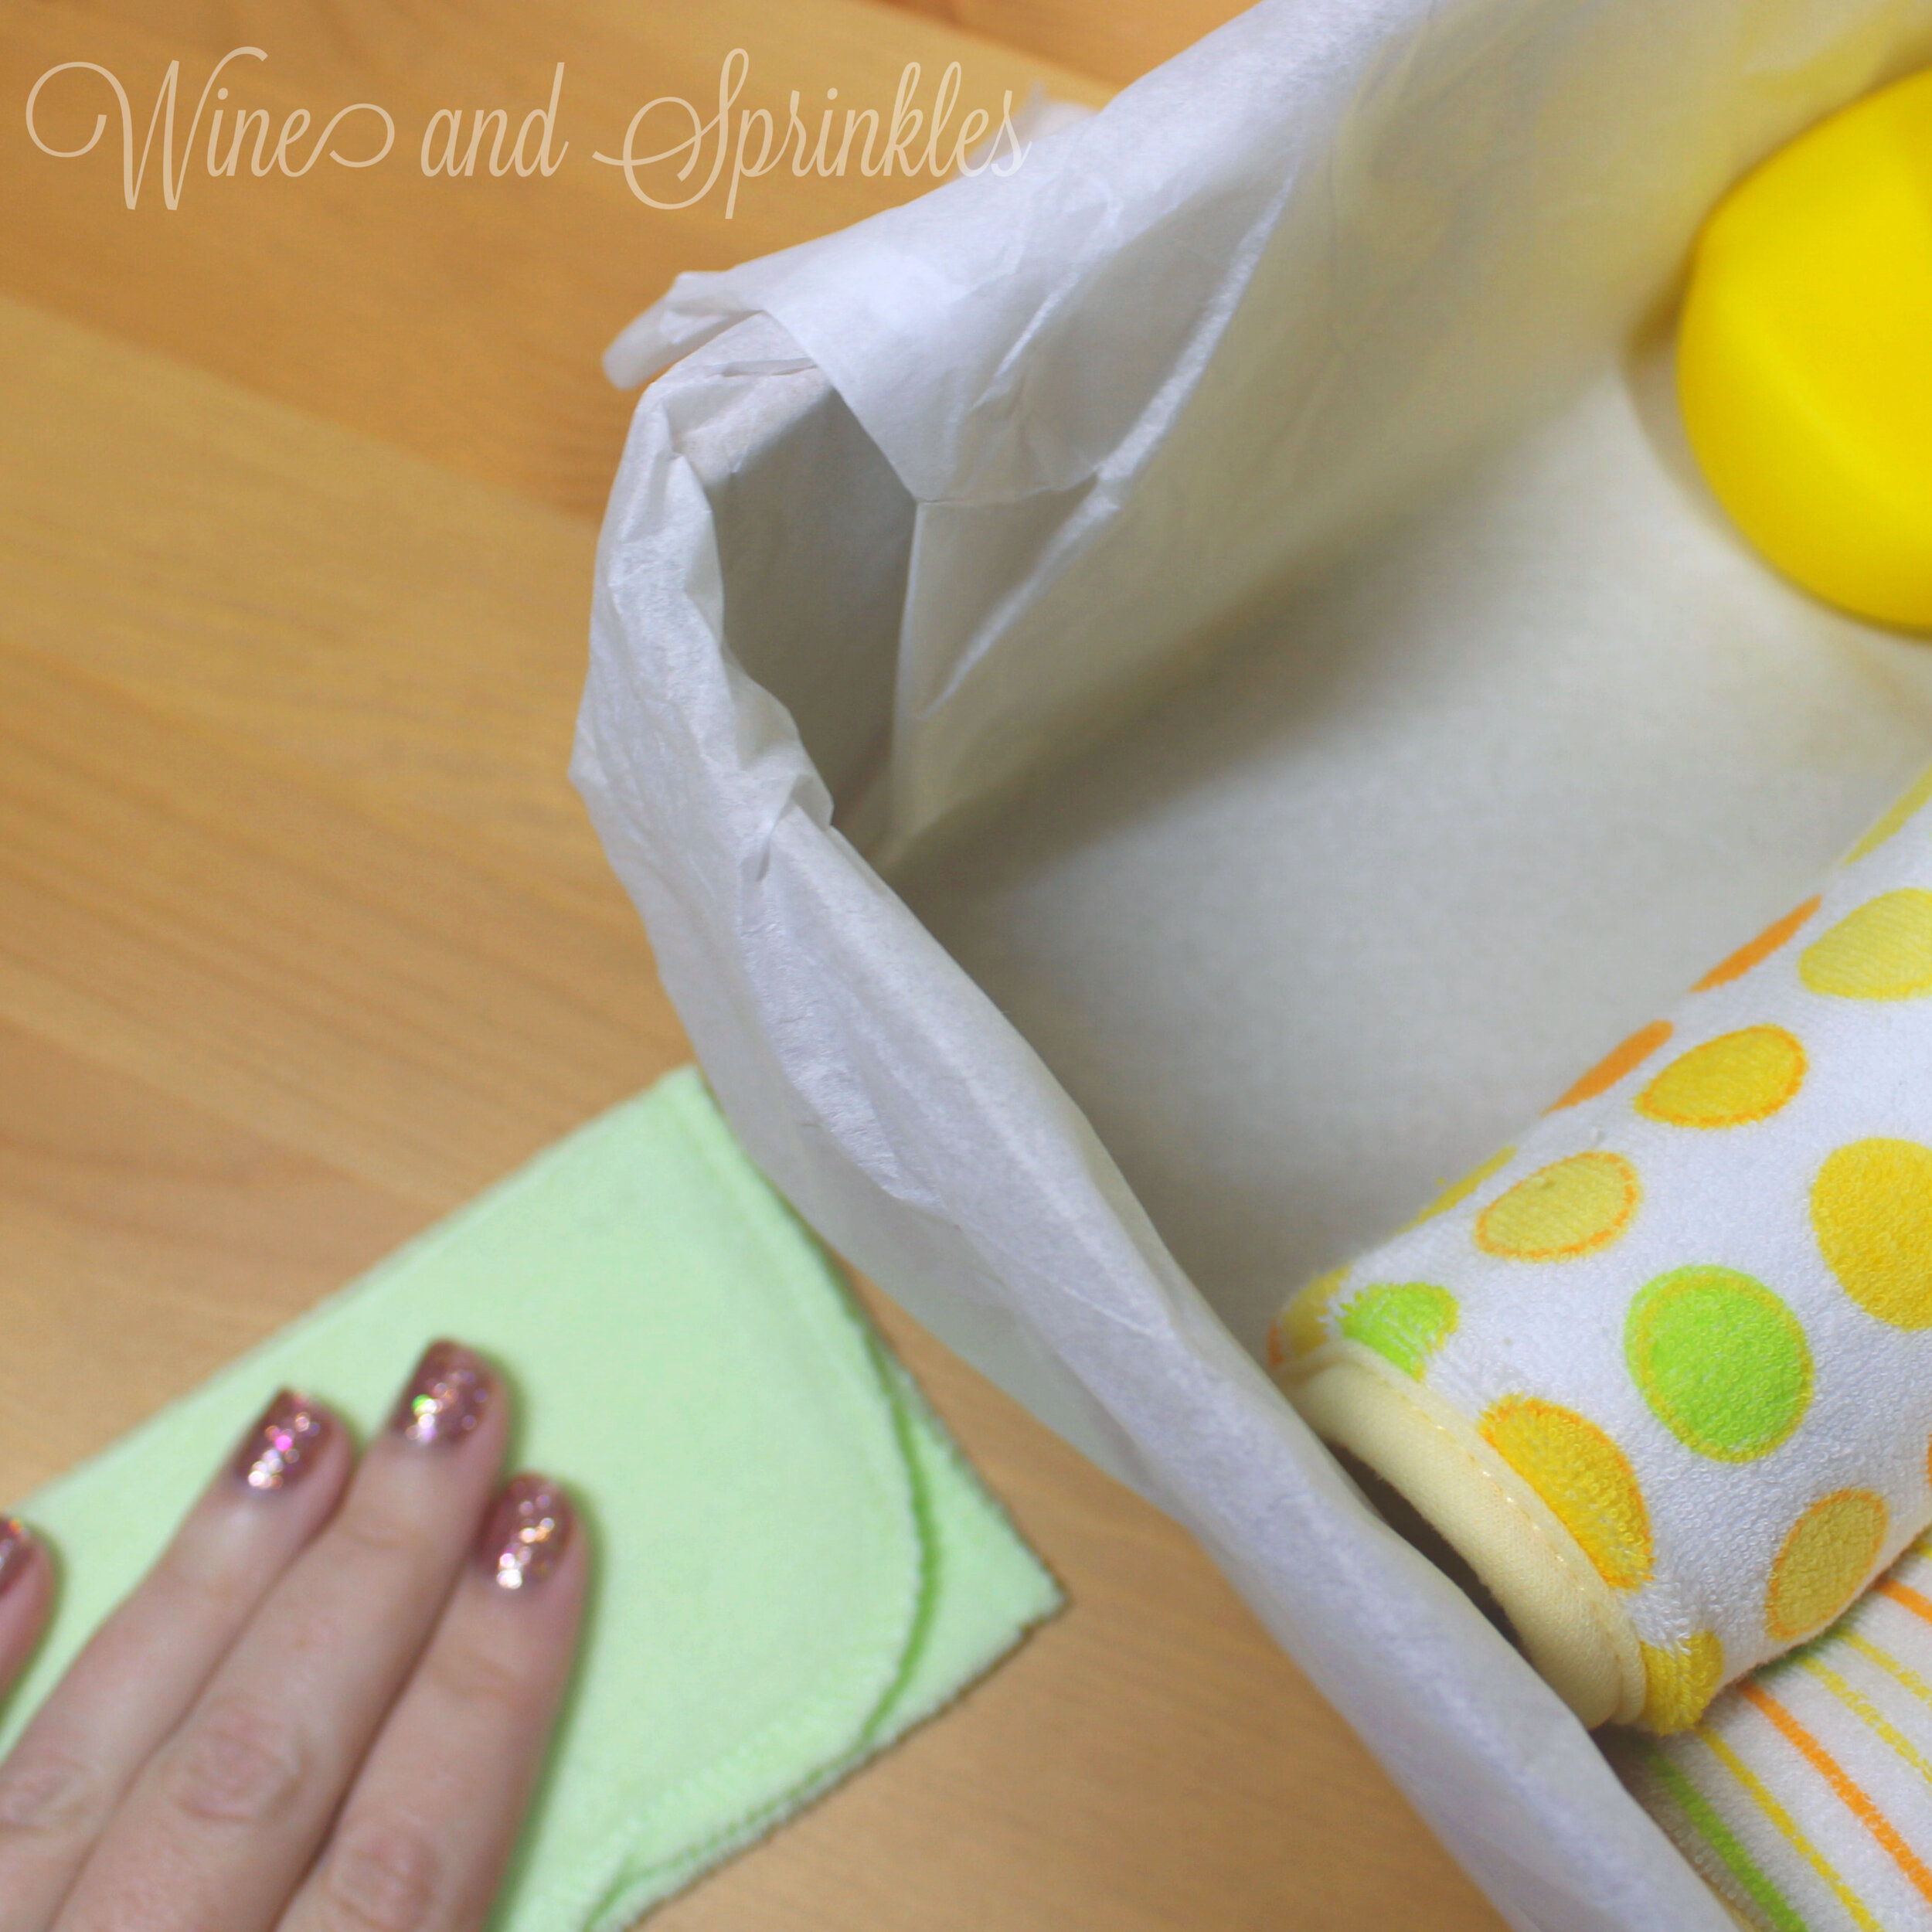
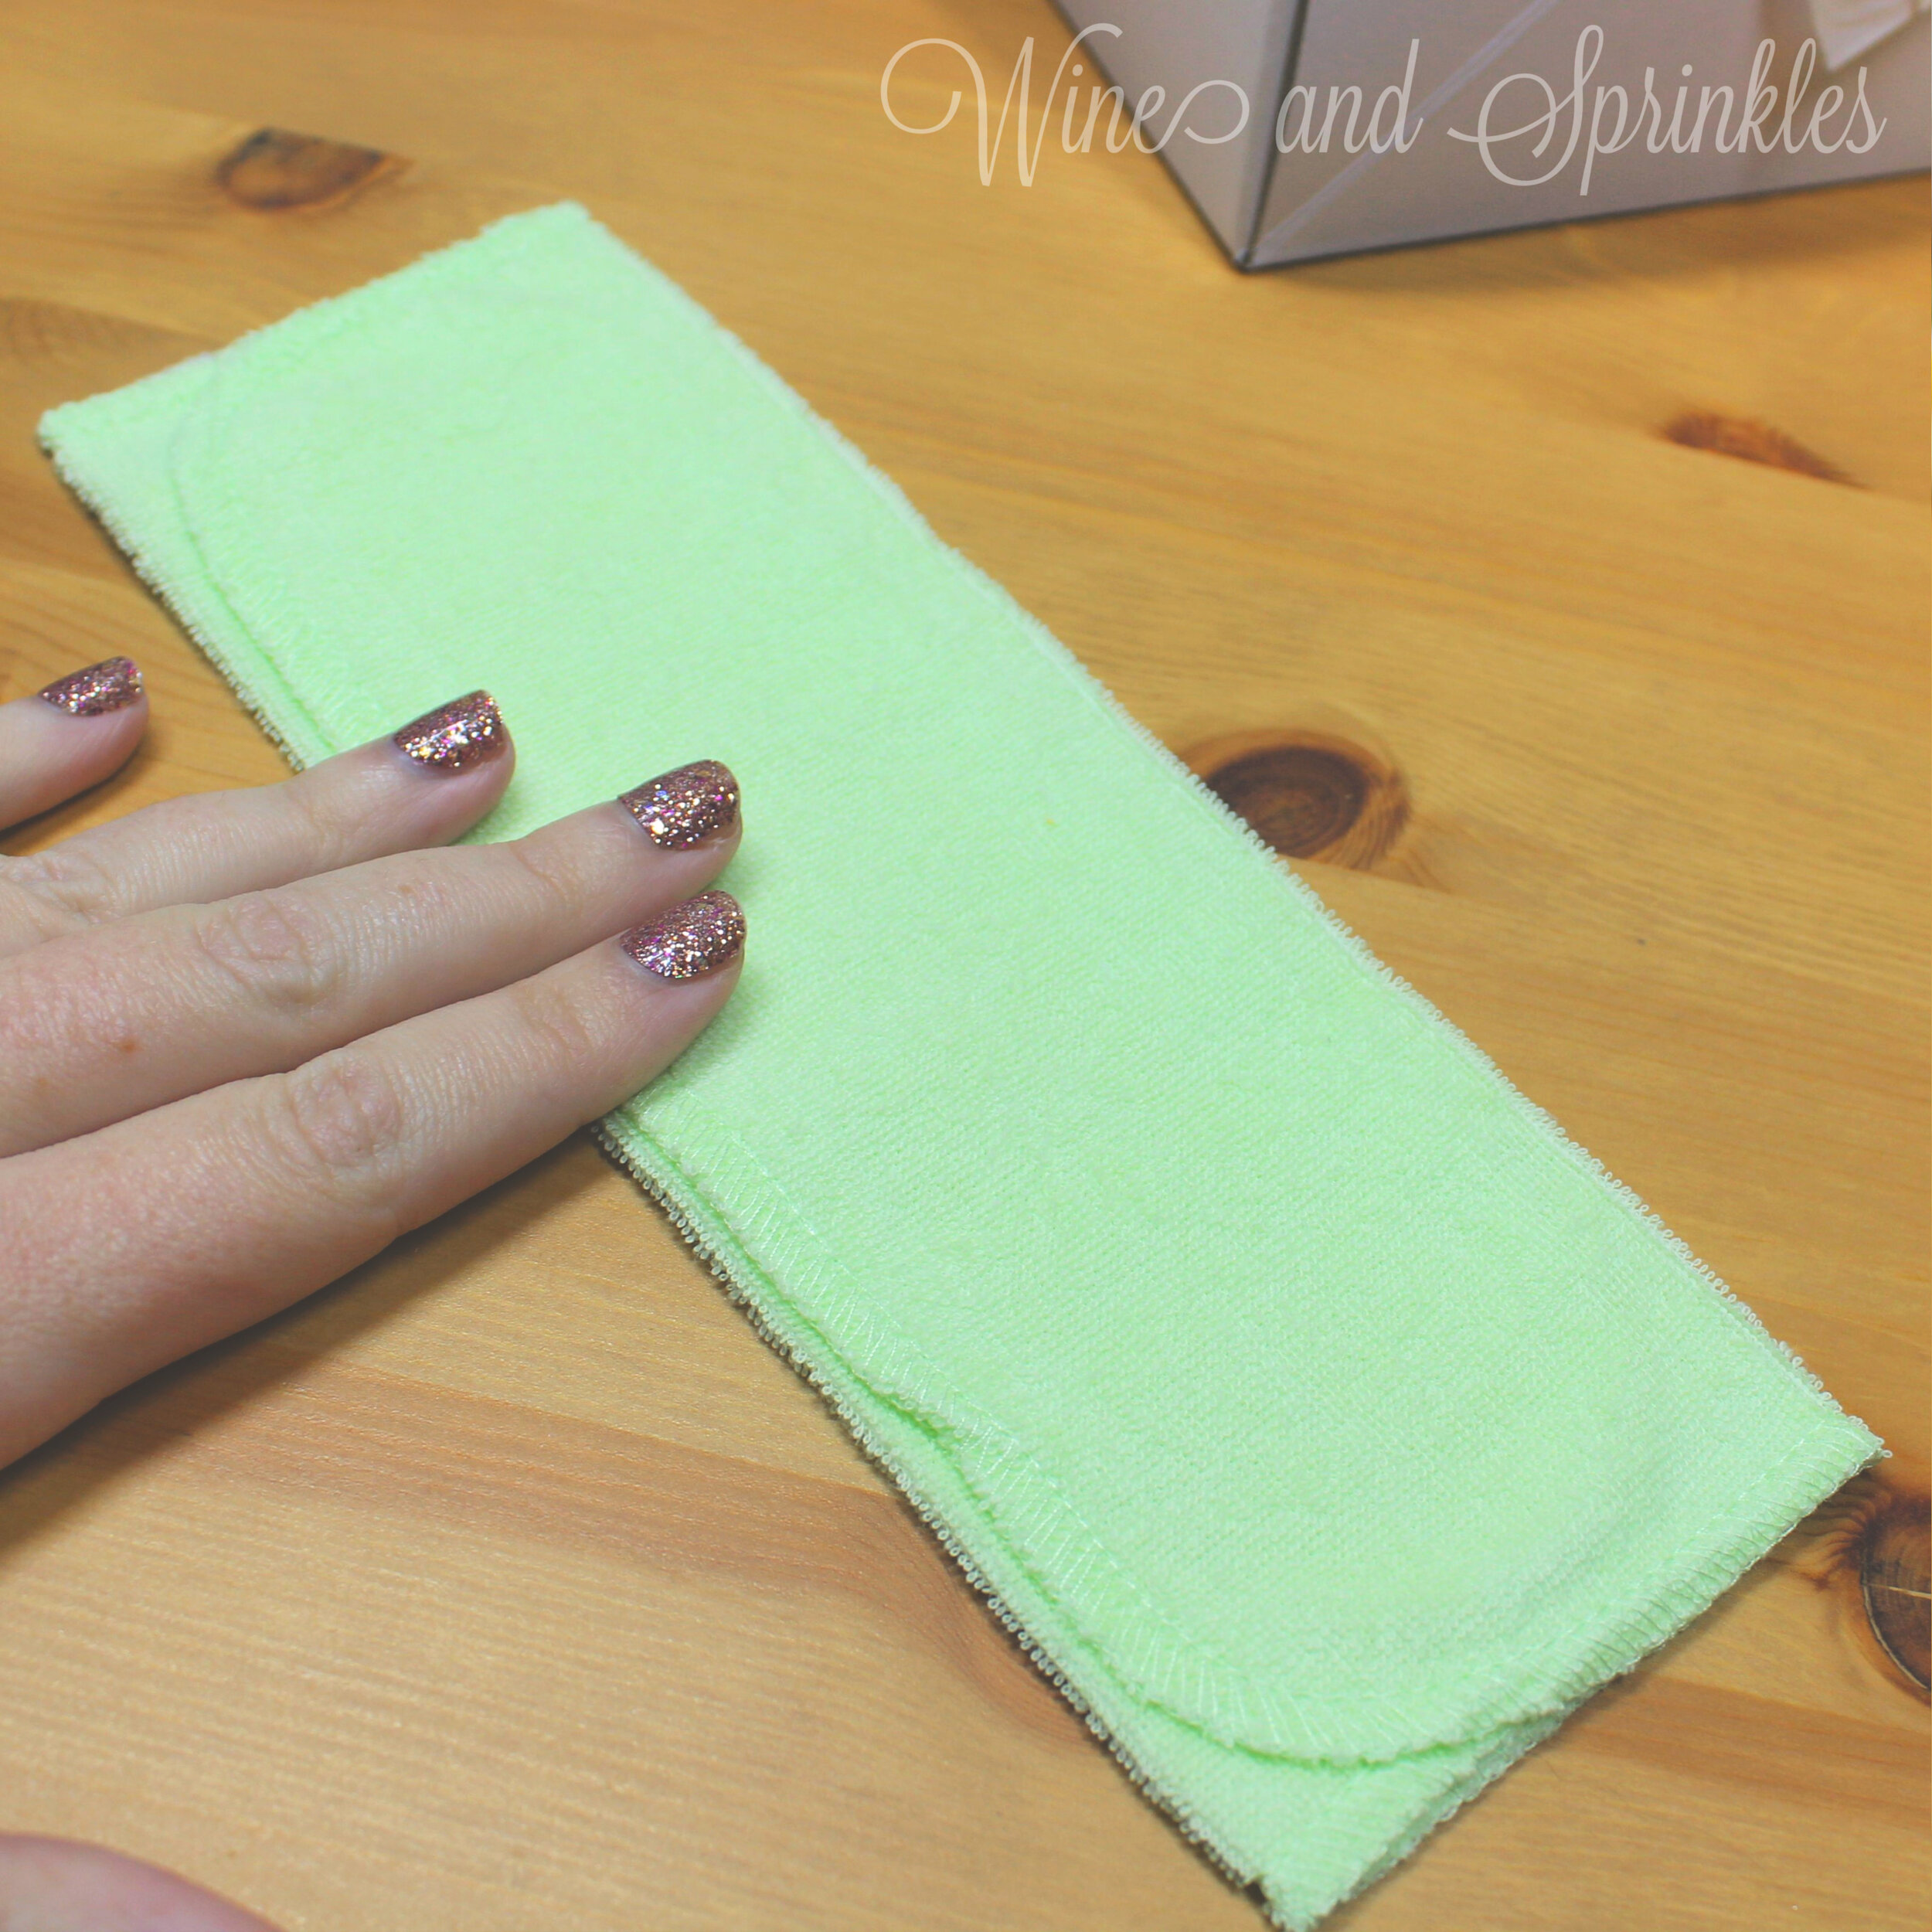
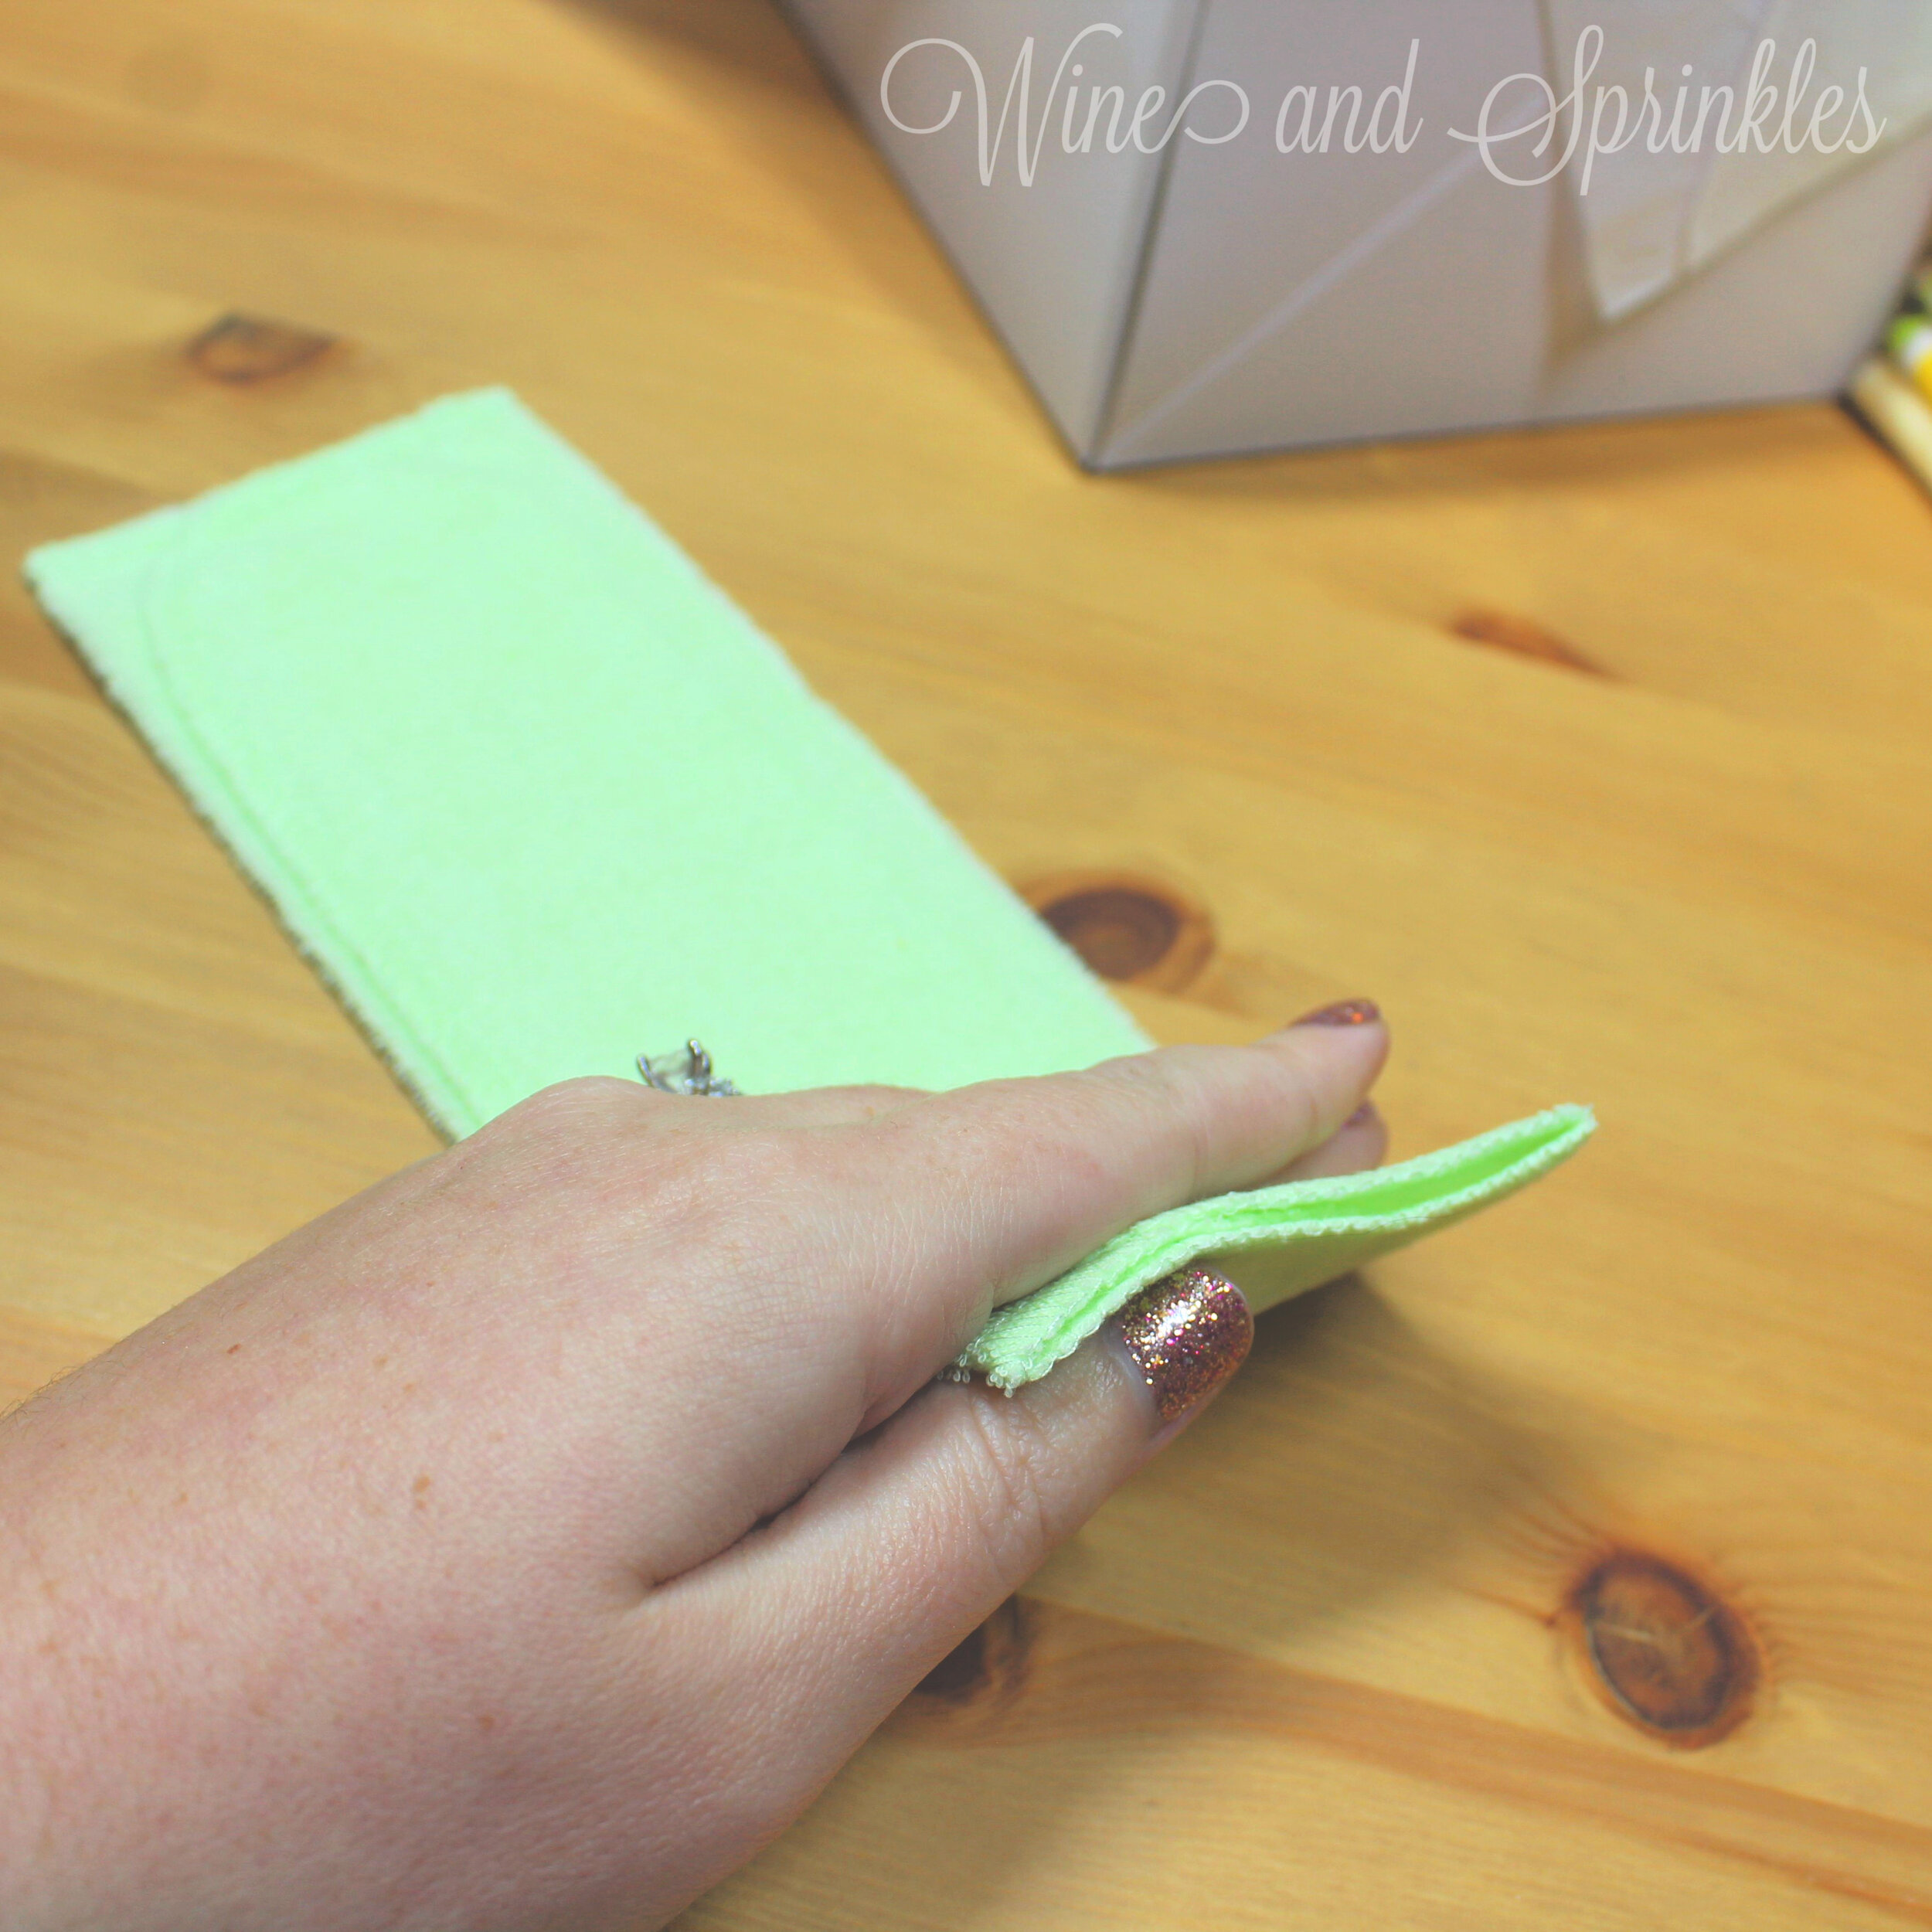
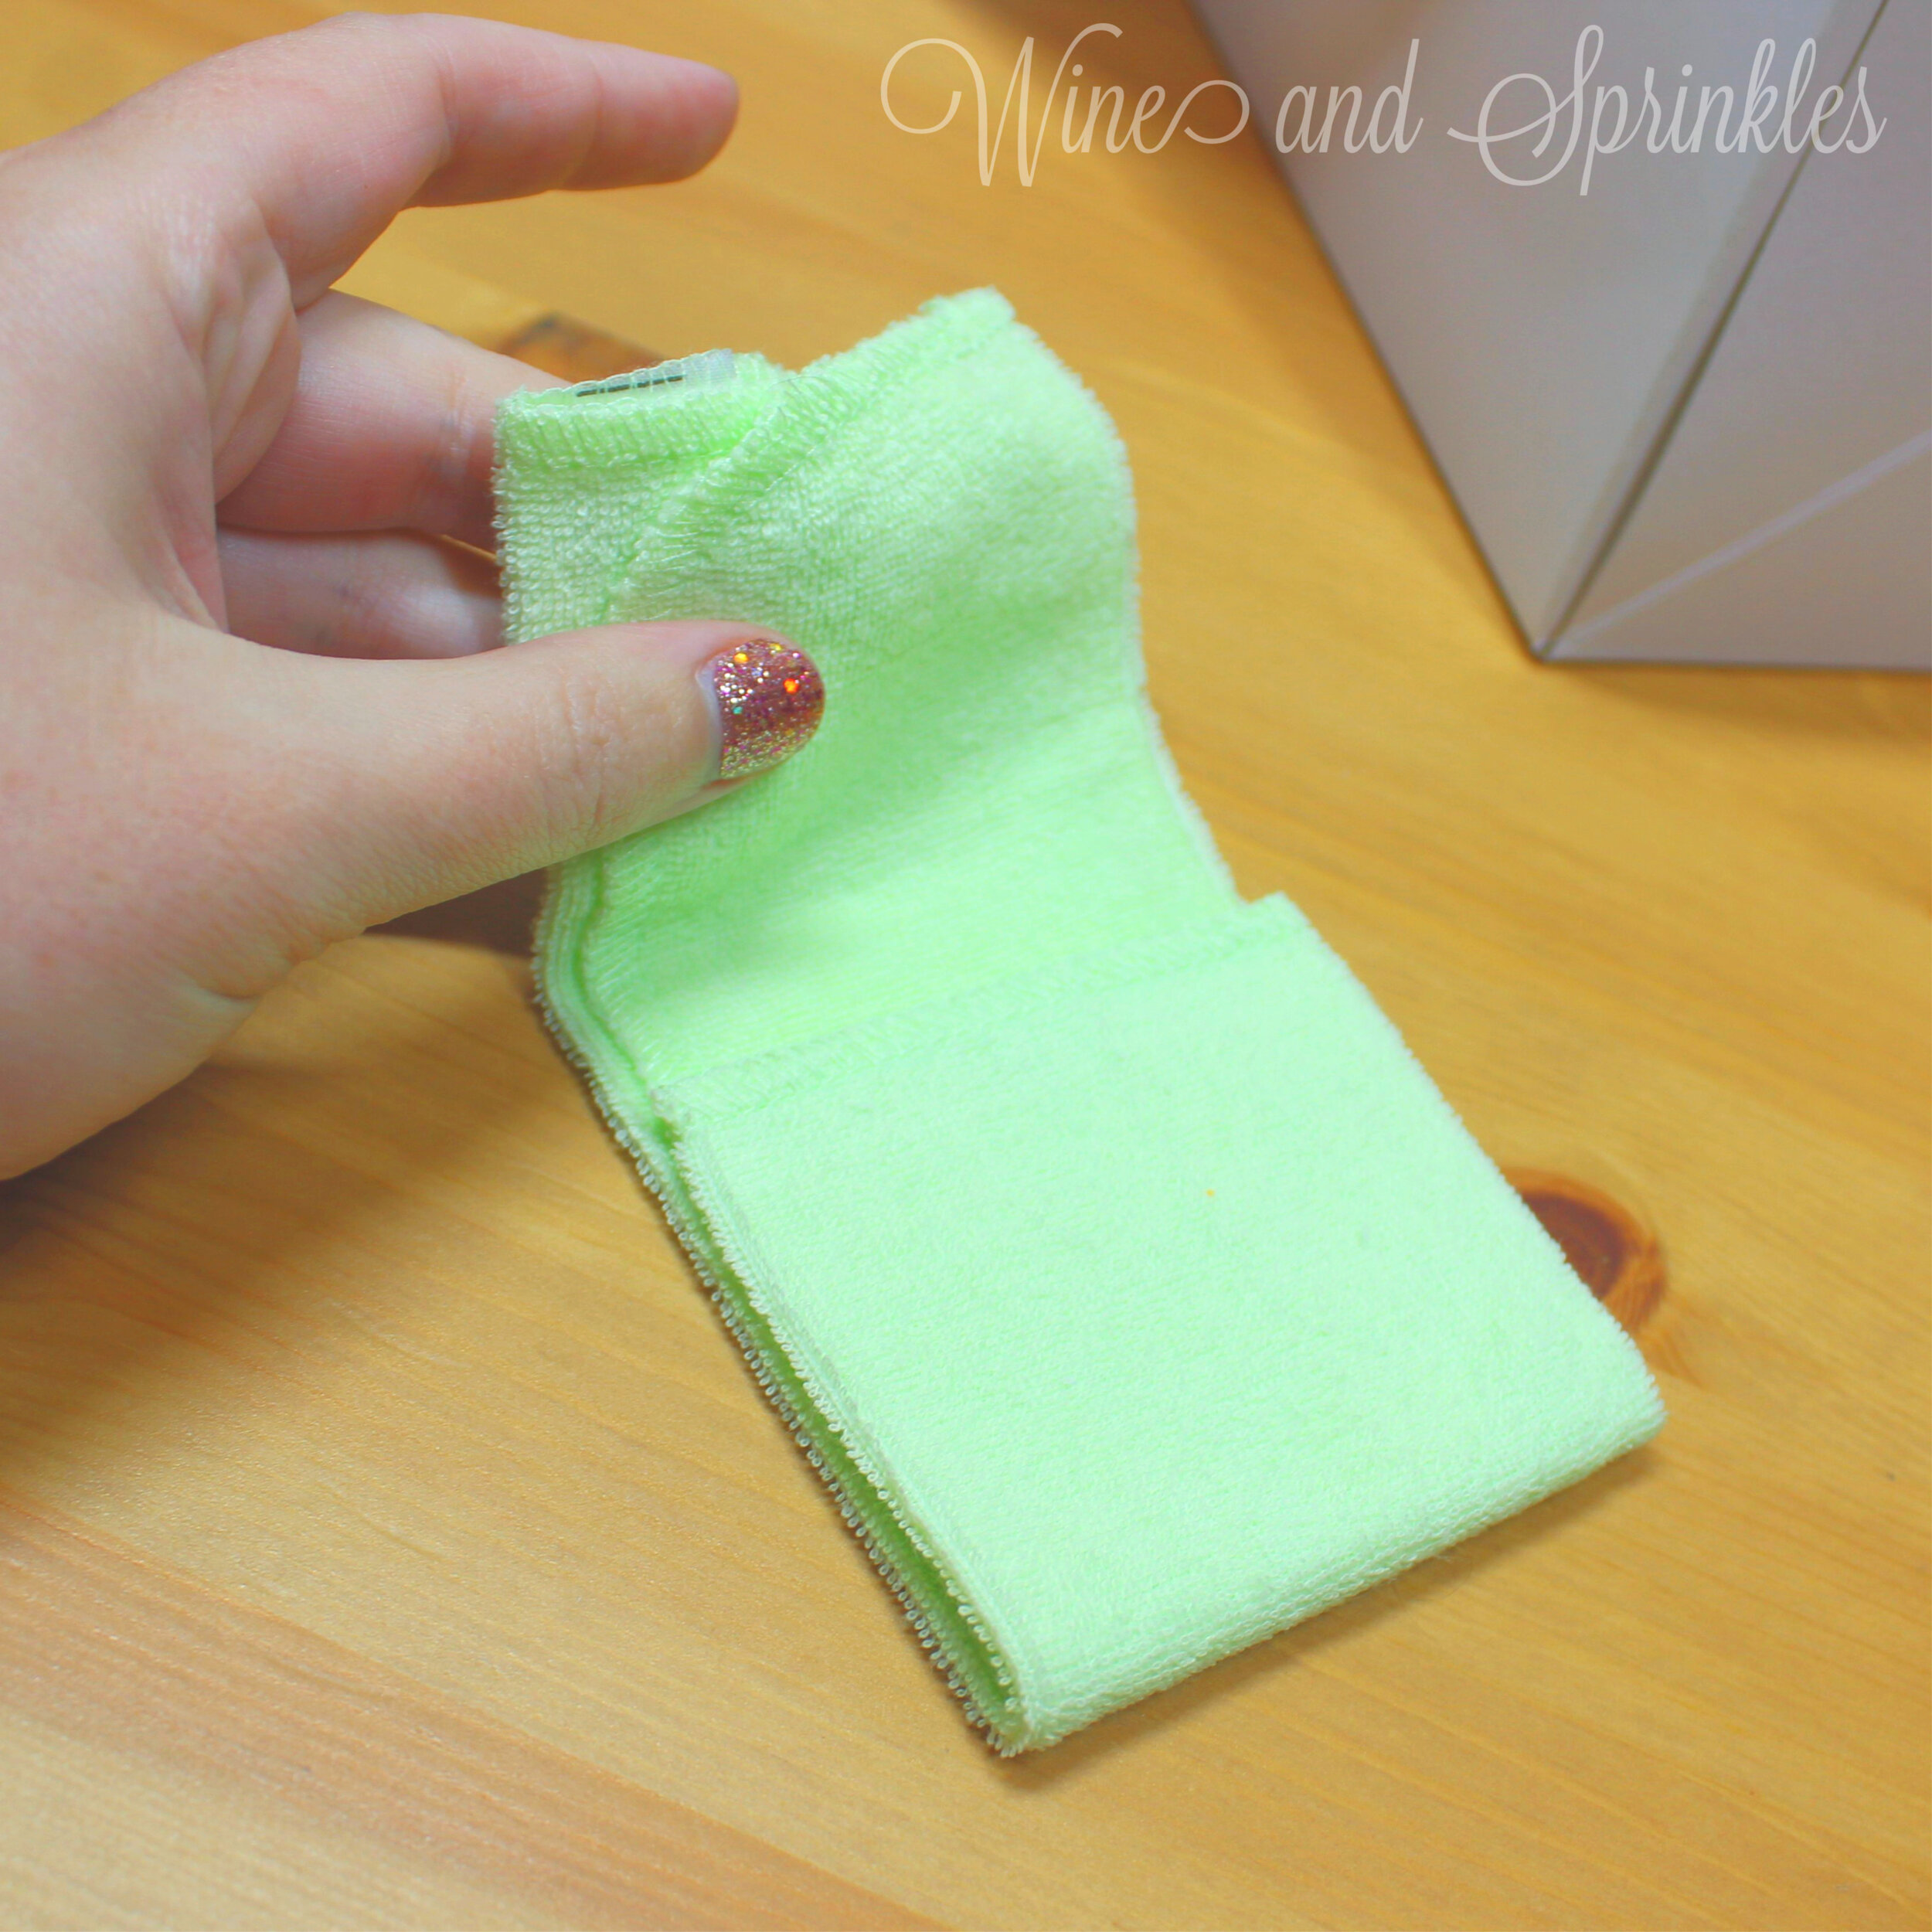
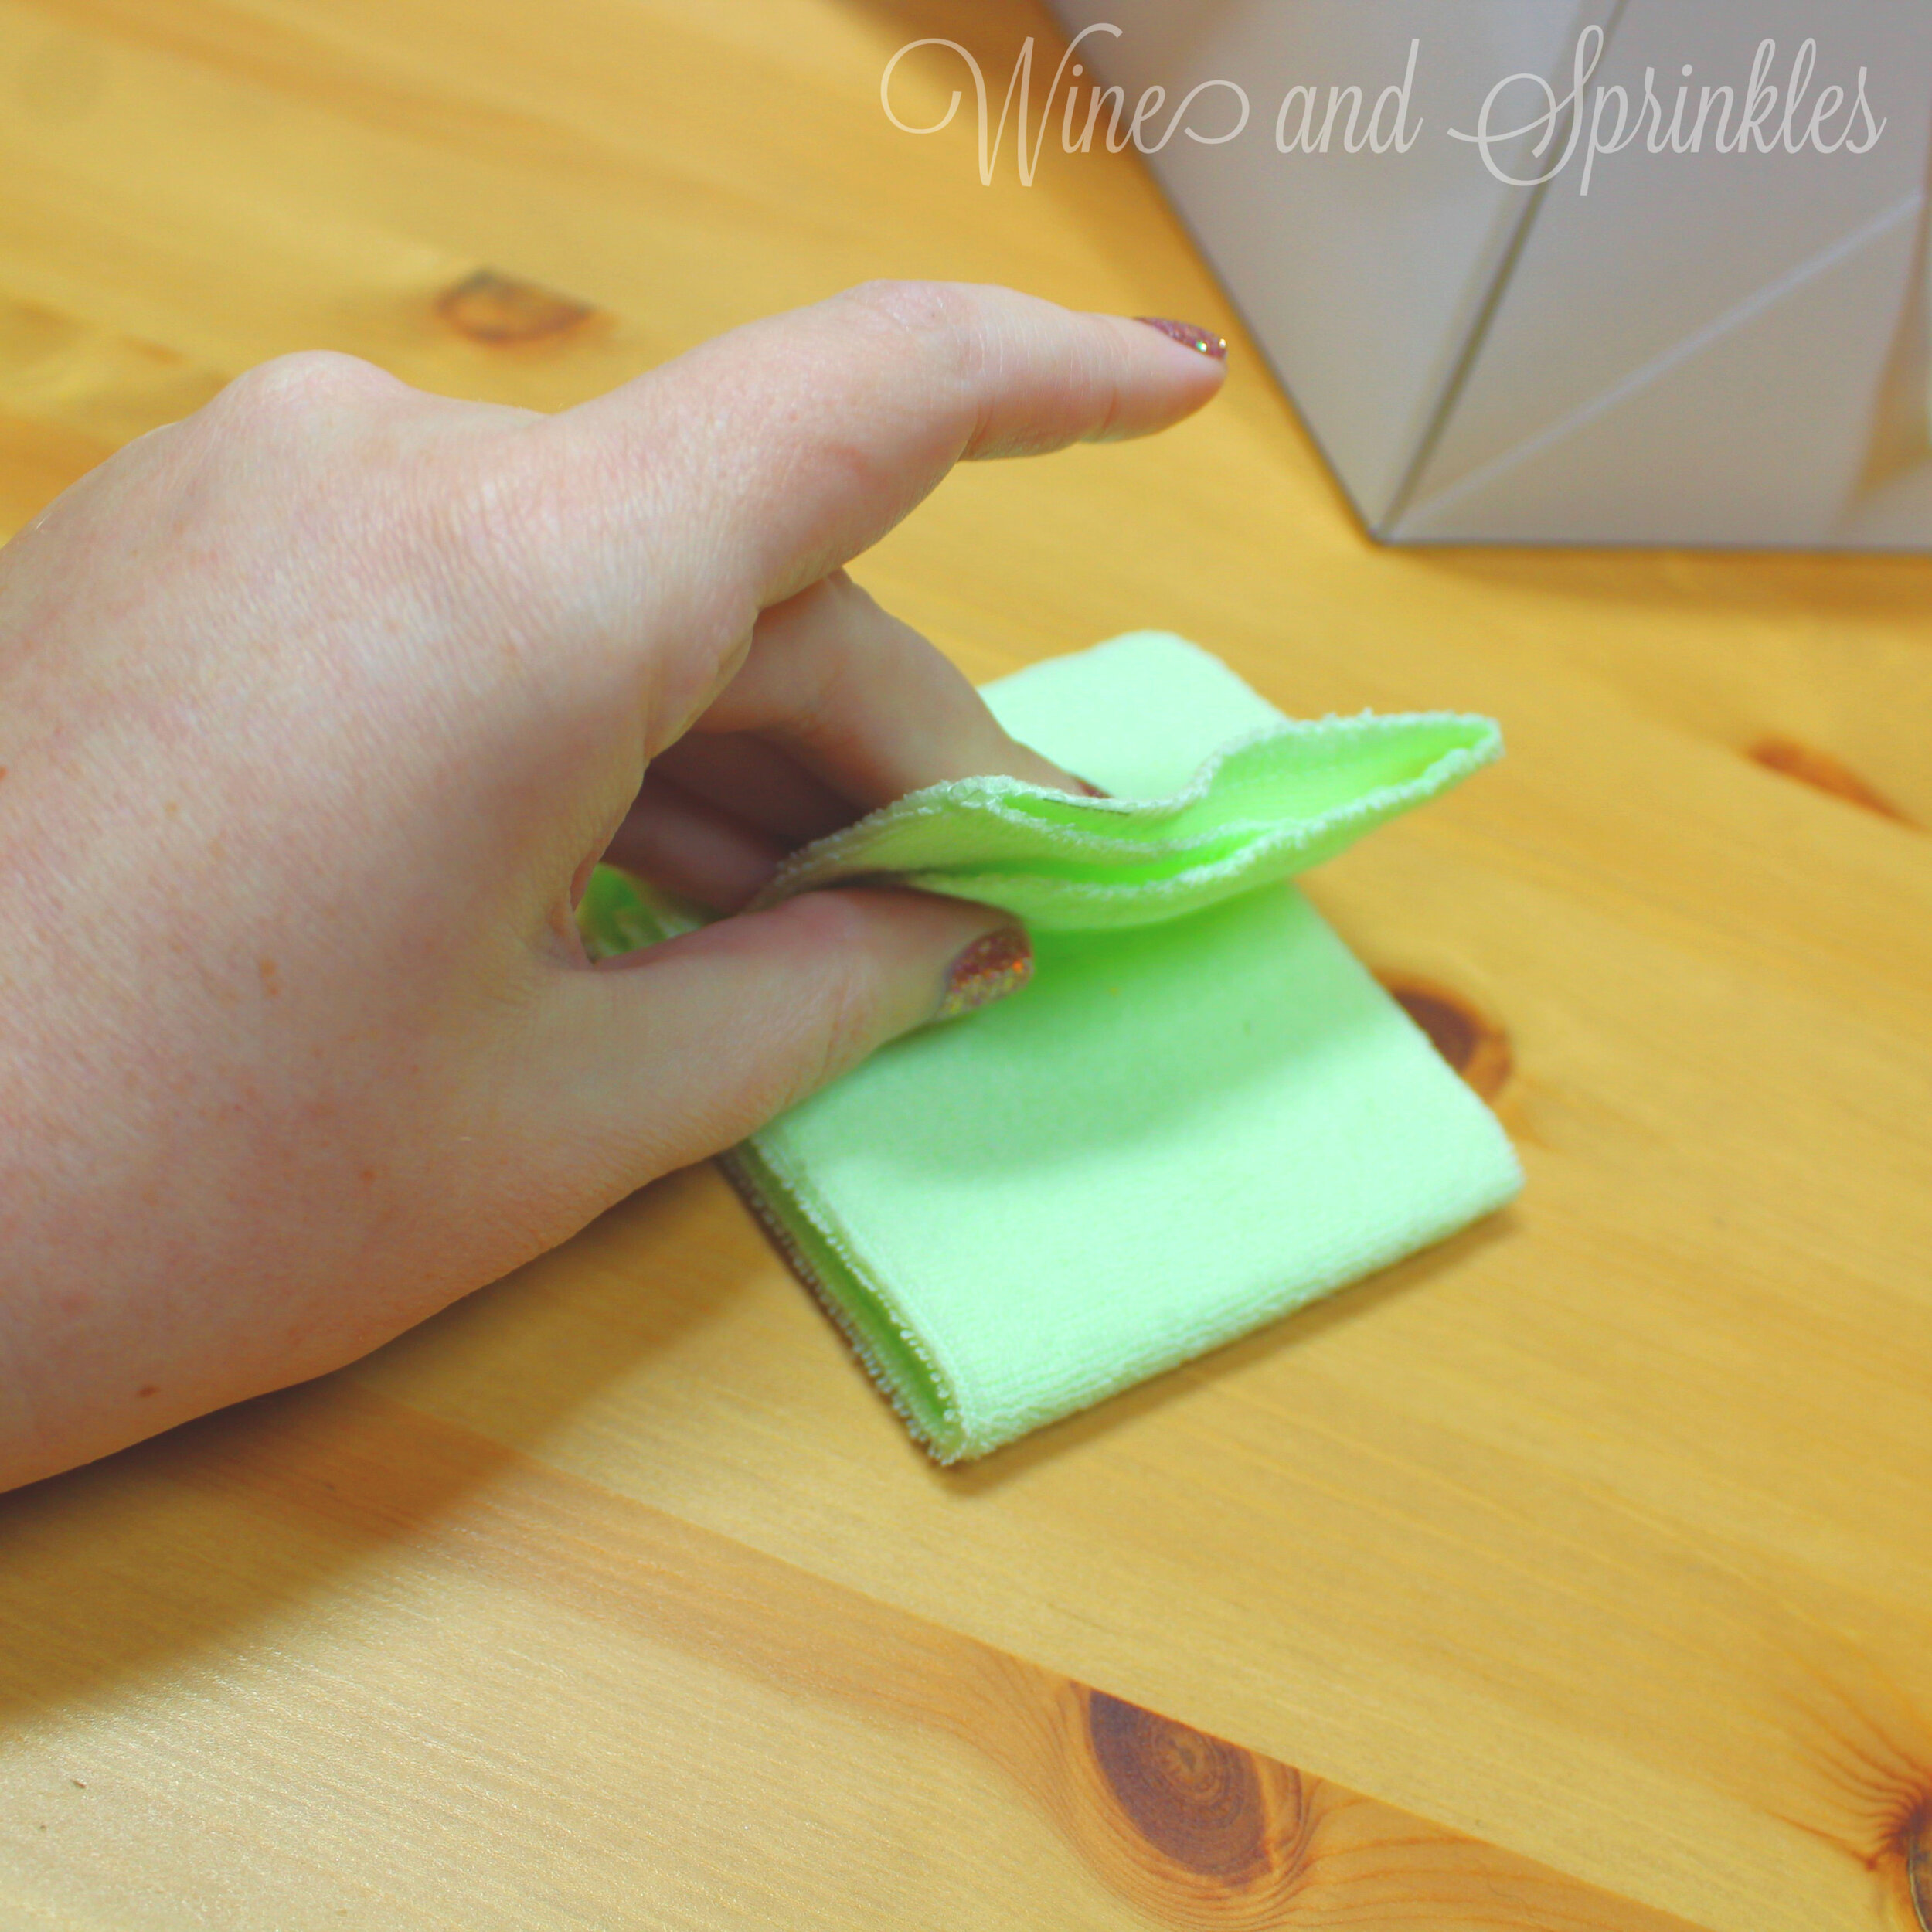
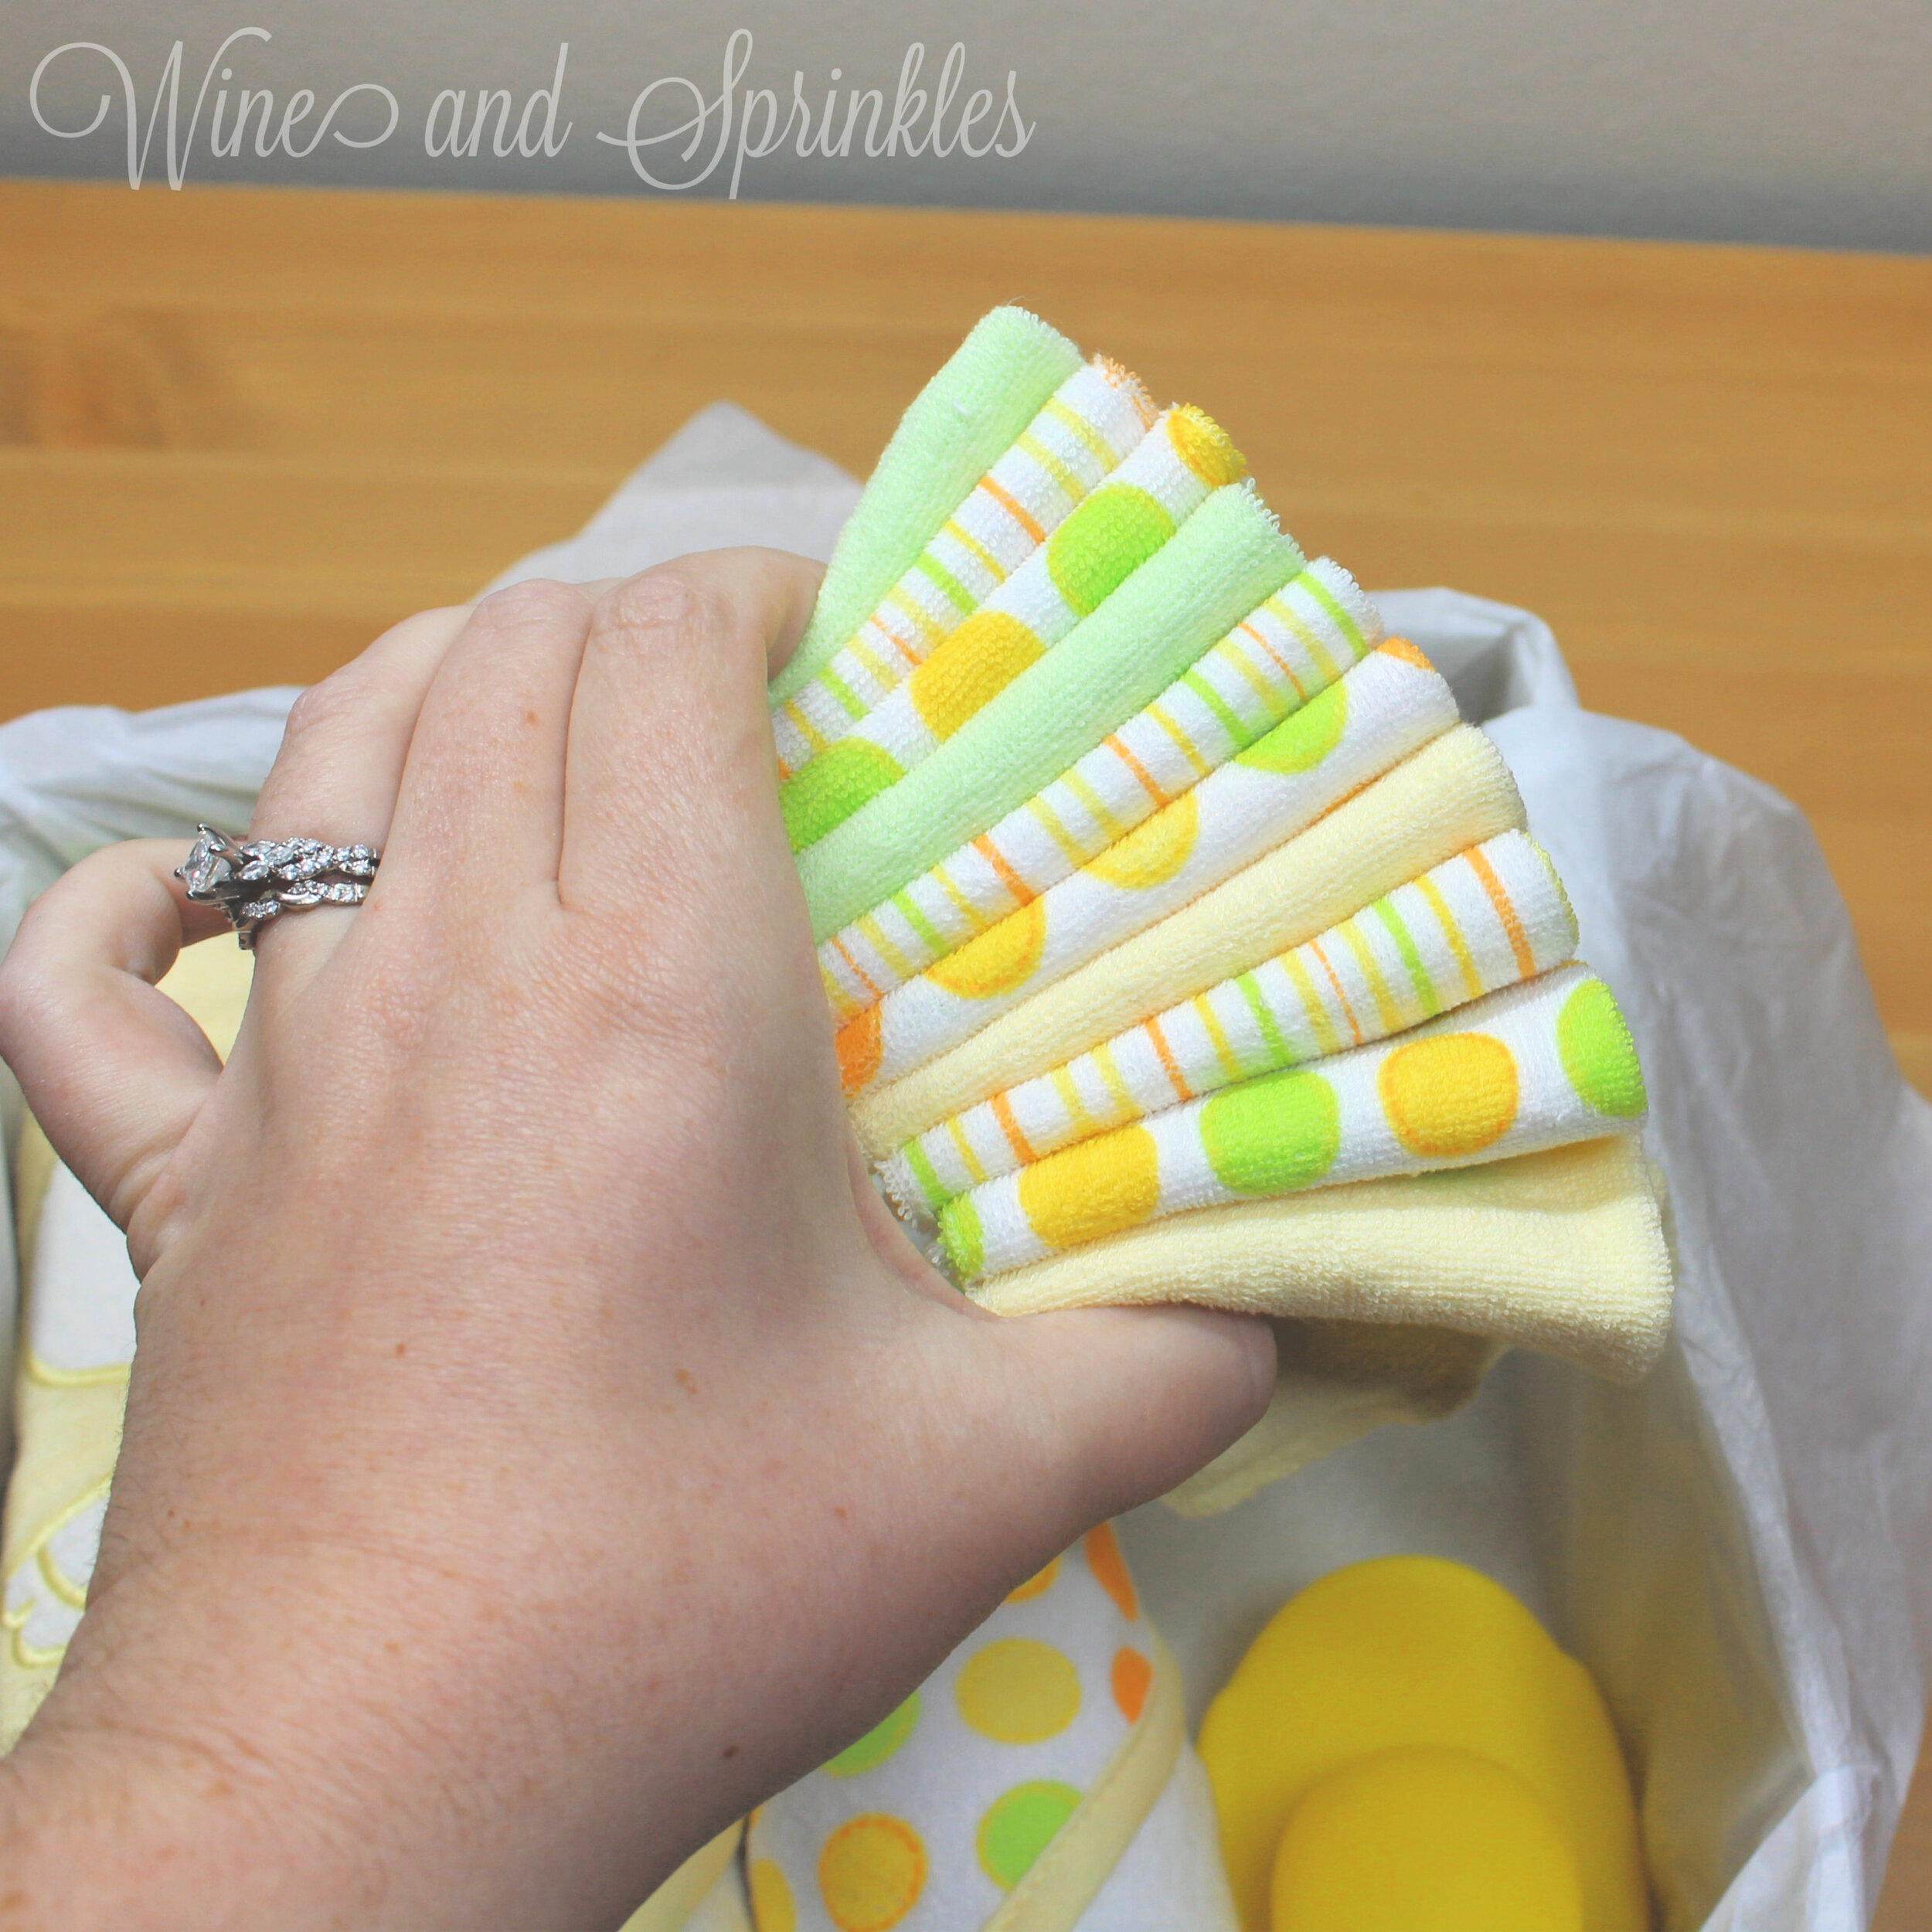
  1. To fold the washcloths, start with the washcloth unfolded with the tag facing up. Start by folding the right side of the washcloth over so that the tag of the washcloth is nestled against the fold, as shown in the photos. Then, using the gift box as a guide, fold over the other side of the washcloth so that it forms a long rectangle that is the width of the open area behind the rubber duck.

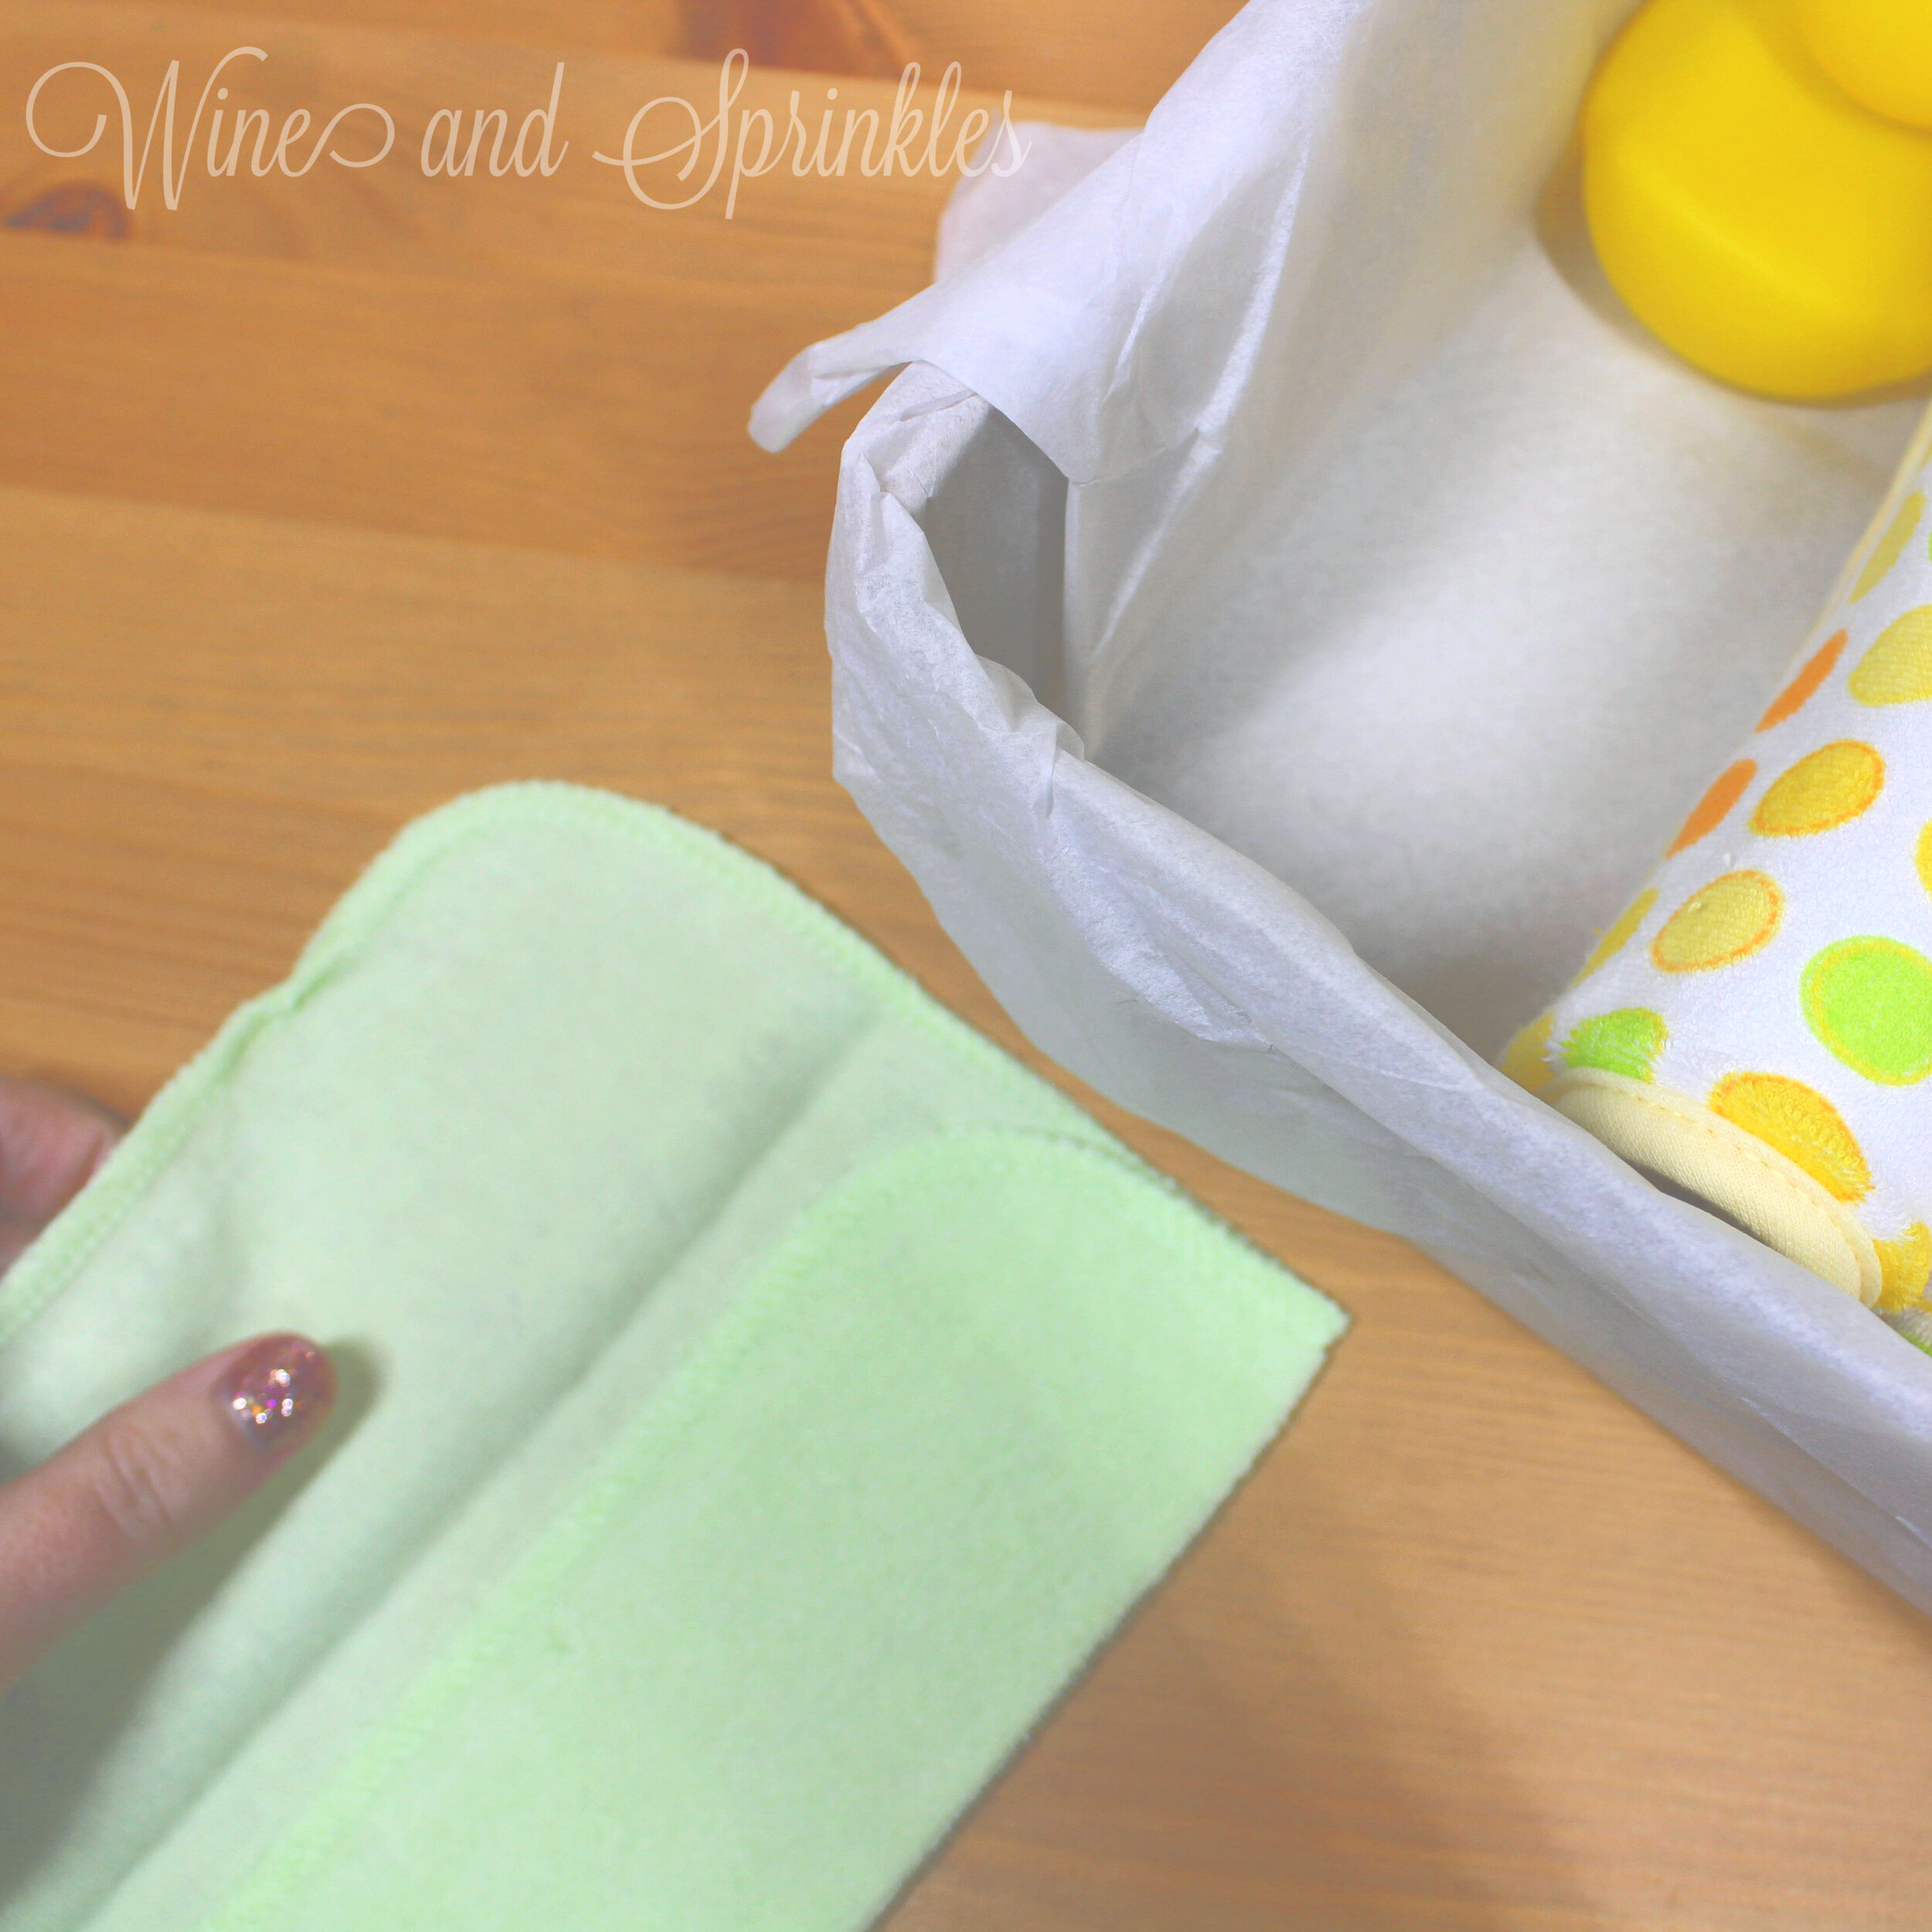
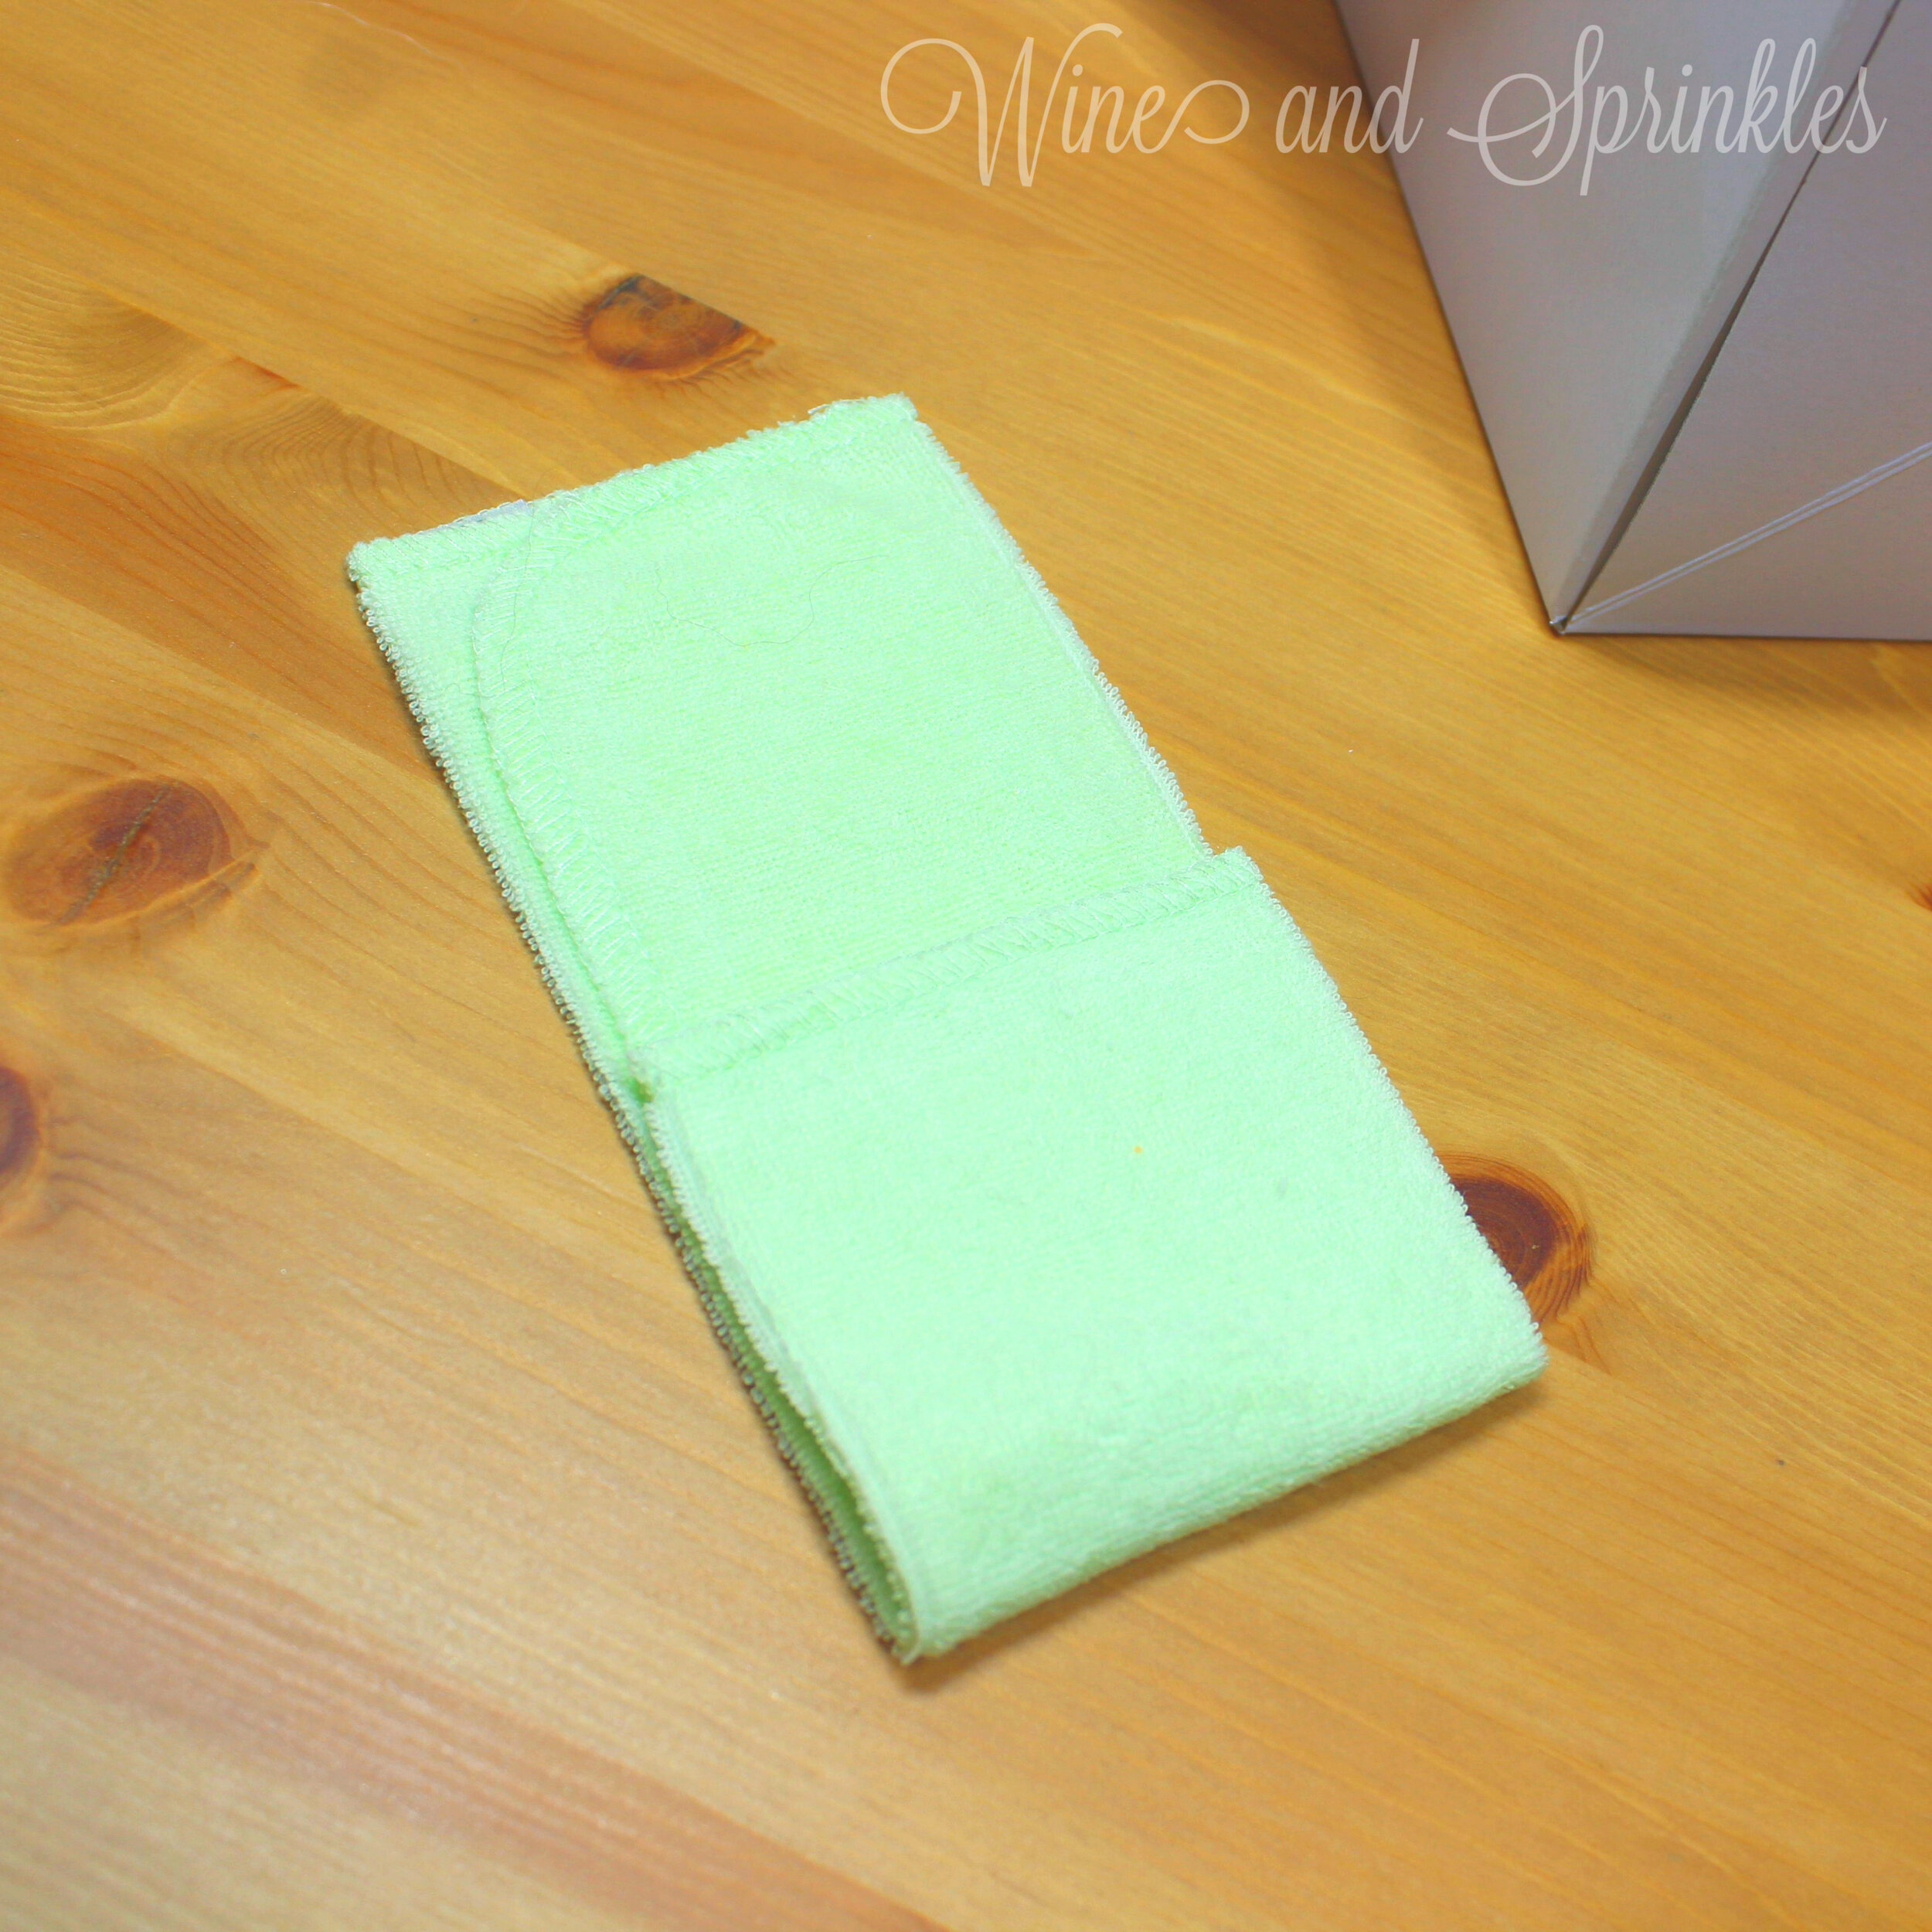
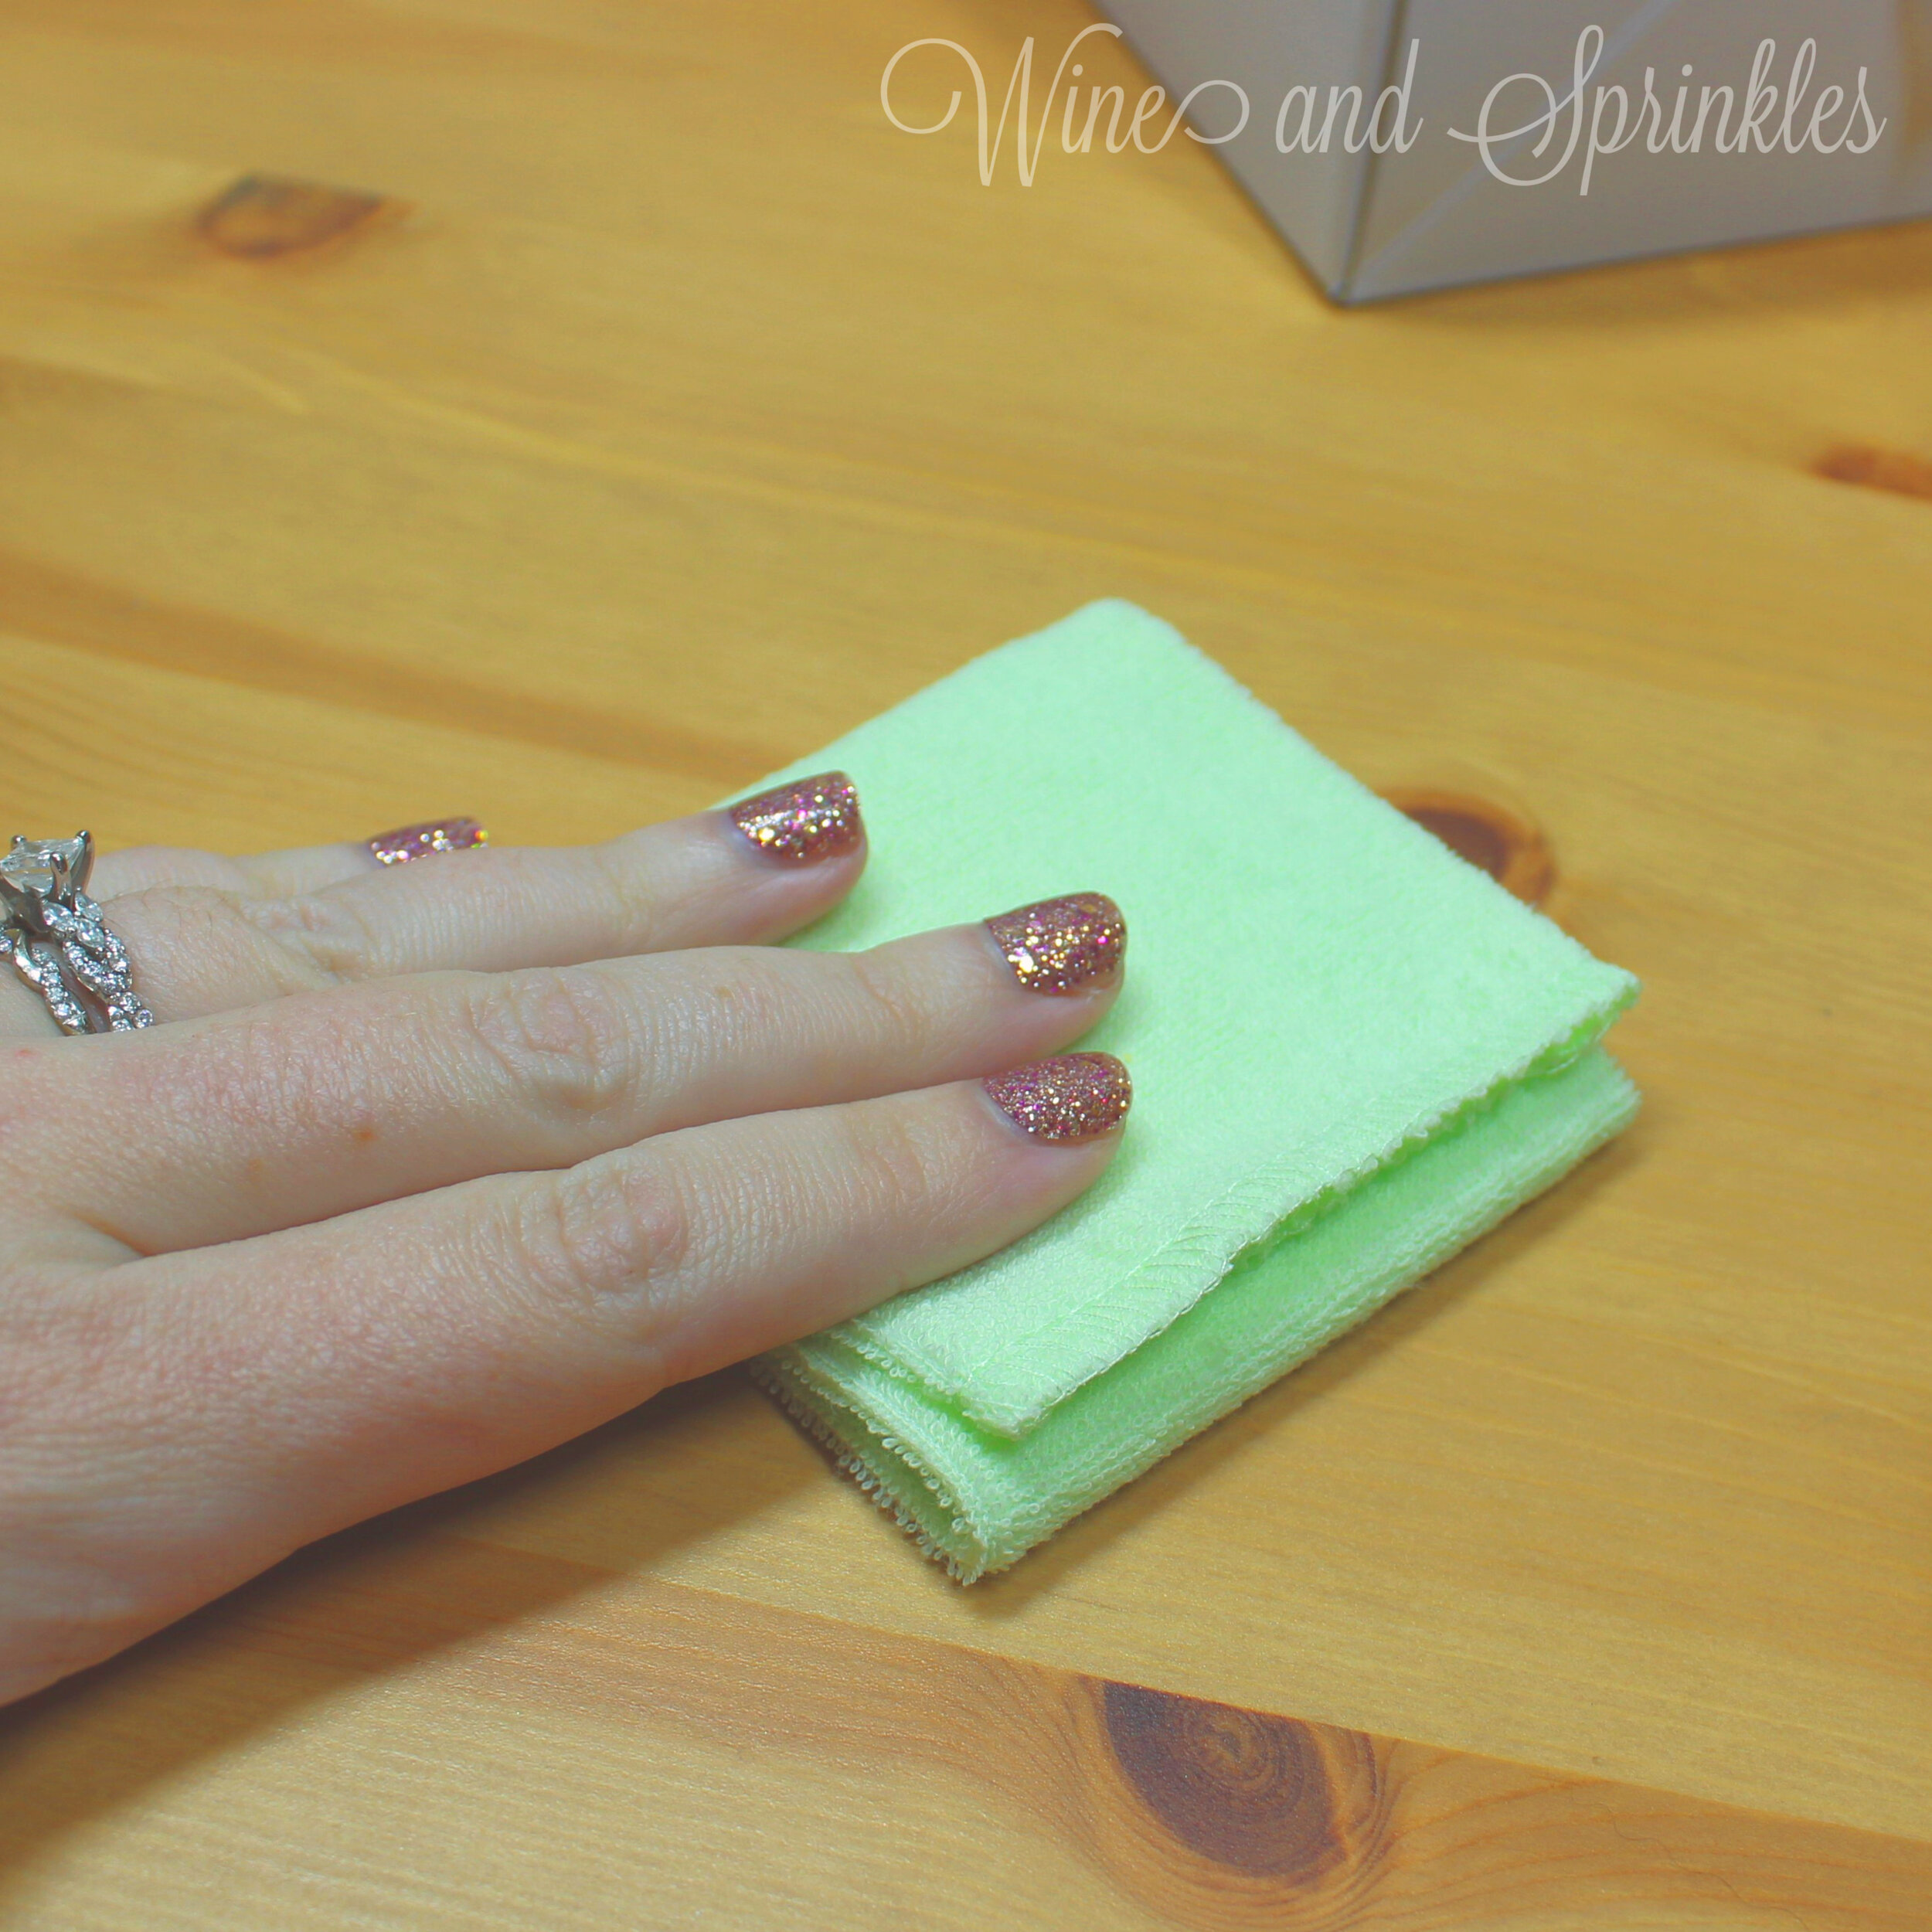
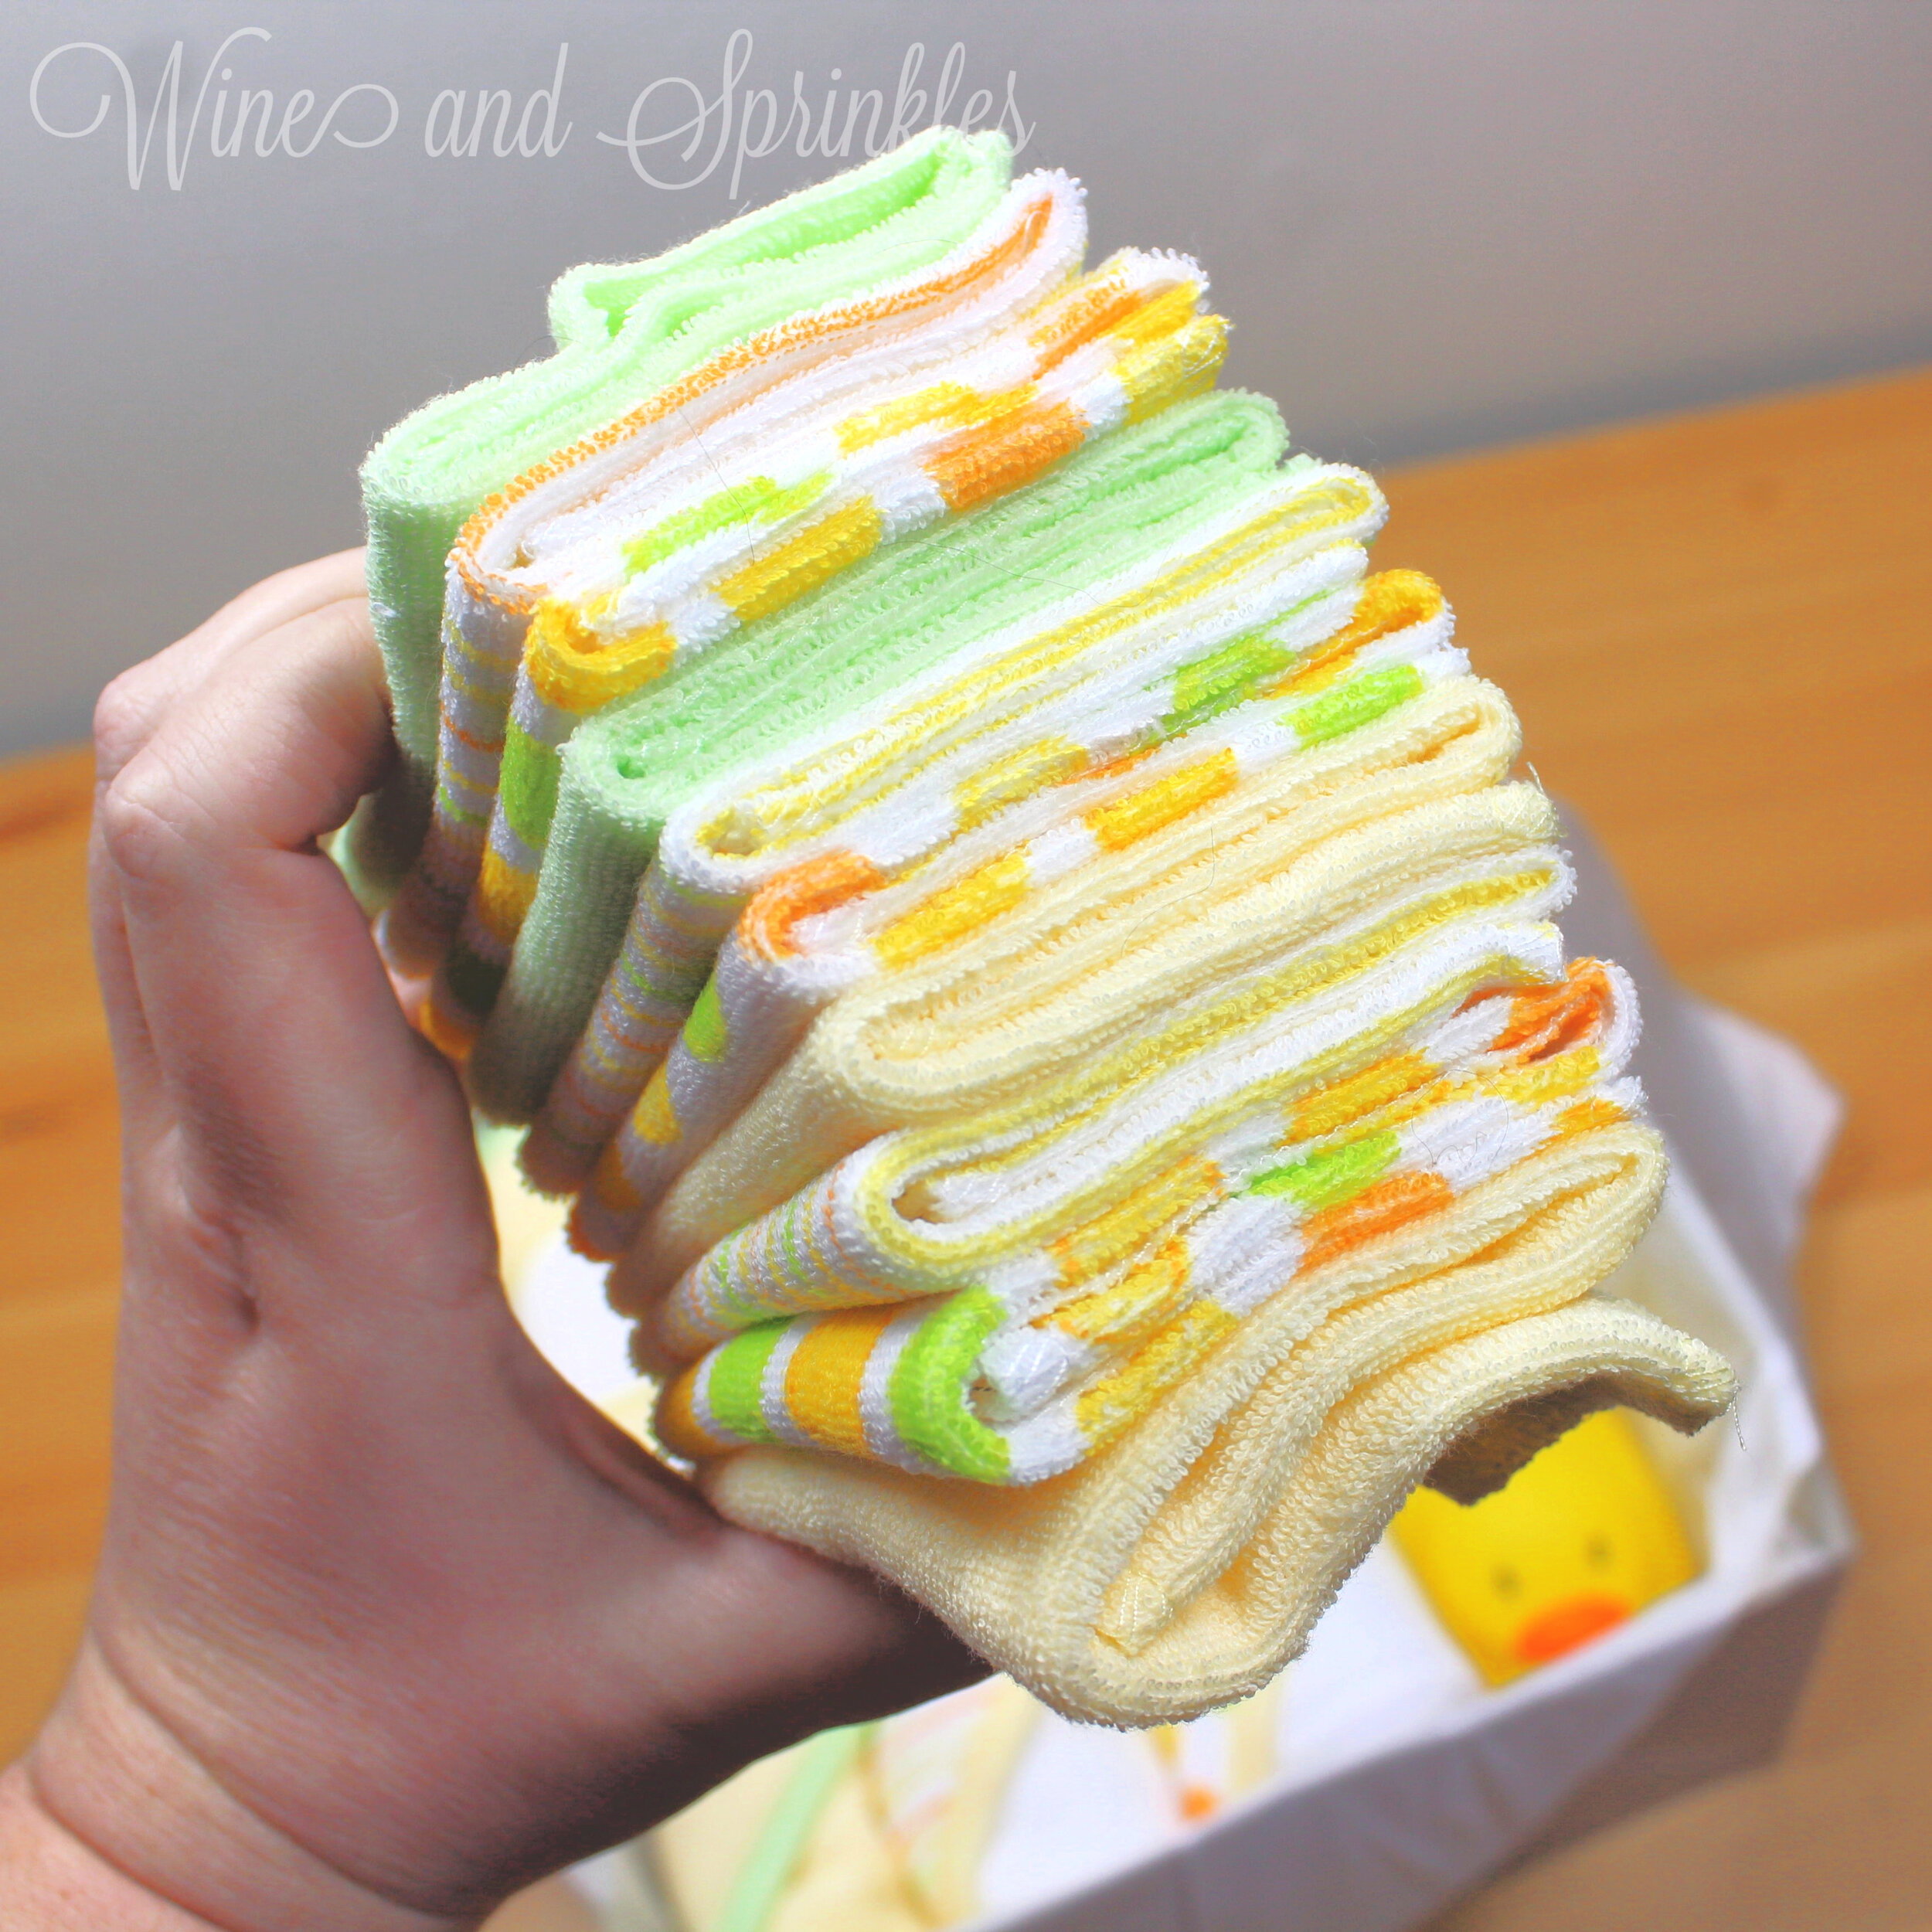
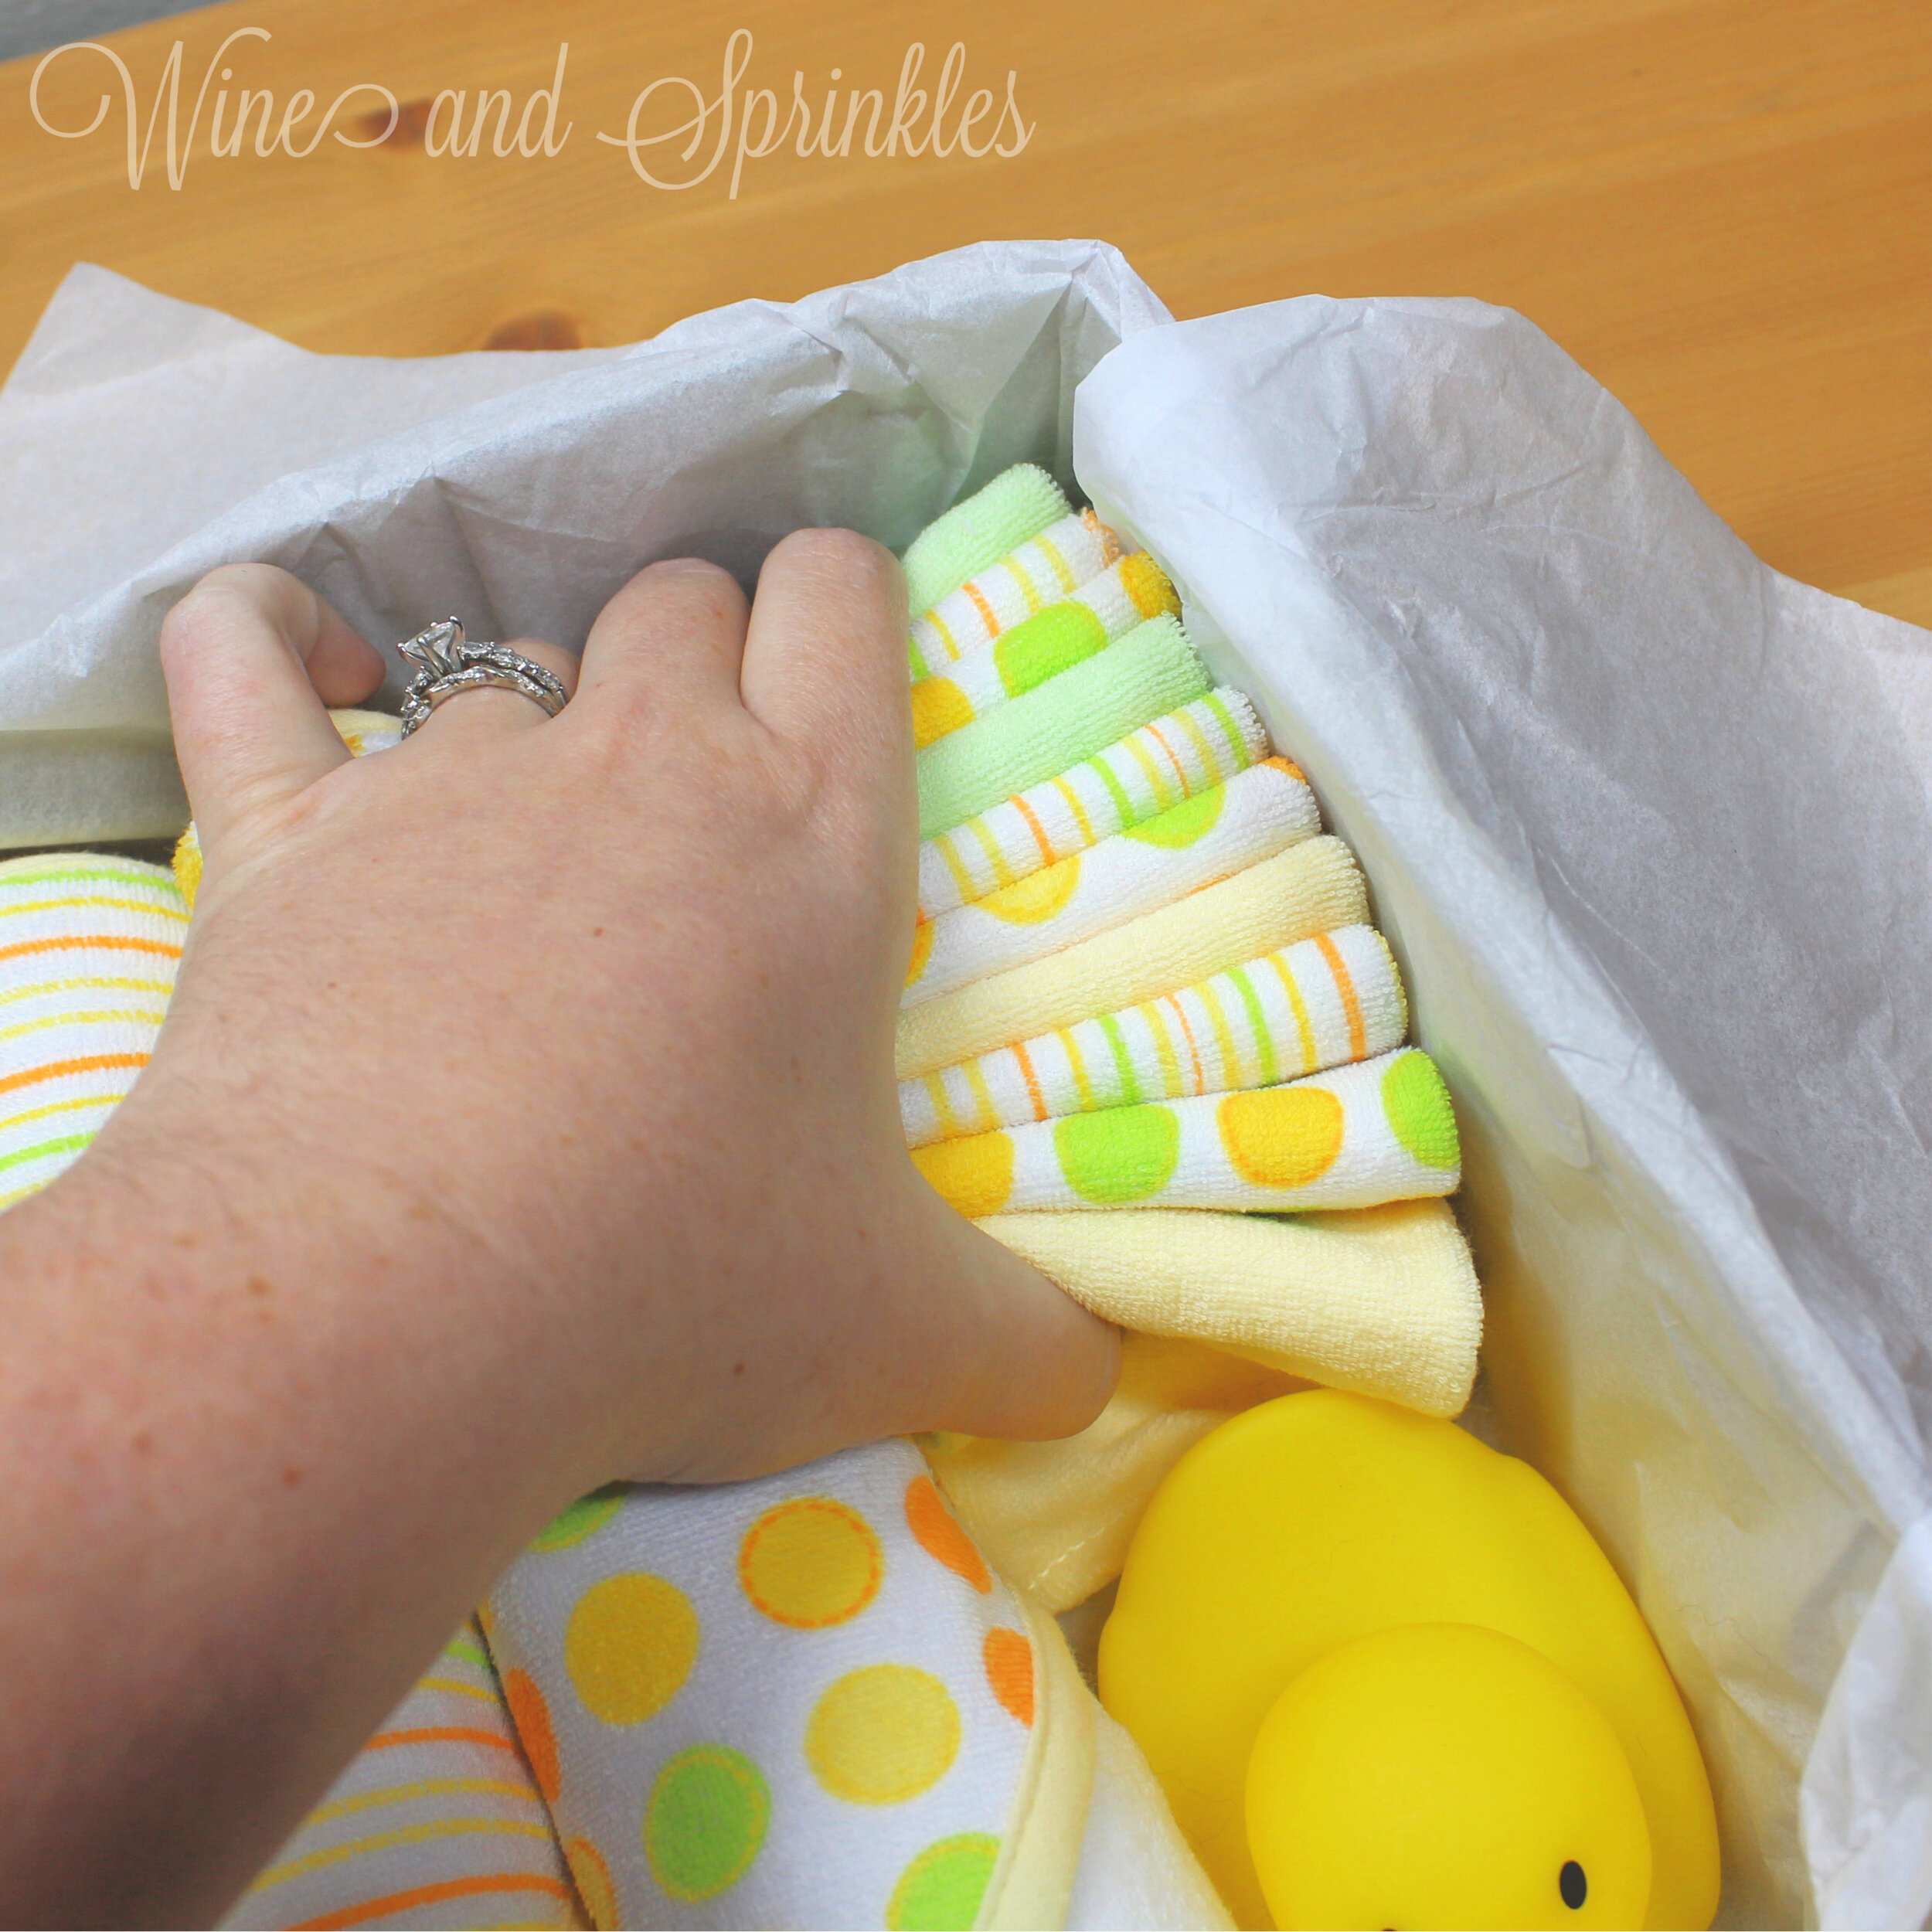
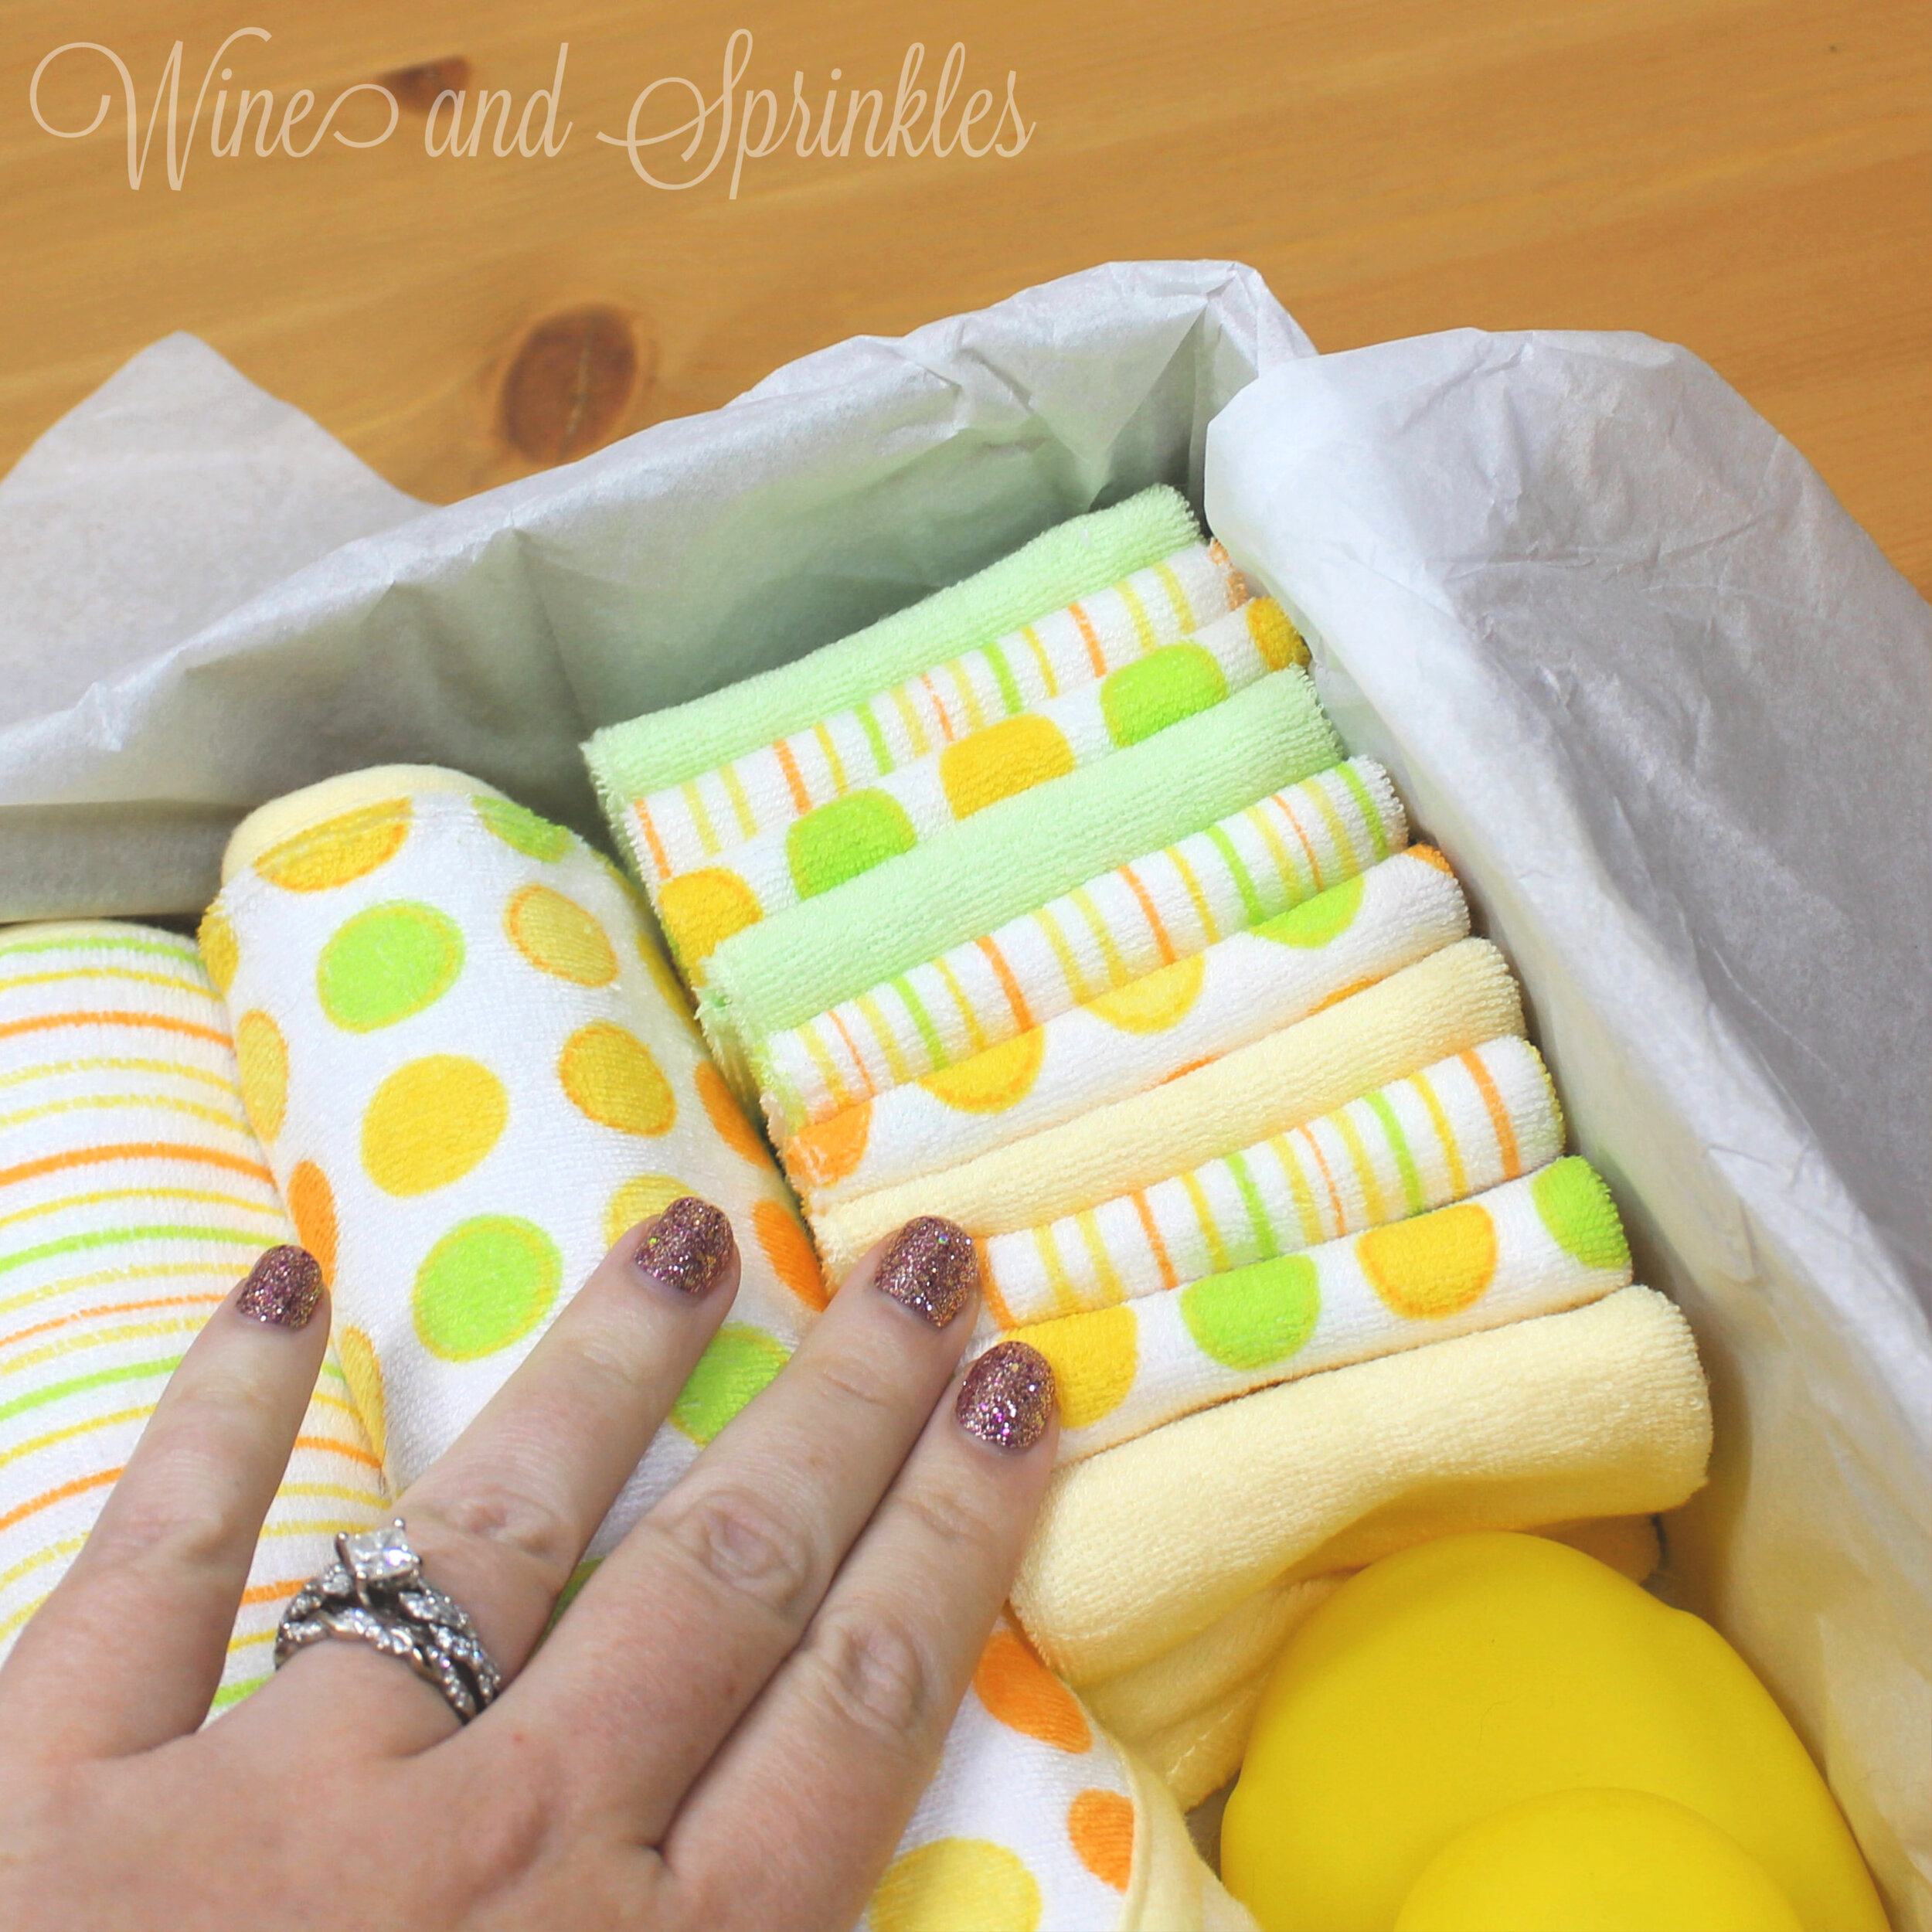
  2. Now, fold the washcloth rectangle in thirds width-wise to create a small folded packet as shown below. Repeat this folding with all the remaining washcloths then put the washcloths into a stack, with all the folded, pretty, sides together and the open ends towards the back. I stacked mine so that the solid and patterns alternated between the three options and would highly recommend it!

Bath Time Essentials Baby Gift Bento Box #babygift #babybento #babyshowergift

3. Grabbing the entire stack with one hand, with the pretty side of the stack towards you, place it into the gift box above the rubber duck, pressing them in gently as needed to fill the space and show off their patterns.  Top your creation with extra tissue paper if you wish and put on the top of your box. Your bento is now folded, assembled and ready to gift!

Bath Time Essentials Baby Gift Bento Box #babygift #babybento #babyshowergift

DIY HTV Future Pirate Baby Onesie

This post contains affiliate links, meaning that if you click on a link I will recieve a small comission. This costs you nothing extra and I only promote products I use and love! You can read our full disclosure here

DIY HTV Future Pirate Baby Onesie #babygift #onesie #svgfile

A super cute trend that I adore for baby onesies are ones where the parents encourage their little ones with hopes of the future, or at least jokingly give them future professions based on the parents interest. Since my sister loves pirates I decided, instead of a Future Princess or other more common choice, to design her baby a Future Pirate Onesie!

This decal was made with Gold Metal Foil HTV on a Hand Dyed Red Onesie, and I just adore the color combination for a piratey onesie!  Similar to the Pirate Life Onesie and Daddy’s First Mate Onesie, I used Antique Book Cover as one of my design fonts, this time pairing it with a super fun pirate font called Freebooter Script and I love how it turned out! Both of these fonts are free to download on dafont.com for any of your pirate themed projects!


DIY HTV Future Pirate Baby Onesie #babygift #onesie #svgfile

Make sure to check out our other Baby Onesie Projects for more DIY Baby Shower Gift and Onesie Inspiration!


DIY HTV Future Pirate Baby Onesie #babygift #onesie #svgfile
  1. After downloading the cut files, import them into the Cricut Software. After creating a new project, select Upload Image. Select the file you wish to upload and it will automatically take you to the final upload screen, where you can name the file, then select Save. The SVG Files are sized so that they will automatically cut to the size you see in the photos, but if you want to change the size you can do so to fit your onesies the way you like.

  2. After selecting “Make It” Make sure to select the Mirror Mode on the cutting screen. Cut the design in your choice of heat transfer vinyl with the Iron On (for Easyweed HTV) or Iron On+ (for Glitter HTV) Setting on your Cricut, with the shiny side of the material down.

  3. Weed the additional material off of the backing material so that, looking down with the shiny side up, you can see your design with the correct orientation.Iron your onesie to remove any creases, then center the design over the top half of the onesie. Arrange the design shiny side up, then cover with parchment paper. Make sure to keep the parchment paper between the design and the iron.

DIY HTV Future Pirate Baby Onesie #babygift #onesie #svgfile

4. Set your Iron to the second Highest setting. Cover the parchment paper and decal with your iron, pressing down firmly on the design. Using your iron like a small heat press, press the design for 10-15 seconds for the Metal HTV or at least 20-30 seconds for Easyweed or Glitter HTV, repeating and overlapping the last position as you move across the design. Luckily, onesie decals are so small, you should be able to fit the whole decal under the iron in a single press!

5. Remove the parchment paper and peel the clear  backing from the decal, leaving the design on the onesie. Pair this design with our adorable Daddy’s First Mate Onesie for the perfect pirate two pack!

DIY HTV Future Pirate Baby Onesie #babygift #onesie #svgfile

Check out our other Baby Onesie Projects for more DIY Baby Shower Gift Inspiration!
DIY HTV Future Pirate Baby Onesie #babygift #onesie #svgfile

DIY HTV Daddy’s First Mate Baby Onesie

This post contains affiliate links, meaning that if you click on a link I will recieve a small comission. This costs you nothing extra and I only promote products I use and love! You can read our full disclosure here

DIY HTV Daddy’s First Mate Baby Onesie #babygift #onesie #svgfile

It's always fun to include daddy’s in the baby onesie fun, so for the next onesie in our Pirate Themed Onesie Set is the perfect choice for a pirate papa, the Daddy’s First Mate Onesie! 

This decal was cut in Black Easyweed HTV for a Yellow Hand Dyed Onesie and the color combo was a perfect fit for the pirate theme! I used the fonts Passengers Script and Antique Book Cover while designing this decal, which are both free to download from dafont.com to use in customizing these onesies or any other Baby Projects you can think of!


Make sure to check out our other Baby Onesie Projects for more DIY Baby Shower Gift and Onesie Inspiration!

DIY HTV Daddy’s First Mate Baby Onesie #babygift #onesie #svgfile


DIY HTV Daddy’s First Mate Baby Onesie #babygift #onesie #svgfile
  1. After downloading the cut files, import them into the Cricut Software. After creating a new project, select Upload Image. Select the file you wish to upload and it will automatically take you to the final upload screen, where you can name the file, then select Save. The SVG Files are sized so that they will automatically cut to the size you see in the photos, but if you want to change the size you can do so to fit your onesies the way you like.

  2.  After selecting “Make It” Make sure to select the Mirror Mode on the cutting screen. Cut the design in your choice of heat transfer vinyl with the Iron On (for Easyweed HTV) or Iron On+ (for Glitter HTV) Setting on your Cricut, with the shiny side of the material down.

  3. Weed the additional material off of the backing material so that, looking down with the shiny side up, you can see your design with the correct orientation.Iron your onesie to remove any creases, then center the design over the top half of the onesie. Arrange the design shiny side up, then cover with parchment paper. Make sure to keep the parchment paper between the design and the iron.

DIY HTV Daddy’s First Mate Baby Onesie #babygift #onesie #svgfile

4. Set your Iron to the second Highest setting. Cover the parchment paper and decal with your iron, pressing down firmly on the design. Using your iron like a small heat press, press the design for at least 20-30 seconds, repeating and overlapping the last position as you move across the design. Luckily, onesie decals are so small, you should be able to fit the whole decal under the iron in a single press!

5. Remove the parchment paper and peel the clear  backing from the decal, leaving the design on the onesie.

DIY HTV Daddy’s First Mate Baby Onesie #babygift #onesie #svgfile

Check out our other Baby Onesie Projects for more DIY Baby Shower Gift Inspiration!

DIY HTV Daddy’s First Mate Baby Onesie #babygift #onesie #svgfile

DIY HTV Pirate Life Baby Onesie

This post contains affiliate links, meaning that if you click on a link I will recieve a small comission. This costs you nothing extra and I only promote products I use and love! You can read our full disclosure here

DIY HTV Pirate Life Baby Onesie #babygift #onesie #svgfile

I love theming onesies for new parents, so when my sister was having her baby I had to include some pirate themed onesies, especially because she lives on an island and has dressed as a pirate for Halloween for several years! So her new little one can join in her fun, I made a whole set of pirate onesies in different sizes. First was our newborn New to the Crew Onesie, and now we are adding to the collection with this adorable Pirate Life Onesie!

I made the decal with Black Easyweed HTV on a Emerald Hand Dyed Baby Onesie and I love the way it turned out! I used the font Antique Book Cover for this decal, which you can download for free at dafont.com to use in customizing this onesie further or for any seafaring baby projects!

DIY HTV Pirate Life Baby Onesie #babygift #onesie #svgfile

Make sure to check out our other Baby Onesie Projects for more DIY Baby Shower Gift and Onesie Inspiration!


DIY HTV Pirate Life Baby Onesie #babygift #onesie #svgfile
  1. After downloading the cut files, import them into the Cricut Software. After creating a new project, select Upload Image. Select the file you wish to upload and it will automatically take you to the final upload screen, where you can name the file, then select Save. The SVG Files are sized so that they will automatically cut to the size you see in the photos, but if you want to change the size you can do so to fit your onesies the way you like.

  2. After selecting “Make It” Make sure to select the Mirror Mode on the cutting screen. Cut the design in your choice of heat transfer vinyl with the Iron On (for Easyweed HTV) or Iron On+ (for Glitter HTV) Setting on your Cricut, with the shiny side of the material down.

  3. Weed the additional material off of the backing material so that, looking down with the shiny side up, you can see your design with the correct orientation.Iron your onesie to remove any creases, then center the design over the top half of the onesie. Arrange the design shiny side up, then cover with parchment paper. Make sure to keep the parchment paper between the design and the iron.

DIY HTV Pirate Life Baby Onesie #babygift #onesie #svgfile

4. Set your Iron to the second Highest setting. Cover the parchment paper and decal with your iron, pressing down firmly on the design. Using your iron like a small heat press, press the design for at least 20-30 seconds, repeating and overlapping the last position as you move across the design. Luckily, onesie decals are so small, you should be able to fit the whole decal under the iron in a single press!

5. Remove the parchment paper and peel the clear  backing from the decal, leaving the design on the onesie. Pair this design with any of our pirate themed onesies, but one of my favorites is the New to the Crew Onesie!

DIY HTV Pirate Life Baby Onesie #babygift #onesie #svgfile

Check out our other Baby Onesie Projects for more DIY Baby Shower Gift Inspiration!

DIY HTV Pirate Life Baby Onesie #babygift #onesie #svgfile