Bridesmaids

Personalized HTV Fuzzy Socks

Personalized HTV Fuzzy Socks

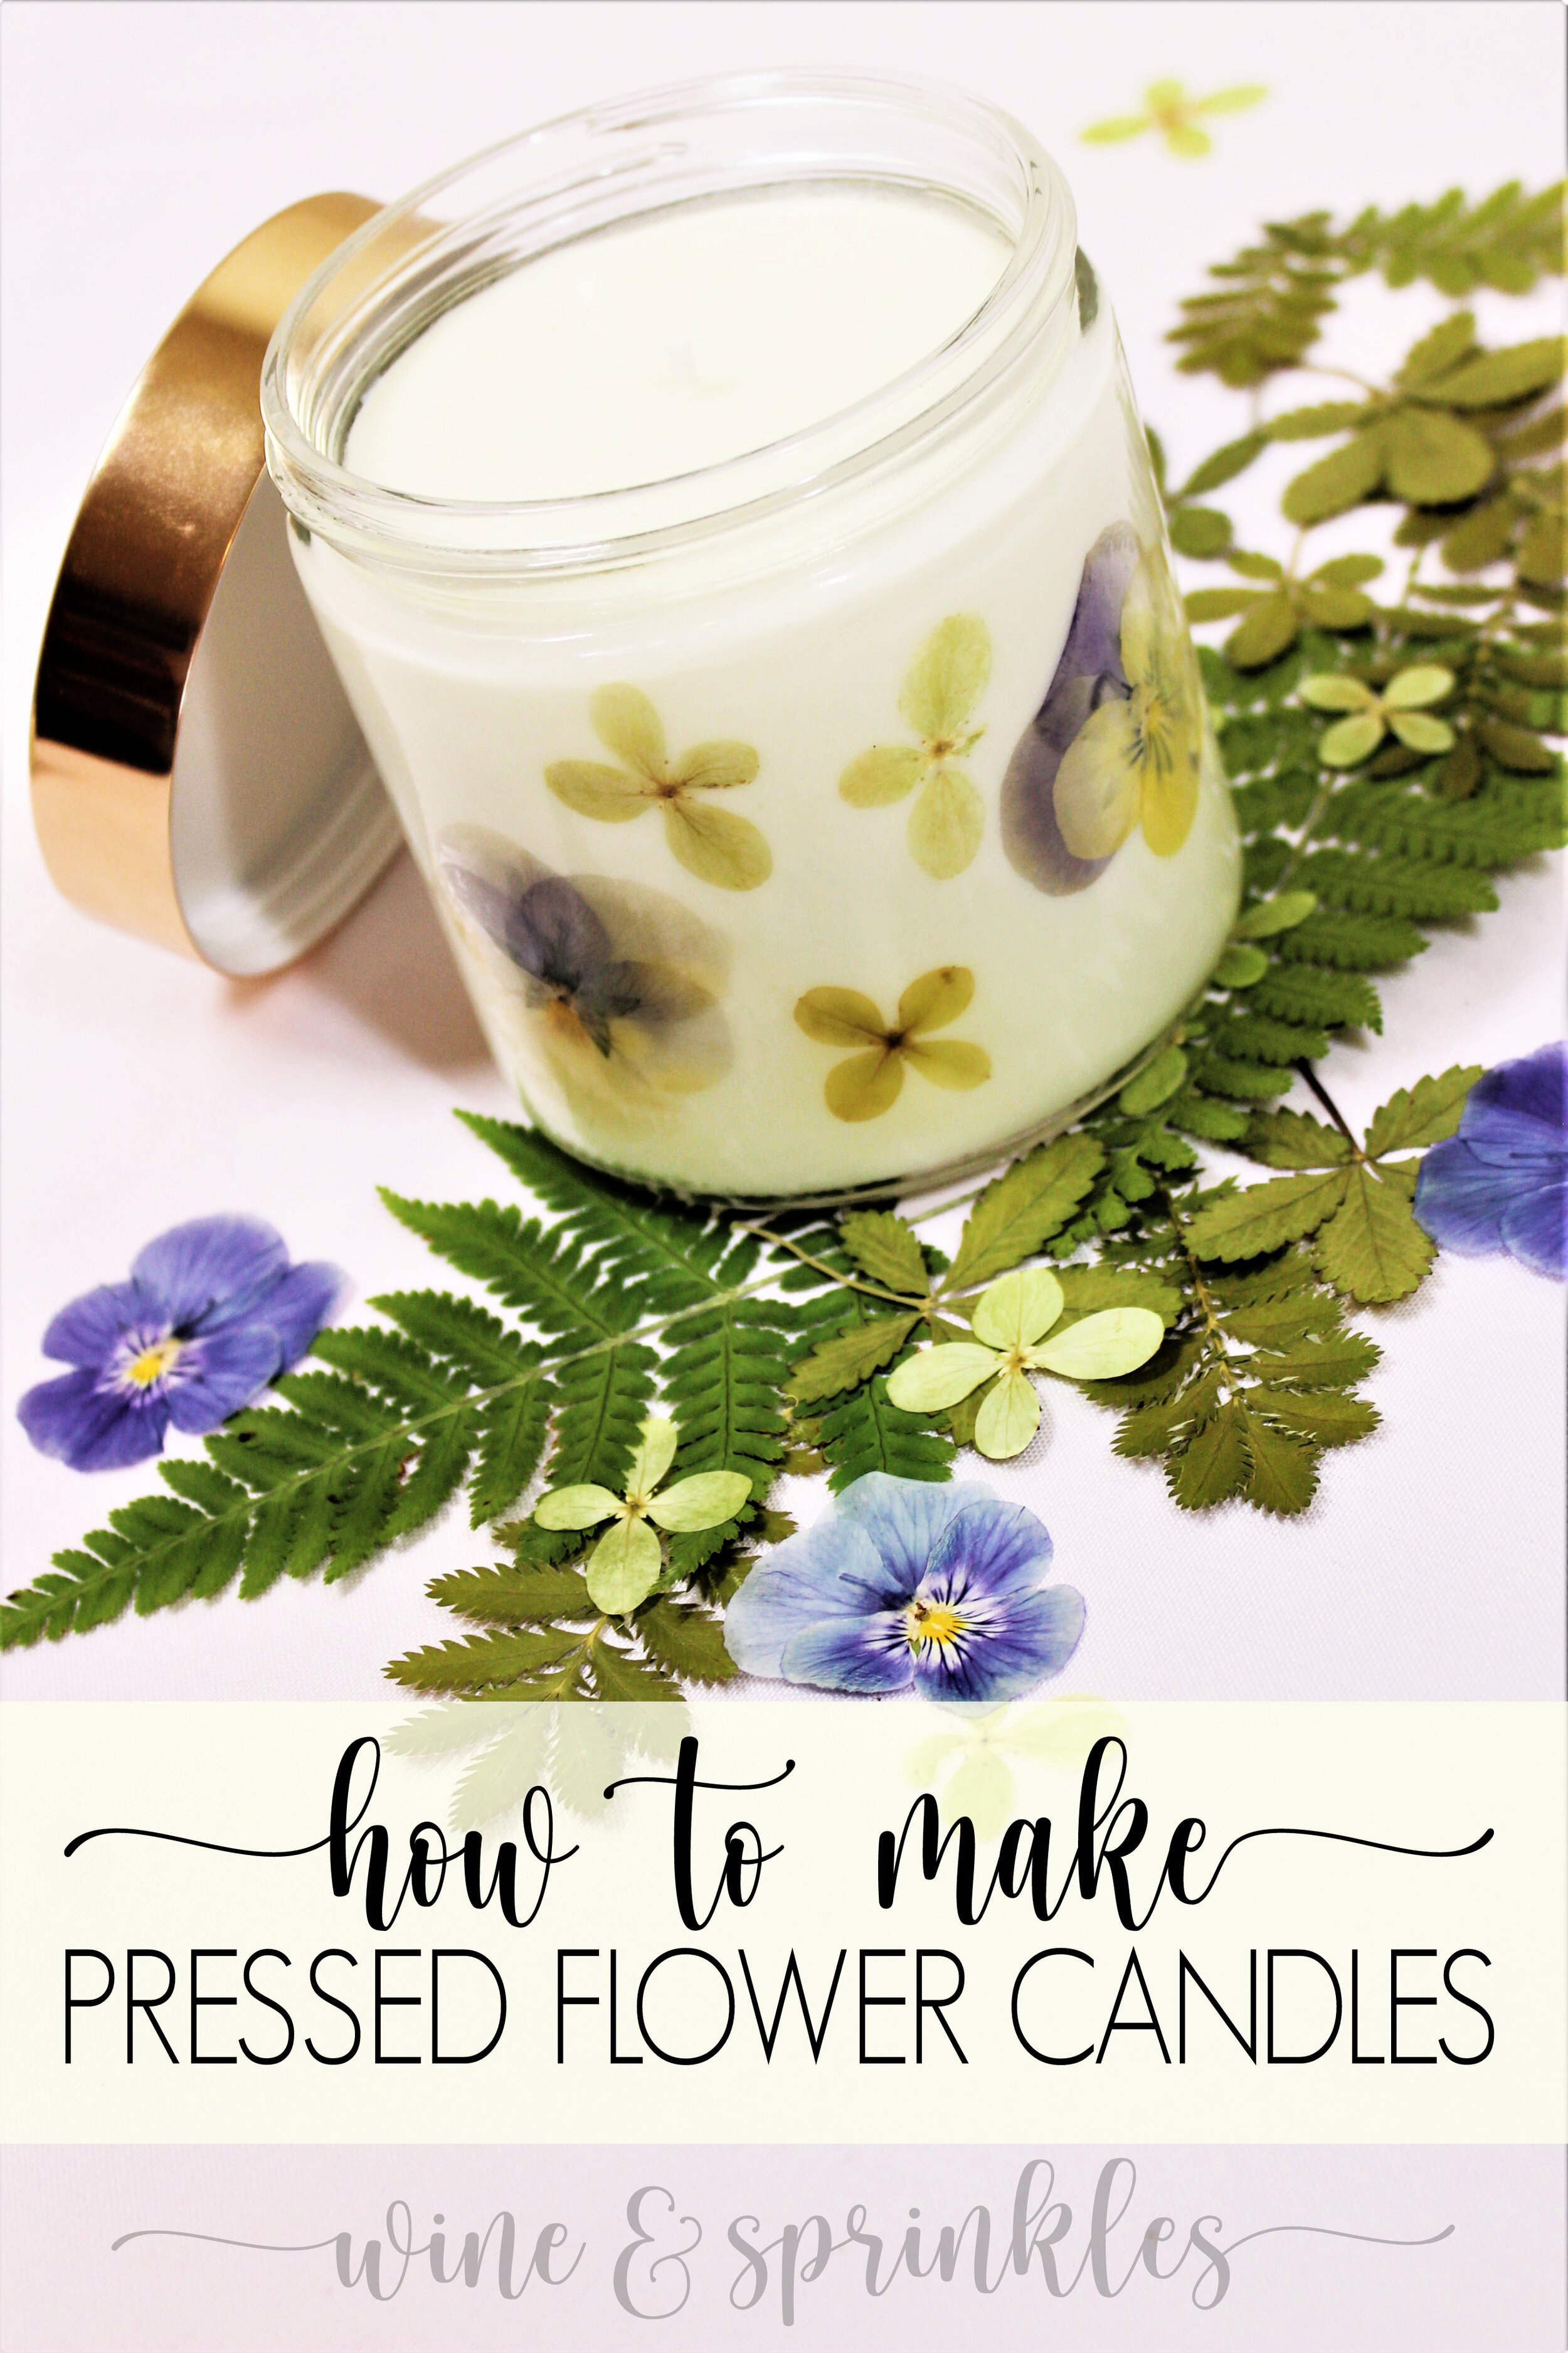
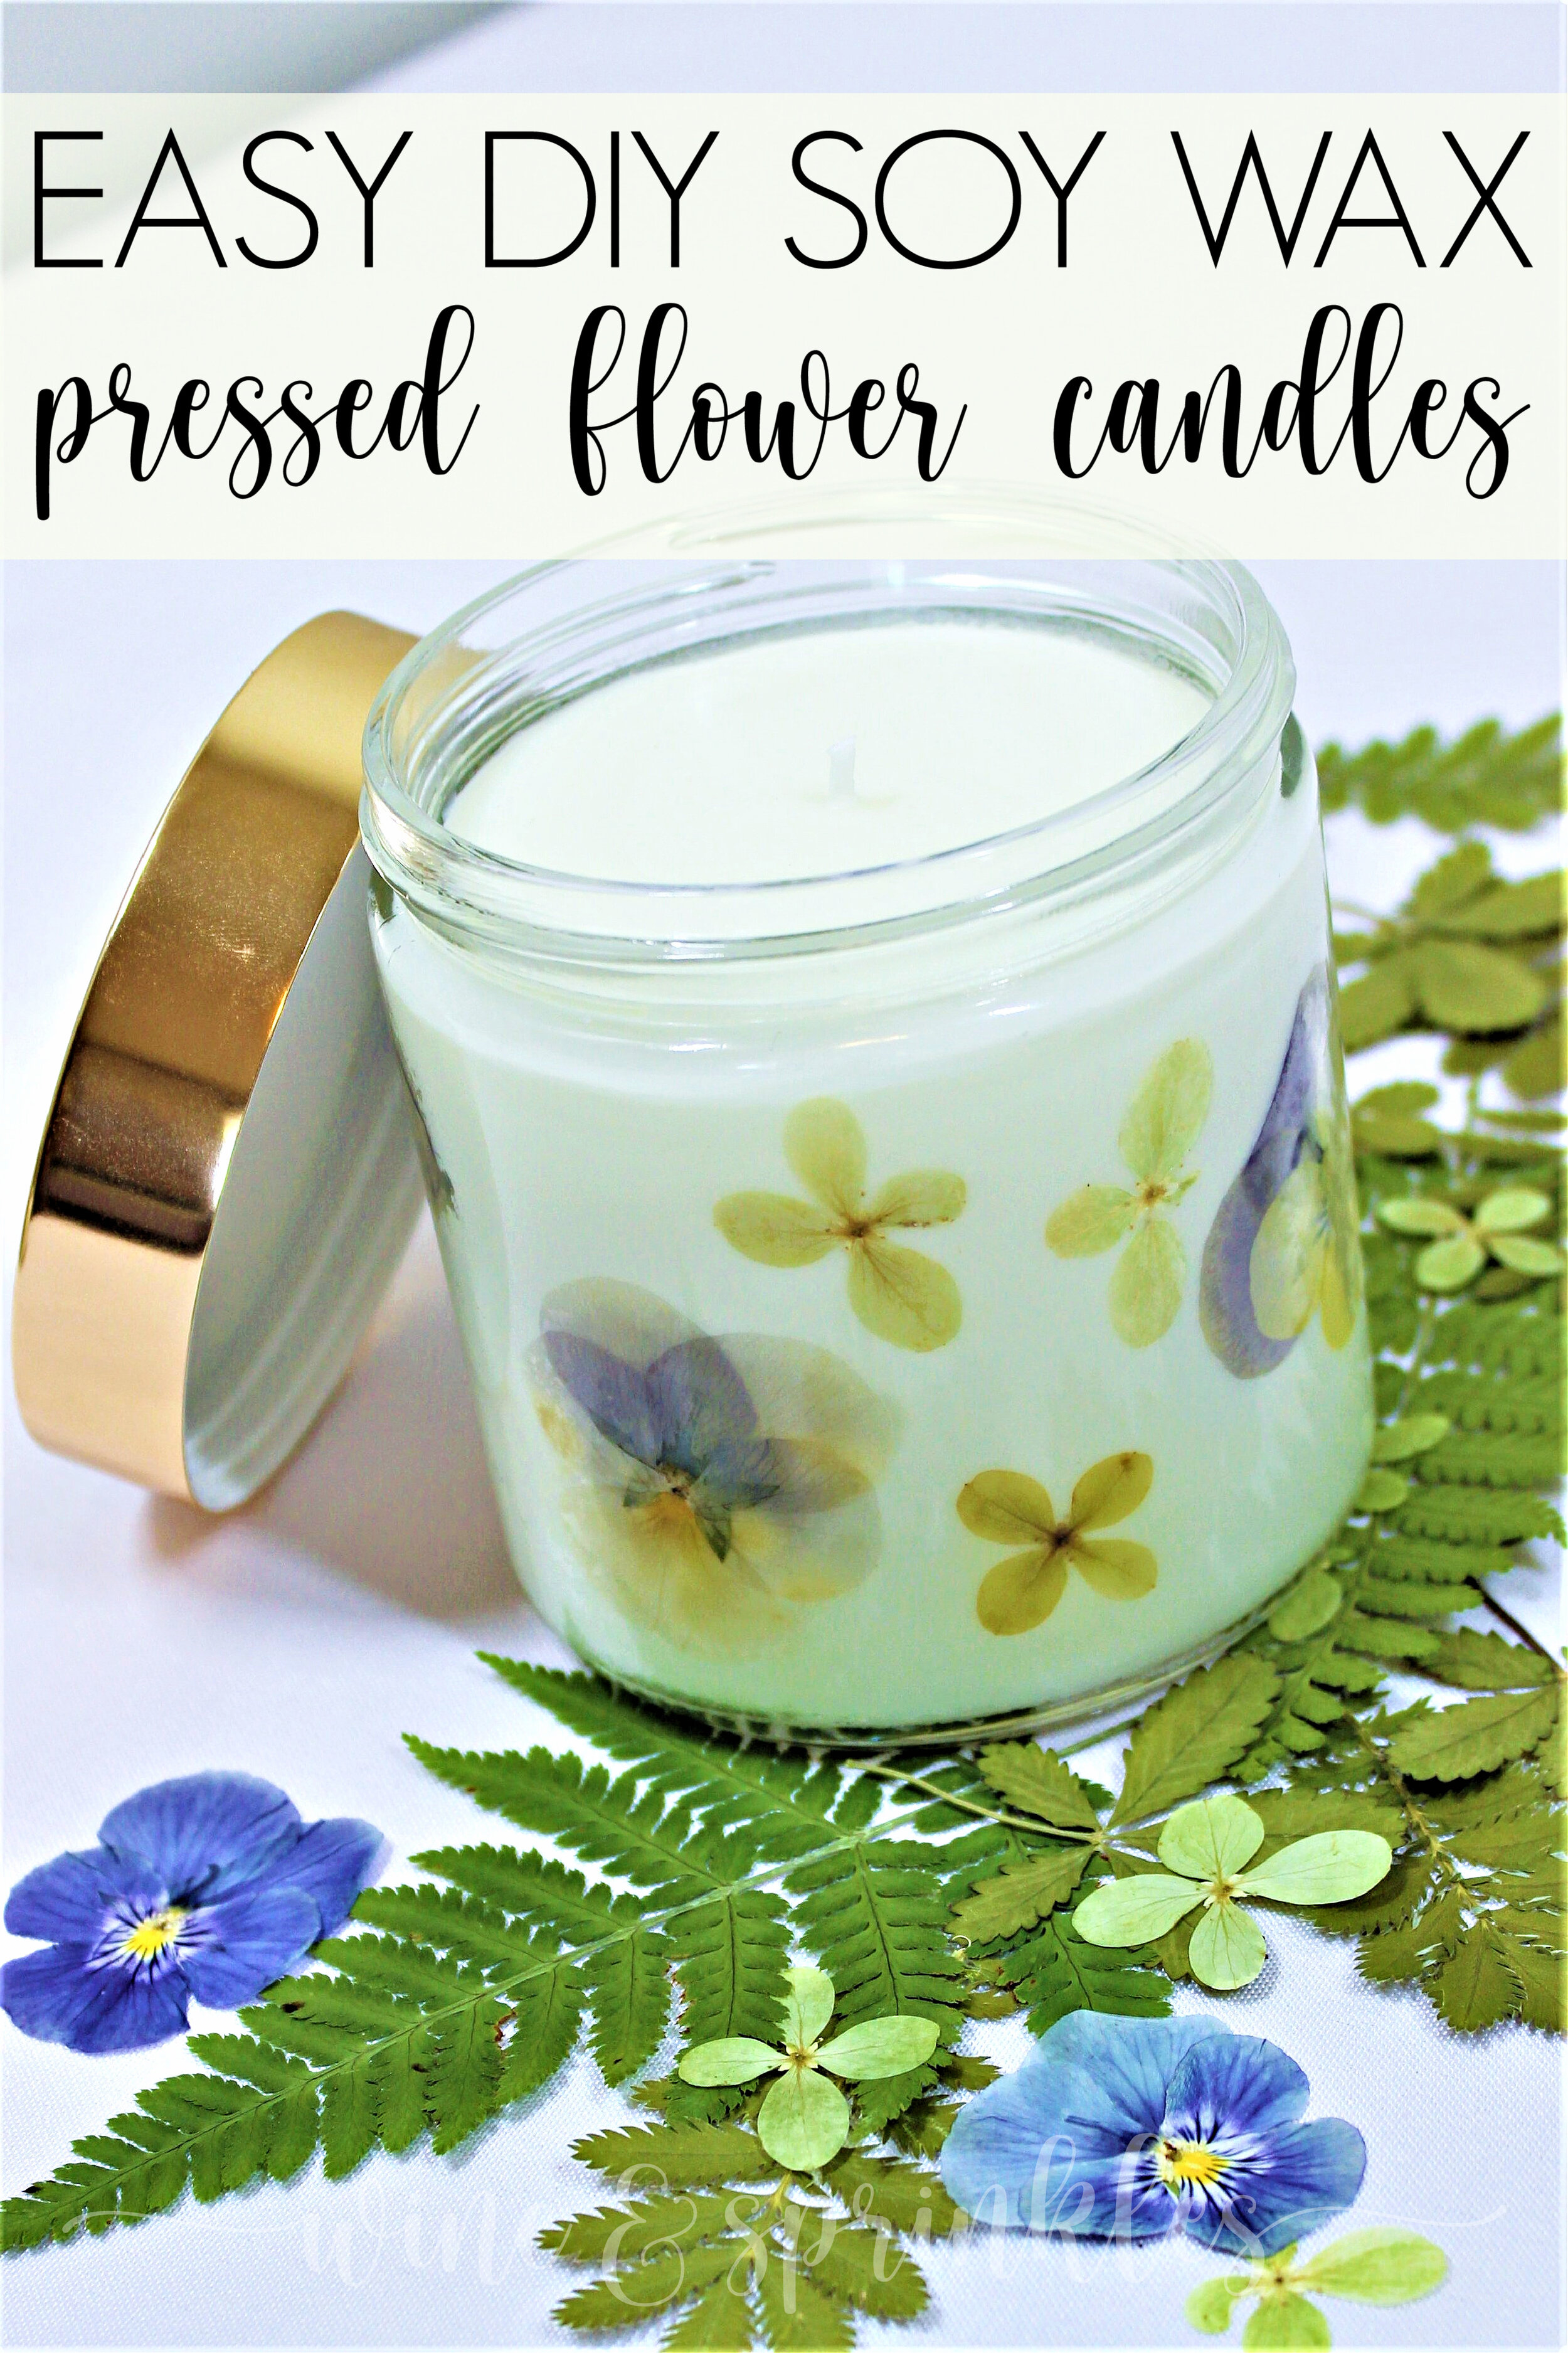
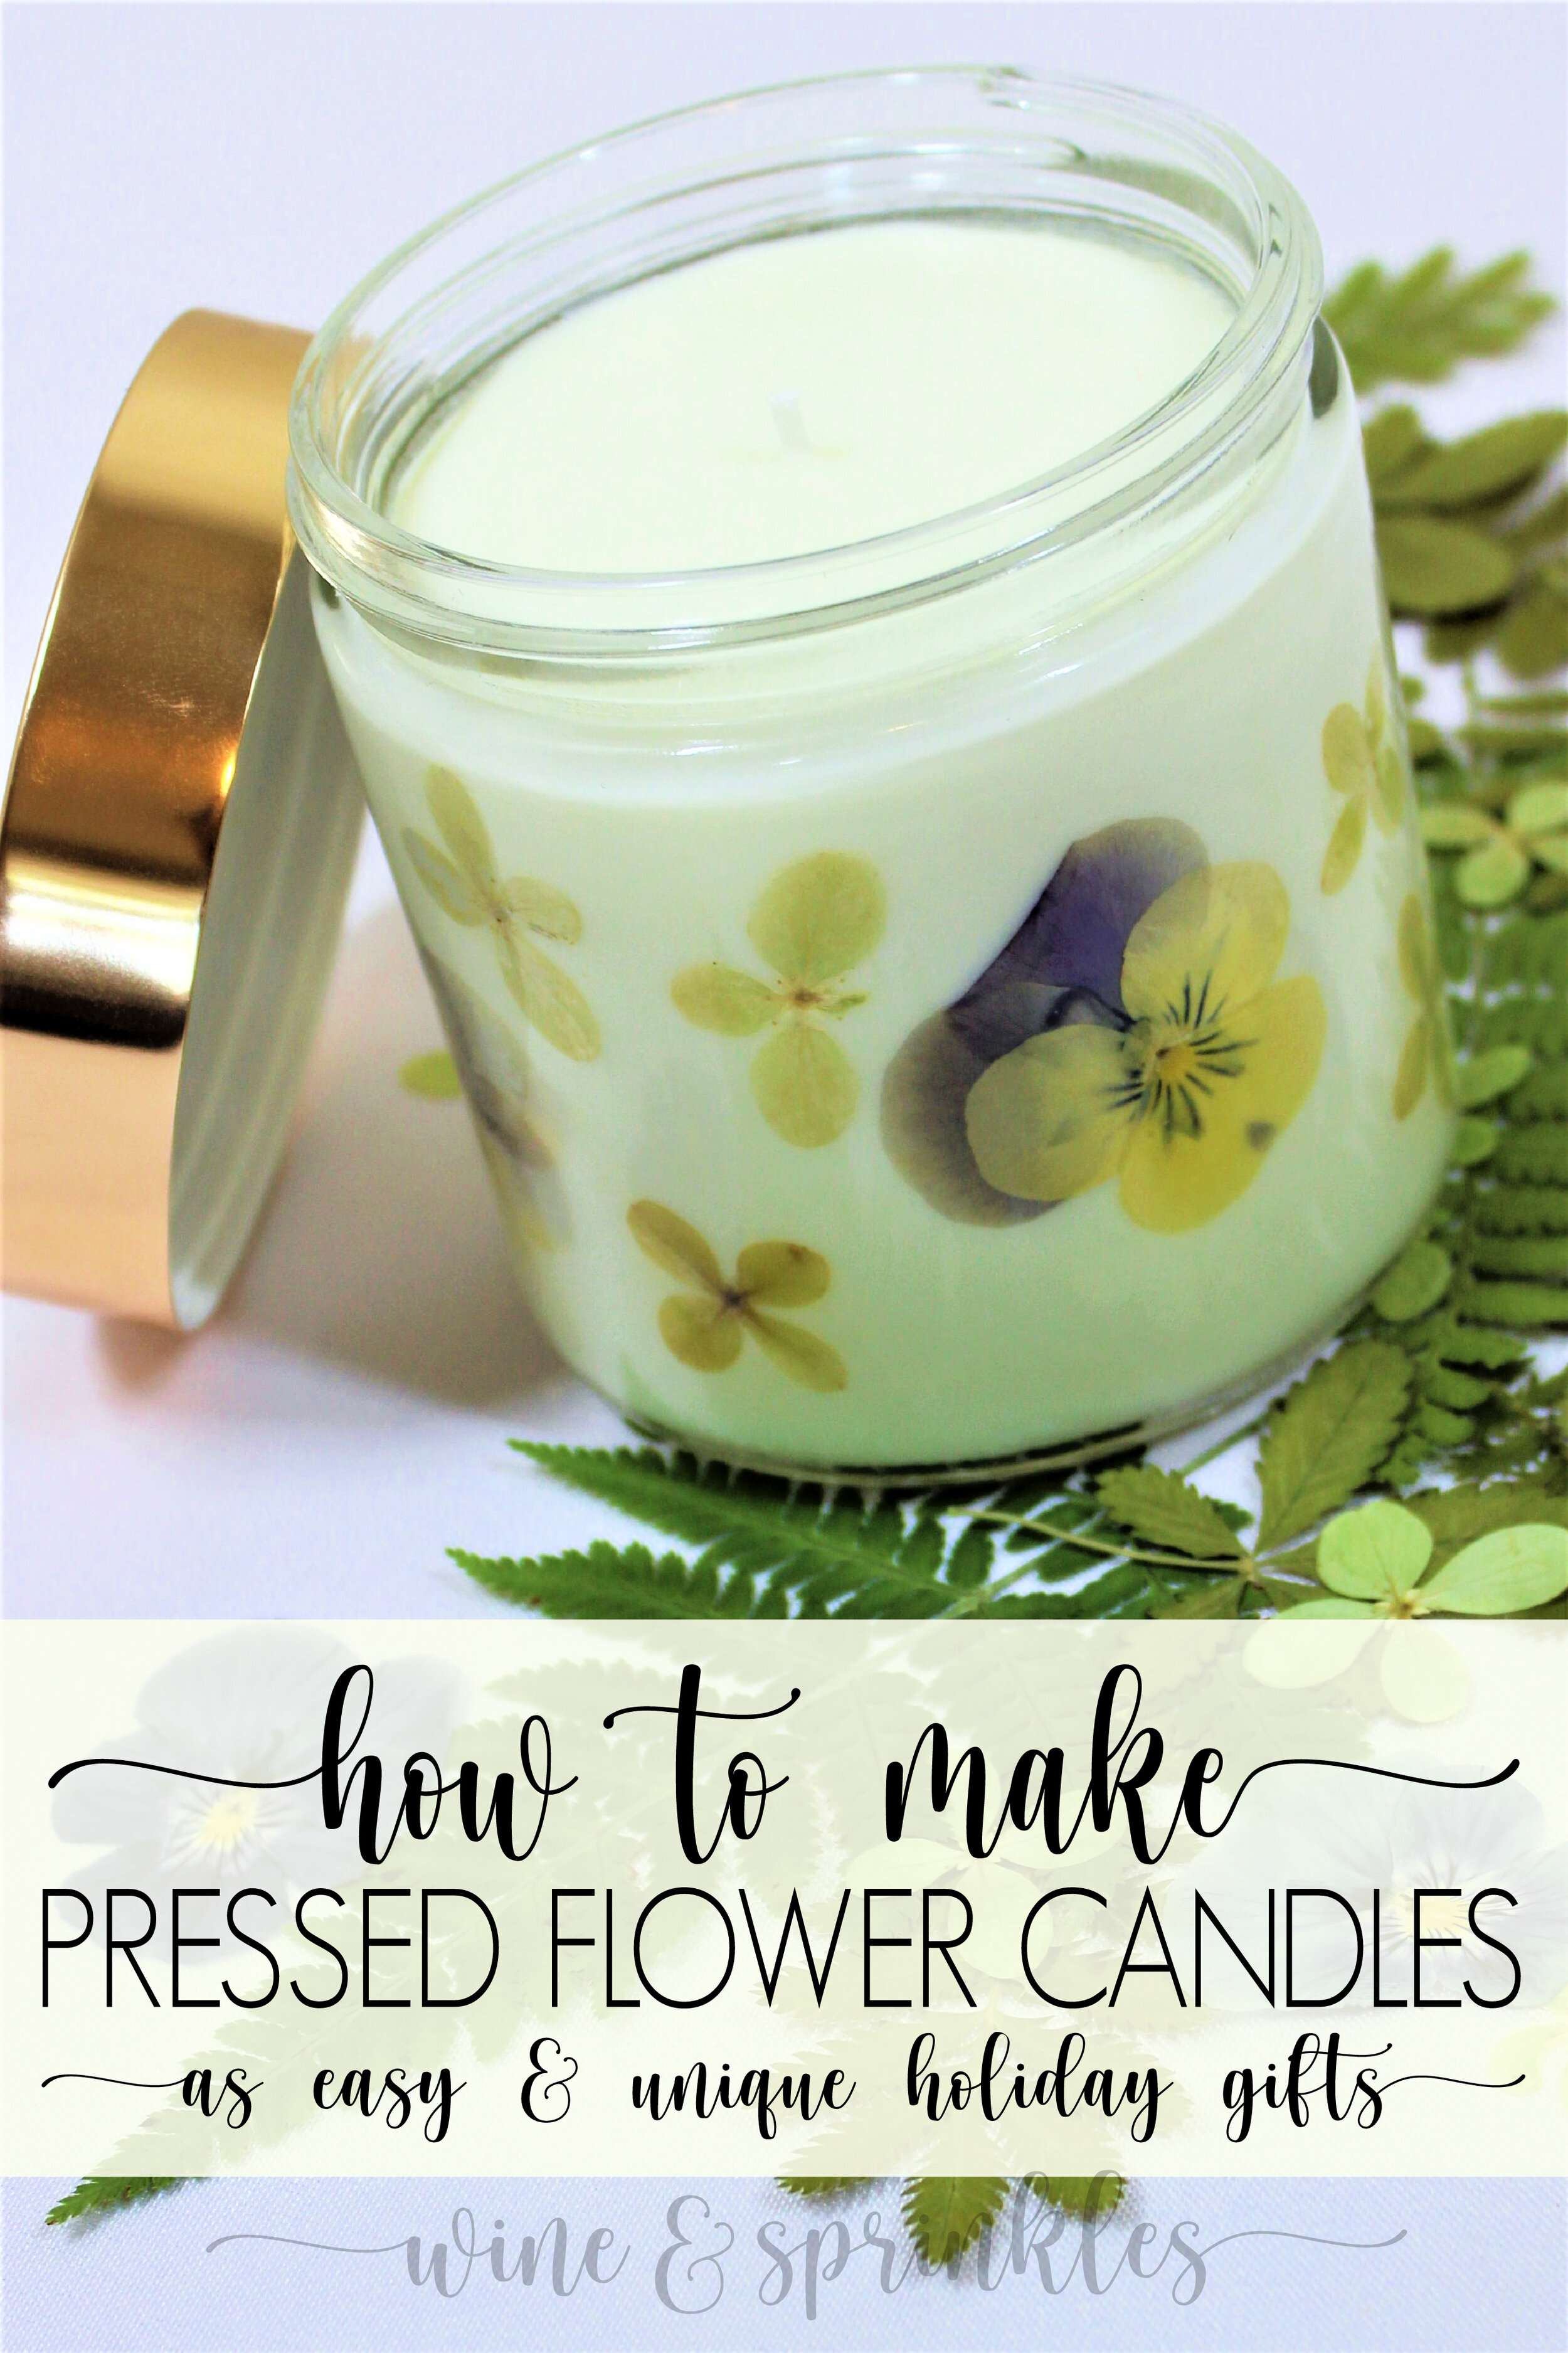
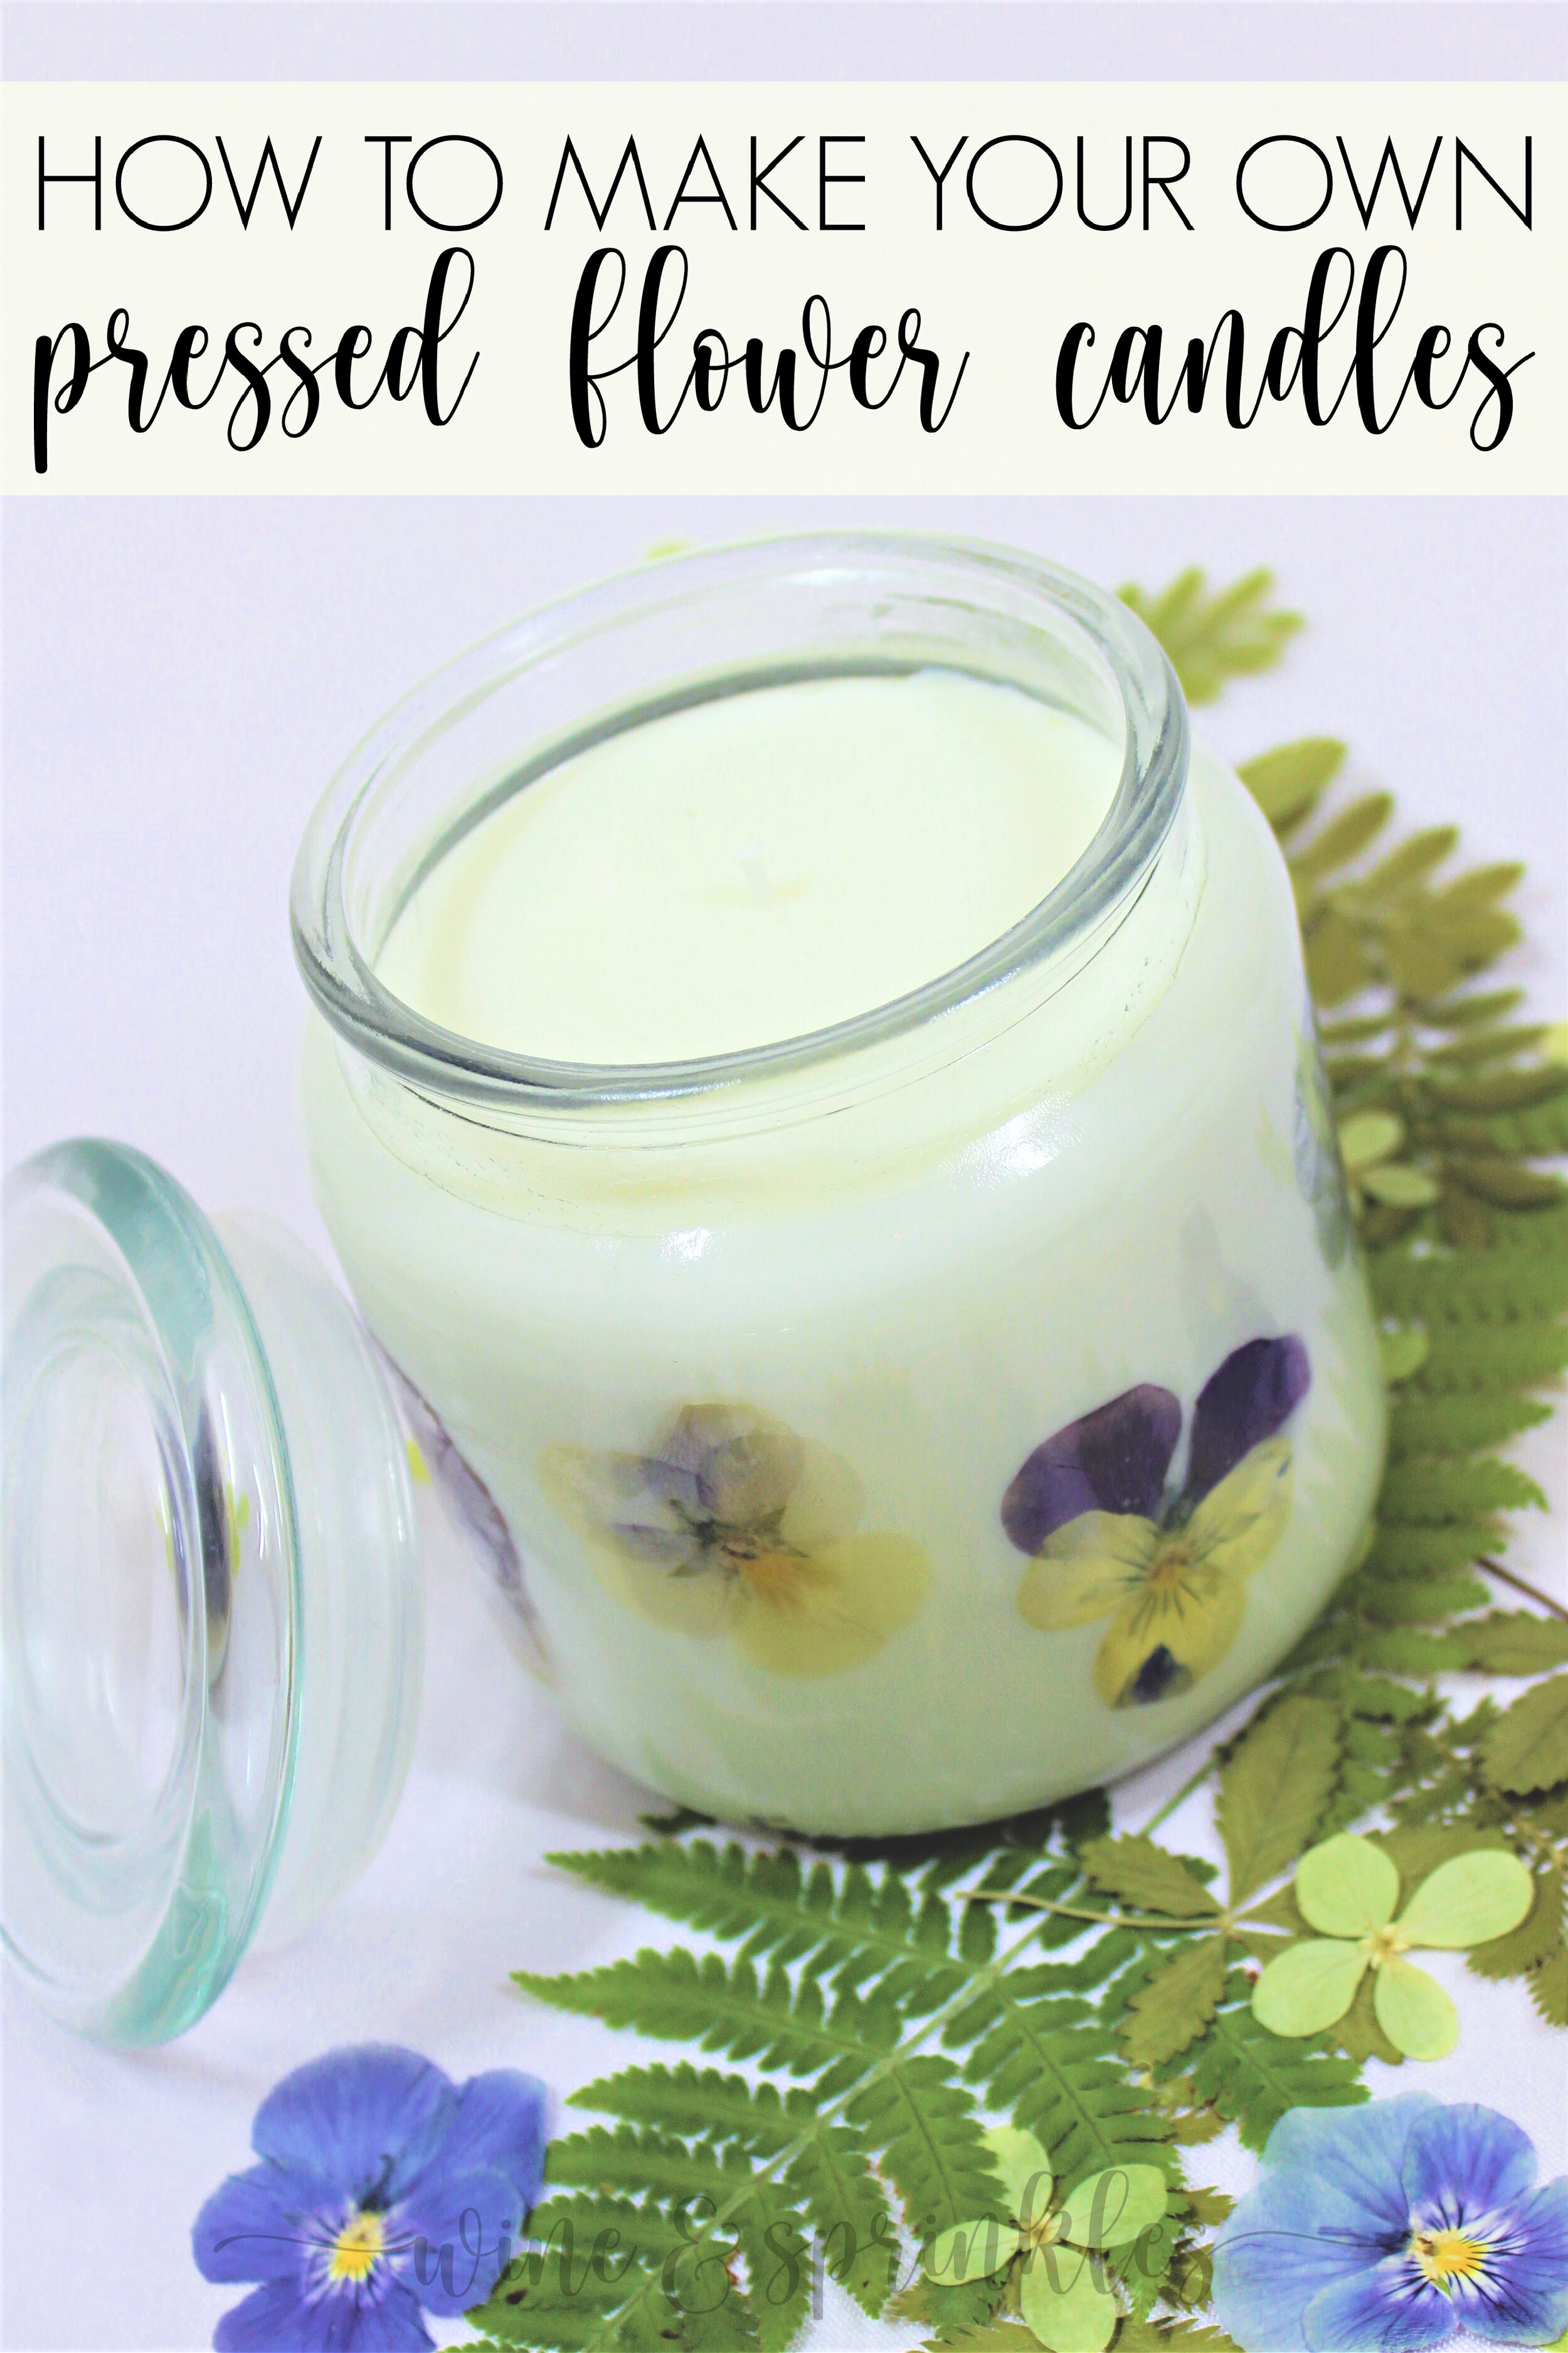
For those cold winter nights, nothing beats a delightful pair of fuzzy slipper socks! I feel like this is equally true all year round, so despite the fact I was jetting off from the cold to balmy beach weather, I wanted to include something in my friend’s Sleepover Spa Sorority Gift Boxes with a cozy vibe that still fit my theme for our college getaway vacation. Enter these Personalized Sorority Socks, that gave us the perfect matching accessory to share during the weekend, just like TShirts from our college days, while also being lovely for traversing those chilly tile floors of our rental home in the morning!

Read More

Personalized HTV Sleep Masks

Personalized HTV Sleep Masks

We’re back from some balmy southern weather and ready to show off all the cute gifts and favors I made for all my friends! So the next couple weeks of projects are devoted to all the fun goodies in the Sleepover Sorority Spa Gift Boxes I crafted for my wonderful college friends, starting with a lovely favor to make sure everyone gets some shut eye when it's time for bed after a day of chatting and vacationing!

Read More

Pressed Flower UV Resin Necklaces

Pressed Flower UV Resin Necklaces

The best part of spring and summer for me are all the beautiful blooms that come out after the cold snowy winter, and I’m always wanting to find new ways to use flowers in my DIY Projects. For my Goddess of Spring Cocktail Party, I wanted to send all my guests home with a little something to commemorate the day and for them to wear during the party, so all my ladies went home with beautiful necklaces, each inlaid with pressed flowers between two layers of resin.

Read More

Bride and Tribe DIY Skinny Tumblers

Bride and Tribe DIY Skinny Tumblers

Whether it's for a Bachelorette Party or for getting ready drinks the day of your Wedding, bridal party tumblers and a classic and useful drinkware choice for all the ladies in your Bride Tribe. Help them celebrate in style with these simple and gorgeous Bride and Tribe DIY Vinyl decal Skinny Tumblers!

Read More

I Do Crew DIY Flasks

I Do Crew DIY Flasks

If there’s a classic piece of drinkware that states you’re ready to party, it’s a flask! Flasks are always a fun addition for your Bachelorette party and a great way to safely seal, store, and enjoy your bachelorette drinks as you hit the town, and these I Do Crew Flasks are perfect for a large party where not everyone is in the bridal party itself.

Read More

Romantic Font DIY Bridal Party Skinny Tumblers

Romantic Font DIY Bridal Party Skinny Tumblers

Getting ready with your bridesmaids and family is one of the best memories to start off your wedding day, and no wedding pregaming, whether mimosas or water, is complete without some fun drinkware for your ladies to use and take home! For a classic and romantic getting ready tumbler, look no further than these beauties you can make yourself!

Read More

Romantic Font DIY Bridal Party Flutes

Romantic Font DIY Bridal Party Flutes

I love using champagne flutes as proposal items or getting ready items for weddings, they're such a romantic and classy way to toast to your future together. These flutes are perfect for either of those purposes or any shower or wedding event! Plus I made decals for not only the bridesmaids, maid of honor, matron of honor if you have one, and the bride; but also for the mothers of the bride and groom so that you can make sure all of your ladies feel extra special at your wedding.

Read More

DIY I Do Crew Bridal Party TShirts

This post contains affiliate links, meaning that if you click on a link I will recieve a small comission. This costs you nothing extra and I only promote products I use and love! You can read our full disclosure here

DIY I Do Crew HTV Bridal Party TShirts #diywedding #svgfiles #idocrew

To go with our adorable I Do Crew Tumblers, I made some corresponding decals to use on shirts and other wearables! The shirts are great not only as Bridesmaid Proposals, but also for any pre-wedding events especially ones where you may have a large support group but not necessarily everyone is in the bridal party. These would be perfect to make, for example, to give to people going wedding dress shopping with you!

 I made the “I Do Crew” decals on Mermaid Blue Glitter HTV and I made the Bride decal out of Gold Foil HTV and I love the color combination! 

DIY I Do Crew HTV Bridal Party TShirts #diywedding #svgfiles #idocrew

You can see our other Bridesmaid Proposal and Gift Projects here, so whether you were looking for tumblers, tank tops, or something else you can find the perfect set to propose to your best girls!


DIY I Do Crew HTV Bridal Party TShirts #diywedding #svgfiles #idocrew
  1. After downloading the cut files, import them into the Cricut Software. After creating a new project, select Upload Image. Select the file you wish to upload and it will automatically take you to the final upload screen, where you can name the file the select Save. The SVG Files are sized so that they will automatically cut to the size you see in the photos, but if you want to change the size you can do so to fit the tank tops the way you like.

  2. After selecting “Make It” Make sure to select the Mirror Mode on the cutting screen. Cut the design in your choice of heat transfer vinyl with the Iron On (for Easyweed Vinyl) or Iron On+ (for Glitter Vinyl) Setting on your Cricut, with the shiny side of the material down.

DIY I Do Crew HTV Bridal Party TShirts #diywedding #svgfiles #idocrew

3. Weed the additional material off of the backing material so that, looking down with the shiny side up, you can see your design with the correct orientation.

4. Iron your tshirt or tank top to remove any creases, then center the design over the top half of the tank top. Arrange the design shiny side up, then cover with parchment paper. Make sure to keep the parchment paper between the design and the iron.

DIY I Do Crew HTV Bridal Party TShirts #diywedding #svgfiles #idocrew

5. Set your Iron to the second Highest setting and press the iron down firmly on the design, not ironing but rather using it as a small heat press. I worked from the upper left to lower right on the design, pressing the iron on each part of the design for at least 20-30 seconds, then overlapping the last position as you move the iron across the design.

6. Remove the backing from the design, leaving the design on the fabric. Repeat with all remaining tshirts.

You can find more designs for your bridal party in our Tank Top and TShirt Projects!

DIY I Do Crew HTV Bridal Party TShirts #diywedding #svgfiles #idocrew
 

OUR PINS FOR THIS POST:

Pop Fizz Clink Bachelorette Tote Bags

This post contains affiliate links, meaning that if you click on a link I will recieve a small comission. This costs you nothing extra and I only promote products I use and love! You can read our full disclosure here

Pop Fizz Clink DIY HTV Bachelorette Party Tote Bags

It's the first day of December, so it's time to pop some bottles in honor of the holidays or maybe this crazy year being almost over! In that spirit, there’s no better way to end 2020 than with a fun champagne inspired DIY Tote Bag Project. Group Tote Bags for all your ladies to keep their belongings in are a great addition to any Bachelorette Party. I love these Tote Bags not only for Bachelorette Parties, but also for any New Years bar crawl or casual party!

For my totes, I used Old Gold Glitter HTV for the decal on a plain black tote bag and I absolutely love how it turned out!  The only parts of the design that had any trouble weeding were some of the smaller bits of the bubble outlines, but mainly just me remembering they were there and to remove them rather than it being hard to weed. This super fun design goes with any bachelorette or champagne poppin celebration and is an easy project for people who are new to Iron on Transfer Projects. :)

Pop Fizz Clink DIY HTV Bachelorette Party Tote Bags

For more Bachelorette DIY Projects, see our Bachelorette Party Projects & Posts Here!


1. After downloading the cut files, import them into the Cricut Software. After creating a new project, select Upload Image. Select the file you wish to upload and it will automatically take you to the final upload screen, where you can name the file the select Save. The SVG Files are sized so that they will automatically cut to the size you see in the photos, but if you want to change the size you can do so to fit the tank tops the way you like.

2. After selecting “Make It” Make sure to select the Mirror Mode on the cutting screen. Cut the design(s) in your choice of heat transfer vinyl with the Iron On (for Easyweed Vinyl) or Iron On+ (for Glitter Vinyl) Setting on your Cricut, with the shiny side of the material down.

Pop Fizz Clink DIY HTV Bachelorette Party Tote Bags

5. Set your Iron to the second Highest setting and press the the iron down firmly on the design, not ironing but rather using it as a small heat press. I worked from the upper left to lower right on the design, pressing the iron on each part of the design for at least 30 seconds, then overlapping the last position as you move the iron across the design.

Pop Fizz Clink DIY HTV Bachelorette Party Tote Bags

3. Weed the additional material off of the backing material so that, looking down with the shiny side up, you can see your design with the correct orientation.

4. Iron your tote bag to remove any creases, then center the design in the middle of the tote. Arrange the design shiny side up, then cover with parchment paper. Make sure to keep the parchment paper between the design and the iron.

Pop Fizz Clink DIY HTV Bachelorette Party Tote Bags

6. Remove the backing from the design, leaving the design on the Tote Bag. Repeat with all the remaining tote bags.

Check out more of our Tote Bag Projects Here! :)

Pop Fizz Clink DIY HTV Bachelorette Party Tote Bags
 
Pop Fizz Clink DIY HTV Bachelorette Party Tote Bags
 

Looking for more Bachelorette Party inspiration?

SEE MORE BACHELORETTE TOTE BAGS HERE:


OUR PINS FOR THIS POST:

DIY Pressed Flower Wall Candles

This post contains affiliate links, meaning that if you click on a link I will recieve a small comission. This costs you nothing extra and I only promote products I use and love! You can read our full disclosure here

DIY Dried Pressed Flower Wall Soy Wax Scented Candles

To finish up my Candle DIY Posts for the week, I saved my favorite for last! A couple months ago I ordered a whole slew of different pressed flowers, and when this idea came to me I had to make it happen!  I love the look of colorful pressed flowers and, with so many floral candle scents out there, having a Pressed Flower Candle was the perfect feminine way to display their pretty patterns and they came out even better than I could have hoped! These beautiful pressed flower candles were surprisingly super easy to make and are the perfect choice to DIY for holiday gifts, bridesmaid proposals, or bridal shower and baby shower prizes! 

While you can certainly press your own flowers for this project, I bought a whole selection of them for different Pressed Flower DIY Projects from the Etsy Shop My Love Meadow, and they were the perfect choice for me! They have a variety of different pressed flowers that change based on what they have currently, and all the ones I received were both affordable and perfect for all my projects, so I would highly recommend them if you don’t want to press flowers yourself! I used Blue Larkspur Delphinium Flowers for one of my candles and a beautiful set of Multicolored Pansies for my other Candles, which the shop was nice enough to include as a bonus with my other flowers!

DIY Dried Pressed Flower Wall Soy Wax Scented Candles

For these fun floral candles, I wanted a light floral scent so I went with a mix of jasmine and lemongrass and they came out smelling and looking gardentastic! I loved the colorful flowers against the natural color of the wax, so I chose not to dye it like I did for my  Wooden Wick Candles and Color Striped Candles, but I bet they would look beautiful in different pastel colors too!

DIY Dried Pressed Flower Wall Soy Wax Scented Candles

Supplies:
- Soy Wax and Cotton Wicks
- Lidded Candle Jars or Glass Candle Jars
- Candle Pouring Pot
- Candle Dye
- Fragrance Oils or Essential Oils
- Pressed Flowers
- Paintbrush and Bowl of Water
- Silicone Whisk or Spatula
- Hot Plate or Burner

DIY Dried Pressed Flower Wall Soy Wax Scented Candles

1. Start by weighing out your candle wax for the candles you wish to make into your pot or candle pouring pot. I used 16 oz per for each candle, the full volume of the jars I used, so that I had a little extra wax to work with and top them with at the end. For the bits of extra wax I used in these projects I made myself a couple of little candle in favor jars to burn in my office! You can make up to four candles if you are using a melting pot like I am, but I liked melting 16 oz at once so I could color and scent each candle uniquely, which is super fun for personalizing them for your friends, bridesmaids, or yourself!

 
DIY Dried Pressed Flower Wall Soy Wax Scented Candles

2. Now, prep your jars with the dried flowers. Using a paint brush with water, paint the inside of your jar to create a wet layer to attach the dried flowers to. Using tweezers with the jar on its side, lay the flowers in the design you want inside the jar, using the water to adhere them to the side. Once complete, position your jars upright with their lids removed and prepare the wax.

DIY Dried Pressed Flower Wall Soy Wax Scented Candles
 
DIY Dried Pressed Flower Wall Soy Wax Scented Candles

3. Melt the wax over medium low heat until the wax is 150 F. In this case, I didn’t want to add any dyes to my waxing prior to adding fragrance, because I wanted the dried flowers to be the central focus, but if you want to add dyes, follow the wax dying steps in our Wooden Wick Candles post to see how! 

Add the fragrance or essential oil of your choice to the melted wax, continuously stirring with a silicone whisk or spatula to bond the fragrance The fragrance I chose for my candles were:

Per 16 oz of Wax:

Jasmine Essential Oil - 15-20 drops
Lemongrass Essential Oil - 7-10 drops

Continue to stir to cool the wax. When it has cooled to about 120 F, it is ready to pour into the jars.

DIY Dried Pressed Flower Wall Soy Wax Scented Candles
 
DIY Dried Pressed Flower Wall Soy Wax Scented Candles

4. While the wax is cooling, prepare your wicks and jars. Taking a cotton wick, dip the stand end into the melted wax and place into the candle jar, using the wax to seal it to the bottom of the jar. Once the wicks are dry, thread the wick through the metal centering device (or a little piece of cardstock with a hole) to secure it in place for wax pouring. Once the wicks are dry, use your candle pourer to fill your candles just below the lip of the jar, reserving any extra wax to finish the candle. Now let the candle cool completely.

DIY Dried Pressed Flower Wall Soy Wax Scented Candles

5. Once the candle is cooled, check the top to see if there are any divots or imperfections in the top of the candle, which can happen during cooling. If needed, remelt the remaining wax to 120 F and “top off” any imperfections on the top of the candle, again allowing it to cool completely. Trim the wooden wick with nail clippers, cuticle cutters, or small scissors and you’re done!

DIY Dried Pressed Flower Wall Soy Wax Scented Candles
 

Looking for more DIY Candle Inspiration?

SEE MORE CANDLE PROJECTS HERE


OUR PINS FOR THIS POST:

DIY Color Striped Soy Wax Candle

This post contains affiliate links, meaning that if you click on a link I will recieve a small comission. This costs you nothing extra and I only promote products I use and love! You can read our full disclosure here

WS-41-PIN-17txt (1).jpg

I absolutely love candles as Bridal Shower Favors, so in addition to the Wooden Wick Candles that I made for my bestie’s Bridal Shower, I wanted to experiment with other candle making ideas so that guests had a variety of different candle prizes to choose from. An idea I’ve had for a while that I’ve always been too nervous to try was to make candles with different stripes of colors, and this was the perfect opportunity to try it. So I took out my Candle Dyes and made my first attempt at Color Striped Candles, and they turned out to be way easier and cuter than I could have imagined! 

While they may look difficult, in reality they consist of nothing more than heating the candle wax to color it, then letting it cool, and remelting and scenting it based on what colored stripe you are doing. The hardest part of this project was merely storing the wax after it was colored, which I used my set of Rectangular Soap Molds for, and it actually was the perfect choice because I could easily store 2-3 oz per cavity and then I had nice little colored blocks to remelt. It’s easiest to complete this project in two sessions, the first to color the wax, then the second once you have all your colors cooled and ready, remelting them and pouring them into candle jars.

 
WS-41-S-2txt.jpg
WS-41-S-4txt.jpg
WS-41-S-1txt.jpg

For these candles, I made a mix of Rose Color Striped and Lavender Color Striped in two types of candle jars, and they all came out so cute! I would recommend waiting a little longer and making sure each layer is set, so your stripes have nice distinct edges and don’t bleed into each other, which mine did in a couple places! I weighed the wax as I created each stripe to make sure they were all the same width, which I highly recommend; however, if you choose to do this I would also work one candle at a time, letting each layer cool on the scale and then rezeroing and pour the next stripe, some of my crisp lines got messed up because I moved them off the scale to make the next one before they cooled. Next time, I’ll be keeping them on the scale until they are completely poured! 

WS-41-S-5txt.jpg

While a little time consuming to wait for each stripe to solidify, it was well worth it for how cute they turned out! These candles are an easy project as well as a beautiful and unique gift to impress your friends and family with; whether you choose to use them for Bridesmaid Proposals, Holiday Gifts, or Bridal Shower or Baby Prizes!


Supplies:

- Soy Wax and Cotton Wicks
- Lidded Candle Jars or Glass Candle Jars
- Candle Pouring Pot
- Candle Dye
- Fragrance Oils or Essential Oils
- Soap Molds or Bowls for holding wax
- Kitchen Scale
- Burner or Hot Plate

WS-41-S-4txt.jpg

WS-41-1txt.jpg

1. Start by weighing out your wax for the candles you wish to make into your pot or candle pouring pot. I used 16 oz per for each candle, the full volume of the jars I used, so that I had a little extra wax to work with and top them with at the end. For the bits of extra wax I used in these projects I made myself a couple of little striped candles in jars to burn in my office! You can make up to four candles if you are using a melting pot like I am, but I liked melting 16 oz at once so I could color and scent each candle uniquely, which is super fun for personalizing them for your friends, bridesmaids, or yourself!


2.  To create the stripes on these candles, I chose to color and cool the lighter colors of the wax first, measuring out what I needed and then dying the remaining wax in the melting pot darker.

Start by melting all the wax over medium low heat until the wax is between 200-220 F. Once it has reached this temperature, you can add your wax coloring. Start by adding your first round of wax dye, mixing with a silicone whisk until it is completely incorporated. I tried measuring my dye in grams, but I found it easier to add a little at a time and test the color. Check the color of your wax by letting wax dry on the back of a metal spoon, until it has reached the desired shade. For the lightest shade I added just a couple chips of dye, as shown in the photos. For the pink I used a mix of white and cherry red candle dye, while the lavender was made by adding small amounts of the purple dye only.

WS-41-2txt.jpg
WS-41-3txt.jpg
WS-41-4txt.jpg

Once you have your desired light colored shade, pour 2.5-3 oz of melted wax per candle into a separate bowl or silicone mold to cool. I found the perfect thing to use was my Silicone Soap Molds for cooling the wax, each cavity is a little over three ounces so I just poured them mostly full to reserve my wax colors. Depending on the candle jar you want to use, the amount of was you reserve will vary, for my jars I reserved:

WS-41-5txt.jpg

Gold Lidded Glass Jar 

- 4 Stripes: 3 oz of wax per stripe
- 5 Stripes: 2.5 oz of wax per stripe

Glass Lidded Jars

 - 5 Stripes: 3 oz of wax per stripe

WS-41-6txt.jpg
WS-41-7txt.jpg
WS-41-8txt.jpg
WS-41-8txt.jpg

Now, make your medium shade by adding more candle dye to the melting pot, adding another 1-2 small chips of the wax coloring. Once you have reached the desired mid colored shade, pour 5-6 oz of wax per candle into a separate bowl or silicone mold to cool, just like the light colored wax. You’ll notice you reserve twice the amount of wax for these candles, that’s because you need it for two stripes!

Finally, add a final chip or two of candle dye once more to the remaining wax in the melting pot for your final darkest shade. Remove remaining wax from heat, and you now have the three shades for your striped candles! Let the wax cool in the molds, with the third color either cooling in your candle pourer pot to be scented first and the first stripe of your candle, or pour all the wax into molds and wait for each color to solidify. That makes it easier to choose what colors you want to scent and pour first or to make a rainbow of stripes for your own personalized candles! 

WS-41-9txt.jpg
 

3. While the wax is cooling, prepare your wicks and jars.  Taking a cotton wick, dip the stand end into the melted wax and place into the candle jar, using the wax to seal it to the bottom of the jar. Once the wicks are dry, thread the wick through the metal centering device (or a little piece of cardstock with a hole) to secure it in place for wax pouring. Once the wicks are dry, it's time to pour your candles!

WS-41-10txt.jpg
WS-41-11txt.jpg
WS-41-12txt.jpg
 
WS-41-14txt.jpg

4.  Melt and cool each of your colored waxes to 150 F, add the fragrance or essential oil of your choice, continuously stirring the wax with your whisk to bond the fragrance and continue to cool for pouring. I started with scenting my shades lightest to darkest, so I could use the same whisk to mix all the bowls without changing the colors noticeably in the darker shades. The fragrances I chose for my candles were:

Pink: 
Rose Fragrance - 5 drops per wax color

Lavender: 
Lavender Fragrance Oil - 5 drops per wax color

When the wax has cooled to about 120 F, it is ready to pour into the jars.

 
WS-41-15txt.jpg
WS-41-18txt.jpg
WS-41-19txt.jpg
WS-41-22txt.jpg

5. For each candle, start by placing it on a kitchen scale so that you can measure out your wax by weight. Starting with your darkest shade, use your candle pourer to measure 2.5 - 3 oz of wax into the bottom of each candle jar, creating the first stripe. Reserve the rest of the wax for the top stripe in a separate bowl or mold. 

Once the first stripe has cooled and solidified, reheat the middle shade wax in the melting pot to 150 F, scent it, and cool to 120 F. Using the kitchen scale again, measure 2.5 - 3 oz of wax into each jar, creating the second stripe.

Repeat this process of cooling the candles and reheating the wax to 120 F for the next three stripes, with your lightest color being the third, middle color being the fourth, and darkest color being the top stripes in the candle. Reserve any additional dark colored wax for topping the candles, and let cool completely.

WS-41-23txt.jpg
WS-41-24txt.jpg
WS-41-25txt.jpg
 

5. Once the candle is cooled, check the top to see if there are any divots or imperfections in the top, which can happen during cooling. If needed, remelt the remaining wax to 120 F and “top off” any imperfections on the top of the candle, again allowing it to cool completely. Trim the wick with nail clippers, cuticle cutters, or small scissors and you’re done!

WS-41-26txt.jpg
 

Looking for more DIY Candle Inspiration?

SEE MORE CANDLE PROJECTS HERE


OUR PINS FOR THIS POST:

DIY Wooden Wick Candles

This post contains affiliate links, meaning that if you click on a link I will recieve a small comission. This costs you nothing extra and I only promote products I use and love! You can read our full disclosure here

DIY Scented Soy Wax Wooden Wick Candles

For my own Bridal Shower years ago, my bridesmaids chose wooden wick candles as the prizes for my bridal shower games and I thought it was the best idea ever! For the fall or for just feeling cozy, there is nothing like the sound of a crackling fire and the crackling candles gave that same feel and were a beloved prize by all those lucky enough to win them! As I was deciding what prizes I wanted to give at my best friends shower this November, I knew some Wooden Wick Candles had to be Included!

For my candles, I made one of them a Deep Rose Pink with a Rose and Vanilla Scent for my bestie’s Beauty and the Beast Tea Party Bridal Shower, and the other a light Silver Sage Green with a Cedar, Peppermint, and Lemon Scents for a nice cozy wintertime feel, which I can’t wait to burn myself this holiday season! For these candles, I bought a Candle Dye and Fragrance Set that came with a variety of different color and scent options, while also making use of my Essential Oils Set I bought for my other Spa Themed Projects to scent my Silver Sage Candle, so make sure to check out the scent available in both sets to decide what you want to do for your own candles.

DIY Scented Soy Wax Wooden Wick Candles

I melted, dyed, and scented each of my candles individually, which I also love for making each candle unique for your recipient. While I’m using my candles for Bridal Shower Prizes and my own personal use, these candles are an easy and fun gift to make for Bridesmaid Proposals, Holiday Gifts, or Baby Shower Prizes too!


DIY Scented Soy Wax Wooden Wick Candles

1. Start by weighing out your candle wax for the candles you wish to make into your pot or candle pouring pot. I used 16 oz per for each candle, the full volume of the jars I used, so that I had a little extra wax to work with and top them with at the end. For the bits of extra wax I used in these projects I made myself a couple of little striped Candles in Favor Jars to burn in my office! You can make up to four candles if you are using a melting pot like I am, but I liked melting 16 oz at once so I could color and scent each candle uniquely, which is super fun for personalizing them for your friends, bridesmaids, or yourself!

DIY Scented Soy Wax Wooden Wick Candles

2. Melt the wax over medium low heat until the wax is between 200-220 F. Once it has reached this temperature, add your wax coloring,  mixing with a silicone whisk until it is completely incorporated. Check the color of your wax as you add more dye by letting wax dry on the back of a metal spoon, until it has reached the desired shade. Remove wax from heat.

For my candles, I used a mix of two dyes per candle, one to make a rosy gold shade and one to make a silvery sage shade.

DIY Scented Soy Wax Wooden Wick Candles

Rose Gold: (per 16 oz of candle)

Fuschia Dye: 3g
Gold Dye: 2g

Silver Sage: (per 16 oz of candle)

Dark Green Dye: 2g
Silver Grey Dye: 2g


These were the first candles I dyed, and while I like their darker colors, my scale wasn’t accurate enough to measure these small amounts of grams accurately! If you also don’t have a scale that can measure 1-5 g, I’d recommend adding the dye a few chips at a time and checking the color until it reaches the right shade, which is how I did the rest of my Candle Projects.


3. Let the wax cool to 150 F and then add the fragrance or essential oil of your choice, continuously stirring the wax with your whisk to bond the fragrance and continue to cool for pouring. The fragrances I chose for my candles were:

DIY Scented Soy Wax Wooden Wick Candles

Rose Gold: Candle Fragrance Oils
Rose Fragrance - 15 drops
Vanilla Fragrance - 5-10 drops

Silver Sage: Essential Oils Set
Cedar Essential Oil - 10 drops
Peppermint Essential Oil - 5 drops
Lemon Essential Oil - 5 drops

When the wax has cooled to about 120 F, it is ready to pour into the jars.


4. While the wax is cooling, prepare your wicks and jars. I used to think that you had to soak your wooden wicks in melted wax prior to candle making, but from new research that is not the case, though with soy wax you may want to add a drop or two of fragrance oil to your wicks for easier burning! Taking a wooden wick secured in its iron stand, dip the stand end into the melted wax and place into the candle jar, using the wax to seal it to the bottom of the jar. Once the wicks are dry, use your candle pourer to fill your candles just below the lip of the jar, reserving any extra wax to finish the candle. Now let the candle cool completely.

DIY Scented Soy Wax Wooden Wick Candles

5. Once the candle is cooled, check the top to see if there are any divots or imperfections in the top of the candle, which can happen during cooling. If needed, remelt the remaining wax to 120 F and “top off” any imperfections on the top of the candle, again allowing it to cool completely. Trim the wooden wick with nail clippers, cuticle cutters, or small scissors and you’re done!

DIY Scented Soy Wax Wooden Wick Candles
 

Looking for more DIY Candle Inspiration?

SEE MORE CANDLE PROJECTS HERE


OUR PINS FOR THIS POST:

Romantic Font DIY Bridal Party Shirts

This post contains affiliate links, meaning that if you click on a link I will recieve a small comission. This costs you nothing extra and I only promote products I use and love! You can read our full disclosure here

Romantic Font DIY HTV Bridal Party Getting Ready Wedding TShirts #weddingparty #diywedding #svgfiles

Some of my favorite DIY projects are for getting ready with your best girls on the morning of your wedding! To deck out you ladies in matching tank tops or t-shirts for getting ready, these beautiful romantic font wedding title bridal party t-shirts are a wonderful choice! I made these ones at wedding ready t-shirts, but they would also be great as bridesmaids proposals too!

I include decals for the bride, bridesmaids, maid and matron of honor, as well as mother of the bride and groom; so the whole group can join in the getting ready wedding fun! I used the font Clarissa when designing these decals and you can download it for free at dafont.com to use in further personalizing these t-shirts or in any other wedding projects you like!

Romantic Font DIY HTV Bridal Party Getting Ready Wedding TShirts #weddingparty #diywedding #svgfiles

I made the bride decal in Mermaid Blue Glitter HTV, the bridesmaids and MOH decals in Gold Foil HTV, and the mother of the bride and groom's in Mermaid Blue Glitter HTV, but these colors could be easily customized to any wedding color theme you like when there are so many different HTV color choices to choose from!

Romantic Font DIY HTV Bridal Party Getting Ready Wedding TShirts #weddingparty #diywedding #svgfiles

 You can check out more of our HTV Tank Top and Tshirt Projects Here, so you will be able to DIY the perfect set for all the special ladies in your life!


Romantic Font DIY HTV Bridal Party Getting Ready Wedding TShirts #weddingparty #diywedding #svgfiles
  1. After downloading the cut files, import them into the Cricut Software. After creating a new project, select Upload Image. Select the file you wish to upload and it will automatically take you to the final upload screen, where you can name the file the select Save. The SVG Files are sized so that they will automatically cut to the size you see in the photos, but if you want to change the size you can do so to fit the shirts the way you like.

  2.  After selecting “Make It” Make sure to select the Mirror Mode on the cutting screen. Cut the design in your choice of heat transfer vinyl with the Iron On (for Easyweed Vinyl) or Iron On+ (for Glitter Vinyl) Setting on your Cricut, with the shiny side of the material down.

  3. Weed the additional material off of the backing material so that, looking down with the shiny side up, you can see your design with the correct orientation.

Romantic Font DIY HTV Bridal Party Getting Ready Wedding TShirts #weddingparty #diywedding #svgfiles

4. Iron your tshirt or tank top to remove any creases, then center the design over the top half of the tank top. Arrange the design shiny side up, then cover with parchment paper. Make sure to keep the parchment paper between the design and the iron.

5. Set your Iron to the second Highest setting and press the iron down firmly on the design, not ironing but rather using it as a small heat press. I worked from the upper left to lower right on the design, pressing the iron on each part of the design for at least 20-30 seconds, then overlapping the last position as you move the iron across the design.

Romantic Font DIY HTV Bridal Party Getting Ready Wedding TShirts #weddingparty #diywedding #svgfiles

6. Remove the backing from the design, leaving the design on the fabric. Repeat with all remaining tshirts.

You can find more designs for your bridal party in our Tank Top and TShirt Projects! :)

Romantic Font DIY HTV Bridal Party Getting Ready Wedding TShirts #weddingparty #diywedding #svgfiles
 
Romantic Font DIY HTV Bridal Party Getting Ready Wedding TShirts #weddingparty #diywedding #svgfiles

DIY I Do Crew Skinny Tumblers

This post contains affiliate links, meaning that if you click on a link I will recieve a small comission. This costs you nothing extra and I only promote products I use and love! You can read our full disclosure here

DIY I Do Crew Bridal Party Skinny Tumblers #idocrew #diywedding #svgfiles

When I was designing Bridesmaids Tumblers, I had to include my new favorite bridal party group saying, the I Do Crew! I love this saying and it's perfect not only for Bridesmaids Proposals and Gifts, but also for your whole bridal party group to use for getting ready or dress shopping! 

 I made the decals with Oracal 651 Turquoise Vinyl and they were beautiful on the Clear Acrylic Tumblers, but I would love to see what the Gold Metalized Vinyl would look like on a Black, White or Marbled Tumbler for a bachelorette party! I used the fonts Bebas Kai for “I Do” and Rachella for “Crew” if you would like to use these phones to further personalize tumblers they are available for free at dafont.com


DIY I Do Crew Bridal Party Skinny Tumblers #idocrew #diywedding #svgfiles

You can see more of our Tumbler Decal Designs Here for other choices to perfectly fit your taste and that you can DIY for your girls!


DIY I Do Crew Bridal Party Skinny Tumblers #idocrew #diywedding #svgfiles
  1. After downloading the cut files, import them into the Cricut Software. After creating a new project, select Upload Image. Select the file you wish to upload and it will automatically take you to the final upload screen, where you can name the file, then select Save.

  2. Cut the design(s) in your choice of permanent adhesive vinyl with the Vinyl Setting on your Cricut. The SVG Files are sized so that they will automatically cut to the size you see in the photos, but if you want to change the size you can.

DIY I Do Crew Bridal Party Skinny Tumblers #idocrew #diywedding #svgfiles

4. Now, transfer the design to your tumbler. Remove the tape and decal from the backing, making sure that the entire decal transfers to the transfer tape.

3. Once the designs are cut, weed away the extra vinyl and cut a piece of transfer tape to 2.5" x 7.5". Cut away any excess backing from the vinyl design and smooth transfer tape over the design, aligning it with the text and arranging it such that one set of the 1/2” blocks are along the left of the decal, as shown in the photos. Using the smoother tool, smooth the tape over the vinyl, removing any air bubbles.

DIY I Do Crew Bridal Party Skinny Tumblers #idocrew #diywedding #svgfiles

5. Arrange the design such that the short side of the transfer tape is along the top edge of the lip of the tumbler, as shown in the photos. Starting from the top and working down, trace the letters to smooth them onto the tumbler. Smooth the design to remove any air bubbles. Remove the transfer tape from the tumbler, leaving the design on the tumbler.

6. Use the smoother tool or your finger to retrace the letters after removing the transfer tape to smooth out any additional air bubbles. Repeat with the remaining tumblers.

DIY I Do Crew Bridal Party Skinny Tumblers #idocrew #diywedding #svgfiles

DIY HTV Getting Ready Bridal Party Koozies

This post contains affiliate links, meaning that if you click on a link I will recieve a small comission. This costs you nothing extra and I only promote products I use and love! You can read our full disclosure here

DIY HTV Romantic Font Getting Ready Bridesmaid Koozies #bridesmaid #bridesmaidproposal #weddingkoozies

Koozies are always a fun, casual way to make everyone feel like a part of the party and these bridal party koozies are the perfect choice for keeping your getting ready beverages cool!  I made decals for not only the bridesmaids, maid of honor, matron of honor (if you have one), and the bride; but also for the mothers of the bride and groom so that you can make sure all of your ladies feel extra special at your wedding!


DIY HTV Romantic Font Getting Ready Bridesmaid Koozies #bridesmaid #bridesmaidproposal #weddingkoozies

 I made these decals in Gold Glitter HTV on White Koozies and they turned out beautifully, but I also would love them on pink koozies so that only the bride is drinking with white!  I used the font Clarissa while designing these decals, which you can download for free at dafont.com to use for personalizing these koozies or any of your other wedding projects!

DIY HTV Romantic Font Getting Ready Bridesmaid Koozies #bridesmaid #bridesmaidproposal #weddingkoozies


DIY HTV Romantic Font Getting Ready Bridesmaid Koozies #bridesmaid #bridesmaidproposal #weddingkoozies
  1. After downloading the cut files, import them into the Cricut Software. After creating a new project, select Upload Image. Select the file you wish to upload and it will automatically take you to the final upload screen, where you can name the file the select Save. The SVG Files are sized so that they will automatically cut to the size you see in the photos, but if you want to change the size you can do so to fit the koozies the way you like.

  2. After selecting “Make It” Make sure to select the Mirror Mode on the cutting screen. Cut the design(s) in your choice of heat transfer vinyl with the Iron On (for Easyweed Vinyl) or Iron On+ (for Glitter Vinyl) Setting on your Cricut, with the shiny side of the material down.

DIY HTV Romantic Font Getting Ready Bridesmaid Koozies #bridesmaid #bridesmaidproposal #weddingkoozies

3. Weed the additional material off of the backing material so that, looking down with the shiny side up, you can see your design with the correct orientation.

4. Center the design in the middle of the koozie. Arrange the design shiny side up, then cover with parchment paper. Make sure to keep the parchment paper between the design and the iron.

DIY HTV Romantic Font Getting Ready Bridesmaid Koozies #bridesmaid #bridesmaidproposal #weddingkoozies

5. Set your Iron to the second Highest setting and press the iron down firmly on the design, not ironing but rather using it as a small heat press. The koozie design should be completely covered by the iron. Pressing the iron on the design for 15 - 30 seconds, mine took only 20 seconds. :) I’m always a little nervous about ironing koozies, so I check them every 5 seconds or so until the design has transferred. :)

6. Remove the backing from the design, leaving the design on the koozie. Repeat with all the remaining koozies.

DIY HTV Romantic Font Getting Ready Bridesmaid Koozies #bridesmaid #bridesmaidproposal #weddingkoozies

Check out more of our Koozie Projects Here! :)

DIY HTV Romantic Font Getting Ready Bridesmaid Koozies #bridesmaid #bridesmaidproposal #weddingkoozies